2011 NISSAN TIIDA checking oil
[x] Cancel search: checking oilPage 3207 of 3787
MA-36
< SERVICE INFORMATION >
ENGINE MAINTENANCE (MR18DE)
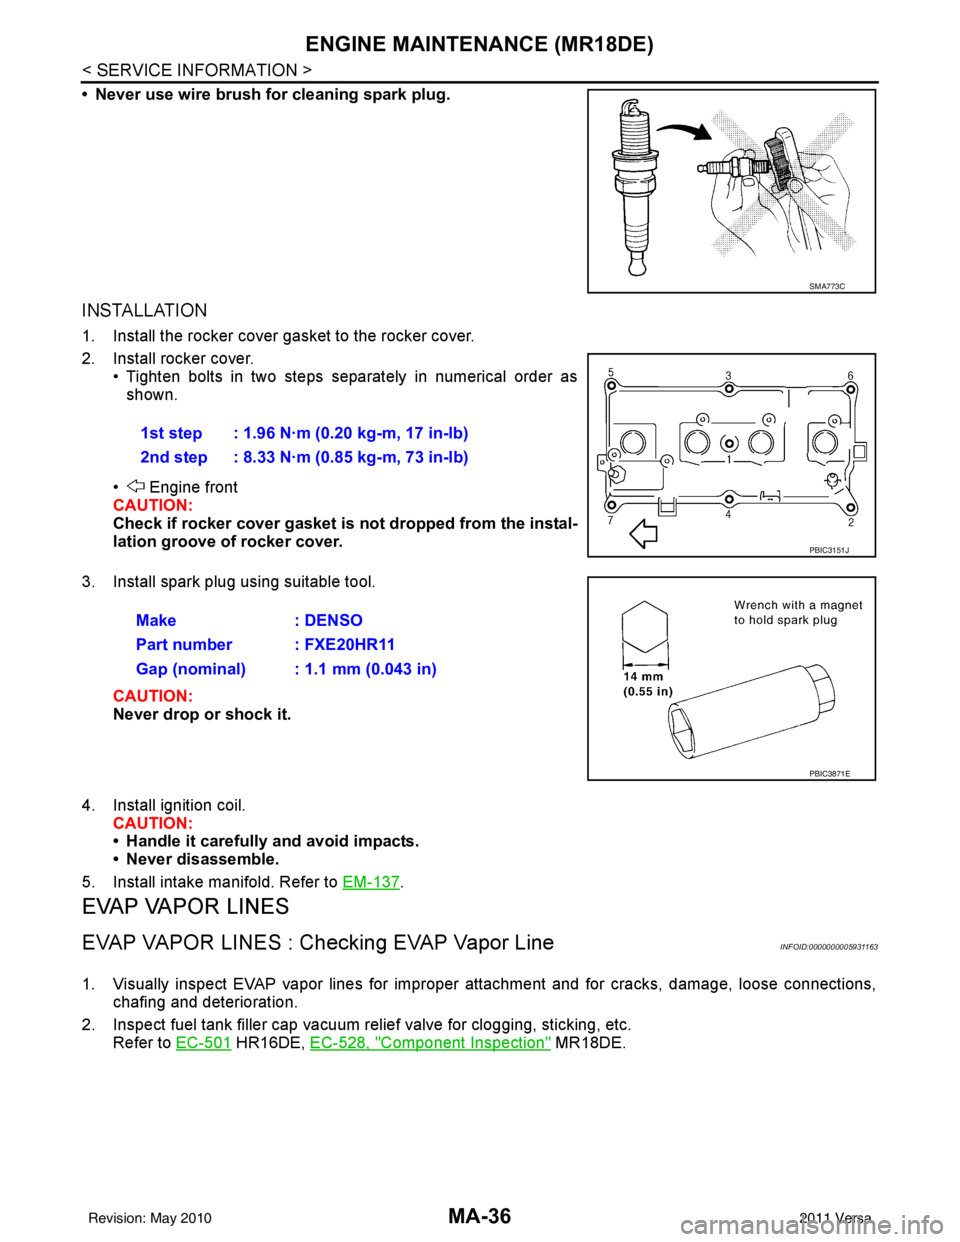
• Never use wire brush for cleaning spark plug.
INSTALLATION
1. Install the rocker cover gasket to the rocker cover.
2. Install rocker cover.• Tighten bolts in two steps separately in numerical order as
shown.
• Engine front
CAUTION:
Check if rocker cover gasket is not dropped from the instal-
lation groove of rocker cover.
3. Install spark plug using suitable tool.
CAUTION:
Never drop or shock it.
4. Install ignition coil. CAUTION:
• Handle it carefully and avoid impacts.
• Never disassemble.
5. Install intake manifold. Refer to EM-137
.
EVAP VAPOR LINES
EVAP VAPOR LINES : Checking EVAP Vapor LineINFOID:0000000005931163
1. Visually inspect EVAP vapor lines for improper attachment and for cracks, damage, loose connections,
chafing and deterioration.
2. Inspect fuel tank filler cap vacuum relief valve for clogging, sticking, etc. Refer to EC-501
HR16DE, EC-528, "Component Inspection" MR18DE.
SMA773C
1st step : 1.96 N·m (0.20 kg-m, 17 in-lb)
2nd step : 8.33 N·m (0.85 kg-m, 73 in-lb)
PBIC3151J
Make : DENSO
Part number : FXE20HR11
Gap (nominal) : 1.1 mm (0.043 in)
PBIC3871E
Revision: May 2010 2011 Versa
Page 3212 of 3787
CHASSIS AND BODY MAINTENANCEMA-41
< SERVICE INFORMATION >
C
DE
F
G H
I
J
K
M A
B
MA
N
O P
M/T OIL : Refilling (RS5F91R)INFOID:0000000005931171
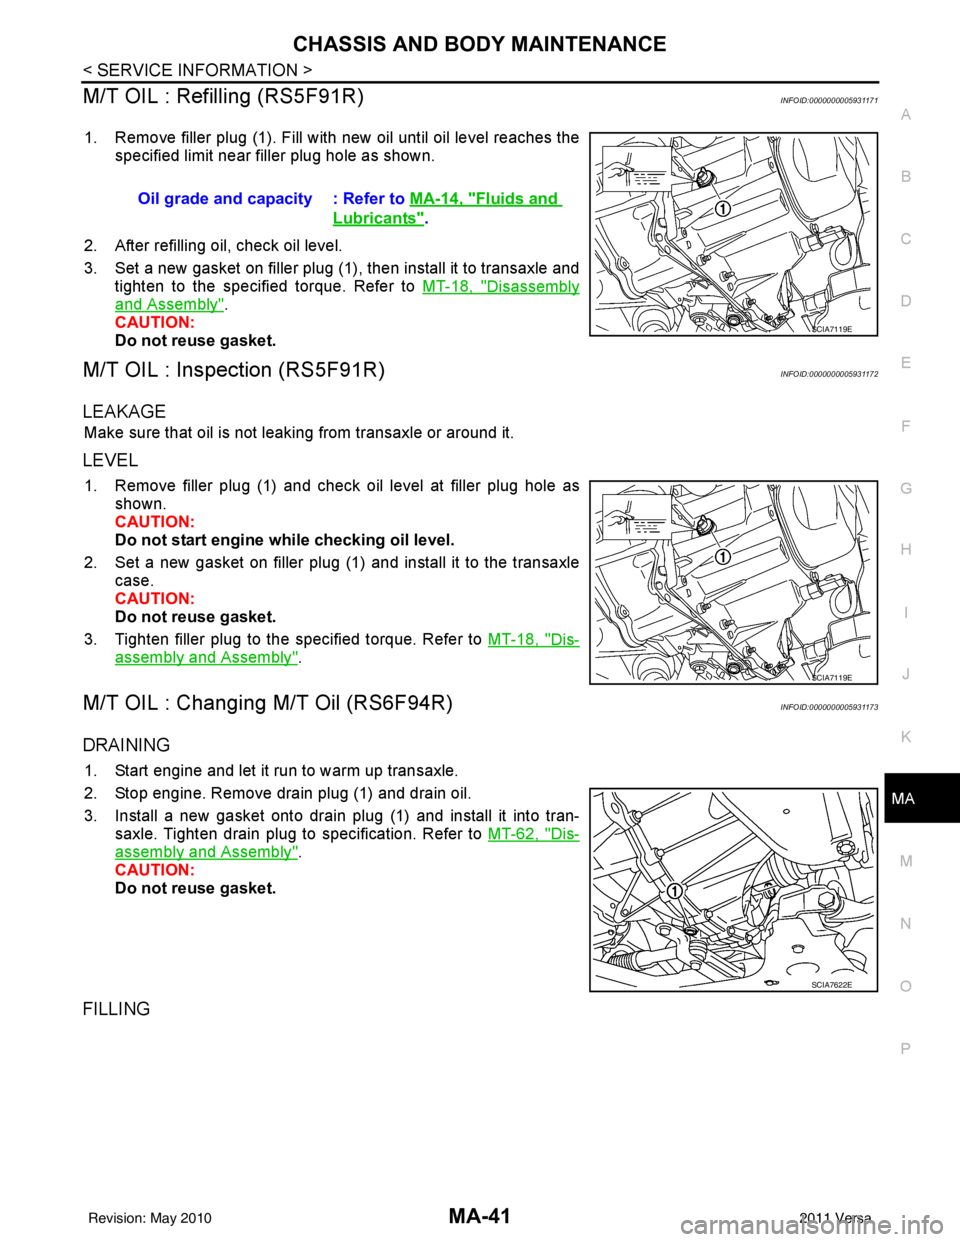
1. Remove filler plug (1). Fill with new oil until oil level reaches the specified limit near filler plug hole as shown.
2. After refilling oil, check oil level.
3. Set a new gasket on filler plug (1), then install it to transaxle and tighten to the specified torque. Refer to MT-18, "
Disassembly
and Assembly".
CAUTION:
Do not reuse gasket.
M/T OIL : Inspection (RS5F91R)INFOID:0000000005931172
LEAKAGE
Make sure that oil is not leaking from transaxle or around it.
LEVEL
1. Remove filler plug (1) and check oil level at filler plug hole as shown.
CAUTION:
Do not start engine while checking oil level.
2. Set a new gasket on filler plug (1) and install it to the transaxle case.
CAUTION:
Do not reuse gasket.
3. Tighten filler plug to the specified torque. Refer to MT-18, "
Dis-
assembly and Assembly".
M/T OIL : Changing M/T Oil (RS6F94R)INFOID:0000000005931173
DRAINING
1. Start engine and let it run to warm up transaxle.
2. Stop engine. Remove drain plug (1) and drain oil.
3. Install a new gasket onto drain plug (1) and install it into tran-
saxle. Tighten drain plug to specification. Refer to MT-62, "
Dis-
assembly and Assembly".
CAUTION:
Do not reuse gasket.
FILLING
Oil grade and capacity : Refer to MA-14, "Fluids and
Lubricants".
SCIA7119E
SCIA7119E
SCIA7622E
Revision: May 2010 2011 Versa
Page 3213 of 3787
MA-42
< SERVICE INFORMATION >
CHASSIS AND BODY MAINTENANCE
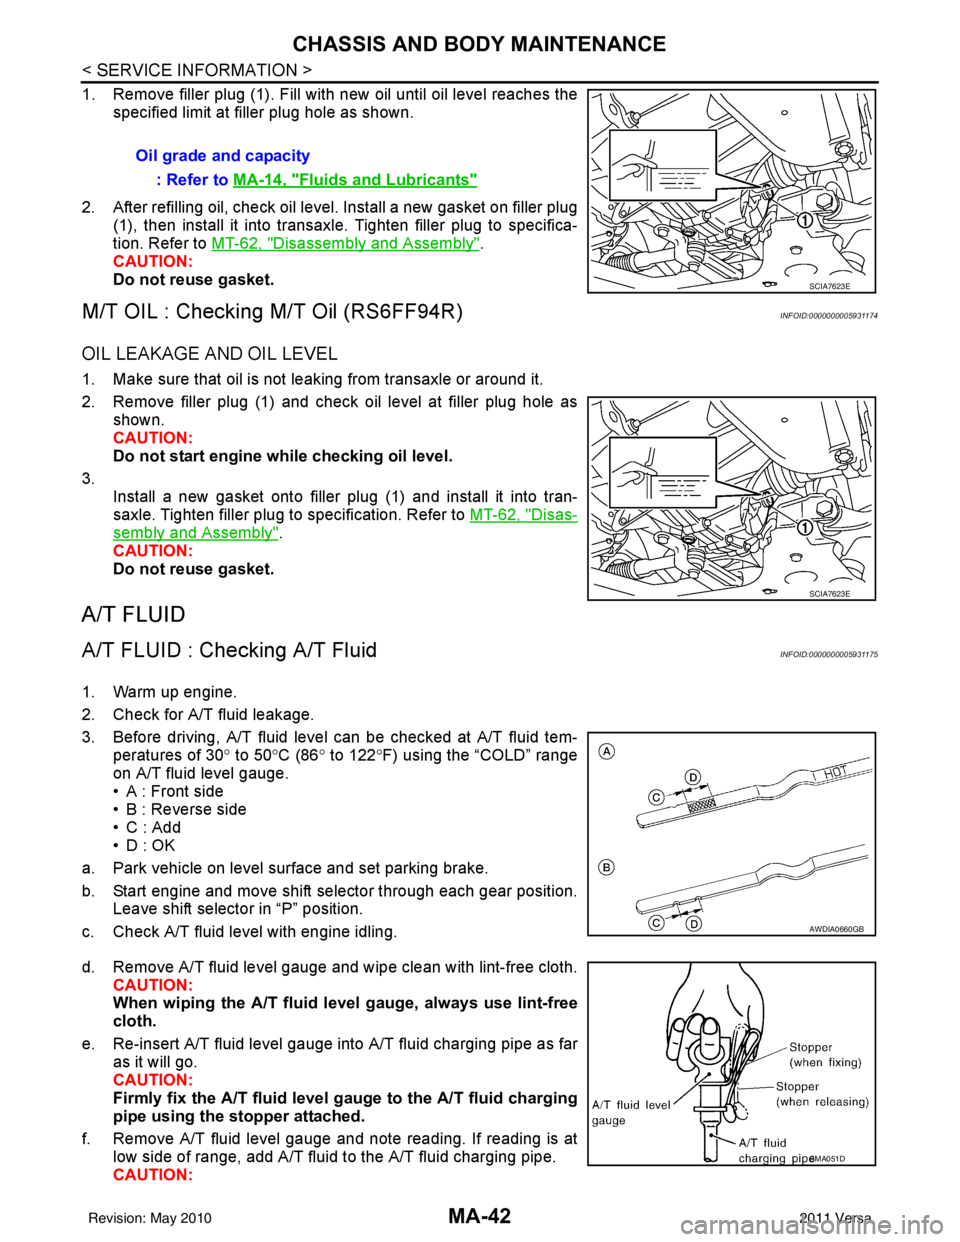
1. Remove filler plug (1). Fill with new oil until oil level reaches thespecified limit at filler plug hole as shown.
2. After refilling oil, check oil level. Install a new gasket on filler plug (1), then install it into transaxle. Tighten filler plug to specifica-
tion. Refer to MT-62, "
Disassembly and Assembly".
CAUTION:
Do not reuse gasket.
M/T OIL : Checking M/T Oil (RS6FF94R)INFOID:0000000005931174
OIL LEAKAGE AND OIL LEVEL
1. Make sure that oil is not leaking from transaxle or around it.
2. Remove filler plug (1) and check oil level at filler plug hole as shown.
CAUTION:
Do not start engine wh ile checking oil level.
3. Install a new gasket onto filler plug (1) and install it into tran-
saxle. Tighten filler plug to specification. Refer to MT-62, "
Disas-
sembly and Assembly".
CAUTION:
Do not reuse gasket.
A/T FLUID
A/T FLUID : Checking A/T FluidINFOID:0000000005931175
1. Warm up engine.
2. Check for A/T fluid leakage.
3. Before driving, A/T fluid level can be checked at A/T fluid tem- peratures of 30 ° to 50 °C (86° to 122° F) using the “COLD” range
on A/T fluid level gauge.
• A : Front side
• B : Reverse side
• C : Add
• D : OK
a. Park vehicle on level surface and set parking brake.
b. Start engine and move shift selector through each gear position. Leave shift selector in “P” position.
c. Check A/T fluid level with engine idling.
d. Remove A/T fluid level gauge and wipe clean with lint-free cloth. CAUTION:
When wiping the A/T fluid level gauge, always use lint-free
cloth.
e. Re-insert A/T fluid level gauge into A/T fluid charging pipe as far as it will go.
CAUTION:
Firmly fix the A/T fluid level gauge to the A/T fluid charging
pipe using the stopper attached.
f. Remove A/T fluid level gauge and note reading. If reading is at low side of range, add A/T fluid to the A/T fluid charging pipe.
CAUTION:Oil grade and capacity
: Refer to MA-14, "
Fluids and Lubricants"
SCIA7623E
SCIA7623E
AWDIA0660GB
SMA051D
Revision: May 2010 2011 Versa
Page 3222 of 3787

MT-1
TRANSMISSION/TRANSAXLE
DE
F
G H
I
J
K L
M
SECTION MT
A
B
MT
N
O P
CONTENTS
MANUAL TRANSAXLE
RS5F91R
SERVICE INFORMATION .. ..........................
3
PRECAUTIONS .............................................. .....3
Precaution for Supplemental Restraint System
(SRS) "AIR BAG" and "SEAT BELT PRE-TEN-
SIONER" ............................................................. ......
3
Precaution Necessary for Steering Wheel Rota-
tion After Battery Disconnect ............................... ......
3
Precaution for Procedure without Cowl Top Cover ......4
Service Notice or Precaution .....................................4
PREPARATION ...................................................5
Special Service Tools ........................................ ......5
Commercial Service Tools .......................................7
NOISE, VIBRATION AND HARSHNESS
(NVH) TROUBLESHOOTING .............................
8
NVH Troubleshooting Chart ................................ ......8
DESCRIPTION ....................................................9
System Diagram .................................................. ......9
System Description ...................................................9
M/T OIL ...............................................................11
Draining ...................................................................11
Refilling ...................................................................11
Inspection ................................................................11
SIDE OIL SEAL ..................................................12
Removal and Installation .........................................12
POSITION SWITCH ........................................ ....13
Checking ............................................................. ....13
CONTROL LINKAGE .........................................14
Exploded View .................................................... ....14
Removal and Installation .........................................14
Inspection ............................................................ ....15
AIR BREATHER HOSE ......................................16
Exploded View .................................................... ....16
Removal and Installation ..................................... ....16
TRANSAXLE ASSEMBLY ................................17
Exploded View .........................................................17
Removal and Installation .........................................17
Disassembly and Assembly .....................................18
INPUT SHAFT AND GEAR ...............................36
Disassembly and Assembly .....................................36
MAINSHAFT AND GEAR .................................37
Disassembly and Assembly .....................................37
FINAL DRIVE ....................................................41
Disassembly and Assembly .....................................41
SHIFT CONTROL ..............................................42
Inspection ................................................................42
SERVICE DATA AND SPECIFICATIONS
(SDS) .................................................................
43
General Specification ..............................................43
RS6F94R
SERVICE INFORMATION .. .........................
44
PRECAUTIONS .................................................44
Precaution for Supplemental Restraint System
(SRS) "AIR BAG" and "SEAT BELT PRE-TEN-
SIONER" ............................................................. ....
44
Precaution Necessary for Steering Wheel Rota-
tion After Battery Disconnect ...................................
44
Precaution for Procedure without Cowl Top Cover ....45
Precaution ...............................................................45
PREPARATION .................................................46
Special Service Tool ................................................46
Commercial Service Tool ........................................48
NOISE, VIBRATION AND HARSHNESS
(NVH) TROUBLESHOOTING ...........................
51
NVH Troubleshooting Chart ....................................51
Revision: May 2010 2011 Versa
Page 3223 of 3787

MT-2
DESCRIPTION ...................................................52
Cross-Sectional View .......................................... ...52
M/T OIL ..............................................................54
Changing M/T Oil ................................................. ...54
Checking M/T Oil ....................................................54
VEHICLE SPEED SENSOR ..............................55
Removal and Installation ..................................... ...55
SIDE OIL SEAL .................................................56
Removal and Installation ..................................... ...56
POSITION SWITCH ...........................................57
Checking .............................................................. ...57
CONTROL LINKAGE ........................................58
Component of Control Device and Cable ............ ...58
Removal and Installation ........................................58
AIR BREATHER HOSE .....................................60
Removal and Installation ..................................... ...60
TRANSAXLE ASSEMBLY ................................61
Component .......................................................... ...61
Removal and Installation .........................................61
Disassembly and Assembly ................................. ...62
INPUT SHAFT AND GEARS .............................80
Disassembly and Assembly ................................. ...80
MAINSHAFT AND GEARS ...............................85
Disassembly and Assembly ................................. ...85
REVERSE IDLER SHAFT AND GEARS ...........90
Disassembly and Assembly ................................. ...90
FINAL DRIVE .....................................................92
Disassembly and Assembly ....................................92
SHIFT CONTROL ..............................................94
Inspection ............................................................. ...94
SERVICE DATA AND SPECIFICATIONS
(SDS) .................................................................
95
General Specification ........................................... ...95
Revision: May 2010 2011 Versa
Page 3232 of 3787
![NISSAN TIIDA 2011 Service Repair Manual M/T OILMT-11
< SERVICE INFORMATION > [RS5F91R]
D
E
F
G H
I
J
K L
M A
B
MT
N
O P
M/T OIL
DrainingINFOID:0000000005929662
1. Start engine and let it run to warm up transaxle.
2. Stop engine. Remove drai](/manual-img/5/57396/w960_57396-3231.png "NISSAN TIIDA 2011 Service Repair Manual M/T OILMT-11
< SERVICE INFORMATION > [RS5F91R]
D
E
F
G H
I
J
K L
M A
B
MT
N
O P
M/T OIL
DrainingINFOID:0000000005929662
1. Start engine and let it run to warm up transaxle.
2. Stop engine. Remove drai")
M/T OILMT-11
< SERVICE INFORMATION > [RS5F91R]
D
E
F
G H
I
J
K L
M A
B
MT
N
O P
M/T OIL
DrainingINFOID:0000000005929662
1. Start engine and let it run to warm up transaxle.
2. Stop engine. Remove drain plug (1) and drain oil.
3. Set a new gasket on drain plug (1) and install it to transaxle and tighten drain plug to the specified torque. Refer to MT-18, "
Dis-
assembly and Assembly".
CAUTION:
Do not reuse gasket.
RefillingINFOID:0000000005929663
1. Remove filler plug (1). Fill with new oil until oil level reaches the specified limit near filler plug hole as shown.
2. After refilling oil, check oil level.
3. Set a new gasket on filler plug (1), then install it to transaxle and tighten to the specified torque. Refer to MT-18, "
Disassembly
and Assembly".
CAUTION:
Do not reuse gasket.
InspectionINFOID:0000000005929664
LEAKAGE
Make sure that oil is not leaking from transaxle or around it.
LEVEL
1. Remove filler plug (1) and check oil level at filler plug hole as shown.
CAUTION:
Do not start engine while checking oil level.
2. Set a new gasket on filler plug (1) and install it to the transaxle case.
CAUTION:
Do not reuse gasket.
3. Tighten filler plug to the specified torque. Refer to MT-18, "
Dis-
assembly and Assembly".
PCIB1504E
Oil grade and capacity : Refer to MA-14, "Fluids and
Lubricants".
SCIA7119E
SCIA7119E
Revision: May 2010 2011 Versa
Page 3275 of 3787
![NISSAN TIIDA 2011 Service Repair Manual MT-54
< SERVICE INFORMATION >[RS6F94R]
M/T OIL
M/T OIL
Changing M/T OilINFOID:0000000005929688
DRAINING
1. Start engine and let it run to warm up transaxle.
2. Stop engine. Remove drain plug (1) and d](/manual-img/5/57396/w960_57396-3274.png "NISSAN TIIDA 2011 Service Repair Manual MT-54
< SERVICE INFORMATION >[RS6F94R]
M/T OIL
M/T OIL
Changing M/T OilINFOID:0000000005929688
DRAINING
1. Start engine and let it run to warm up transaxle.
2. Stop engine. Remove drain plug (1) and d")
MT-54
< SERVICE INFORMATION >[RS6F94R]
M/T OIL
M/T OIL
Changing M/T OilINFOID:0000000005929688
DRAINING
1. Start engine and let it run to warm up transaxle.
2. Stop engine. Remove drain plug (1) and drain oil.
3. Install a new gasket onto drain plug (1) and install it into tran-
saxle. Tighten drain plug to specification. Refer to MT-61, "
Com-
ponent".
CAUTION:
Do not reuse gasket.
FILLING
1. Remove filler plug (1). Fill with new oil until oil level reaches the specified limit at filler plug hole as shown.
2. After refilling oil, check oil level. Install a new gasket on filler plug (1), then install it into transaxle. Tighten filler plug to specifica-
tion. Refer to MT-61, "
Component".
CAUTION:
Do not reuse gasket.
Checking M/T OilINFOID:0000000005929689
OIL LEAKAGE AND OIL LEVEL
1. Make sure that oil is not leaking from transaxle or around it.
2. Remove filler plug (1) and check oil level at filler plug hole as shown.
CAUTION:
Do not start engine wh ile checking oil level.
3. Install a new gasket onto filler plug (1) and install it into tran-
saxle. Tighten filler plug to specification. Refer to MT-61, "
Com-
ponent".
CAUTION:
Do not reuse gasket.
SCIA7622E
Oil grade and capacity
: Refer to MA-14, "
Fluids and Lubricants"
SCIA7623E
SCIA7623E
Revision: May 2010 2011 Versa
Page 3277 of 3787
![NISSAN TIIDA 2011 Service Repair Manual MT-56
< SERVICE INFORMATION >[RS6F94R]
SIDE OIL SEAL
SIDE OIL SEAL
Removal and InstallationINFOID:0000000005929691
REMOVAL
1. Remove front drive shafts from transaxle assembly. Refer to
FAX-9, "Remov](/manual-img/5/57396/w960_57396-3276.png "NISSAN TIIDA 2011 Service Repair Manual MT-56
< SERVICE INFORMATION >[RS6F94R]
SIDE OIL SEAL
SIDE OIL SEAL
Removal and InstallationINFOID:0000000005929691
REMOVAL
1. Remove front drive shafts from transaxle assembly. Refer to
FAX-9, \"Remov")
MT-56
< SERVICE INFORMATION >[RS6F94R]
SIDE OIL SEAL
SIDE OIL SEAL
Removal and InstallationINFOID:0000000005929691
REMOVAL
1. Remove front drive shafts from transaxle assembly. Refer to
FAX-9, "Removal and Installation (Left Side)"
and FAX-10, "Removal and Installation (Right Side)".
2. Remove differential side oil seal (1) using a suitable tool. CAUTION:
Be careful not to damage transaxle case and clutch hous-
ing.
INSTALLATION
Installation is in the reverse order of removal.
• Install differential side oil seal (1) to clutch housing and transaxlecase using Tool.
CAUTION:
Do not reuse oil seal.
- A: Transaxle case side
- B: Clutch housing side
CAUTION:
• Never reuse differential oil seal
• Never incline differential oil seal.
• Never damage clutch housing and transaxle case.
• Check oil level after installation. Refer to MT-54, "
Checking M/T Oil".
SCIA7625E
Tool number : KV32500QAA (B.vi 1666-B)
Dimension (L1) : 1.2 - 1.8 mm (0.047 - 0.071 in)
Dimension (L2) : 2.7 - 3.3 mm (0.106 - 0.130 in)
JPDIC0454ZZ
Revision: May 2010 2011 Versa