Page 232 of 3787
SHIFT CONTROL SYSTEMAT-215
< SERVICE INFORMATION >
DE
F
G H
I
J
K L
M A
B
AT
N
O P
7. Remove the plate (1) from the A/T shift selector assembly. : Vehicle front
8. Remove the lock plate (1) from the shift selector control cable (2).
: Vehicle front
9. Remove the shift selector control cable (2) from the A/T shift selector assembly.
10. Insert suitable tool at points (A) and (B) as shown, and press both tabs (E) and (F) at the front (C) and rear (D) slightly toward
the center of the A/T shift select or assembly to remove the A/T
shift selector assembly from the underside of the vehicle.
: Vehicle front
INSTALLATION
Installation is in the reverse order of removal.
SCIA6967E
SCIA6968E
SCIA6970E
Revision: May 2010 2011 Versa
Page 233 of 3787
AT-216
< SERVICE INFORMATION >
SHIFT CONTROL SYSTEM
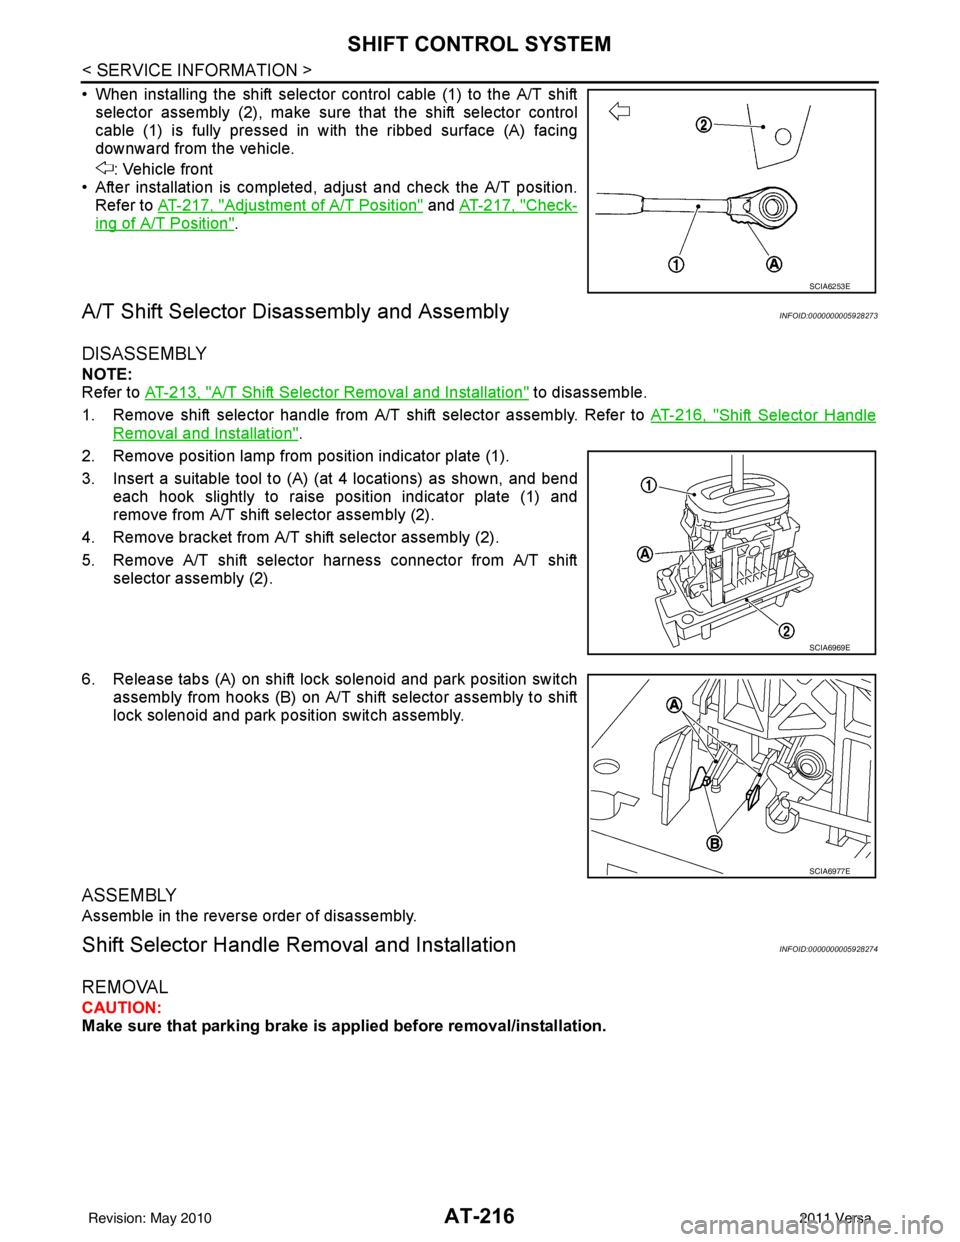
• When installing the shift selector control cable (1) to the A/T shiftselector assembly (2), make sure that the shift selector control
cable (1) is fully pressed in with the ribbed surface (A) facing
downward from the vehicle.
: Vehicle front
• After installation is completed, adjust and check the A/T position. Refer to AT-217, "
Adjustment of A/T Position" and AT-217, "Check-
ing of A/T Position".
A/T Shift Selector Di sassembly and AssemblyINFOID:0000000005928273
DISASSEMBLY
NOTE:
Refer to AT-213, "
A/T Shift Selector Removal and Installation" to disassemble.
1. Remove shift selector handle from A/T shift selector assembly. Refer to AT-216, "
Shift Selector Handle
Removal and Installation".
2. Remove position lamp from position indicator plate (1).
3. Insert a suitable tool to (A) (at 4 locations) as shown, and bend each hook slightly to raise position indicator plate (1) and
remove from A/T shift selector assembly (2).
4. Remove bracket from A/T shift selector assembly (2).
5. Remove A/T shift selector harness connector from A/T shift selector assembly (2).
6. Release tabs (A) on shift lock solenoid and park position switch assembly from hooks (B) on A/T shift selector assembly to shift
lock solenoid and park position switch assembly.
ASSEMBLY
Assemble in the reverse order of disassembly.
Shift Selector Handle Removal and InstallationINFOID:0000000005928274
REMOVAL
CAUTION:
Make sure that parking brake is applied before removal/installation.
SCIA6253E
SCIA6969E
SCIA6977E
Revision: May 2010 2011 Versa
Page 241 of 3787
AT-224
< SERVICE INFORMATION >
ON-VEHICLE SERVICE
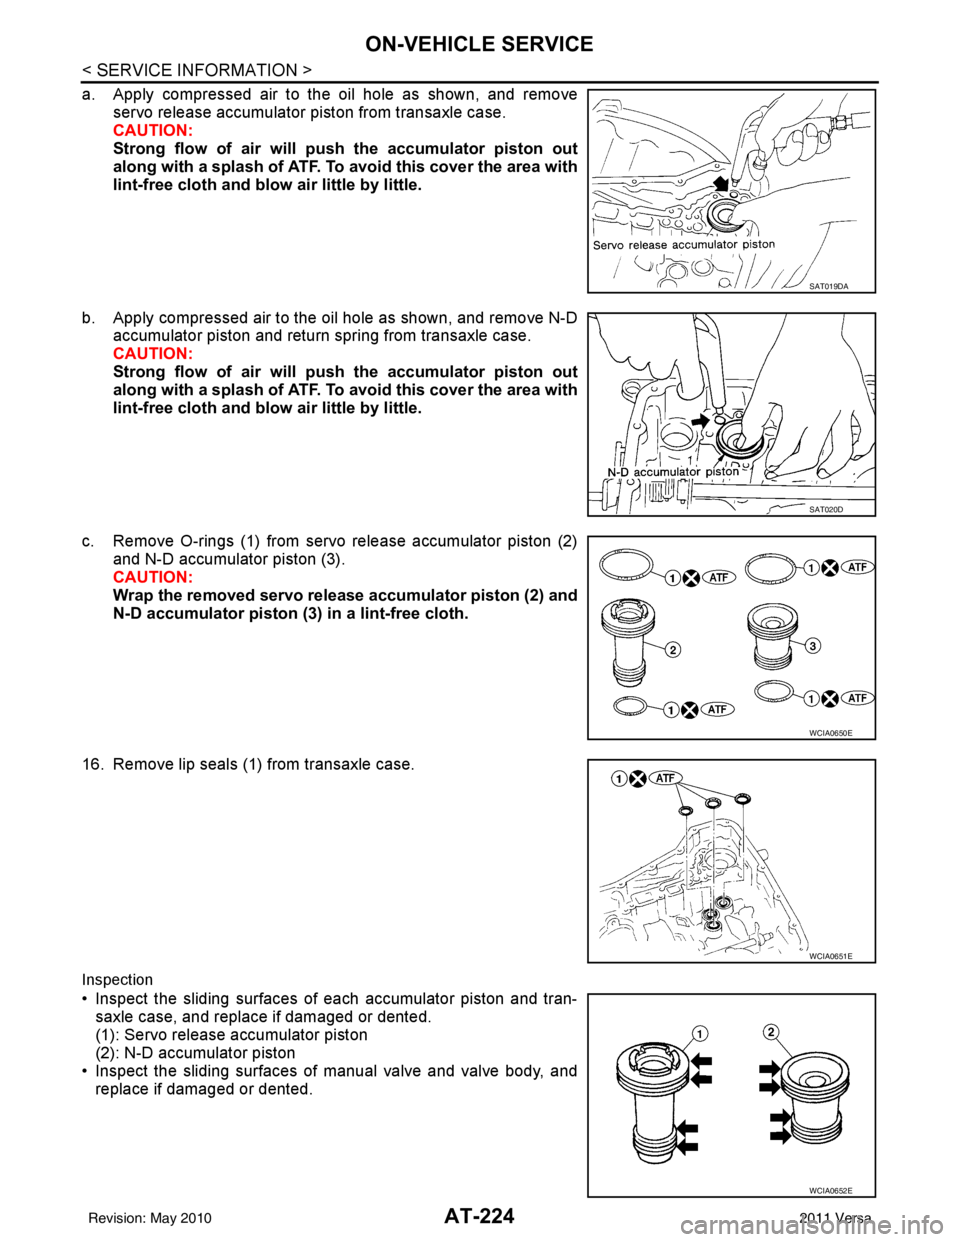
a. Apply compressed air to the oil hole as shown, and removeservo release accumulator piston from transaxle case.
CAUTION:
Strong flow of air will push the accumulator piston out
along with a splash of ATF. To avoid this cover the area with
lint-free cloth and blow air little by little.
b. Apply compressed air to the oil hole as shown, and remove N-D accumulator piston and return spring from transaxle case.
CAUTION:
Strong flow of air will push the accumulator piston out
along with a splash of ATF. To avoid this cover the area with
lint-free cloth and blow air little by little.
c. Remove O-rings (1) from servo release accumulator piston (2) and N-D accumulator piston (3).
CAUTION:
Wrap the removed servo release accumulator piston (2) and
N-D accumulator piston (3) in a lint-free cloth.
16. Remove lip seals (1) from transaxle case.
Inspection
• Inspect the sliding surfaces of each accumulator piston and tran- saxle case, and replace if damaged or dented.
(1): Servo release accumulator piston
(2): N-D accumulator piston
• Inspect the sliding surfaces of manual valve and valve body, and replace if damaged or dented.
SAT019DA
SAT020D
WCIA0650E
WCIA0651E
WCIA0652E
Revision: May 2010 2011 Versa
Page 247 of 3787
AT-230
< SERVICE INFORMATION >
ON-VEHICLE SERVICE
REMOVAL AND INSTALLATION
Removal
1. Remove front drive shaft. Refer to FA X - 9.
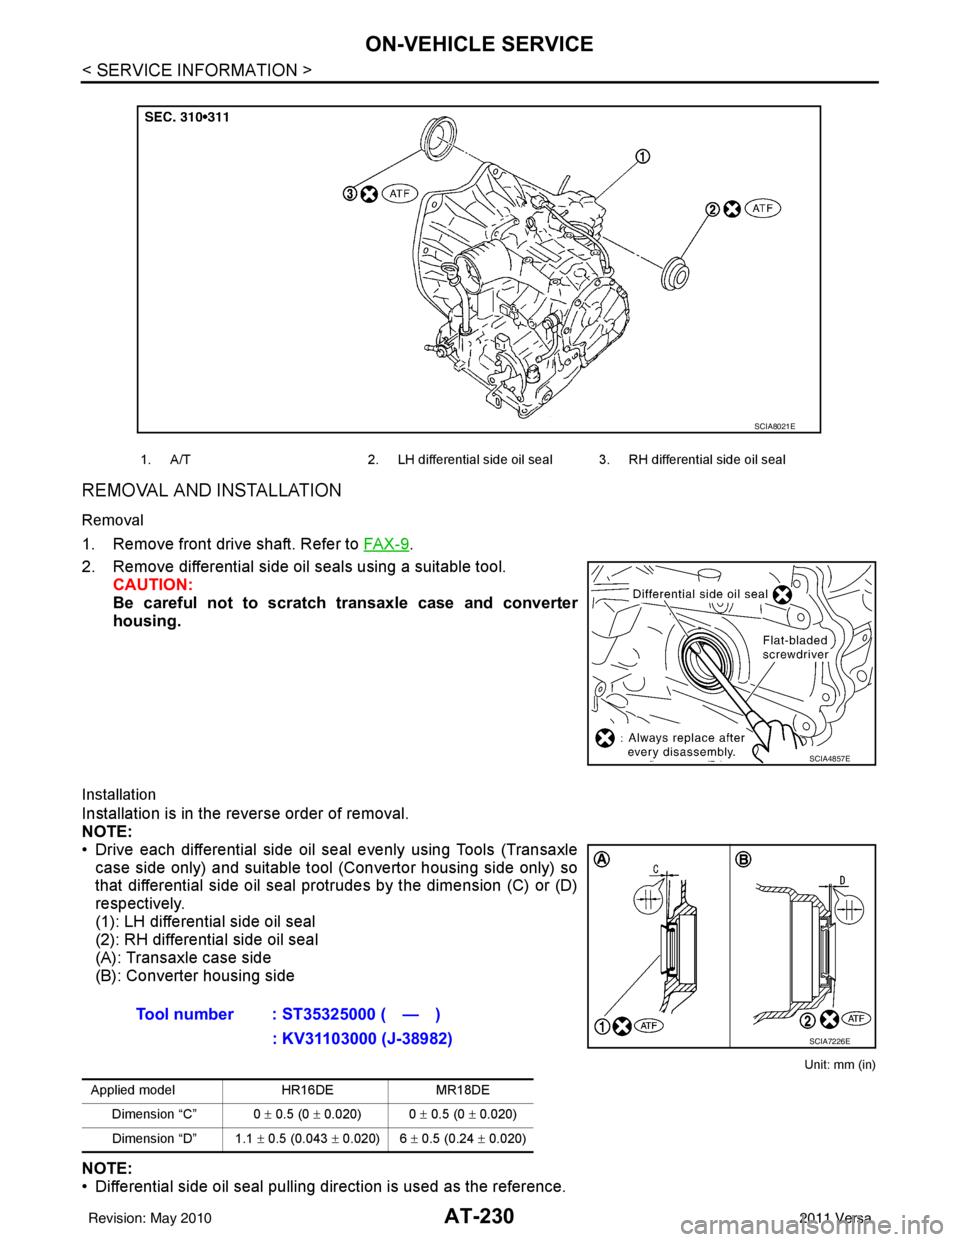
2. Remove differential side oil seals using a suitable tool. CAUTION:
Be careful not to scratch transaxle case and converter
housing.
Installation
Installation is in the reverse order of removal.
NOTE:
• Drive each differential side oil seal evenly using Tools (Transaxlecase side only) and suitable tool (Convertor housing side only) so
that differential side oil seal prot rudes by the dimension (C) or (D)
respectively.
(1): LH differential side oil seal
(2): RH differential side oil seal
(A): Transaxle case side
(B): Converter housing side
Unit: mm (in)
NOTE:
• Differential side oil seal pulling direction is used as the reference.
1. A/T 2. LH differential side oil seal 3. RH differential side oil seal
SCIA8021E
SCIA4857E
Tool number : ST35325000 ( — )
: KV31103000 (J-38982)
Applied model HR16DEMR18DE
Dimension “C” 0 ± 0.5 (0 ± 0.020) 0 ± 0.5 (0 ± 0.020)
Dimension “D” 1.1 ± 0.5 (0.043 ± 0.020) 6 ± 0.5 (0.24 ± 0.020)
SCIA7226E
Revision: May 2010 2011 Versa
Page 249 of 3787
AT-232
< SERVICE INFORMATION >
AIR BREATHER HOSE
AIR BREATHER HOSE
Removal and InstallationINFOID:0000000005928283
COMPONENTS
REMOVAL
1. Remove air duct (front), air duct (inlet) and air cleaner case. Refer to EM-135.
2. Remove air breather hose.
INSTALLATION
Installation is in the reverse order of removal.
CAUTION:
Make sure air breather hose is not collapsed or bl ocked due to folding or bending when installed.
NOTE:
• Install the air breather hose (1) to the air breather tube (2) so that
the paint mark (A) faces upward. Also make sure the air breather
hose end laps with air breather tube 17 mm (0.67 in) or more.
• When installing air breather hose (1) to air duct and air cleaner
case, make sure to fully insert the hose clips.
1. Air cleaner case 2. Air duct (inlet) 3. Air breather hose
4. Clip 5. Air breather tube 6. A/T
WCIA0642E
WCIA0641E
Revision: May 2010 2011 Versa
Page 251 of 3787
AT-234
< SERVICE INFORMATION >
TRANSAXLE ASSEMBLY
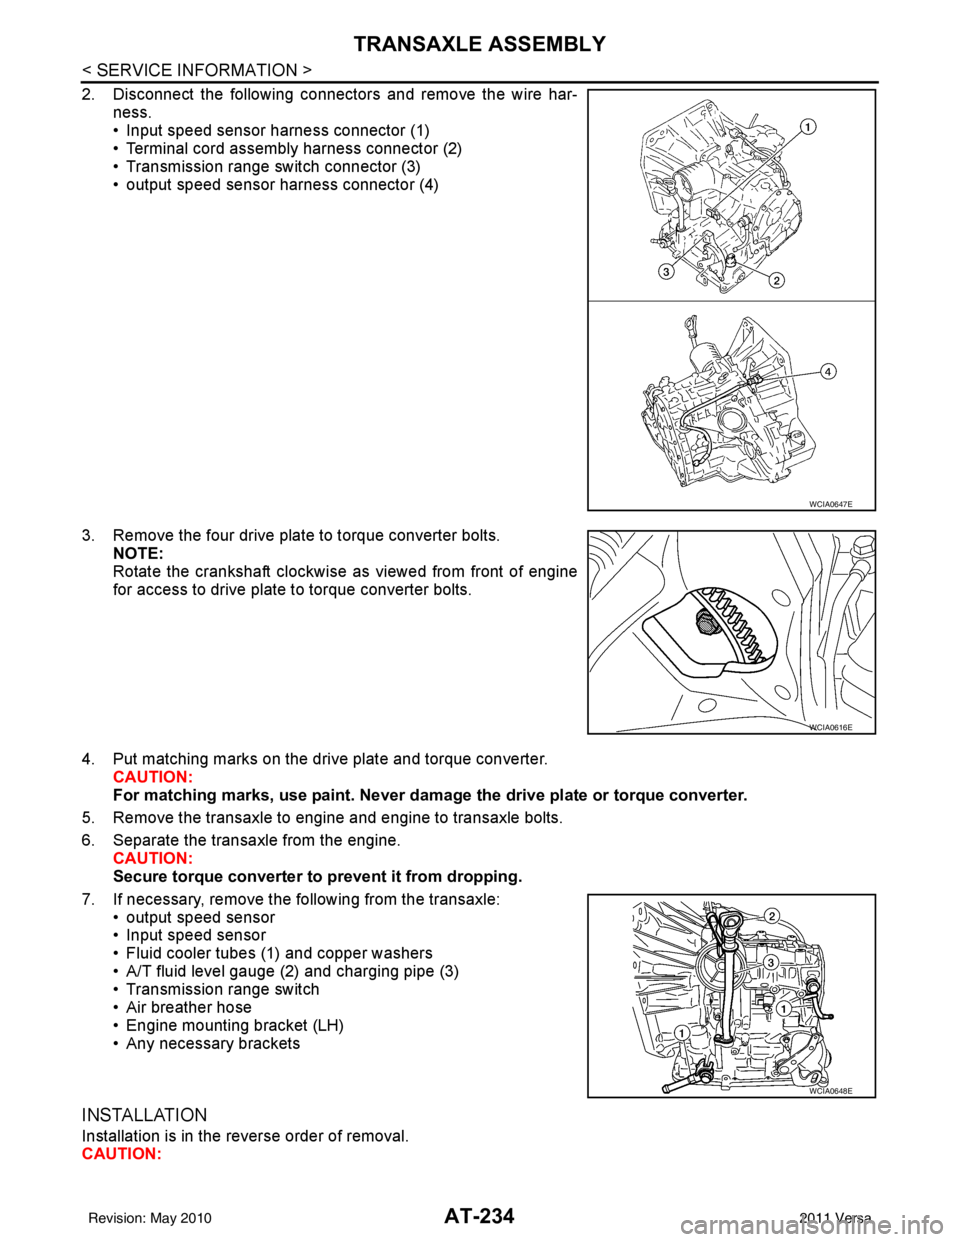
2. Disconnect the following connectors and remove the wire har-ness.
• Input speed sensor harness connector (1)
• Terminal cord assembly harness connector (2)
• Transmission range switch connector (3)
• output speed sensor harness connector (4)
3. Remove the four drive plate to torque converter bolts. NOTE:
Rotate the crankshaft clockwise as viewed from front of engine
for access to drive plate to torque converter bolts.
4. Put matching marks on the drive plate and torque converter. CAUTION:
For matching marks, use paint. Never dama ge the drive plate or torque converter.
5. Remove the transaxle to engine and engine to transaxle bolts.
6. Separate the transaxle from the engine. CAUTION:
Secure torque converter to prevent it from dropping.
7. If necessary, remove the following from the transaxle: • output speed sensor
• Input speed sensor
• Fluid cooler tubes (1) and copper washers
• A/T fluid level gauge (2) and charging pipe (3)
• Transmission range switch
• Air breather hose
• Engine mounting bracket (LH)
• Any necessary brackets
INSTALLATION
Installation is in the reverse order of removal.
CAUTION:
WCIA0647E
WCIA0616E
WCIA0648E
Revision: May 2010 2011 Versa
Page 252 of 3787
TRANSAXLE ASSEMBLYAT-235
< SERVICE INFORMATION >
DE
F
G H
I
J
K L
M A
B
AT
N
O P
• When replacing an engine or transmission you must make sure any dowels are installed correctly during re-assembly.
• Improper alignment caused by missing dowels may cause vibration, oil leaks or breakage of drive
train components.
• Do not reuse O-rings and copper washers. Refer to "COMPONENTS".
• When turning crankshaft, turn it clockwise as viewed from the front of the engine.
• When tightening the bolts for th e torque converter while securing the crankshaft pulley bolt, be sure
to confirm the tightening torque of the crankshaft pulley bolt. Refer to EM-159
.
• After converter is installed to drive plate, ro tate crankshaft several turns to check that transaxle
rotates freely without binding.
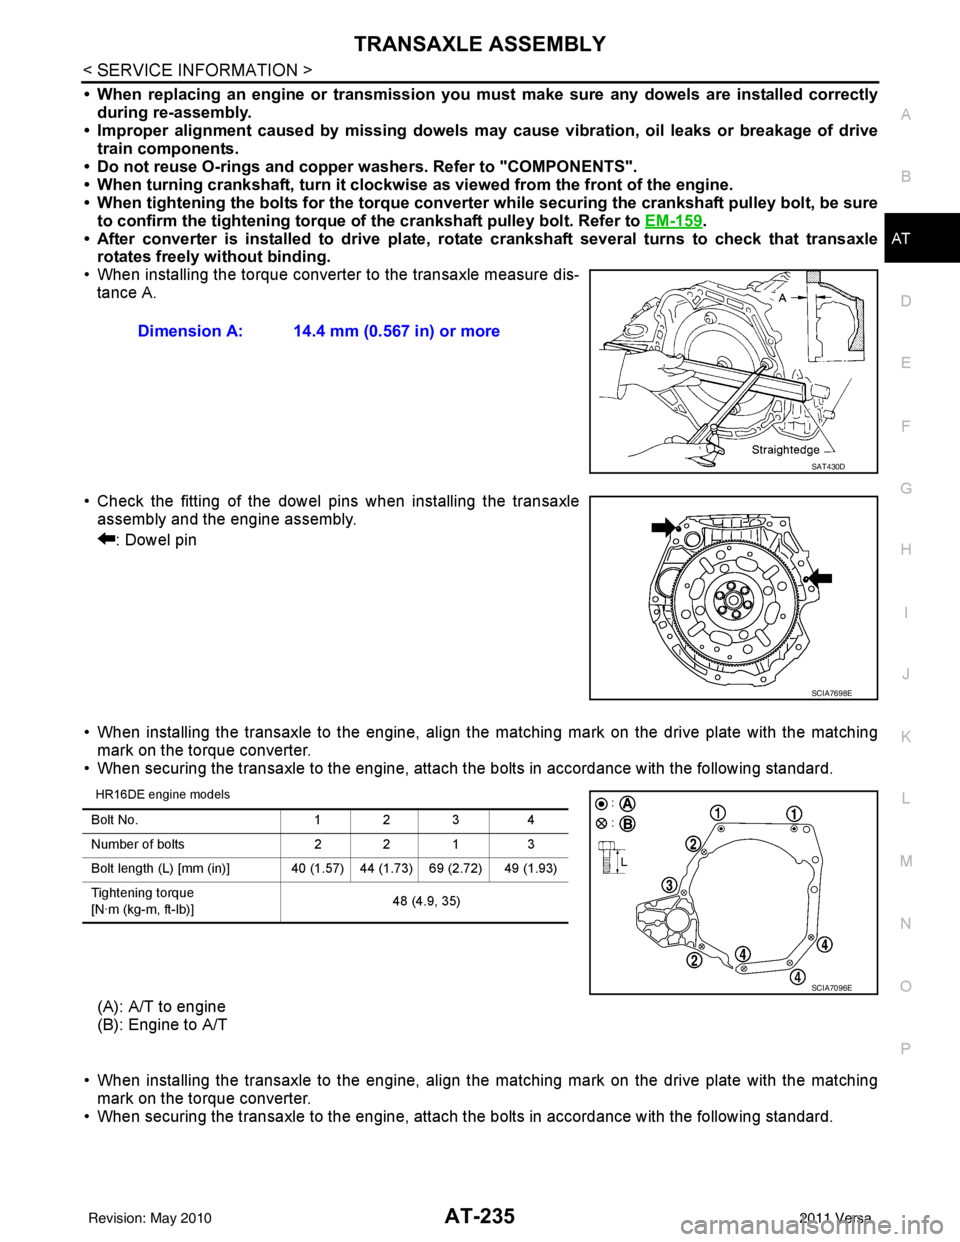
• When installing the torque converter to the transaxle measure dis- tance A.
• Check the fitting of the dowel pins when installing the transaxle assembly and the engine assembly.
: Dowel pin
• When installing the transaxle to the engine, align the matching mark on the drive plate with the matching mark on the torque converter.
• When securing the transaxle to the engine, attach the bolts in accordance with the following standard.
HR16DE engine models
(A): A/T to engine
(B): Engine to A/T
• When installing the transaxle to the engine, align the matching mark on the drive plate with the matching mark on the torque converter.
• When securing the transaxle to the engine, attach the bolts in accordance with the following standard. Dimension A: 14.4 mm (0.567 in) or more
SAT430D
SCIA7698E
Bolt No.
1 2 34
Number of bolts 2 2 13
Bolt length (L) [mm (in)] 40 (1.5 7) 44 (1.73) 69 (2.72) 49 (1.93)
Tightening torque
[N·m (kg-m, ft-lb)] 48 (4.9, 35)
SCIA7096E
Revision: May 2010
2011 Versa
Page 258 of 3787

OVERHAULAT-241
< SERVICE INFORMATION >
DE
F
G H
I
J
K L
M A
B
AT
N
O P
7. Seal lip 8. D-ring9. Reverse clutch drum
10. Thrust washer 11. Reverse clutch assembly 12. Drive plate
13. Snap ring 14. Needle bearing15. Front sun gear
16. Needle bearing 17. High clutch hub18. Snap ring
19. Retaining plate 20. Drive plate21. Snap ring
22. Cancel cover 23. Spring retainer assembly 24. High clutch piston
25. Input shaft assembly (high clutch drum) 26. Needle bearing
27. High clutch assembly
28. Bearing race 29. Seal ring30. Driven plate
31. Needle bearing 32. Needle bearing33. Overrun clutch hub
34. End bearing 35. Forward clutch hub 36. Needle bearing
37. Rear planetary carrier 38. Rear sun gear39. Front planetary carrier
40. Low one-way clutch 41. Snap ring42. Needle bearing
43. Needle bearing 44. Rear internal gear 45. Thrust washer
46. Forward one-way clutch 47. Thrust washer48. Thrust washer
49. Forward clutch drum 50. Seal ring51. Seal ring
52. Overrun clutch piston 53. Spring retainer assembly 54. Snap ring
55. Dish plate 56. Driven plate57. Retaining plate
58. Snap ring 59. Dish plate60. Driven plate
61. Retaining plate 62. Snap ring63. Forward clutch assembly and over-
run clutch assembly
64. Drive plate 65. Drive plate66. D-ring
67. Forward clutch piston 68. D-ring69. Seal ring
70. Driven plate 71. Snap ring72. Low & reverse brake assembly
73. Retaining plate 74. Drive plate75. Retaining plate
76. Dish plate 77. Driven plate78. Snap ring
79. Spring retainer assembly 80. Low & reverse brake pis-
ton 81. D-ring
Revision: May 2010
2011 Versa