Page 3203 of 3787

MA-32
< SERVICE INFORMATION >
ENGINE MAINTENANCE (MR18DE)
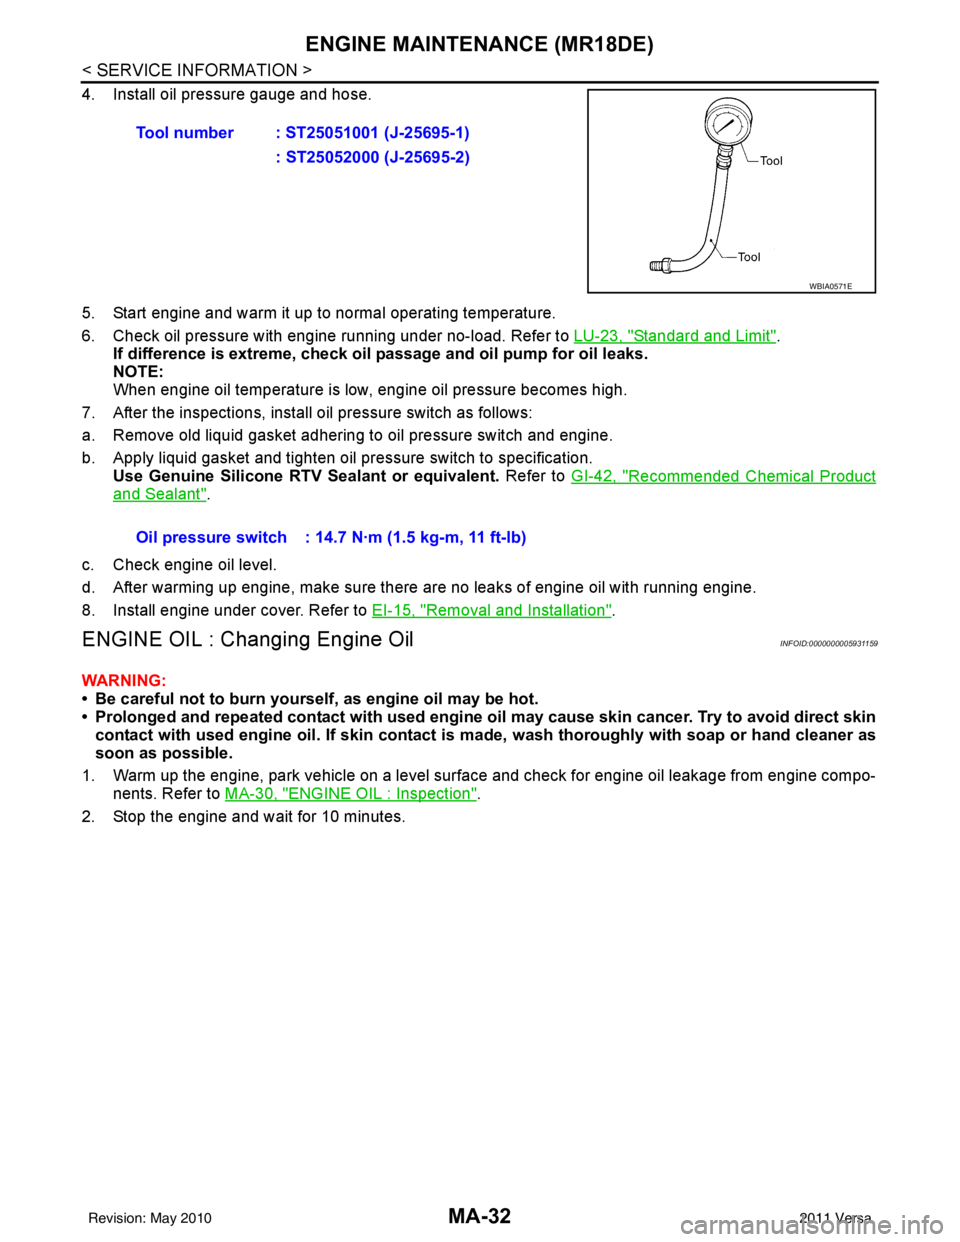
4. Install oil pressure gauge and hose.
5. Start engine and warm it up to normal operating temperature.
6. Check oil pressure with engine running under no-load. Refer to LU-23, "
Standard and Limit".
If difference is extreme, check oil passage and oil pump for oil leaks.
NOTE:
When engine oil temperature is low, engine oil pressure becomes high.
7. After the inspections, install oil pressure switch as follows:
a. Remove old liquid gasket adhering to oil pressure switch and engine.
b. Apply liquid gasket and tighten oil pressure switch to specification. Use Genuine Silicone RTV Sealant or equivalent. Refer to GI-42, "
Recommended Chemical Product
and Sealant".
c. Check engine oil level.
d. After warming up engine, make sure there are no leaks of engine oil with running engine.
8. Install engine under cover. Refer to EI-15, "
Removal and Installation".
ENGINE OIL : Changing Engine OilINFOID:0000000005931159
WARNING:
• Be careful not to burn yourself, as engine oil may be hot.
• Prolonged and repeated contact with used engine oil may cause ski n cancer. Try to avoid direct skin
contact with used engine oil. If skin contact is made, wash thoroughly with soap or hand cleaner as
soon as possible.
1. Warm up the engine, park vehicle on a level surface and check for engine oil leakage from engine compo- nents. Refer to MA-30, "
ENGINE OIL : Inspection".
2. Stop the engine and wait for 10 minutes. Tool number : ST25051001 (J-25695-1)
: ST25052000 (J-25695-2)
WBIA0571E
Oil pressure switch : 14.7 N·m (1.5 kg-m, 11 ft-lb)
Revision: May 2010 2011 Versa
Page 3204 of 3787

ENGINE MAINTENANCE (MR18DE)MA-33
< SERVICE INFORMATION >
C
DE
F
G H
I
J
K
M A
B
MA
N
O P
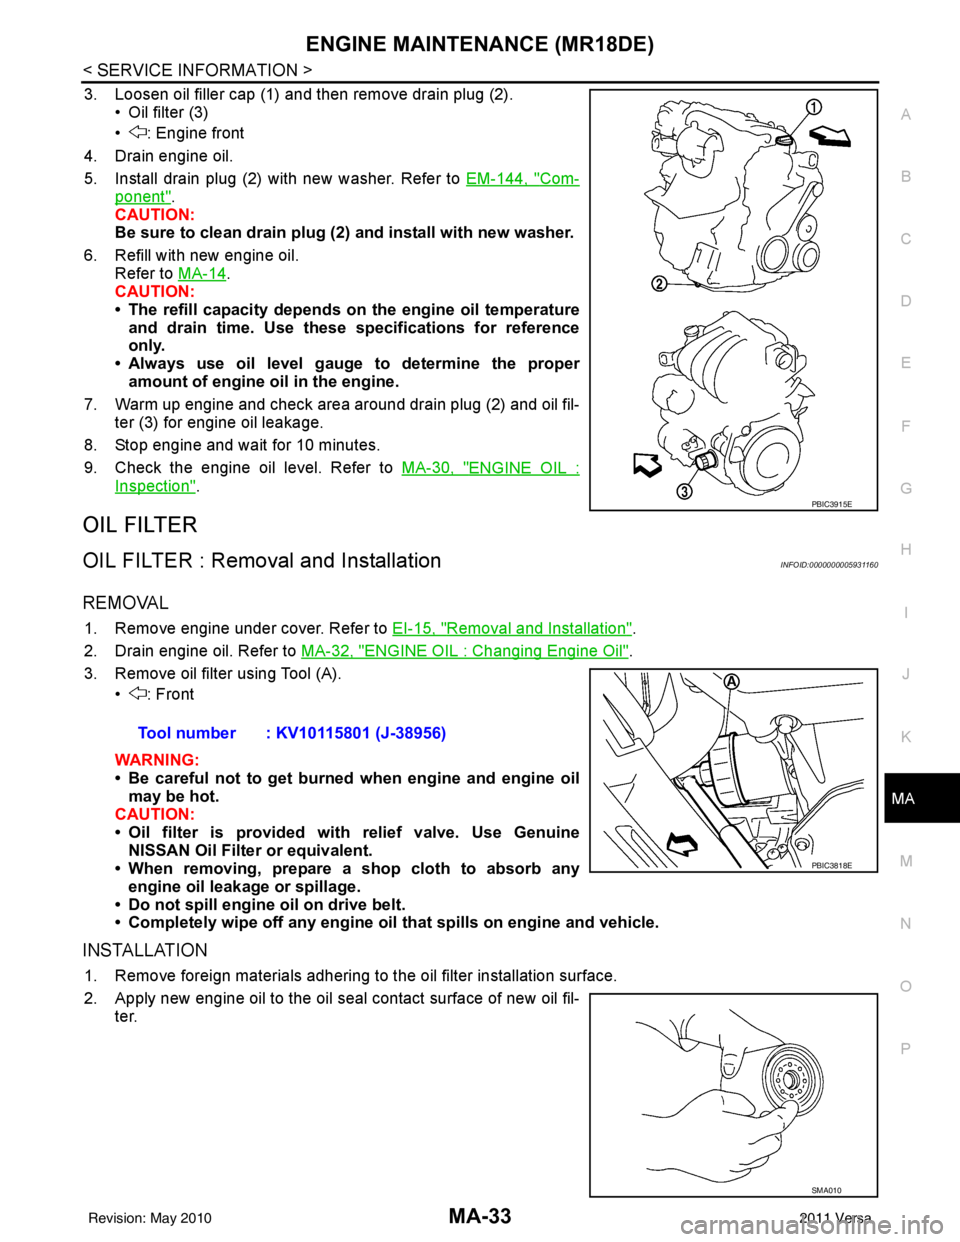
3. Loosen oil filler cap (1) and then remove drain plug (2). • Oil filter (3)
• : Engine front
4. Drain engine oil.
5. Install drain plug (2) with new washer. Refer to EM-144, "
Com-
ponent".
CAUTION:
Be sure to clean drain plug (2 ) and install with new washer.
6. Refill with new engine oil. Refer to MA-14
.
CAUTION:
• The refill capacity depends on the engine oil temperature
and drain time. Use these specifications for reference
only.
• Always use oil level gauge to determine the proper amount of engine oil in the engine.
7. Warm up engine and check area around drain plug (2) and oil fil- ter (3) for engine oil leakage.
8. Stop engine and wait for 10 minutes.
9. Check the engine oil level. Refer to MA-30, "
ENGINE OIL :
Inspection".
OIL FILTER
OIL FILTER : Removal and InstallationINFOID:0000000005931160
REMOVAL
1. Remove engine under cover. Refer to EI-15, "Removal and Installation".
2. Drain engine oil. Refer to MA-32, "
ENGINE OIL : Changing Engine Oil".
3. Remove oil filter using Tool (A). • : Front
WARNING:
• Be careful not to get burned when engine and engine oil
may be hot.
CAUTION:
• Oil filter is provided with relief valve. Use Genuine
NISSAN Oil Filter or equivalent.
• When removing, prepare a s hop cloth to absorb any
engine oil leakage or spillage.
• Do not spill engine oil on drive belt.
• Completely wipe off any engine oil that spills on engine and vehicle.
INSTALLATION
1. Remove foreign materials adhering to the oil filter installation surface.
2. Apply new engine oil to the oil seal contact surface of new oil fil-
ter.
PBIC3915E
Tool number : KV10115801 (J-38956)
PBIC3818E
SMA010
Revision: May 2010 2011 Versa
Page 3205 of 3787
MA-34
< SERVICE INFORMATION >
ENGINE MAINTENANCE (MR18DE)
3. Screw oil filter manually until it touches the installation surface,
then tighten it by 2/3 turn. Or tighten to specification.
4. Refill engine with new engine oil. Refer to MA-32, "
ENGINE OIL : Changing Engine Oil".
5. Install engine under cover. Refer to EI-15, "
Removal and Installation".
INSPECTION AFTER INSTALLATION
1. Check the engine oil level. Refer to MA-30, "ENGINE OIL : Inspection".
2. Start engine, and make sure there are no leaks of engine oil.
3. Stop engine and wait for 10 minutes.
4. Check the engine oil level and adjust as necessary. Refer to MA-30, "
ENGINE OIL : Inspection".
SPARK PLUG
SPARK PLUG : ComponentINFOID:0000000005931161
Oil filter: : 17.7 N·m (1.8 kg-m, 13 ft-lb)
SMA229B
1. PCV hose2. Rocker cover3. Spark plug
4. Ignition coil 5. PCV hose6. PCV valve
PBIC3536J
Revision: May 2010 2011 Versa
Page 3212 of 3787

CHASSIS AND BODY MAINTENANCEMA-41
< SERVICE INFORMATION >
C
DE
F
G H
I
J
K
M A
B
MA
N
O P
M/T OIL : Refilling (RS5F91R)INFOID:0000000005931171
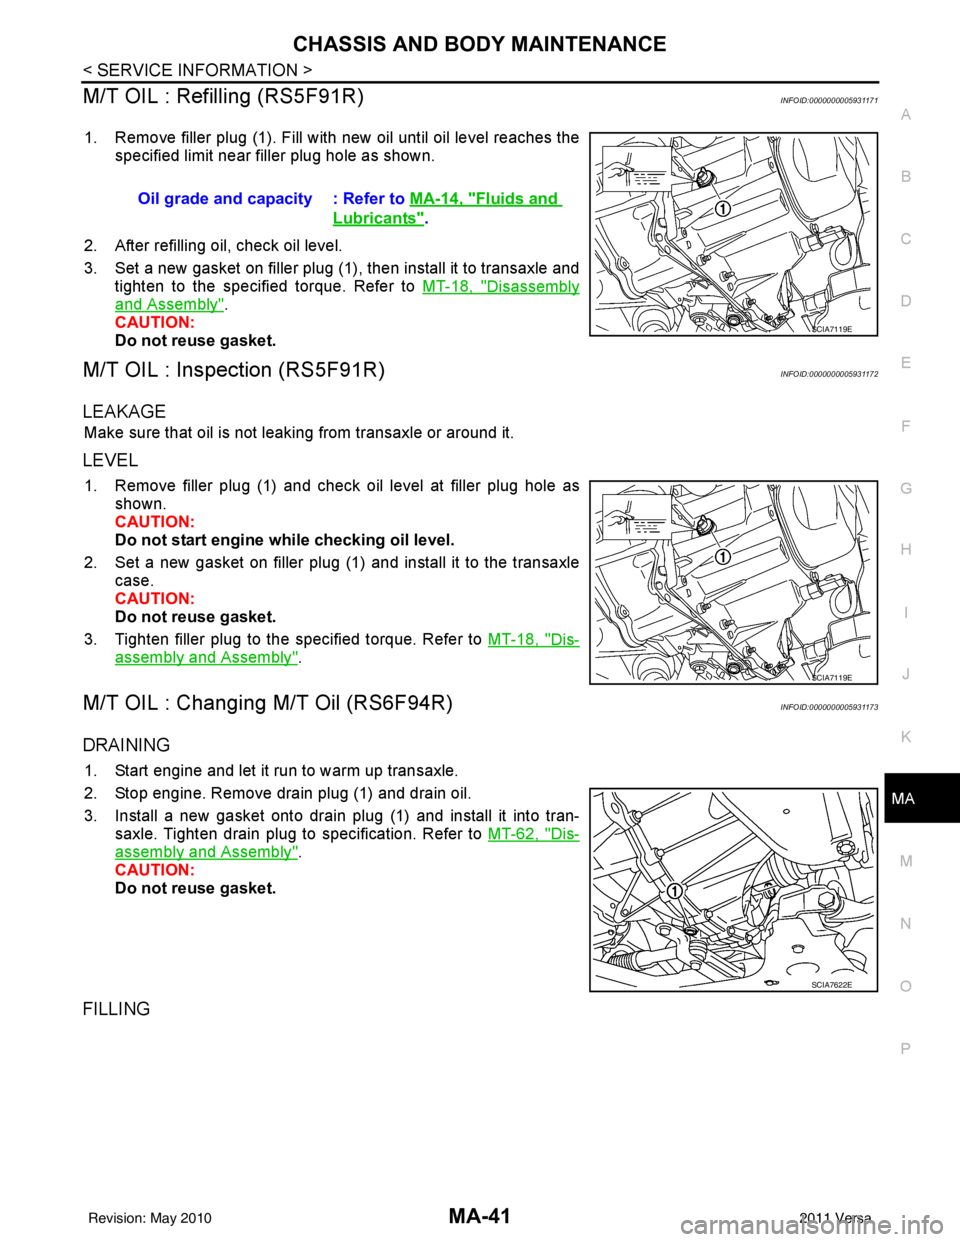
1. Remove filler plug (1). Fill with new oil until oil level reaches the specified limit near filler plug hole as shown.
2. After refilling oil, check oil level.
3. Set a new gasket on filler plug (1), then install it to transaxle and tighten to the specified torque. Refer to MT-18, "
Disassembly
and Assembly".
CAUTION:
Do not reuse gasket.
M/T OIL : Inspection (RS5F91R)INFOID:0000000005931172
LEAKAGE
Make sure that oil is not leaking from transaxle or around it.
LEVEL
1. Remove filler plug (1) and check oil level at filler plug hole as shown.
CAUTION:
Do not start engine while checking oil level.
2. Set a new gasket on filler plug (1) and install it to the transaxle case.
CAUTION:
Do not reuse gasket.
3. Tighten filler plug to the specified torque. Refer to MT-18, "
Dis-
assembly and Assembly".
M/T OIL : Changing M/T Oil (RS6F94R)INFOID:0000000005931173
DRAINING
1. Start engine and let it run to warm up transaxle.
2. Stop engine. Remove drain plug (1) and drain oil.
3. Install a new gasket onto drain plug (1) and install it into tran-
saxle. Tighten drain plug to specification. Refer to MT-62, "
Dis-
assembly and Assembly".
CAUTION:
Do not reuse gasket.
FILLING
Oil grade and capacity : Refer to MA-14, "Fluids and
Lubricants".
SCIA7119E
SCIA7119E
SCIA7622E
Revision: May 2010 2011 Versa
Page 3213 of 3787

MA-42
< SERVICE INFORMATION >
CHASSIS AND BODY MAINTENANCE
1. Remove filler plug (1). Fill with new oil until oil level reaches thespecified limit at filler plug hole as shown.
2. After refilling oil, check oil level. Install a new gasket on filler plug (1), then install it into transaxle. Tighten filler plug to specifica-
tion. Refer to MT-62, "
Disassembly and Assembly".
CAUTION:
Do not reuse gasket.
M/T OIL : Checking M/T Oil (RS6FF94R)INFOID:0000000005931174
OIL LEAKAGE AND OIL LEVEL
1. Make sure that oil is not leaking from transaxle or around it.
2. Remove filler plug (1) and check oil level at filler plug hole as shown.
CAUTION:
Do not start engine wh ile checking oil level.
3. Install a new gasket onto filler plug (1) and install it into tran-
saxle. Tighten filler plug to specification. Refer to MT-62, "
Disas-
sembly and Assembly".
CAUTION:
Do not reuse gasket.
A/T FLUID
A/T FLUID : Checking A/T FluidINFOID:0000000005931175
1. Warm up engine.
2. Check for A/T fluid leakage.
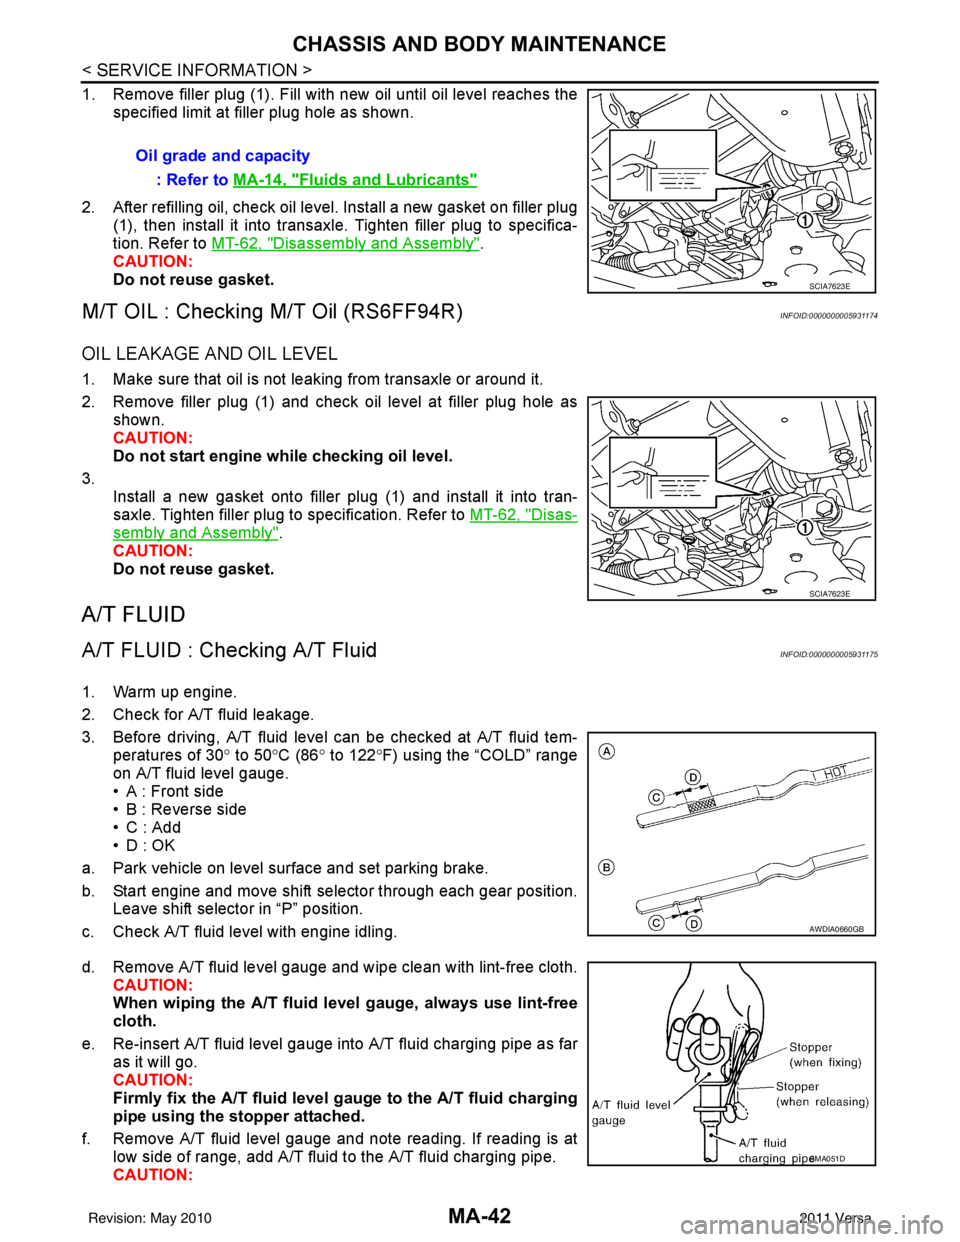
3. Before driving, A/T fluid level can be checked at A/T fluid tem- peratures of 30 ° to 50 °C (86° to 122° F) using the “COLD” range
on A/T fluid level gauge.
• A : Front side
• B : Reverse side
• C : Add
• D : OK
a. Park vehicle on level surface and set parking brake.
b. Start engine and move shift selector through each gear position. Leave shift selector in “P” position.
c. Check A/T fluid level with engine idling.
d. Remove A/T fluid level gauge and wipe clean with lint-free cloth. CAUTION:
When wiping the A/T fluid level gauge, always use lint-free
cloth.
e. Re-insert A/T fluid level gauge into A/T fluid charging pipe as far as it will go.
CAUTION:
Firmly fix the A/T fluid level gauge to the A/T fluid charging
pipe using the stopper attached.
f. Remove A/T fluid level gauge and note reading. If reading is at low side of range, add A/T fluid to the A/T fluid charging pipe.
CAUTION:Oil grade and capacity
: Refer to MA-14, "
Fluids and Lubricants"
SCIA7623E
SCIA7623E
AWDIA0660GB
SMA051D
Revision: May 2010 2011 Versa
Page 3229 of 3787
MT-8
< SERVICE INFORMATION >[RS5F91R]
NOISE, VIBRATION AND HARSHNESS
(NVH) TROUBLESHOOTING
NOISE, VIBRATION AND HARSHNESS (NVH) TROUBLESHOOTING
NVH Troubleshooting ChartINFOID:0000000005929659
Use the chart below to help you find the cause of the symptom. The numbers indicate the order of the inspec-
tion. If necessary, repair or replace these parts.
Reference pageMT-18MT-18MT-14MT-18MT-18
SUSPECTED PARTS
(Possible cause)
OIL (Oil level is low.)
OIL (Wrong oil.)
OIL (Oil level is high.)
GASKET (Damaged)
OIL SEAL (Worn or damaged)
O-RING (Worn or damaged)
SHIFT CONTROL LINKAGE (Worn)
SHIFT FORK (Worn)
GEAR (Worn or damaged)
BEARING (Worn or damaged)
BAULK RING (Worn or damaged)
INSERT SPRING (Damaged)
SymptomsNoise
1 2 3 3
Oil leakage 31222
Hard to shift or will not shift 1 123 3
Jumps out of gear 1 2 2
Revision: May 2010 2011 Versa
Page 3232 of 3787
![NISSAN TIIDA 2011 Service Repair Manual M/T OILMT-11
< SERVICE INFORMATION > [RS5F91R]
D
E
F
G H
I
J
K L
M A
B
MT
N
O P
M/T OIL
DrainingINFOID:0000000005929662
1. Start engine and let it run to warm up transaxle.
2. Stop engine. Remove drai NISSAN TIIDA 2011 Service Repair Manual M/T OILMT-11
< SERVICE INFORMATION > [RS5F91R]
D
E
F
G H
I
J
K L
M A
B
MT
N
O P
M/T OIL
DrainingINFOID:0000000005929662
1. Start engine and let it run to warm up transaxle.
2. Stop engine. Remove drai](/manual-img/5/57396/w960_57396-3231.png)
M/T OILMT-11
< SERVICE INFORMATION > [RS5F91R]
D
E
F
G H
I
J
K L
M A
B
MT
N
O P
M/T OIL
DrainingINFOID:0000000005929662
1. Start engine and let it run to warm up transaxle.
2. Stop engine. Remove drain plug (1) and drain oil.
3. Set a new gasket on drain plug (1) and install it to transaxle and tighten drain plug to the specified torque. Refer to MT-18, "
Dis-
assembly and Assembly".
CAUTION:
Do not reuse gasket.
RefillingINFOID:0000000005929663
1. Remove filler plug (1). Fill with new oil until oil level reaches the specified limit near filler plug hole as shown.
2. After refilling oil, check oil level.
3. Set a new gasket on filler plug (1), then install it to transaxle and tighten to the specified torque. Refer to MT-18, "
Disassembly
and Assembly".
CAUTION:
Do not reuse gasket.
InspectionINFOID:0000000005929664
LEAKAGE
Make sure that oil is not leaking from transaxle or around it.
LEVEL
1. Remove filler plug (1) and check oil level at filler plug hole as shown.
CAUTION:
Do not start engine while checking oil level.
2. Set a new gasket on filler plug (1) and install it to the transaxle case.
CAUTION:
Do not reuse gasket.
3. Tighten filler plug to the specified torque. Refer to MT-18, "
Dis-
assembly and Assembly".
PCIB1504E
Oil grade and capacity : Refer to MA-14, "Fluids and
Lubricants".
SCIA7119E
SCIA7119E
Revision: May 2010 2011 Versa
Page 3239 of 3787
![NISSAN TIIDA 2011 Service Repair Manual MT-18
< SERVICE INFORMATION >[RS5F91R]
TRANSAXLE ASSEMBLY
CAUTION:
• Make sure the transaxle assembly does not interfer
e with the wire harnesses and clutch tube.
• When installing transaxle assem NISSAN TIIDA 2011 Service Repair Manual MT-18
< SERVICE INFORMATION >[RS5F91R]
TRANSAXLE ASSEMBLY
CAUTION:
• Make sure the transaxle assembly does not interfer
e with the wire harnesses and clutch tube.
• When installing transaxle assem](/manual-img/5/57396/w960_57396-3238.png)
MT-18
< SERVICE INFORMATION >[RS5F91R]
TRANSAXLE ASSEMBLY
CAUTION:
• Make sure the transaxle assembly does not interfer
e with the wire harnesses and clutch tube.
• When installing transaxle assembly, do not bring input shaft into contact with clutch cover.
• If transaxle is removed from the vehicle, always replace CSC. Refer to CL-13, "
Removal and Installa-
tion".
• When installing the transaxle assembly to the engine, install the
bolts according to the following:
(A): Transaxle to engine
(B): Engine to transaxle
• After installation perform the following:
- Bleed the air from the clutch hydraulic system. Refer to CL-9, "
Air Bleeding Procedure".
- Check for oil leakage and oil level. Refer to MT-11, "
Inspection".
- Check the control linkage. Refer to MT-15, "
Inspection".
Disassembly and AssemblyINFOID:0000000005929674
COMPONENTS
Case and Housing Component
Bolt No.1234
Quantity 2213
Bolt length “ ”
mm (in) 55
(2.17) 49
(1.93) 69
(2.72) 55
(2.17)
Tightening torque
N·m (kg-m, ft-lb) 48.0
(4.9, 35)
PCIB1517E
Revision: May 2010 2011 Versa