Page 430 of 3787
AUDIO ANTENNAAV-33
< SERVICE INFORMATION > [AUDIO WITHOUT NAVIGATION]
C
D
E
F
G H
I
J
L
M A
B
AV
N
O P
AUDIO ANTENNA
Location of AntennaINFOID:0000000005931295
Removal and Installati on of Roof AntennaINFOID:0000000005931296
REMOVAL
1. For hatchback, remove the luggage side upper finisher (LH). Refer to EI-56.
2. For sedan, remove the rear pillar finisher. Refer to EI-54, "
Removal and Installation - Sedan".
3. Remove rear assist grip (LH). Refer to EI-50
.
4. Remove three clips of headlining (rear side). Pull down headlining (rear side) and obtain space for work between vehicle and headlining.
5. Disconnect the roof antenna harness connectors.
6. Remove nut (A) and clips (B).
LKIA0934E
1. Roof antenna 2. Roof antenna base3. Audio unit
A. Audio antenna harness connector B. Harness clips C. Roof antenna harness connectors
Revision: May 2010 2011 Versa
Page 446 of 3787
TELEPHONEAV-49
< SERVICE INFORMATION > [AUDIO WITHOUT NAVIGATION]
C
D
E
F
G H
I
J
L
M A
B
AV
N
O P
BLUETOOTH MICROPHONE
Removal
1. Remove over-head console assembly, roof finisher. Refer to EI-50.
2. Remove the Bluetooth microphone.
Installation
Installation is in the reverse order of removal.
Revision: May 2010 2011 Versa
Page 486 of 3787
TELEPHONEAV-89
< SERVICE INFORMATION > [AUDIO WITH NAVIGATION]
C
D
E
F
G H
I
J
L
M A
B
AV
N
O P
BLUETOOTH MICROPHONE
Removal
1. Remove over-head console assembly, roof finisher. Refer to EI-50.
2. Remove the Bluetooth microphone.
Installation
Installation is in the reverse order of removal.
Revision: May 2010 2011 Versa
Page 488 of 3787
AUDIO ANTENNAAV-91
< SERVICE INFORMATION > [AUDIO WITH NAVIGATION]
C
D
E
F
G H
I
J
L
M A
B
AV
N
O P
AUDIO ANTENNA
Location of AntennaINFOID:0000000006216724
Removal and Installati on of Roof AntennaINFOID:0000000005931337
REMOVAL
1. For hatchback, remove the luggage side upper finisher (LH). Refer to EI-56.
2. For sedan, remove the rear pillar finisher. Refer to EI-54, "
Removal and Installation - Sedan".
3. Remove rear assist grip (LH). Refer to EI-50
.
4. Remove three clips of headlining (rear side). Pull down headlining (rear side) and obtain space for work between vehicle and headlining.
5. Disconnect the roof antenna harness connectors.
6. Remove nut (A) and clips (B).
LKIA0934E
1. Roof antenna 2. Roof antenna base3. AV control unit
A. Audio antenna harness connector B. Harness clips C. Roof antenna harness connectors
Revision: May 2010 2011 Versa
Page 2380 of 3787
EI-50
< ON-VEHICLE REPAIR >
HEADLINING
HEADLINING
ComponentINFOID:0000000005929575
Hatchback Models
LIIA2576E
1. Headlining2. Assist grip 3. Sunvisor
4. Cap 5. Sunvisor holder 6. Roof console retainer
Revision: May 2010 2011 Versa
Page 2766 of 3787
GW-12
< SERVICE INFORMATION >
WINDSHIELD GLASS
WINDSHIELD GLASS
Removal and InstallationINFOID:0000000005929465
REMOVAL
1. Partially remove the headlining (front edge). Refer to EI-50.
2. Remove the front wiper arms. Refer to WW-20, "
Removal and Installation of Front Wiper Arms".
3. Remove the cowl top cover. Refer to EI-24
.
4. Apply protective tape around the windshield glas s to protect the painted surface from damage.
After removing windshield upper molding, remove glass using piano wire or power cutting tool (A) and an
inflatable pump bag (B).
• If a windshield glass is to be reused, mark the body and the glass with mating marks.
WARNING:
PIIB6285E
1. Windshield glass assembly 2. Dam sealant 3. Windshield molding
4. Spacer 5. Mirror base 6. Roof panel outer
7. Cowl top front 8. Adhesive 9. Front pillar outer panel
10. Cowl top cover 11. Primer
Revision: May 2010 2011 Versa
Page 3547 of 3787

RF-24
< ON-VEHICLE REPAIR >
SUNROOF
SUNROOF UNIT ASSEMBLY
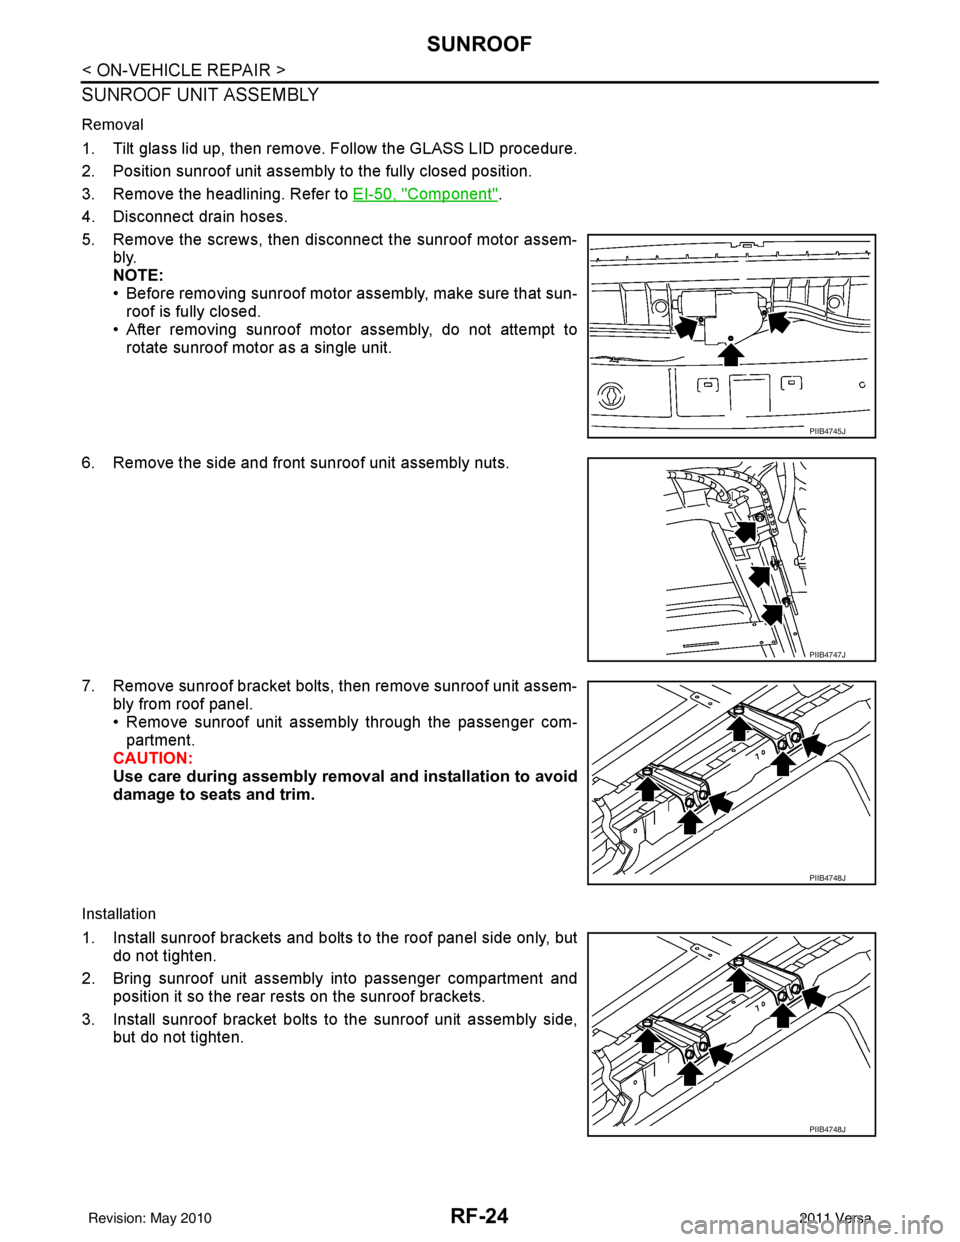
Removal
1. Tilt glass lid up, then remove. Follow the GLASS LID procedure.
2. Position sunroof unit assembly to the fully closed position.
3. Remove the headlining. Refer to EI-50, "
Component".
4. Disconnect drain hoses.
5. Remove the screws, then disconnect the sunroof motor assem- bly.
NOTE:
• Before removing sunroof motor assembly, make sure that sun-roof is fully closed.
• After removing sunroof motor assembly, do not attempt to rotate sunroof motor as a single unit.
6. Remove the side and front sunroof unit assembly nuts.
7. Remove sunroof bracket bolts, then remove sunroof unit assem- bly from roof panel.
• Remove sunroof unit assembly through the passenger com-
partment.
CAUTION:
Use care during assembly removal and installation to avoid
damage to seats and trim.
Installation
1. Install sunroof brackets and bolts to the roof panel side only, but do not tighten.
2. Bring sunroof unit assembly into passenger compartment and position it so the rear rests on the sunroof brackets.
3. Install sunroof bracket bolts to the sunroof unit assembly side, but do not tighten.
PIIB4745J
PIIB4747J
PIIB4748J
PIIB4748J
Revision: May 2010 2011 Versa
Page 3548 of 3787
SUNROOFRF-25
< ON-VEHICLE REPAIR >
C
DE
F
G H
J
K L
M A
B
RF
N
O P
4. Install the front and side sunroof unit assembly nuts, but do not tighten.
5. Tighten the sunroof unit assembly.
a. First, tighten the sunroof bracket bolts at the vehicle side, then tighten the bolt on the rail side.
b. Next, tighten the front and side sunroof unit assembly nuts diag- onally.
6.7. Connect the sunroof motor assembly connector and install thescrews.
8. Install the glass lid. Follow the GLASS LID procedure.
9. Connect drain hoses.
10. Install headlining. Refer to EI-50, "
Component".
11. Perform fitting adjustment and test for leaks, refer to RF-27, "
Fitting Adjustment" .
GLASS LID
Removal
1. Open the sunshade fully and close the glass lid.
2. Remove glass lid bolts, then remove glass lid.
Installation
PIIB4746J
PIIB4748J
PIIB4745J
PIIB4749J
Revision: May 2010 2011 Versa