Page 2472 of 3787
EM-82
< REMOVAL AND INSTALLATION >[HR16DE]
ENGINE ASSEMBLY
REMOVAL AND INSTALLATION
ENGINE ASSEMBLY
Exploded ViewINFOID:0000000005930962
Removal and InstallationINFOID:0000000005930963
WARNING:
• Situate the vehicle on a flat and solid surface.
• Place chocks at front and back of rear wheels.
• Attach proper slingers and bolts
described in PARTS CATALOG if engine slingers are not equipped.
• Always be careful to work safely, avoid forceful or uninstructed operations.
• Never start working until exhaust system and coolant are cool enough.
CAUTION:
1. Engine mounting insulator (LH) 2. Engine mounting bracket (LH) 3. Mass damper
4. Dynamic damper 5. Engine mounting insulator (RH) 6. Engine mounting stay
7. Engine mounting bracket (RH) 8. Rear engine mounting bracket 9. Rear torque rod
10. Washer 11. Engine mounting bracket (LH)
A. Front mark B. M/T models
PBIC3736E
Revision: May 2010 2011 Versa
Page 2494 of 3787
![NISSAN LATIO 2011 Service Repair Manual EM-104
< DISASSEMBLY AND ASSEMBLY >[HR16DE]
CYLINDER BLOCK
• When main bearing cap is removed after being tightened to the
specified torque with main bearings installed, the tip end of bearing
must NISSAN LATIO 2011 Service Repair Manual EM-104
< DISASSEMBLY AND ASSEMBLY >[HR16DE]
CYLINDER BLOCK
• When main bearing cap is removed after being tightened to the
specified torque with main bearings installed, the tip end of bearing
must](/manual-img/5/57357/w960_57357-2493.png)
EM-104
< DISASSEMBLY AND ASSEMBLY >[HR16DE]
CYLINDER BLOCK
• When main bearing cap is removed after being tightened to the
specified torque with main bearings installed, the tip end of bearing
must protrude. Refer to EM-90, "
Disassembly and Assembly".
• If the standard is not met, replace main bearings.
CONNECTING ROD BEARING CRUSH HEIGHT
• When connecting rod bearing cap is removed after being tightened to the specified torque with connecting rod bearings installed, the
tip end of bearing must protrude. Refer to EM-90, "
Disassembly
and Assembly".
• If the standard is not met, replace connecting rod bearings.
MAIN BEARING CAP BOLT OUTER DIAMETER
• Measure the outer diameters (“d1”, “d2”) at two positions as shown.
• If reduction appears in a position other than “d
2 ”, regard it as “d2”.
• If it exceeds the limit (a large difference in dimensions), replace main bearing cap bolt with a new one.
CONNECTING ROD CAP BOLT OUTER DIAMETER
• Measure the outer diameter “d” at position as shown.
• If reduction appears in a position other than “d”, regard it as “d”.
• When “d” falls below the limit (when it becomes thinner), replaceconnecting rod cap bolt with a new one.
FLYWHEEL DEFLECTION
Standard: There must be crush height.
SEM502G
Standard: There must be crush height.
PBIC1646E
Limit (“d1 ” – “d2 ”): 0.2 mm (0.008 in)
PBIC3768E
Limit: 7.75 mm (0.3051 in)
PBIC3769E
Revision: May 2010 2011 Versa
Page 2587 of 3787
![NISSAN LATIO 2011 Service Repair Manual ENGINE ASSEMBLYEM-197
< SERVICE INFORMATION > [MR18DE]
C
D
E
F
G H
I
J
K L
M A
EM
NP
O
ENGINE ASSEMBLY
ComponentINFOID:0000000005931030
Removal and InstallationINFOID:0000000005931031
WARNING:
• Sit NISSAN LATIO 2011 Service Repair Manual ENGINE ASSEMBLYEM-197
< SERVICE INFORMATION > [MR18DE]
C
D
E
F
G H
I
J
K L
M A
EM
NP
O
ENGINE ASSEMBLY
ComponentINFOID:0000000005931030
Removal and InstallationINFOID:0000000005931031
WARNING:
• Sit](/manual-img/5/57357/w960_57357-2586.png)
ENGINE ASSEMBLYEM-197
< SERVICE INFORMATION > [MR18DE]
C
D
E
F
G H
I
J
K L
M A
EM
NP
O
ENGINE ASSEMBLY
ComponentINFOID:0000000005931030
Removal and InstallationINFOID:0000000005931031
WARNING:
• Situate the vehicle on a flat and solid surface.
• Place chocks at front and back of rear wheels.
• Attach proper slingers and bolts described in P
ARTS CATALOG if engine slingers are not equipped.
CAUTION:
• Always be careful to work safely, avoid forceful or uninstructed operations.
• Do not start working until exhaust system and coolant are cool enough.
• If items or work required are not covered by th e engine section, follow the applicable procedures.
• Always use the support poin t specified for lifting.
1. Engine mounting Insulator (RH) 2. Engine mounting shim (RH) (if equipped) 3. Engine mounting bracket (RH)
4. Bracket 5. Rear torque rod 6. Engine through bolt
7. Engine mounting bracket (LH) 8. Engine mounting insulator (LH) 9. Torque rod (RH)
A. Front mark B. Silicone lubricant
WBIA0846E
Revision: May 2010 2011 Versa
Page 2619 of 3787
![NISSAN LATIO 2011 Service Repair Manual CYLINDER BLOCKEM-229
< SERVICE INFORMATION > [MR18DE]
C
D
E
F
G H
I
J
K L
M A
EM
NP
O
• If measured value is out of the standard, replace flywheel.
Movement Amount in Radial (Rotation) Direction
Che NISSAN LATIO 2011 Service Repair Manual CYLINDER BLOCKEM-229
< SERVICE INFORMATION > [MR18DE]
C
D
E
F
G H
I
J
K L
M A
EM
NP
O
• If measured value is out of the standard, replace flywheel.
Movement Amount in Radial (Rotation) Direction
Che](/manual-img/5/57357/w960_57357-2618.png)
CYLINDER BLOCKEM-229
< SERVICE INFORMATION > [MR18DE]
C
D
E
F
G H
I
J
K L
M A
EM
NP
O
• If measured value is out of the standard, replace flywheel.
Movement Amount in Radial (Rotation) Direction
Check the movement amount of radial (rotation) direction with the following procedure:
1. Install clutch cover bolt (1) to clutch cover mating hole, and
place a torque wrench (A) on the extended line of the flywheel
(2) center line.
• Tighten bolt at a force of 9.8 N·m (1.0 kg-m, 87 in-lb) to keep itfrom loosening.
2. Put a mating mark on circumferences of the two flywheel masses without applying any load (Measurement standard
points).
3. Apply a force of 9.8 N·m (1.0 kg-m, 87 in-lb) in each direction, and mark the movement amount on the mass on the transaxle
side.
4. Measure the dimensions of movement amounts (A) and (B) on circumference of the flywheel on the transaxle side.
• If measured value is out of the standard, replace flywheel. Limit: 33.2 mm (1.307 in) or less.
PBIC4007E
Revision: May 2010
2011 Versa
Page 2646 of 3787
FAX-4
< SERVICE INFORMATION >
PREPARATION
PREPARATION
Special Service ToolINFOID:0000000005931065
The actual shapes of Kent-Moore tools may differ from those of special service tools illustrated here.
Commercial Service ToolINFOID:0000000005931066
Tool number
(Kent-Moore No.)
Tool name Description
KV40107300
(—)
Boot Band crimping tool Installing boot bands
KV38105500
(J-33904)
Differential side oil seal protector Installing drive shaft LH
a: 40 mm (1.57 in) dia.
KV38106700
(J-34296)
Differential side oil seal protector Installing drive shaft RH
a: 36 mm (1.42 in) dia.
HT72520000
(J-25730-A)
Ball joint remover Removing steering outer socket
ZZA1229D
ZZA0835D
ZZA0835D
NT146
Tool name
Description
Power tool • Removing wheel nuts
• Removing torque member bolts
• Removing hub lock nut
PBIC0190E
Revision: May 2010 2011 Versa
Page 2649 of 3787

FRONT WHEEL HUB AND KNUCKLEFAX-7
< SERVICE INFORMATION >
CEF
G H
I
J
K L
M A
B
FA X
N
O P
2. Without disassembling the hydraulic lines, remove the torque member bolts using power tool. Then repo- sition the torque member and brake caliper assembly aside with wire. Refer to BR-25
.
CAUTION:
Do not depress brake pedal while brake caliper is removed.
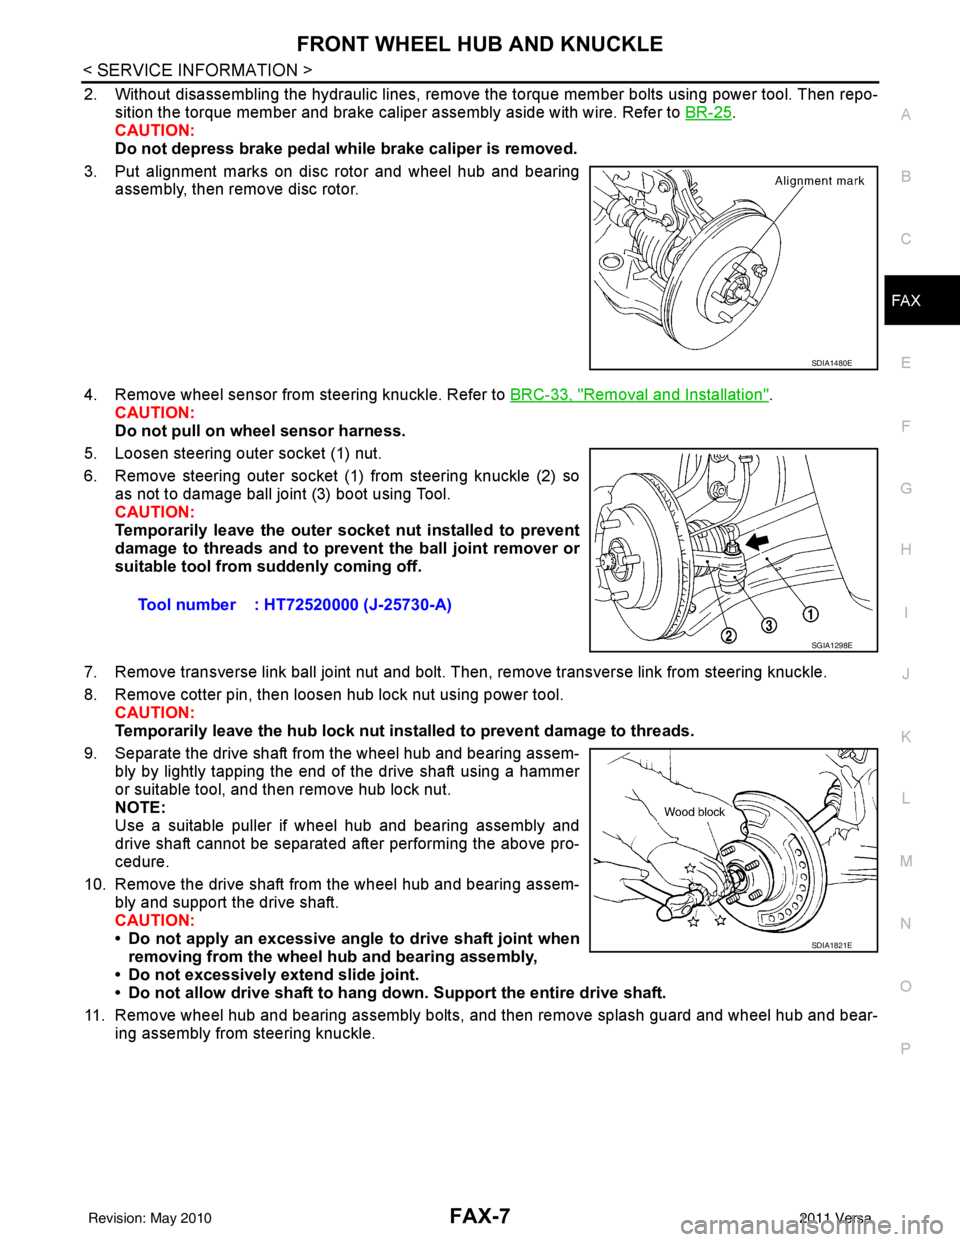
3. Put alignment marks on disc rotor and wheel hub and bearing assembly, then remove disc rotor.
4. Remove wheel sensor from steering knuckle. Refer to BRC-33, "
Removal and Installation".
CAUTION:
Do not pull on wheel sensor harness.
5. Loosen steering outer socket (1) nut.
6. Remove steering outer socket (1) from steering knuckle (2) so as not to damage ball joint (3) boot using Tool.
CAUTION:
Temporarily leave the outer socket nut installed to prevent
damage to threads and to prevent the ball joint remover or
suitable tool from suddenly coming off.
7. Remove transverse link ball joint nut and bolt. Then, remove transverse link from steering knuckle.
8. Remove cotter pin, then loosen hub lock nut using power tool. CAUTION:
Temporarily leave the hub lock nut inst alled to prevent damage to threads.
9. Separate the drive shaft from the wheel hub and bearing assem- bly by lightly tapping the end of the drive shaft using a hammer
or suitable tool, and then remove hub lock nut.
NOTE:
Use a suitable puller if wheel hub and bearing assembly and
drive shaft cannot be separated after performing the above pro-
cedure.
10. Remove the drive shaft from the wheel hub and bearing assem- bly and support the drive shaft.
CAUTION:
• Do not apply an excessive angle to drive shaft joint when
removing from the wheel hub and bearing assembly,
• Do not excessively extend slide joint.
• Do not allow drive shaft to hang do wn. Support the entire drive shaft.
11. Remove wheel hub and bearing assembly bolts, and then remove splash guard and wheel hub and bear- ing assembly from steering knuckle.
SDIA1480E
Tool number : HT72520000 (J-25730-A)
SGIA1298E
SDIA1821E
Revision: May 2010 2011 Versa
Page 2650 of 3787

FAX-8
< SERVICE INFORMATION >
FRONT WHEEL HUB AND KNUCKLE
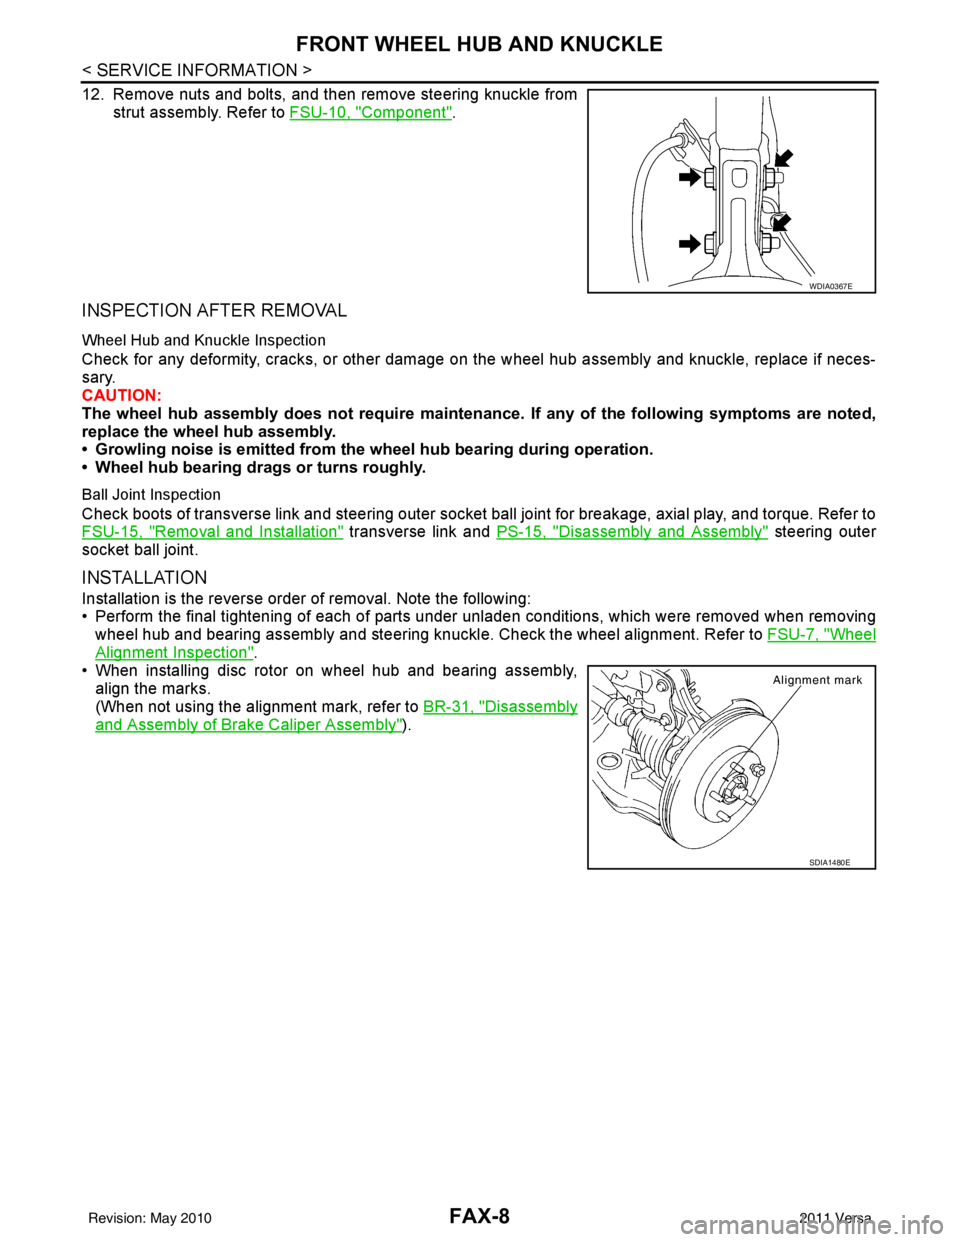
12. Remove nuts and bolts, and then remove steering knuckle fromstrut assembly. Refer to FSU-10, "
Component".
INSPECTION AFTER REMOVAL
Wheel Hub and Knuckle Inspection
Check for any deformity, cracks, or other damage on the wheel hub assembly and knuckle, replace if neces-
sary.
CAUTION:
The wheel hub assembly does not require maintenance. If any of the following symptoms are noted,
replace the wheel hub assembly.
• Growling noise is emitted from the wheel hub bearing during operation.
• Wheel hub bearing drags or turns roughly.
Ball Joint Inspection
Check boots of transverse link and steering outer socket ball joint for breakage, axial play, and torque. Refer to
FSU-15, "
Removal and Installation" transverse link and PS-15, "Disassembly and Assembly" steering outer
socket ball joint.
INSTALLATION
Installation is the reverse order of removal. Note the following:
• Perform the final tightening of each of parts under unladen conditions, which were removed when removing wheel hub and bearing assembly and steering knuckl e. Check the wheel alignment. Refer to FSU-7, "
Wheel
Alignment Inspection".
• When installing disc rotor on wheel hub and bearing assembly,
align the marks.
(When not using the alignment mark, refer to BR-31, "
Disassembly
and Assembly of Brake Caliper Assembly").
WDIA0367E
SDIA1480E
Revision: May 2010 2011 Versa
Page 2696 of 3787

FRONT SUSPENSION ASSEMBLYFSU-11
< SERVICE INFORMATION >
C
DF
G H
I
J
K L
M A
B
FSU
N
O P
Removal and InstallationINFOID:0000000005930901
REMOVAL
1. Separate intermediate shaft from steering gear pinion shaft. Refer to PS-13, "Removal and Installation".
2. Remove front tires from vehicle using a power tool.
3. Remove wheel sensor from steering knuckle. Refer to BRC-33
.
CAUTION:
Do not pull on wheel sensor harness.
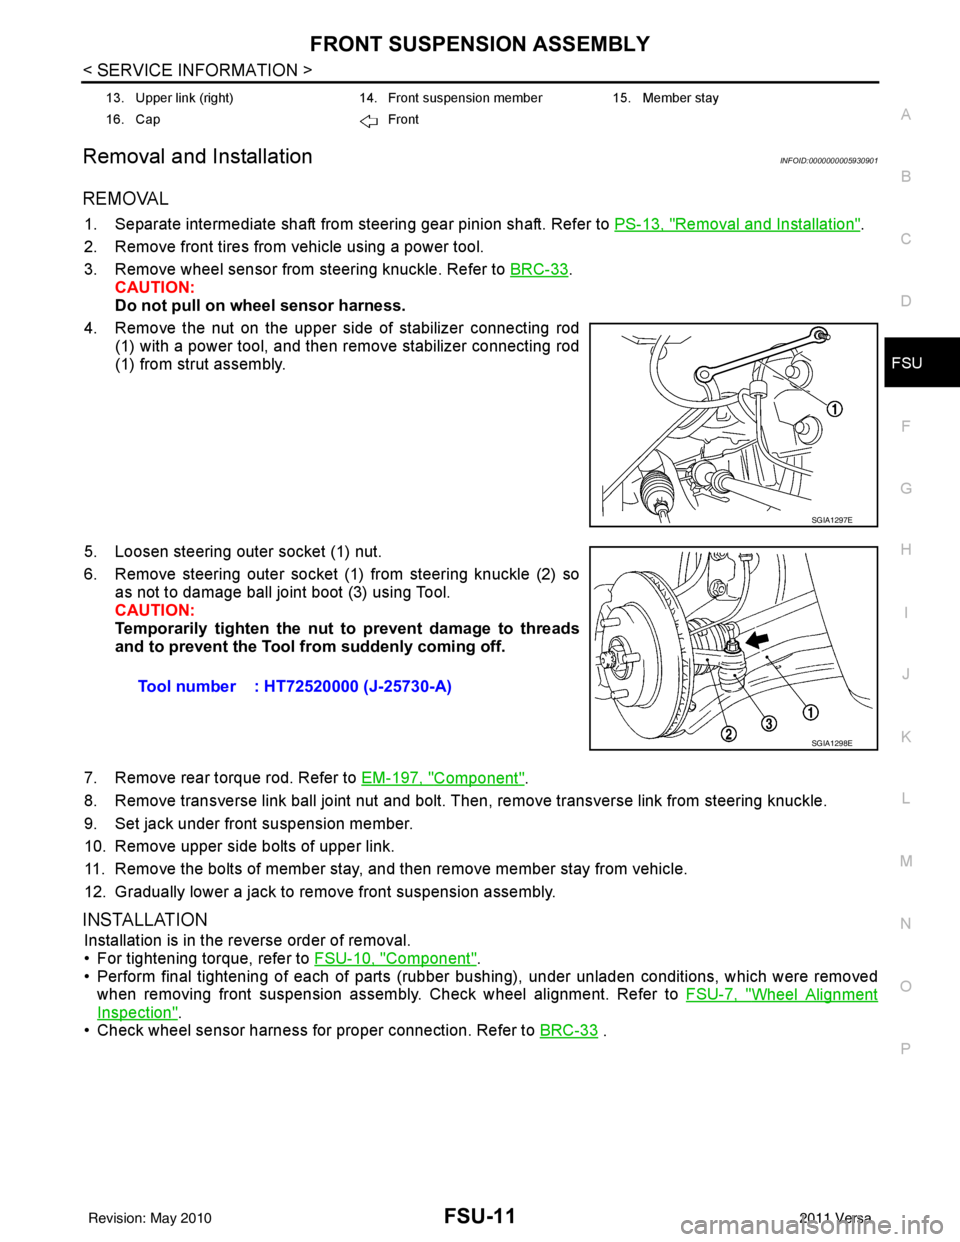
4. Remove the nut on the upper side of stabilizer connecting rod (1) with a power tool, and then remove stabilizer connecting rod
(1) from strut assembly.
5. Loosen steering outer socket (1) nut.
6. Remove steering outer socket (1) from steering knuckle (2) so as not to damage ball joint boot (3) using Tool.
CAUTION:
Temporarily tighten the nut to prevent damage to threads
and to prevent the Tool fr om suddenly coming off.
7. Remove rear torque rod. Refer to EM-197, "
Component".
8. Remove transverse link ball joint nut and bolt. Then, remove transverse link from steering knuckle.
9. Set jack under front suspension member.
10. Remove upper side bolts of upper link.
11. Remove the bolts of member stay, and then remove member stay from vehicle.
12. Gradually lower a jack to remove front suspension assembly.
INSTALLATION
Installation is in the reverse order of removal.
• For tightening torque, refer to FSU-10, "
Component".
• Perform final tightening of each of parts (rubber bushing), under unladen conditions, which were removed when removing front suspension assembly. Check wheel alignment. Refer to FSU-7, "
Wheel Alignment
Inspection".
• Check wheel sensor harness for proper connection. Refer to BRC-33
.
13. Upper link (right)14. Front suspension member15. Member stay
16. Cap Front
SGIA1297E
Tool number : HT72520000 (J-25730-A)
SGIA1298E
Revision: May 2010 2011 Versa