2011 NISSAN LATIO Air cleaner
[x] Cancel search: Air cleanerPage 3185 of 3787

MA-14
< SERVICE INFORMATION >
RECOMMENDED FLUIDS AND LUBRICANTS
RECOMMENDED FLUIDS AND LUBRICANTS
Fluids and LubricantsINFOID:0000000005931134
*1: For further details, see “Engine Oil Recommendation”.
*2: If Genuine NISSAN gear oil is not available, API GL-4, Viscosity SAE 75W-85 may also be used as a temporary replacement. How-
ever, use Genuine NISSAN gear oil as soon as it is available.
*3: If Genuine NISSAN ge ar oil is not available, API GL-4, Viscosity SAE 75W-80 may be used as a temporary replacement. However
use Genuine NISSAN gear oil as soon as it is available.
*4: If Genuine NISSAN Matic S ATF is not available, Genuine NISSIAN Matic D ATF may also be used. Using automatic transmission
other than Genuine NISSAN Matic S or Genuine NISSIAN Matic D ATF will cause deteri oration in driveability and automatic transmis-
sion durability, and may damage the automatic transmission, which is not covered by th e NISSAN new vehicle limited warranty.
*5: Use only Genuine NISSAN CVT Fluid NS-2. Using transmission fluid other than Genuine NISSAN CVT Fluid NS-2 will dam-
age the CVT, which is not covered by the NISSAN new vehicle limited warranty.
*6: Available in mainland U.S.A. through a NISSAN dealer.
*7: For further details, see “Air conditioner specification label”. Description
Capacity (Approximate)
Recommended Fluids/Lubricants
Liter US measure Imp measure
Fuel 50.0 13 1/4 gal 11 galUnleaded gasoline with an octane
rating of at least 87 AKI (RON 91)
Engine oil
Drain and refill With oil filter
change
HR16DE 3.0 3 1/8 qt 2 5/8 qt
• Engine oil with API Certification Mark *1
• Viscosity SAE 5W-30
MR18DE 4.1 4 3/8 qt 3 5/8 qt
Without oil
filter change HR16DE 2.8
3 qt 2 1/2 qt
MR18DE 3.9 4 1/8 qt 3 3/8 qt
Dry engine (engine overhaul) HR16DE 3.5 3 3/4 qt 3 1/8 qt
MR18DE 4.9 5 1/8 qt 4 3/8 qt
Cooling system
(with reservoir at max level) HR16DE 6.3 6 5/8 qt 5 1/2 qt Genuine NISSAN Long Life Anti-
freeze / Coolant (blue) or equivalent
MR18DE 6.8 7 1/4 qt 6 qt
Manual transaxle fluid (MTF) 5MT
2.6 5 1/2 pt 4 5/8 pt Genuine NISSAN Manual Transmis-
sion Fluid (MTF) HQ Multi 75W-85 or
equivalent*2
6MT 2.0 4 1/4 pt 3 1/2 pt Genuine NISSAN gear oil (Chevron
Texaco ETL8997B) 75W-80, or
equivalent *3
Automatic transaxle fluid (ATF) HR16DE 7.7 8 1/8 qt 6 3/4 qt
Genuine NISSAN Matic S ATF*4
MR18DE 7.9 8 3/8 qt 7 qt
CVT fluid RE0F08B 6.9 7 1/4 qt 6 1/8 qt Genuine NISSAN CVT Fluid NS-2 *5
Brake and clutch fluid ———Genuine NISSAN Super Heavy Duty
Brake Fluid*6 or equivalent DOT 3
(US FMVSS No. 116)
Multi-purpose grease ——— NLGI No. 2 (Lithium soap base)
Windshield washer fluid 4.5 4 3/4 qt 4 qtGenuine NISSAN Windshield Wash-
er Concentrate Cleaner & Anti-
Freeze or equivalent
Air conditioning system refrigerant 0.45 ± 0.05 kg 0.99 ± 0.11 lb 0.99 ± 0.11 lb HFC-134a (R-134a) *7
Air conditioning system oil MR18DE -
Typ e 1
and
HR16DE
120 m
4.1 fl oz 4.2 fl oz A/C System Oil Type R (DH-PR) *7
MR18DE -
Typ e 2 100 m
3.4 fl oz 3.5 fl oz A/C System Oil Type S (DH-PS)*7
Revision: May 2010
2011 Versa
Page 3190 of 3787
ENGINE MAINTENANCE (HR16DE)MA-19
< SERVICE INFORMATION >
C
DE
F
G H
I
J
K
M A
B
MA
N
O P
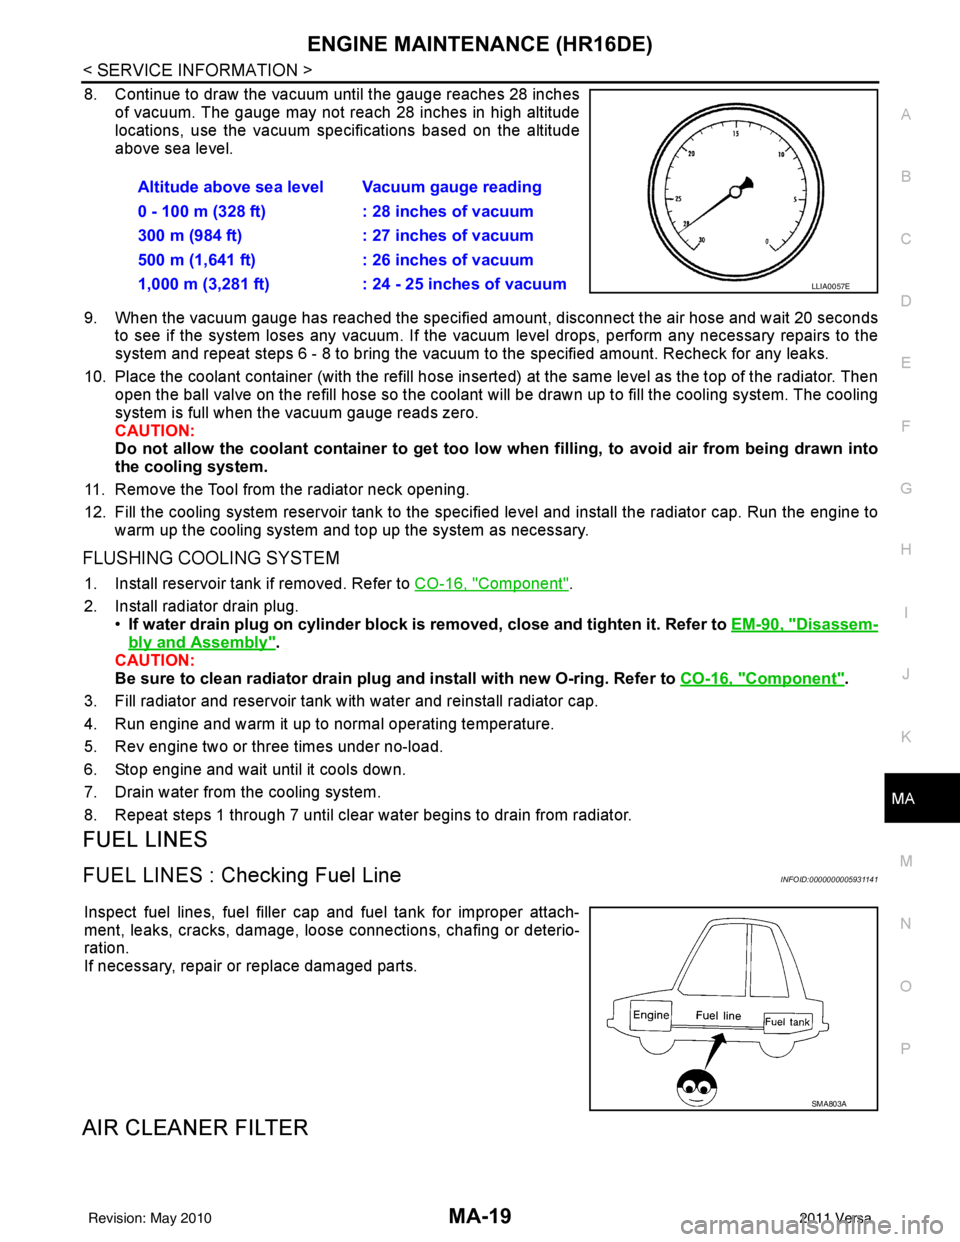
8. Continue to draw the vacuum until the gauge reaches 28 inches of vacuum. The gauge may not reach 28 inches in high altitude
locations, use the vacuum specifications based on the altitude
above sea level.
9. When the vacuum gauge has reached the specified amount, disconnect the air hose and wait 20 seconds
to see if the system loses any vacuum. If the vacuum level drops, perform any necessary repairs to the
system and repeat steps 6 - 8 to br ing the vacuum to the specified amount. Recheck for any leaks.
10. Place the coolant container (with the refill hose inserted) at the same level as the top of the radiator. Then
open the ball valve on the refill hose so the coolant will be drawn up to fill the cooling system. The cooling
system is full when the vacuum gauge reads zero.
CAUTION:
Do not allow the coolant container to get too low when filling, to avoid air from being drawn into
the cooling system.
11. Remove the Tool from the radiator neck opening.
12. Fill the cooling system reservoir tank to the specif ied level and install the radiator cap. Run the engine to
warm up the cooling system and top up the system as necessary.
FLUSHING COOLING SYSTEM
1. Install reservoir tank if removed. Refer to CO-16, "Component".
2. Install radiator drain plug. •If water drain plug on cylinder block is removed, close and tighten it. Refer to EM-90, "
Disassem-
bly and Assembly".
CAUTION:
Be sure to clean radiator drain plug and install with new O-ring. Refer to CO-16, "
Component".
3. Fill radiator and reservoir tank with water and reinstall radiator cap.
4. Run engine and warm it up to normal operating temperature.
5. Rev engine two or three times under no-load.
6. Stop engine and wait until it cools down.
7. Drain water from the cooling system.
8. Repeat steps 1 through 7 until clear water begins to drain from radiator.
FUEL LINES
FUEL LINES : Checking Fuel LineINFOID:0000000005931141
Inspect fuel lines, fuel filler cap and fuel tank for improper attach-
ment, leaks, cracks, damage, loos e connections, chafing or deterio-
ration.
If necessary, repair or replace damaged parts.
AIR CLEANER FILTER
Altitude above sea level Vacuum gauge reading
0 - 100 m (328 ft) : 28 inches of vacuum
300 m (984 ft) : 27 inches of vacuum
500 m (1,641 ft) : 26 inches of vacuum
1,000 m (3,281 ft) : 24 - 25 inches of vacuum
LLIA0057E
SMA803A
Revision: May 2010 2011 Versa
Page 3191 of 3787
MA-20
< SERVICE INFORMATION >
ENGINE MAINTENANCE (HR16DE)
AIR CLEANER FILTER : Removal and Installation
INFOID:0000000005931142
REMOVAL
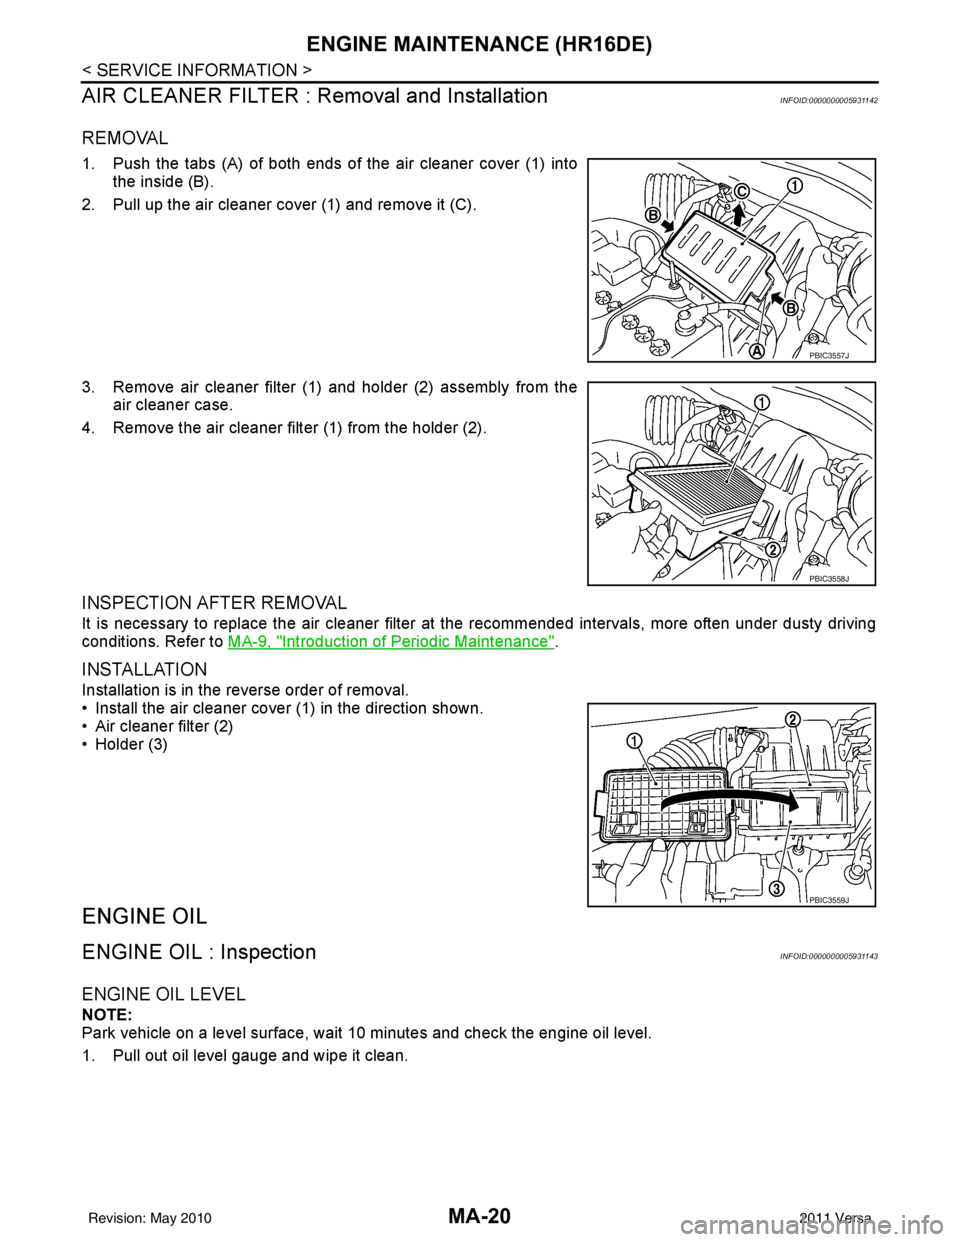
1. Push the tabs (A) of both ends of the air cleaner cover (1) into the inside (B).
2. Pull up the air cleaner cover (1) and remove it (C).
3. Remove air cleaner filter (1) and holder (2) assembly from the air cleaner case.
4. Remove the air cleaner filter (1) from the holder (2).
INSPECTION AFTER REMOVAL
It is necessary to replace the air cleaner filter at the recommended intervals, more often under dusty driving
conditions. Refer to MA-9, "
Introduction of Periodic Maintenance".
INSTALLATION
Installation is in the reverse order of removal.
• Install the air cleaner cover (1) in the direction shown.
• Air cleaner filter (2)
• Holder (3)
ENGINE OIL
ENGINE OIL : InspectionINFOID:0000000005931143
ENGINE OIL LEVEL
NOTE:
Park vehicle on a level surface, wait 10 minutes and check the engine oil level.
1. Pull out oil level gauge and wipe it clean.
PBIC3557J
PBIC3558J
PBIC3559J
Revision: May 2010 2011 Versa
Page 3195 of 3787
MA-24
< SERVICE INFORMATION >
ENGINE MAINTENANCE (HR16DE)
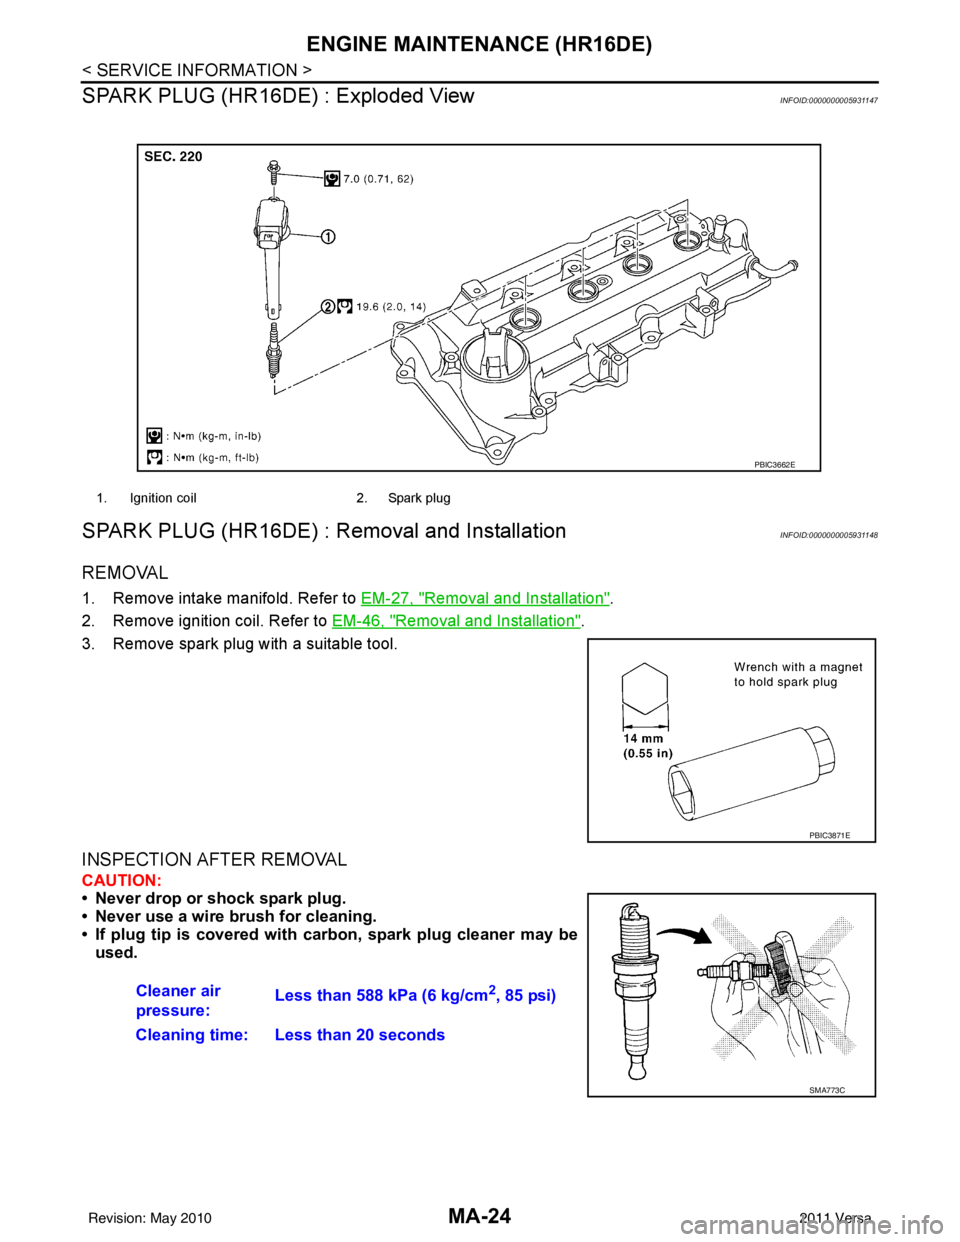
SPARK PLUG (HR16DE) : Exploded View
INFOID:0000000005931147
SPARK PLUG (HR16DE) : Removal and InstallationINFOID:0000000005931148
REMOVAL
1. Remove intake manifold. Refer to EM-27, "Removal and Installation".
2. Remove ignition coil. Refer to EM-46, "
Removal and Installation".
3. Remove spark plug with a suitable tool.
INSPECTION AFTER REMOVAL
CAUTION:
• Never drop or shock spark plug.
• Never use a wire brush for cleaning.
• If plug tip is covered with carbon, spark plug cleaner may be used.
1. Ignition coil 2. Spark plug
PBIC3662E
PBIC3871E
Cleaner air
pressure:Less than 588 kPa (6 kg/cm2, 85 psi)
Cleaning time: Less than 20 seconds
SMA773C
Revision: May 2010 2011 Versa
Page 3200 of 3787
ENGINE MAINTENANCE (MR18DE)MA-29
< SERVICE INFORMATION >
C
DE
F
G H
I
J
K
M A
B
MA
N
O P
CAUTION:
Be sure to clean radiator drain plug and install with new O-ring. Refer to CO-40, "
Component".
3. Fill radiator and reservoir tank with water and reinstall radiator cap.
4. Run engine and warm it up to normal operating temperature.
5. Rev engine two or three times under no-load.
6. Stop engine and wait until it cools down.
7. Drain water from the cooling system.
8. Repeat steps 1 through 7 until clear water begins to drain from radiator.
FUEL LINES
FUEL LINES : Checking Fuel LineINFOID:0000000005931155
Inspect fuel lines, fuel filler cap and fuel tank for improper attach-
ment, leaks, cracks, damage, loos e connections, chafing or deterio-
ration.
If necessary, repair or replace damaged parts.
AIR CLEANER FILTER
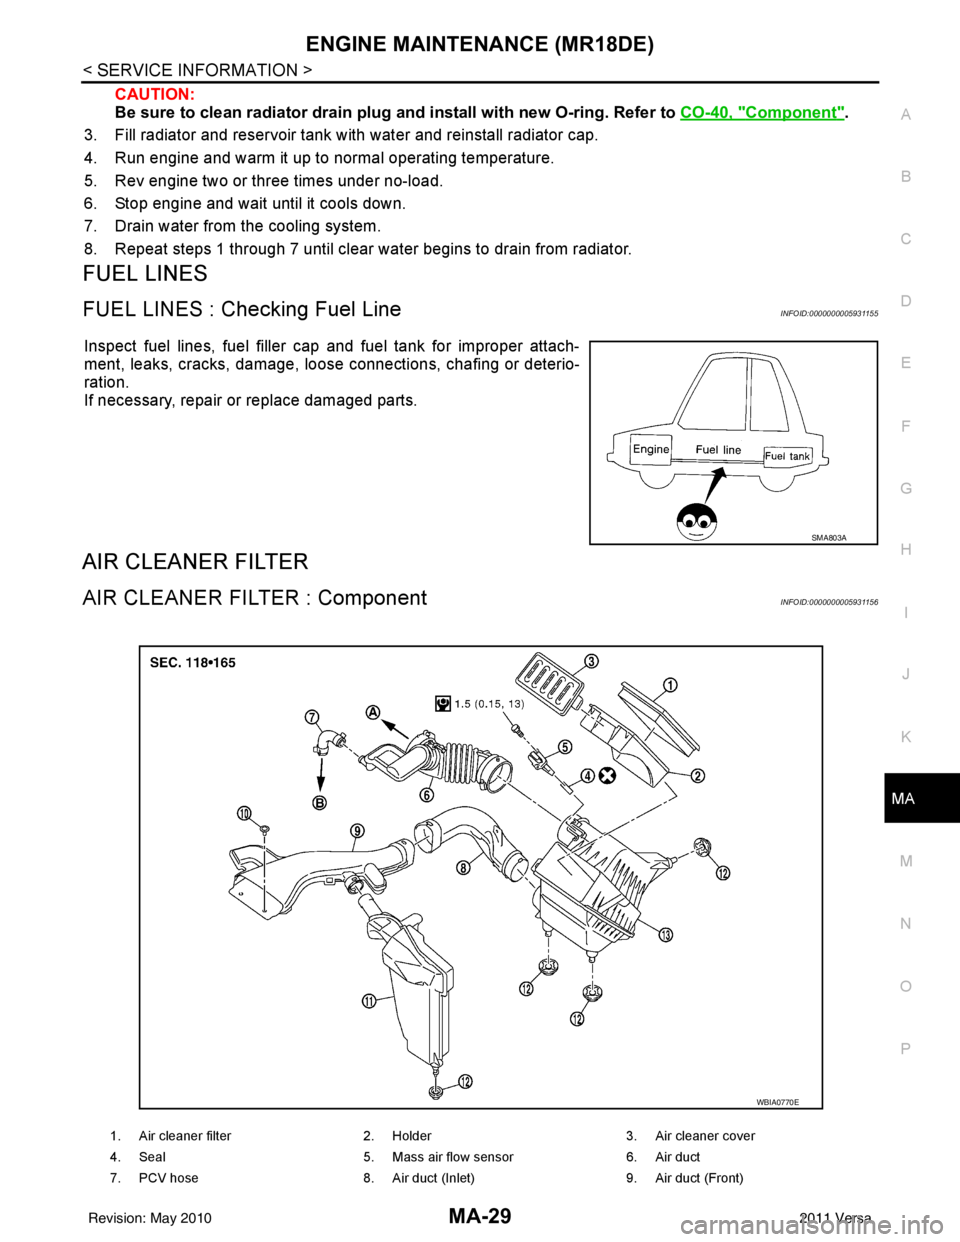
AIR CLEANER FILTER : ComponentINFOID:0000000005931156
SMA803A
1. Air cleaner filter 2. Holder 3. Air cleaner cover
4. Seal 5. Mass air flow sensor 6. Air duct
7. PCV hose 8. Air duct (Inlet) 9. Air duct (Front)
WBIA0770E
Revision: May 2010 2011 Versa
Page 3201 of 3787
MA-30
< SERVICE INFORMATION >
ENGINE MAINTENANCE (MR18DE)
AIR CLEANER FILTER : Changing Air Cleaner Filter
INFOID:0000000005931157
REMOVAL
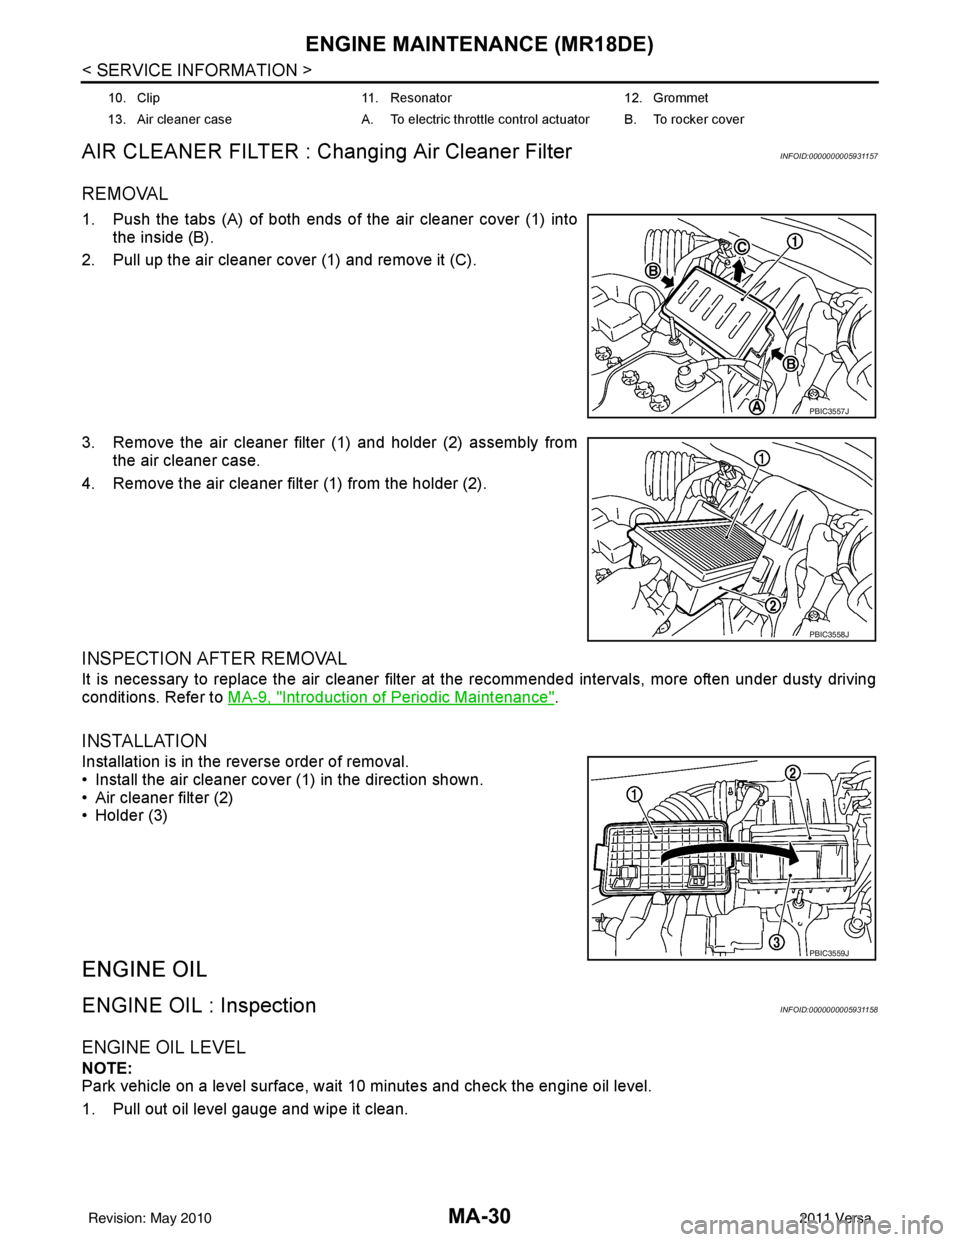
1. Push the tabs (A) of both ends of the air cleaner cover (1) into the inside (B).
2. Pull up the air cleaner cover (1) and remove it (C).
3. Remove the air cleaner filter (1) and holder (2) assembly from the air cleaner case.
4. Remove the air cleaner filter (1) from the holder (2).
INSPECTION AFTER REMOVAL
It is necessary to replace the air cleaner filter at the recommended intervals, more often under dusty driving
conditions. Refer to MA-9, "
Introduction of Periodic Maintenance".
INSTALLATION
Installation is in the reverse order of removal.
• Install the air cleaner cover (1) in the direction shown.
• Air cleaner filter (2)
• Holder (3)
ENGINE OIL
ENGINE OIL : InspectionINFOID:0000000005931158
ENGINE OIL LEVEL
NOTE:
Park vehicle on a level surface, wait 10 minutes and check the engine oil level.
1. Pull out oil level gauge and wipe it clean.
10. Clip 11. Resonator 12. Grommet
13. Air cleaner case A. To electric throttle control actuator B. To rocker cover
PBIC3557J
PBIC3558J
PBIC3559J
Revision: May 2010 2011 Versa
Page 3206 of 3787
ENGINE MAINTENANCE (MR18DE)MA-35
< SERVICE INFORMATION >
C
DE
F
G H
I
J
K
M A
B
MA
N
O P
SPARK PLUG : Removal and InstallationINFOID:0000000005931162
REMOVAL
1. Remove intake manifold. Refer to EM-137.
2. Remove ignition coil. CAUTION:
• Handle ignition coil car efully and avoid impacts.
• Never disassemble.
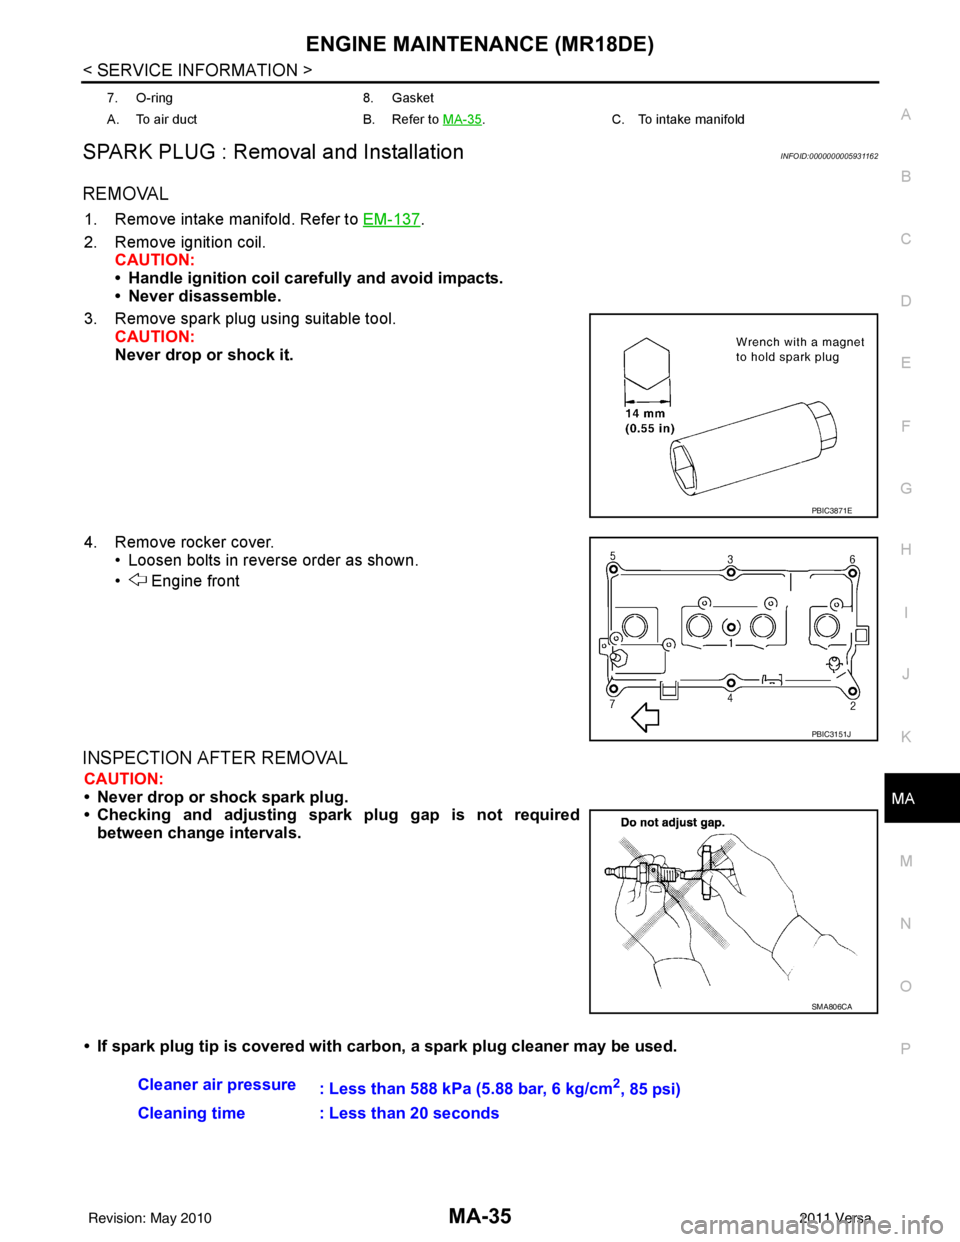
3. Remove spark plug using suitable tool. CAUTION:
Never drop or shock it.
4. Remove rocker cover. • Loosen bolts in reverse order as shown.
• Engine front
INSPECTION AFTER REMOVAL
CAUTION:
• Never drop or shock spark plug.
• Checking and adjusting spar k plug gap is not required
between change intervals.
• If spark plug tip is covered with carbon, a spark plug cleaner may be used.
7. O-ring8. Gasket
A. To air duct B. Refer to MA-35
.C. To intake manifold
PBIC3871E
PBIC3151J
SMA806CA
Cleaner air pressure
: Less than 588 kPa (5.88 bar, 6 kg/cm2, 85 psi)
Cleaning time : Less than 20 seconds
Revision: May 2010 2011 Versa
Page 3235 of 3787
![NISSAN LATIO 2011 Service Repair Manual MT-14
< SERVICE INFORMATION >[RS5F91R]
CONTROL LINKAGE
CONTROL LINKAGE
Exploded ViewINFOID:0000000005929667
Removal and InstallationINFOID:0000000005929668
REMOVAL
1. Remove the battery. Refer to
SC- NISSAN LATIO 2011 Service Repair Manual MT-14
< SERVICE INFORMATION >[RS5F91R]
CONTROL LINKAGE
CONTROL LINKAGE
Exploded ViewINFOID:0000000005929667
Removal and InstallationINFOID:0000000005929668
REMOVAL
1. Remove the battery. Refer to
SC-](/manual-img/5/57357/w960_57357-3234.png)
MT-14
< SERVICE INFORMATION >[RS5F91R]
CONTROL LINKAGE
CONTROL LINKAGE
Exploded ViewINFOID:0000000005929667
Removal and InstallationINFOID:0000000005929668
REMOVAL
1. Remove the battery. Refer to
SC-7, "Removal and Installation".
2. Remove the air duct and air cleaner case. Refer to EM-25, "
Removal and Installation" .
3. Press the release button (1) of select cable and shift selector
cable, and then remove select cable and shift selector cable
from select lever of control shaft (2).
4. Move shift selector to neutral position.
5. Remove shift selector handle.
6. Remove center console assembly. Refer to IP-12, "
Removal and
Installation".
7. Remove M/T shift selector assembly bolts.
8. Remove exhaust front tube, center muffler and heat plate. Refer to EX-5, "
Removal and Installation".
9. Remove cable support bracket.
10. Remove select cable and shift select or cable from cable mounting bracket.
11. Remove M/T shift selector assembly from the vehicle.
INSTALLATION
Installation is in the reverse order of removal.
1. Shift selector handle 2. Shift selector lever 3. M/T shift selector assembly
4. Select cable 5. Shift selector cable6. Clutch housing
7. Cable mounting bracket 8. Bracket
A: Black color B: White color
PCIB1508E
SCIA7077E
Revision: May 2010 2011 Versa