Page 57 of 312
![NISSAN GT-R 2011 Owners Manual Black plate (55,1)
Model "R35-N" EDITED: 2009/ 10/ 30
INFO:
To select a category by directly inputting the
category name, highlight [Category Search]
and push <ENTER> . The category name
input screen NISSAN GT-R 2011 Owners Manual Black plate (55,1)
Model "R35-N" EDITED: 2009/ 10/ 30
INFO:
To select a category by directly inputting the
category name, highlight [Category Search]
and push <ENTER> . The category name
input screen](/manual-img/5/58175/w960_58175-56.png)
Black plate (55,1)
Model "R35-N" EDITED: 2009/ 10/ 30
INFO:
To select a category by directly inputting the
category name, highlight [Category Search]
and push . The category name
input screen is displayed.
6. Highlight the subcategory and push
TER>.
INFO:
Subcategories may not exist depending on
the category that is selected.
7. Enter the name of the destination facility and highlight [List], and then push .
The facility list is displayed.
INFO:
. It is not necessary to enter the facility
name completely. It is also possible to
display the list screen only by high-
lighting [List] without entering the facility
name and pushing .
. The number of narrowed down points
are displayed in the “Matches” column.
. Up to two keywords (part of the facility
name) can be entered by highlighting
[AND Search] and pushing after entering the first facility name.
INFO:
The facility name can also be entered
directly by highlighting [Choose Name] on
the main category list screen and pushing
.
8. Highlight the preferred destination from the
list, and push .
Navigation
2-29
Page 58 of 312
![NISSAN GT-R 2011 Owners Manual Black plate (56,1)
Model "R35-N" EDITED: 2009/ 10/ 30
INFO:
. By highlighting [Sort] and pushing <EN-
TER>, options can be sorted from [By
Name] or [By Dist.]. When selecting [By
Dist.], the position NISSAN GT-R 2011 Owners Manual Black plate (56,1)
Model "R35-N" EDITED: 2009/ 10/ 30
INFO:
. By highlighting [Sort] and pushing <EN-
TER>, options can be sorted from [By
Name] or [By Dist.]. When selecting [By
Dist.], the position](/manual-img/5/58175/w960_58175-57.png)
Black plate (56,1)
Model "R35-N" EDITED: 2009/ 10/ 30
INFO:
. By highlighting [Sort] and pushing
TER>, options can be sorted from [By
Name] or [By Dist.]. When selecting [By
Dist.], the position of the selected
location is displayed in the preview on
the right side of the screen.
. In some cases, when a facility name has
been entered, the number of matching
destinations in the “Matches” column
may be different from the number dis-
played on the list screen. If this occurs,
enter more characters to further reduce
the number of matches.
. The search conditions can be changed
by highlighting [Refine].
9. The entire route is shown on the map.
Highlight [Start] after confirming the location
of the displayed destination and push
. The system sets the destination to the selected location and starts calculat-
ing a route.
INFO:
Even after setting a destination, the location
of the destination can be adjusted, the route
can be stored, etc.“PROCEDURESAFTERSETTING
DESTINATION” page 2-43
Searching for restaurant using
ZAGAT1. Push .
2. Highlight [Places] and push .
3. Highlight [ZAGAT] and push .4. Highlight the preferred state and push
. A list screen is displayed.
2-30
Navigation
Page 59 of 312
Black plate (57,1)
Model "R35-N" EDITED: 2009/ 10/ 30
5. Highlight the preferred city and push
TER>. A list screen is displayed.6. Highlight [RESTAURANT] and push
TER>. A list screen is displayed.
7. Highlight the preferred category and push . A list screen is displayed.8. Highlight the preferred sorting order and
push . A list screen is displayed.
9. Highlight the preferred destination facility
from the list, and then push .
INFO:
. By highlighting [Sort] and pushing
TER>, sorting options can be selected
to re-sort the list.
. The search conditions can be changed
by highlighting [Refine].
. By highlighting [Ratings] and pushing
, an explanation of the ZA-
GAT ratings can be displayed.
Navigation
2-31
Page 60 of 312
![NISSAN GT-R 2011 Owners Manual Black plate (58,1)
Model "R35-N" EDITED: 2009/ 10/ 30
10. The entire route is shown on the map.Highlight [Start] after confirming the location
of the displayed destination and pushing
<ENTER> . The sy NISSAN GT-R 2011 Owners Manual Black plate (58,1)
Model "R35-N" EDITED: 2009/ 10/ 30
10. The entire route is shown on the map.Highlight [Start] after confirming the location
of the displayed destination and pushing
<ENTER> . The sy](/manual-img/5/58175/w960_58175-59.png)
Black plate (58,1)
Model "R35-N" EDITED: 2009/ 10/ 30
10. The entire route is shown on the map.Highlight [Start] after confirming the location
of the displayed destination and pushing
. The system sets the destination
to the selected location and starts calculat-
ing a route.
INFO:
Even after setting a destination, the location
of the destination can be adjusted, the route
can be stored, etc.“PROCEDURES AFTER SETTING
DESTINATION” page 2-43
*C2009 Zagat Survey, LLC. Zagat Survey is a
registered trademark of Zagat Survey, LLC.SETTING HOME AS DESTINATIONThe home location can be set as the destination
to which the system calculates a route. This
function is especially useful when searching for
a route to return to the home location.1. Push .
2. Highlight [Home] and push .
3. The home location is displayed, and the
systemsetsthehomelocationasthe
destination.
INFO:
If the home location is not stored yet, the
system will automatically display a screen for
storing it.“STORING LOCATION” page 2-71
4. The entire route to the home location is shown on the map. Highlight [Start] after
confirming the location of the displayed
destination, and push .The
system sets the destination to the selected
location and starts calculating a route.
Setting by voice command
1. Push <
>located on the steering wheel.
2. After the tone sounds, speak a command.
2-32
Navigation
Page 61 of 312

Black plate (59,1)
Model "R35-N" EDITED: 2009/ 10/ 30
To set the home location as the destination:
“Navigation” “Home” (Standard Mode)
“Home” (Alternate Command Mode)SEARCHING FROM ADDRESS
BOOKStoring frequently used destinations in the
Address Book makes it easy for the system to
set and calculate a route. To utilize this function
more effectively, destinations that are often
traveled to should be stored in advance.1. Push.
2. Highlight [Address Book] and push
TER>. A list screen is displayed.
3. Highlight the preferred location from the list and push .
INFO:
Selecting [Sort] displays a list of various sort
functions. To use the sort functions, stored
locations must be set in advance.“STORING LOCATION” page 2-71
INFO:
. Sorted By Number:
The Address Book entries are displayed
in ascending numerical order.
. Sorted By Name:
The Address Book entries are displayed
in alphabetic order.
. Sorted By Icon:
By selecting a particular icon, a list that
contains only the Address Book entries
associated with that icon is displayed.
. Sorted By Group:
By selecting a particular group (family,
friends, leisure, etc.) , the selected group
is displayed at the top of the list.
4. The entire route is shown on the map. Highlight [Start] after confirming the location
of the displayed dest ination, and push
. The system sets the destination
Navigation
2-33
Page 62 of 312

Black plate (60,1)
Model "R35-N" EDITED: 2009/ 10/ 30
to the selected location and starts calculat-
ing a route.
INFO:
Even after setting a destination, the location of
the destination can be adjusted, the route can
be stored, etc.“PROCEDURES AFTER SETTING DES-
TINATION” page 2-43Setting by voice command
1. Push <
>located on the steering wheel.
2. After the tone sounds, speak a command.
To set the destination from the Address Book:
“Navigation” “Address Book” (Standard Mode)
“Address book” (Alternate Command Mode)
SETTING PREVIOUS DESTINATIONIt is possible to set the destination to a location
that has been previously set as a destination and
have the system calculate a route. Up to 300
previous destinations will be automatically
stored.
If the number of previous destinations exceeds
300, the oldest one will be replaced by the
newest one.1. Push .
2. Highlight [Previous Destinations] and push . A list screen is displayed.
3. Highlight the preferred destination from the
list and push .
INFO:
The list can be sorted by selecting [By Date]
or [By Name]. Highlight [By Date] to sort the
list in chronological order. Highlight [By
Name] to sort the list in alphabetical order.
4. The entire route is shown on the map. Highlight [Start] after confirming the location
2-34
Navigation
Page 63 of 312

Black plate (61,1)
Model "R35-N" EDITED: 2009/ 10/ 30
of the displayed destination, and push
. The system sets the destination
to the selected location and starts calculat-
ing a route.
INFO:
Even after setting a destination, the location of
the destination can be adjusted, the route can
be stored, etc.“PROCEDURES AFTER SETTING DES-
TINATION” page 2-43Setting by voice command
1. Push <
>located on the steering wheel.
2. After the tone sounds, speak a command.
To display the previous destinations list:
“Navigation” “Previous Destinations” (Standard
Mode)
“Previous Destinations” (Alternate Command
Mode)
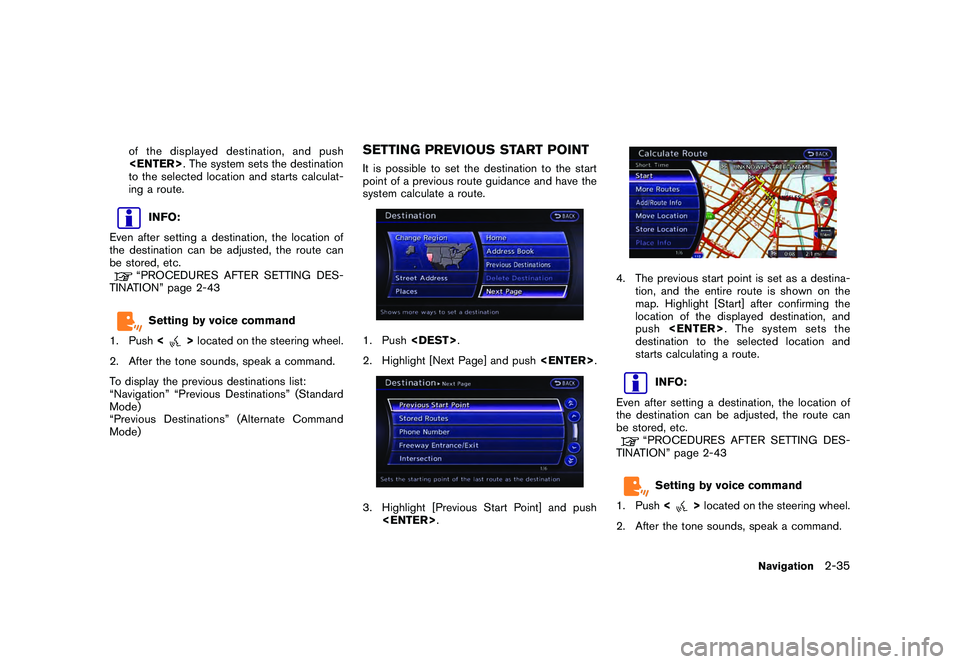
SETTING PREVIOUS START POINTIt is possible to set the destination to the start
point of a previous route guidance and have the
system calculate a route.1. Push .
2. Highlight [Next Page] and push .3. Highlight [Previous Start Point] and push
.
4. The previous start point is set as a destina-
tion, and the entire route is shown on the
map. Highlight [Start] after confirming the
location of the displayed destination, and
push . The system sets the
destination to the selected location and
starts calculating a route.
INFO:
Even after setting a destination, the location of
the destination can be adjusted, the route can
be stored, etc.“PROCEDURES AFTER SETTING DES-
TINATION” page 2-43Setting by voice command
1. Push <
>located on the steering wheel.
2. After the tone sounds, speak a command.
Navigation
2-35
Page 64 of 312

Black plate (62,1)
Model "R35-N" EDITED: 2009/ 10/ 30
To set a previous start point as the destination:
“Previous Start Point” (Alternate Command
Mode)SETTING FROM STORED ROUTESIt is possible to select a preferred route from the
stored routes.1. Push.
2. Highlight [Next Page] and push .3. Highlight [Stored Routes] and push . A list screen is displayed.
4. Highlight the preferred route from the list
and push . The route to the
destination is set.5. The entire route is shown on the map. Highlight [Start] after confirming the location
of the displayed dest ination, and push
. The system sets the destination
to the selected location and starts calculat-
ing a route.
INFO:
. Even after setting a destination, the location
of the destination can be adjusted, the
location can be stored, etc.“PROCEDURES AFTER SETTING
DESTINATION” page 2-43
. The stored route includes only locations
(destination and waypoints) and route cal-
culation conditions, not the route itself.
Therefore, when the destination is set using
a stored route, a different route may be
suggested if the current vehicle location is
different from the one when the route was
stored.
SETTING BY PHONE NUMBERIf the phone number of a facility is known, it is
possible to search for a facility by entering the
phone number, and have the system calculate a
route.
INFO:
. Telephone numbers that were stored for
stored destinations can also be used.
. If the area code of the specified telephone
number does not exist in the map data, the
system cannot search for the location.
. Only the locations included in the database
in the map data can be searched by the
2-36
Navigation