2011 NISSAN CUBE ECO mode
[x] Cancel search: ECO modePage 268 of 345
Black plate (266,1)
Model "Z12-D" EDITED: 2010/ 9/ 27
In order to maintain the appearance of your
vehicle, it is important to take proper care of it.
To protect the paint surfaces, wash your vehicle
as soon as you can:
.after a rainfall to prevent possible damage
from acid rain
. after driving on coastal roads
. when contaminants such as soot, bird
droppings, tree sap, metal particles or bugs
get on the paint surface
. when dust or mud builds up on the surface
Whenever possible, store or park your vehicle
inside a garage or in a covered area.
When it is necessary to park outside, park in a
shady area or protect the vehicle with a body
cover.
Be careful not to scratch the paint surface
when putting on or removing the body
cover.WASHINGWash dirt off the vehicle with a wet sponge and
plenty of water. Clean the vehicle thoroughly
using a mild soap, a special vehicle soap or
general purpose dishwashing liquid mixed with
clean, lukewarm (never hot) water.
CAUTION
. Do not use car washes that use acid
in the detergent. Some car washes,
especially brushless ones, use some
acid for cleaning. The acid may react
with some plastic vehicle compo-
nents, causing them to crack. This
could affect their appearance, and
also could cause them not to func-
tion properly. Always check with
your car wash to confirm that acid
is not used.
. Do not wash the vehicle with strong
household soap, strong chemical
detergents, gasoline or solvents.
. Do not wash the vehicle in direct
sunlight or while the vehicle body is
hot, as the surface may become
water-spotted.
. Avoid using tight-napped or rough
cloths, such as washing mitts. Care
must be taken when removing
caked-on dirt or other foreign sub-
stances so the paint surface is not
scratched or damaged.
Rinse the vehicle thoroughly with plenty of clean
water. Inside flanges, seams and folds on the doors,
hatches and hood are particularly vulnerable to
the effects of road salt. Therefore, these areas
must be regularly cleaned. Make sure that the
drain holes in the lower edge of the door are
open. Spray water under the body and in the
wheel wells to loosen the dirt and wash away
road salt.
Avoid leaving water spots on the paint surface
by using a damp chamois to dry the vehicle.
CLEANING EXTERIOR7-2
Appearance and care
Page 269 of 345
Black plate (267,1)
Model "Z12-D" EDITED: 2010/ 9/ 27
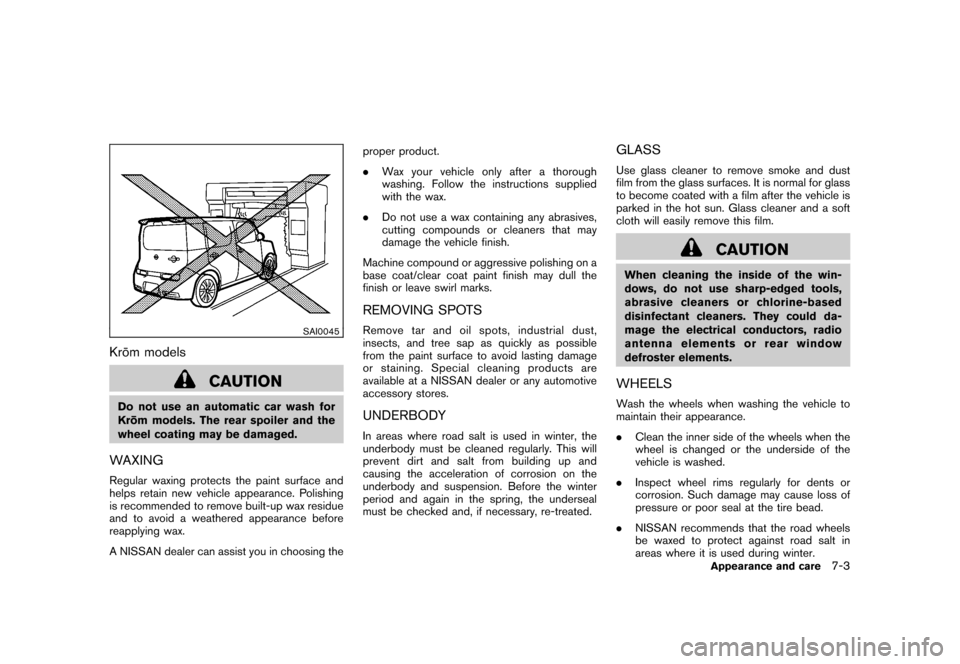
SAI0045
Kro¯
m models
CAUTION
Do not use an automatic car wash for
Kro ¯
m models. The rear spoiler and the
wheel coating may be damaged.WAXINGRegular waxing protects the paint surface and
helps retain new vehicle appearance. Polishing
is recommended to remove built-up wax residue
and to avoid a weathered appearance before
reapplying wax.
A NISSAN dealer can assist you in choosing the proper product.
.
Wax your vehicle only after a thorough
washing. Follow the instructions supplied
with the wax.
. Do not use a wax containing any abrasives,
cutting compounds or cleaners that may
damage the vehicle finish.
Machine compound or aggressive polishing on a
base coat/clear coat paint finish may dull the
finish or leave swirl marks.
REMOVING SPOTSRemove tar and oil spots, industrial dust,
insects, and tree sap as quickly as possible
from the paint surface to avoid lasting damage
or staining. Special cleaning products are
available at a NISSAN dealer or any automotive
accessory stores.UNDERBODYIn areas where road salt is used in winter, the
underbody must be cleaned regularly. This will
prevent dirt and salt from building up and
causing the acceleration of corrosion on the
underbody and suspension. Before the winter
period and again in the spring, the underseal
must be checked and, if necessary, re-treated.
GLASSUse glass cleaner to remove smoke and dust
film from the glass surfaces. It is normal for glass
to become coated with a film after the vehicle is
parked in the hot sun. Glass cleaner and a soft
cloth will easily remove this film.
CAUTION
When cleaning the inside of the win-
dows, do not use sharp-edged tools,
abrasive cleaners or chlorine-based
disinfectant cleaners. They could da-
mage the electrical conductors, radio
antenna elements or rear window
defroster elements.WHEELSWash the wheels when washing the vehicle to
maintain their appearance.
. Clean the inner side of the wheels when the
wheel is changed or the underside of the
vehicle is washed.
. Inspect wheel rims regularly for dents or
corrosion. Such damage may cause loss of
pressure or poor seal at the tire bead.
. NISSAN recommends that the road wheels
be waxed to protect against road salt in
areas where it is used during winter.
Appearance and care
7-3
Page 270 of 345
Black plate (268,1)
Model "Z12-D" EDITED: 2010/ 9/ 27
CAUTION
Do not use abrasive cleaners when
washing the wheels.Aluminum alloy wheelsWash regularly with a sponge dampened in a
mild soap solution, especially during winter
months in areas where road salt is used. Salt
could discolor the wheels if not removed.
CAUTION
Follow the directions below to avoid
staining or discoloring the wheels:
.Do not use a cleaner that uses
strong acid or alkali contents to
clean the wheels.
. Do not apply wheel cleaners to the
wheels when they are hot. The
wheel temperature should be the
same as ambient temperature.
. Rinse the wheel to completely re-
move the cleaner within 15 minutes
after the cleaner is applied.Wheels for Kro ¯
m modelsThe wheels on Kro ¯
m models use a different
coating process than typical aluminum alloy wheel and they are not plated wheels. These
wheels are clear-coated and require the follow-
ing special cleaning. They should be regularly
washed with a soft sponge soaked in a lot of
water. After washing with water, wipe clean with
a dry, soft cloth and dry completely. When there
is chemical or tire wax, or dirt such as an anti-
freeze agent on the surface, wash them with
water as soon as possible.
CAUTION
.
The surfaces of the wheels use a
different coating process than typi-
cal aluminum alloy wheels. Do not
use aluminum alloy wheel cleaners
or abrasive cleaners to clean the
wheels. Using such cleaners could
damage the wheel surfaces.
. Do not use an automatic car wash
for Kro ¯
m models. The wheel coating
may be damaged.
. Do not use a brush to wash the
wheels on Kro ¯
m models. The wheel
coating may be damaged.CHROME PARTSClean chrome parts regularly with a non-
abrasive chrome polish to maintain the finish.
TIRE DRESSINGNISSAN does not recommend the use of tire
dressings. Tire manufacturers apply a coating to
the tires to help reduce discoloration of the
rubber. If a tire dressing is applied to the tires, it
may react with the coating and form a com-
pound. This compound may come off the tire
while driving and stain the vehicle paint.
If you choose to use a tire dressing, take the
following precautions:
. Use a water-based tire dressing. The coat-
ing on the tire dissolves more easily with an
oil-based tire dressing.
. Apply a light coat of tire dressing to help
prevent it from entering the tire tread/
grooves (where it would be difficult to
remove) .
. Wipe off excess tire dressing using a dry
towel. Make sure the tire dressing is
completely removed from the tire tread/
grooves.
. Allow the tire dressing to dry as recom-
mended by tire dressing manufacturer.
7-4
Appearance and care
Page 271 of 345
Black plate (269,1)
Model "Z12-D" EDITED: 2010/ 9/ 27
Occasionally remove loose dust from the interior
trim, plastic parts and seats using a vacuum
cleaner or soft bristled brush. Wipe the vinyl and
leather surfaces with a clean, soft cloth dam-
pened in mild soap solution, then wipe clean
with a dry soft cloth.
Regular care and cleaning is required in order to
maintain the appearance of the leather.
Before using any fabric protector, read the
manufacturer’s recommendations. Some fabric
protectors contain chemicals that may stain or
bleach the seat material.
Use a cloth dampened only with water, to clean
the meter and gauge lens.
WARNING
Do not use water or acidic cleaners (hot
steam cleaners) on the seat. This can
damage the seat or occupant classifica-
tion sensors. This can also affect the
operation of the air bag system and
result in serious personal injury.
CAUTION
.Never use benzine, thinner, or any
similar material.
. Small dirt particles can be abrasive and damaging to the leather sur-
faces and should be removed
promptly. Do not use saddle soap,
car waxes, polishes, oils, cleaning
fluids, solvents, detergents or am-
monia-based cleaners as they may
damage the leather’s natural finish.
. Never use fabric protectors unless
recommended by the manufacturer.
. Do not use glass or plastic cleaner
on meter or gauge lens covers. It
may damage the lens cover.
AIR FRESHENERSMost air fresheners use a solvent that could
affect the vehicle interior. If you use an air
freshener, take the following precautions:
.Hanging-type air fresheners can cause
permanent discoloration when they contact
vehicle interior surfaces. Place the air
freshener in a location that allows it to hang
free and not contact an interior surface.
. Liquid-type air fresheners typically clip on
the vents. These products can cause
immediate damage and discoloration when
spilled on interior surfaces.
Carefully read and follow the manufacturer’s
instructions before using air fresheners.
FLOOR MATS
WARNING
To avoid potential pedal interference
that may result in a collision or injury:
. NEVER place a floor mat on top of
another floor mat in the driver front
position.
. Use only genuine NISSAN floor
mats specifically designed for use
in your vehicle model. See your
NISSAN dealer for more informa-
tion.
. Properly position the mats in the
floorwell using the floor mat posi-
tioning aid. See “Floor mat posi-
tioning aid (driver’s side only)” later
in this section.
The use of genuine NISSAN floor mats can
extend the life of your vehicle carpet and make it
easier to clean the interior. Mats should be
maintained with regular cleaning and replaced if
they become excessively worn.
CLEANING INTERIOR
Appearance and care
7-5
Page 276 of 345
Black plate (274,1)
Model "Z12-D" EDITED: 2010/ 9/ 27
Your new NISSAN has been designed to have
minimum maintenance requirements with long
service intervals to save you both time and
money. However, some day-to-day and regular
maintenance is essential to maintain your
NISSAN’s fine mechanical condition, as well
as its emission and engine performance.
It is the owner’s responsibility to make sure that
the scheduled maintenance, as well as general
maintenance, is performed.
As the vehicle owner, you are the only one who
can ensure that your vehicle receives the proper
maintenance care. You are a vital link in the
maintenance chain.SCHEDULED MAINTENANCEFor your convenience, both required and op-
tional scheduled maintenance items are de-
scribed and listed in your “NISSAN Service and
Maintenance Guide”. You must refer to that
guide to ensure that necessary maintenance is
performed on your NISSAN at regular intervals.GENERAL MAINTENANCEGeneral maintenance includes those items
which should be checked during normal day-
to-day operation. They are essential for proper
vehicle operation. It is your responsibility to
perform these procedures regularly as pre-
scribed.Performing general maintenance checks re-
quires minimal mechanical skill and only a few
general automotive tools.
These checks or inspections can be done by
yourself, a qualified technician or, if you prefer, a
NISSAN dealer.
WHERE TO GO FOR SERVICEIf maintenance service is required or your vehicle
appears to malfunction, have the systems
checked and serviced by a NISSAN dealer.
NISSAN technicians are well-trained specialists
and are kept up-to-date with the latest service
information through technical bulletins, service
tips, and in-dealership information systems.
They are completely qualified to work on
NISSAN vehicles
beforework begins.
You can be confident that a NISSAN dealer’s
service department performs the best job to
meet the maintenance requirements on your
vehicle — in a reliable and economical way. During the normal day-to-day operation of the
vehicle, general maintenance should be per-
formed regularly as prescribed in this section. If
you detect any unusual sounds, vibrations or
smell, be sure to check for the cause or have a
NISSAN dealer do it promptly. In addition, you
should notify a NISSAN dealer if you think that
repairs are required.
When performing any checks or maintenance
work, see “MAINTENANCE PRECAUTIONS”
later in this section.
EXPLANATION OF MAINTENANCE
ITEMSAdditional information on the following
items with “*” is found later in this section.Outside the vehicleThe maintenance items listed here should be
performed from time to time, unless otherwise
specified.
Doors and engine hood:
Check that all doors
and the engine hood operate properly. Also
ensure that all latches lock securely. Lubricate
hinges, latches, latch pins, rollers and links if
necessary. Make sure that the secondary latch
keeps the hood from opening when the primary
latch is released.
When driving in areas using road salt or other
corrosive materials, check lubrication frequently.
MAINTENANCE REQUIREMENT GENERAL MAINTENANCE8-2
Maintenance and do-it-yourself
Page 280 of 345
Black plate (278,1)
Model "Z12-D" EDITED: 2010/ 9/ 27
difficulties or excessive emissions, and could
affect your warranty coverage.If in doubt
about any servicing, we recommend that
it be done by a NISSAN dealer.
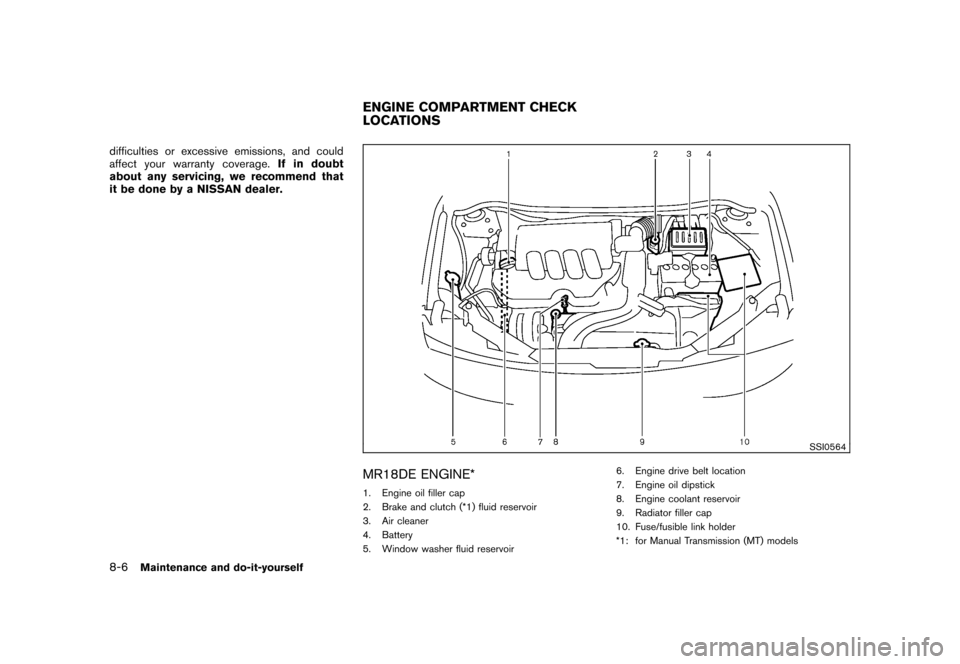
SSI0564
MR18DE ENGINE*1. Engine oil filler cap
2. Brake and clutch (*1) fluid reservoir
3. Air cleaner
4. Battery
5. Window washer fluid reservoir 6. Engine drive belt location
7. Engine oil dipstick
8. Engine coolant reservoir
9. Radiator filler cap
10. Fuse/fusible link holder
*1: for Manual Transmission (MT) modelsENGINE COMPARTMENT CHECK
LOCATIONS
8-6
Maintenance and do-it-yourself
Page 283 of 345
Black plate (281,1)
Model "Z12-D" EDITED: 2010/ 9/ 27
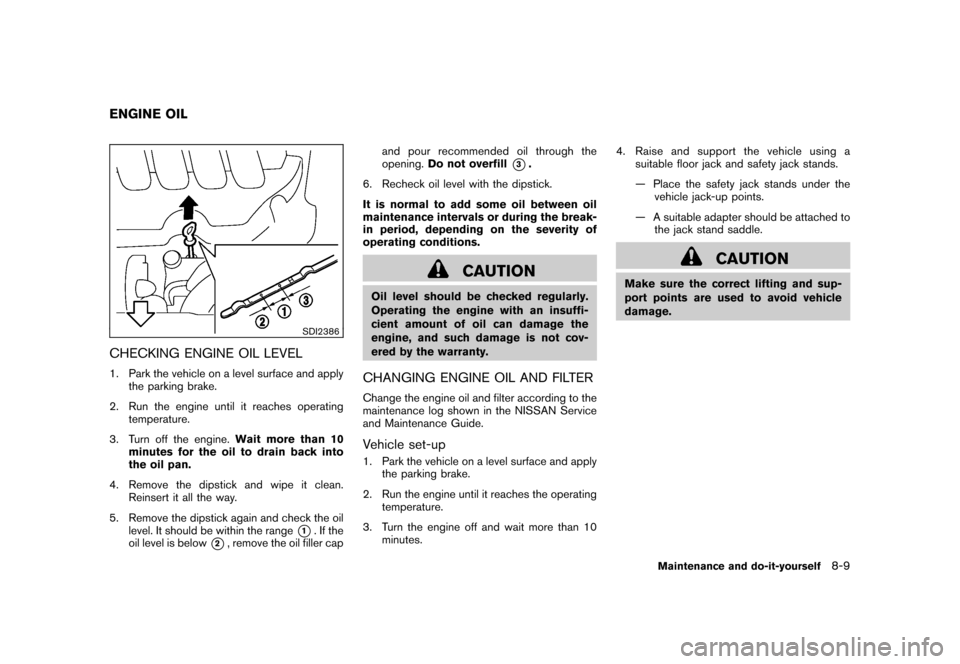
SDI2386
CHECKING ENGINE OIL LEVEL1. Park the vehicle on a level surface and applythe parking brake.
2. Run the engine until it reaches operating temperature.
3. Turn off the engine. Wait more than 10
minutes for the oil to drain back into
the oil pan.
4. Remove the dipstick and wipe it clean. Reinsert it all the way.
5. Remove the dipstick again and check the oil level. It should be within the range
*1. If the
oil level is below
*2, remove the oil filler cap and pour recommended oil through the
opening.
Do not overfill
*3.
6. Recheck oil level with the dipstick.
It is normal to add some oil between oil
maintenance intervals or during the break-
in period, depending on the severity of
operating conditions.
CAUTION
Oil level should be checked regularly.
Operating the engine with an insuffi-
cient amount of oil can damage the
engine, and such damage is not cov-
ered by the warranty.CHANGING ENGINE OIL AND FILTERChange the engine oil and filter according to the
maintenance log shown in the NISSAN Service
and Maintenance Guide.Vehicle set-up1. Park the vehicle on a level surface and apply the parking brake.
2. Run the engine until it reaches the operating temperature.
3. Turn the engine off and wait more than 10 minutes. 4. Raise and support the vehicle using a
suitable floor jack and safety jack stands.
— Place the safety jack stands under thevehicle jack-up points.
— A suitable adapter should be attached to the jack stand saddle.
CAUTION
Make sure the correct lifting and sup-
port points are used to avoid vehicle
damage.
ENGINE OIL
Maintenance and do-it-yourself
8-9
Page 284 of 345
Black plate (282,1)
Model "Z12-D" EDITED: 2010/ 9/ 27
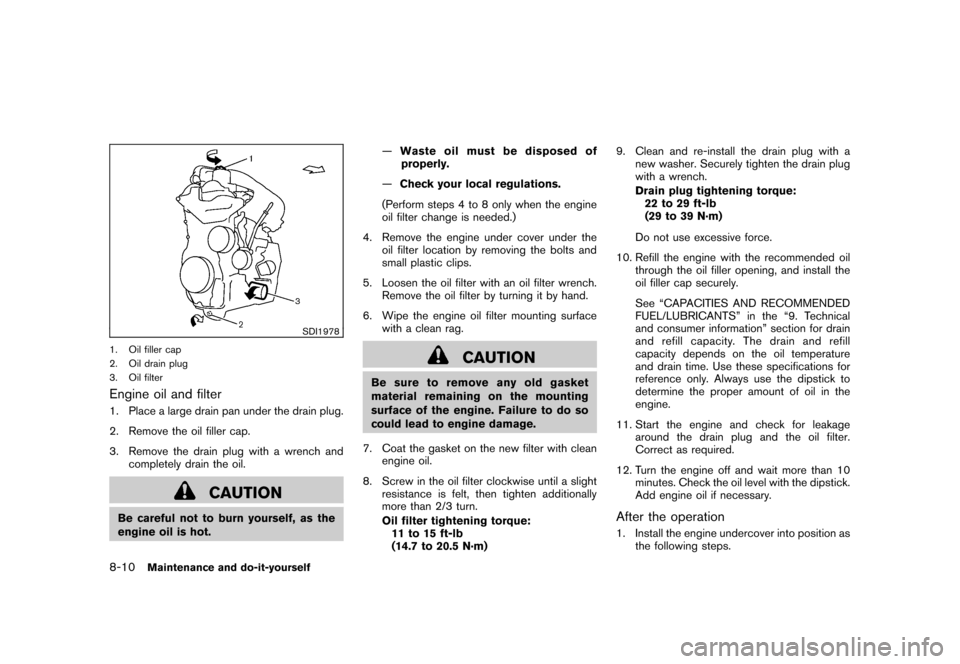
SDI1978
1. Oil filler cap
2. Oil drain plug
3. Oil filterEngine oil and filter1. Place a large drain pan under the drain plug.
2. Remove the oil filler cap.
3. Remove the drain plug with a wrench andcompletely drain the oil.
CAUTION
Be careful not to burn yourself, as the
engine oil is hot. —
Waste oil must be disposed of
properly.
— Check your local regulations.
(Perform steps 4 to 8 only when the engine
oil filter change is needed.)
4. Remove the engine under cover under the oil filter location by removing the bolts and
small plastic clips.
5. Loosen the oil filter with an oil filter wrench. Remove the oil filter by turning it by hand.
6. Wipe the engine oil filter mounting surface with a clean rag.
CAUTION
Be sure to remove any old gasket
material remaining on the mounting
surface of the engine. Failure to do so
could lead to engine damage.
7. Coat the gasket on the new filter with clean engine oil.
8. Screw in the oil filter clockwise until a slight resistance is felt, then tighten additionally
more than 2/3 turn.
Oil filter tightening torque:11 to 15 ft-lb
(14.7 to 20.5 N·m) 9. Clean and re-install the drain plug with a
new washer. Securely tighten the drain plug
with a wrench.
Drain plug tightening torque:22 to 29 ft-lb
(29 to 39 N·m)
Do not use excessive force.
10. Refill the engine with the recommended oil through the oil filler opening, and install the
oil filler cap securely.
See “CAPACITIES AND RECOMMENDED
FUEL/LUBRICANTS” in the “9. Technical
and consumer information” section for drain
and refill capacity. The drain and refill
capacity depends on the oil temperature
and drain time. Use these specifications for
reference only. Always use the dipstick to
determine the proper amount of oil in the
engine.
11. Start the engine and check for leakage around the drain plug and the oil filter.
Correct as required.
12. Turn the engine off and wait more than 10 minutes. Check the oil level with the dipstick.
Add engine oil if necessary.
After the operation1. Install the engine undercover into position asthe following steps.
8-10
Maintenance and do-it-yourself