2011 NISSAN 370Z ROADSTER hood release
[x] Cancel search: hood releasePage 18 of 419
Black plate (12,1)
Model "Z34-D" EDITED: 2010/ 7/ 27
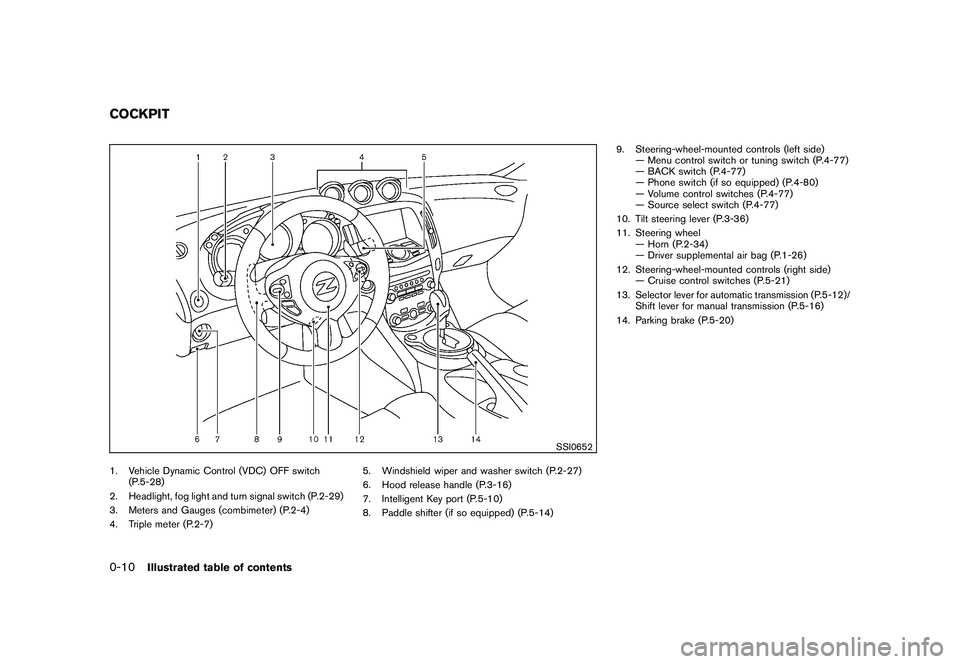
SSI0652
1. Vehicle Dynamic Control (VDC) OFF switch(P.5-28)
2. Headlight, fog light and turn signal switch (P.2-29)
3. Meters and Gauges (combimeter) (P.2-4)
4. Triple meter (P.2-7) 5. Windshield wiper and washer switch (P.2-27)
6. Hood release handle (P.3-16)
7. Intelligent Key port (P.5-10)
8. Paddle shifter (if so equipped) (P.5-14)9. Steering-wheel-mounted controls (left side)
— Menu control switch or tuning switch (P.4-77)
— BACK switch (P.4-77)
— Phone switch (if so equipped) (P.4-80)
— Volume control switches (P.4-77)
— Source select switch (P.4-77)
10. Tilt steering lever (P.3-36)
11. Steering wheel — Horn (P.2-34)
— Driver supplemental air bag (P.1-26)
12. Steering-wheel-mounted controls (right side) — Cruise control switches (P.5-21)
13. Selector lever for automatic transmission (P.5-12)/ Shift lever for manual transmission (P.5-16)
14. Parking brake (P.5-20)COCKPIT0-10
Illustrated table of contents
Page 64 of 419
Black plate (60,1)
Model "Z34-D" EDITED: 2010/ 7/ 27
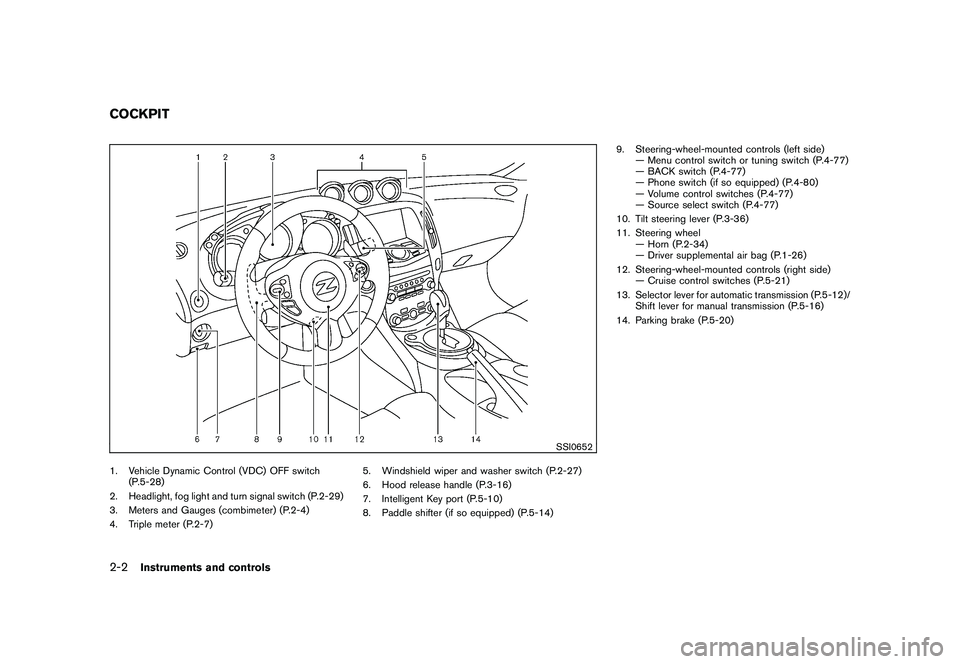
SSI0652
1. Vehicle Dynamic Control (VDC) OFF switch(P.5-28)
2. Headlight, fog light and turn signal switch (P.2-29)
3. Meters and Gauges (combimeter) (P.2-4)
4. Triple meter (P.2-7) 5. Windshield wiper and washer switch (P.2-27)
6. Hood release handle (P.3-16)
7. Intelligent Key port (P.5-10)
8. Paddle shifter (if so equipped) (P.5-14)9. Steering-wheel-mounted controls (left side)
— Menu control switch or tuning switch (P.4-77)
— BACK switch (P.4-77)
— Phone switch (if so equipped) (P.4-80)
— Volume control switches (P.4-77)
— Source select switch (P.4-77)
10. Tilt steering lever (P.3-36)
11. Steering wheel — Horn (P.2-34)
— Driver supplemental air bag (P.1-26)
12. Steering-wheel-mounted controls (right side) — Cruise control switches (P.5-21)
13. Selector lever for automatic transmission (P.5-12)/ Shift lever for manual transmission (P.5-16)
14. Parking brake (P.5-20)COCKPIT2-2
Instruments and controls
Page 73 of 419
Black plate (69,1)
Model "Z34-D" EDITED: 2010/ 7/ 27
minute. Have the system checked by a NISSAN
dealer.
For additional information, see “TIRE PRES-
SURE MONITORING SYSTEM (TPMS)” in the
“5. Starting and driving” section.
WARNING
.If the light does not illuminate with
the ignition switch pushed ON, have
the vehicle checked by a NISSAN
dealer as soon as possible.
. If the light illuminates while driving,
avoid sudden steering maneuvers or
abrupt braking, reduce vehicle
speed, pull off the road to a safe
location and stop the vehicle as
soon as possible. Driving with un-
der-inflated tires may permanently
damage the tires and increase the
likelihood of tire failure. Serious
vehicle damage could occur and
may lead to an accident and could
result in serious personal injury.
Check the tire pressure for all four
tires. Adjust the tire pressure to the
recommended COLD tire pressure
shownontheTireandLoading
Information label to turn the low tire pressure warning light OFF. If
the light still illuminates while driv-
ing after adjusting the tire pressure,
a tire may be flat. If you have a flat
tire, replace it with a spare tire as
soon as possible.
. When a spare tire is mounted or a
wheel is replaced, the TPMS will not
function and the low tire pressure
warning light will flash for approxi-
mately 1 minute. The light will
remain on after the 1 minute. Con-
tact your NISSAN dealer as soon as
possible for tire replacement and/or
system resetting.
. Replacing tires with those not ori-
ginally specified by NISSAN could
affect the proper operation of the
TPMS.
CAUTION
.The TPMS is not a substitute for the
regular tire pressure check. Be sure
to check the tire pressure regularly.
. If the vehicle is being driven at
speeds of less than 16 MPH (25
km/h) , the TPMS may not operate correctly.
. Be sure to install the specified size
of tires to the four wheels correctly.
Master warning light
When the ignition switch is in the ON position,
the master warning light illuminates if any of the
following are displayed on the vehicle informa-
tion display:
.No key warning
. Low fuel warning
. Low washer fluid warning
. Parking brake release warning
. Door/rear hatch open warning
. Loose fuel cap warning
See “VEHICLE INFORMATION DISPLAY” later
in this section.
Seat belt warning light and chime
The light and chime remind you to fasten seat
belts. The light illuminates whenever the ignition
switch is pushed to the ON position, and will
remain illuminated until the driver’s seat belt is
fastened. At the same time, the chime will sound
for about 6 seconds unless the driver’s seat belt
Instruments and controls
2-11
Page 88 of 419
Black plate (84,1)
Model "Z34-D" EDITED: 2010/ 7/ 27
on for about 30 seconds. The vehicle
security system is now pre-armed. After
about 30 seconds the vehicle security
system automatically shifts into the armed
phase. The security light begins to flash
once every approximately 3 seconds. If,
during this 30-second pre-arm time period,
the door is unlocked, or the ignition switch is
pushed to ACC or ON, the system will not
arm.
Even when the driver and/or passengers
are in the vehicle, the system will activate
with all doors, hood and rear hatch locked
withtheignitionswitchintheLOCK
position. When pushing the ignition switch
to the ACC or ON position, the system will
be released.
Vehicle security system activationThe vehicle security system will give the follow-
ing alarm:
. The headlights blink and the horn sounds
intermittently.
. The alarm automatica lly turns off after
approximately 1 minute. However, the alarm
reactivates if the vehicle is tampered with
again.
The alarm is activated by:
. Unlocking the door or opening the rear hatch without using the button on the
Intelligent Key, the door handle request
switch or the mechanical key. (Even if the
door is opened by releasing the door inside
lock knob, the alarm will activate.)
. Opening the hood.
How to stop an activated alarmThe alarm will stop by unlocking a door by
pushing the unlock button on the Intelligent Key,
the door handle request switch or using the
mechanical key. The alarm will not stop if the
ignition switch is pushed to the ACC or ON
position.
If the system does not operate as de-
scribed above, have it checked by a
NISSAN dealer.NISSAN VEHICLE IMMOBILIZER SYS-
TEMThe NISSAN Vehicle Immobilizer System will not
allow the engine to start without the use of the
registered Intelligent Key. Never leave these
keys in the vehicle.
For USA:
This device complies with Part 15 of the
FCC Rules. Operation is subject to the
following two conditions:
(1) This device may not cause harmful interference, and (2) this device must
accept any interference received, including
interference that may cause undesired
operation.
Note: Changes or modifications not ex-
pressly approved by the party responsible
for compliance could void the user’s
authority to operate the equipment.
For Canada:
This device complies with RSS-210 of
Industry Canada. Operation is subject to
the following two conditions:
(1) this device may not cause interference,
and (2) this device must accept any inter-
ference, including interference that may
cause undesired operation of the device.
2-26
Instruments and controls
Page 115 of 419
Black plate (10,1)
3 Pre-driving checks and adjustments
Model "Z34-D" EDITED: 2010/ 7/ 28
Keys ............................................................... 3-2Intelligent Key ................................................ 3-2
Valet hand-off ................................................ 3-3
Doors .............................................................. 3-4
Locking with mechanical key ............................. 3-4
Opening and closing windows with the
mechanical key .............................................. 3-4
Locking with inside lock knob ........................... 3-5
Locking with power door lock switch .................. 3-5
Automatic door locks ...................................... 3-5
Intelligent Key system .......................................... 3-6
Intelligent Key operating range .......................... 3-8
Door locks/unlocks precaution .......................... 3-8
Intelligent Key operation ................................... 3-9
Battery saver system ..................................... 3-11
Warning signals ........................................... 3-11
Troubleshooting guide ................................... 3-12
Remote keyless entry system .............................. 3-13
How to use remote keyless entry system ........... 3-13
Hood ............................................................ 3-16
Rear hatch (Coupe models) ................................ 3-17
Rear hatch opener switch .............................. 3-17
Secondary rear hatch release .......................... 3-18
Trunk lid (Roadster models) ................................ 3-19
Trunk lid opener switch .................................. 3-19 Trunk release power cancel switch
................... 3-19
Interior trunk lid release ................................. 3-20
Secondary trunk lid release ............................ 3-21
Soft top (Roadster models) ................................ 3-21
Before operating the top ................................ 3-21
When operating the top ................................. 3-23
Opening the top .......................................... 3-25
Closing the top ............................................ 3-26
Opening the top using the Intelligent Key ........... 3-26
Troubleshooting guide ................................... 3-27
If the top does not open or close electrically . . .... 3-28
Care of the soft top and the vehicle body .......... 3-32
Front, side and rear unique parts (NISMO
models) ......................................................... 3-32
Fuel-filler door ................................................. 3-34
Opening the fuel-filler door ............................. 3-34
Fuel-filler cap .............................................. 3-34
Tilt steering ..................................................... 3-36
Manual operation ......................................... 3-36
Sun visors ...................................................... 3-36
Mirrors ........................................................... 3-37
Inside mirror ................................................ 3-37
Outside mirrors ............................................ 3-38
Vanity mirror ................................................ 3-39
Page 130 of 419
Black plate (126,1)
Model "Z34-D" EDITED: 2010/ 7/ 27
Switching procedure:
To switch the hazard indicator and horn (chime)
operation, push the LOCK
*1
and UN-
LOCK
*2
buttons on the Intelligent Key
simultaneously for more than 2 seconds.
. When the hazard indicator mode is set, the
hazard indicator flashes 3 times.
. When the hazard indicator and horn mode is
set, the hazard indicator flashes once and
the horn chirps once.
SPA2572
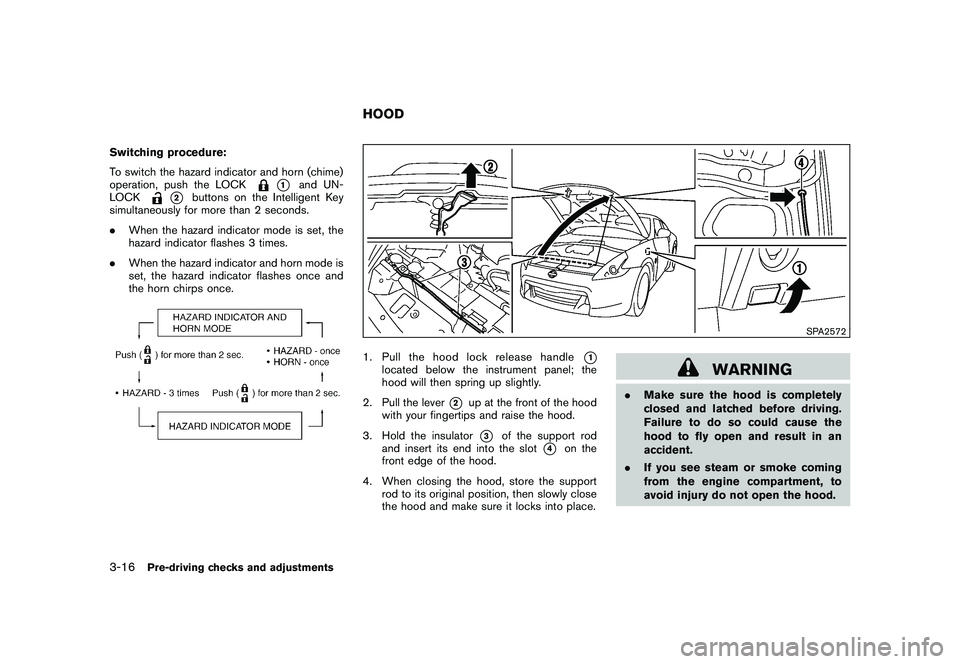
1. Pull the hood lock release handle
*1
located below the instrument panel; the
hood will then spring up slightly.
2. Pull the lever
*2
up at the front of the hood
with your fingertips and raise the hood.
3. Hold the insulator*3
of the support rod
and insert its end into the slot
*4
on the
front edge of the hood.
4. When closing the hood, store the support rod to its original position, then slowly close
the hood and make sure it locks into place.
WARNING
.Make sure the hood is completely
closed and latched before driving.
Failure to do so could cause the
hood to fly open and result in an
accident.
. If you see steam or smoke coming
from the engine compartment, to
avoid injury do not open the hood.
HOOD
3-16
Pre-driving checks and adjustments
Page 309 of 419
Black plate (305,1)
Model "Z34-D" EDITED: 2010/ 7/ 27
distances may also be longer on
rough, gravel or snow covered
roads, or if you are using tire chains.
Alwaysmaintainasafedistance
from the vehicle in front of you.
Ultimately, the driver is responsible
for safety.
. Tire type and condition may also
affect braking effectiveness.
— When replacing tires, install the
specified size of tires on all four
wheels.
— When installing a spare tire, make sure that it is the proper
size and type as specified on the
Tire and Loading Information
label. See “TIRE AND LOADING
INFORMATION LABEL” in the “9.
Technical and consumer infor-
mation” section of this manual.
— For detailed information, see “WHEELS AND TIRES” in the
“8. Maintenance and do-it-your-
self” section of this manual.
The Anti-lock Braking System (ABS) controls
the brakes so the wheels do not lock during hard
braking or when braking on slippery surfaces.
The system detects the rotation speed at each wheel and varies the brake fluid pressure to
prevent each wheel from locking and sliding. By
preventing each wheel from locking, the system
helps the driver maintain steering control and
helps to minimize swerving and spinning on
slippery surfaces.
Using the systemDepress the brake pedal and hold it down.
Depress the brake pedal with firm steady
pressure, but do not pump the brakes. The
ABS will operate to prevent the wheels from
locking up. Steer the vehicle to avoid obstacles.
WARNING
Do not pump the brake pedal. Doing so
may result in increased stopping dis-
tances.Self-test featureThe ABS includes electronic sensors, electric
pumps, hydraulic solenoids and a computer. The
computer has a built-in diagnostic feature that
tests the system each time you start the engine
and move the vehicle at a low speed in forward
or reverse. When the self-test occurs, you may
hear a “clunk” noise and/or feel a pulsation in the
brake pedal. This is normal and does not
indicate a malfunction. If the computer senses
a malfunction, it switches the ABS off and
illuminates the ABS warning light on theinstrument panel. The brake system then oper-
ates normally, but without anti-lock assistance.
If the ABS warning light illuminates during the
self-test or while driving, have the vehicle
checked by a NISSAN dealer.
Normal operationThe ABS operates at speeds above 3 to 6 MPH
(5 to 10 km/h) .
When the ABS senses that one or more wheels
are close to locking up, the actuator rapidly
applies and releases hydraulic pressure. This
action is similar to pumping the brakes very
quickly. You may feel a pulsation in the brake
pedal and hear a noise from under the hood or
feel a vibration from the actuator when it is
operating. This is normal and indicates that the
ABS is operating properly. However, the pulsa-
tion may indicate that road conditions are
hazardous and extra care is required while
driving.
Starting and driving
5-27
Page 346 of 419
Black plate (346,1)
Model "Z34-D" EDITED: 2010/ 7/ 27
Your new NISSAN has been designed to have
minimum maintenance requirements with long
service intervals to save you both time and
money. However, some day-to-day and regular
maintenance is essential to maintain your
NISSAN’s fine mechanical condition, as well
as its emission and engine performance.
It is the owner’s responsibility to make sure that
the scheduled maintenance, as well as general
maintenance, is performed.
As the vehicle owner, you are the only one who
can ensure that your vehicle receives the proper
maintenance care. You are a vital link in the
maintenance chain.SCHEDULED MAINTENANCEFor your convenience, both required and op-
tional scheduled maintenance items are de-
scribed and listed in your “NISSAN Service and
Maintenance Guide”. You must refer to that
guide to ensure that necessary maintenance is
performed on your NISSAN at regular intervals.GENERAL MAINTENANCEGeneral maintenance includes those items
which should be checked during normal day-
to-day operation. They are essential for proper
vehicle operation. It is your responsibility to
perform these procedures regularly as pre-
scribed.Performing general maintenance checks re-
quires minimal mechanical skill and only a few
general automotive tools.
These checks or inspections can be done by
yourself, a qualified technician or, if you prefer, a
NISSAN dealer.
WHERE TO GO FOR SERVICEIf maintenance service is required or your vehicle
appears to malfunction, have the systems
checked and serviced by a NISSAN dealer.
NISSAN technicians are well-trained specialists
and are kept up to date with the latest service
information through technical bulletins, service
tips, and in-dealership information systems.
They are completely qualified to work on
NISSAN vehicles
beforework begins.
You can be confident that a NISSAN dealer’s
service department performs the best job to
meet the maintenance requirements on your
vehicle — in a reliable and economical way. During the normal day-to-day operation of the
vehicle, general maintenance should be per-
formed regularly as prescribed in this section. If
you detect any unusual sounds, vibrations or
smell, be sure to check for the cause or have a
NISSAN dealer do it promptly. In addition, you
should notify a NISSAN dealer if you think that
repairs are required.
When performing any checks or maintenance
work, see “MAINTENANCE PRECAUTIONS”
later in this section.
EXPLANATION OF MAINTENANCE
ITEMSAdditional information on the following
items with “*” is found later in this section.Outside the vehicleThe maintenance items listed here should be
performed from time to time, unless otherwise
specified.
Doors and engine hood:
Check that all doors
and the engine hood, operate properly. Also
ensure that all latches lock securely. Lubricate
hinges, latches, latch pins, rollers and links if
necessary. Make sure that the secondary latch
keeps the hood from opening when the primary
latch is released.
When driving in areas using road salt or other
corrosive materials, check lubrication frequently.
MAINTENANCE REQUIREMENT GENERAL MAINTENANCE8-2
Maintenance and do-it-yourself