2011 NISSAN 370Z ROADSTER change wheel
[x] Cancel search: change wheelPage 56 of 419
Black plate (52,1)
Model "Z34-D" EDITED: 2010/ 7/ 27
passenger air bag OFF for specified child
restraints. Failing to properly secure child
restrains and to use the ALR mode (child
restraint mode) may allow the restraint to tip or
move in an accident or sudden stop. This can
also result in the passenger air bag inflating in a
crash instead of being OFF. (See “CHILD
RESTRAINTS” earlier in this section for proper
use and installation.)
If the front passenger seat is not occupied, the
passenger air bag is designed not to inflate in a
crash. However, heavy objects placed on the
seat could result in air bag inflation, because of
the object being detected by the occupant
classification sensor. Other conditions could
also result in air bag inflation, such as if a child is
standing on the seat, or if two children are on the
seat, contrary to the instructions in this manual.
Always be sure that you and all vehicle
occupants are seated and restrained properly.
Using the passenger air bag status light, you can
monitor when the front passenger air bag is
automatically turned OFF with the seat occu-
pied. The light will not illuminate when the front
passenger seat is unoccupied.
If an adult occupant is in the seat but the
passenger air bag status light is illuminated
(indicating that the air bag is OFF) , it could be
that the person is a small adult, or is not sitting
on the seat properly.If a child restraint must be used in the front seat,
the passenger air bag status light may or may
not be illuminated, depending on the size of the
child and the type of child restraint being used. If
the passenger air bag status light is not
illuminated (indicating that the air bag might
inflate in a crash) , it could be that the child
restraint or seat belt is not being used properly.
Make sure that the child restraint is installed
properly, the seat belt is used properly and the
occupant is positioned properly. If the passen-
ger air bag status light is still not illuminated, try
a different child restraint.
If the passenger air bag status light will not
illuminate even though you believe that the child
restraint, the seat belts and the occupant are
properly positioned, the system may be sensing
an unoccupied seat (in which case the air bag is
OFF) . Your NISSAN dealer can check that the
system is OFF by using a special tool. However,
until you have confirmed with your dealer that
your air bag is working properly, do not transport
a child in this vehicle.
The NISSAN Advanced Air Bag System and
passenger air bag status light will take a few
seconds to register a change in the passenger
seat status. However, if the seat becomes
unoccupied, the air bag status light will remain
off.
If a malfunction occurs in the front passenger air
bag system, the supplemental air bag warninglight
, located in the meter and gauges area
will blink. Have the system checked by a
NISSAN dealer.
Other supplemental front-impact air bag
precautions
WARNING
. Do not place any objects on the
steering wheel pad or on the instru-
ment panel. Also, do not place any
objects between any occupant and
the steering wheel or instrument
panel. Such objects may become
dangerous projectiles and cause
injury if the front air bag inflates.
. Do not place objects with sharp
edges on the seat. Also, do not
place heavy objects on the seat that
will leave permanent impressions in
the seat. Such objects can damage
the seat or occupant classification
sensor (pattern sensor) . This can
affect the operation of the air bag
system and result in serious perso-
nal injury.
. Do not use water or acidic cleaners
(hot steam cleaners) on the seat.
This can damage the seat or occu-
1-34
Safety — Seats, seat belts and supplemental restraint system
Page 57 of 419
Black plate (53,1)
Model "Z34-D" EDITED: 2010/ 7/ 27
pant classification sensor. This can
also affect the operation of the air
bag system and result in serious
personal injury.
. Immediately after inflation, several
front air bag system components
will be hot. Do not touch them; you
may severely burn yourself.
. No unauthorized changes should be
made to any components or wiring
of the air bag system. This is to
prevent accidental inflation of the
supplemental air bag or damage to
the supplemental air bag system.
. Do not make unauthorized changes
to your vehicle’s electrical system,
suspension system or front end
structure. This could affect proper
operation of the front air bag sys-
tem.
. Tampering with the front air bag
system may result in serious perso-
nal injury. Tampering includes
changes to the steering wheel and
the instrument panel assembly by
placing material over the steering
wheel pad and above the instrument
panel or by installing additional trim material around the air bag system.
. Modifying or tampering with the
front passenger seat may result in
serious personal injury. For exam-
ple, do not change the front seats by
placing material on the seat cushion
or by installing additional trim ma-
terial, such as seat covers, on the
seat that is not specifically designed
to assure proper air bag operation.
Additionally, do not stow any ob-
jects under the front passenger seat
or the seat cushion and seatback.
Such objects may interfere with the
proper operation of the occupant
classification sensor.
. No unauthorized changes should be
made to any components or wiring
of the seat belt system. This may
affect the front air bag system.
Tampering with the seat belt system
may result in serious personal in-
jury.
. Work on and around the front air
bag system should be done by a
NISSAN dealer. Installation of elec-
trical equipment should also be
done by a NISSAN dealer. The
Supplemental Restraint System (SRS) wiring harnesses* should not
be modified or disconnected. Un-
authorized electrical test equipment
and probing devices should not be
used on the air bag system.
. A cracked windshield should be
replaced immediately by a qualified
repair facility. A cracked windshield
could affect the function of the
supplemental air bag system.
* The SRS wiring harness connectors are
yellow and orange for easy identifica-
tion.
When selling your vehicle, we request that you
inform the buyer about the front air bag system
and guide the buyer to the appropriate sections
in this Owner’s Manual.
Safety — Seats, seat belts and supplemental restraint system
1-35
Page 121 of 419
Black plate (117,1)
Model "Z34-D" EDITED: 2010/ 7/ 27
computer.
. When the vehicle is parked near a parking
meter.
In such cases, correct the operating conditions
before using the Intelligent Key function or use
the mechanical key.
Although the life of the battery varies depending
on the operating conditions, the battery’s life is
approximately 2 years. If the battery is dis-
charged, replace it with a new one.
When the Intelligent Key battery is almost
discharged, insert the Intelligent Key into the
Intelligent Key port to start the engine. Replace
the discharged battery with a new one as soon
as possible. For more details, see “PUSH-
BUTTON IGNITION SWITCH” in the “5. Start-
ing and driving” section.
Since the Intelligent Key is continuously receiv-
ing radio waves, if the key is left near equipment
which transmits strong radio waves, such as
signals from a TV and personal computer, the
battery life may become shorter.
For information regarding replacement of a
battery, see “INTELLIGENT KEY BATTERY
REPLACEMENT” in the “8. Maintenance and
do-it-yourself” section.
For models with a steering wheel lock mechan-
ism: Because the steering wheel is locked electrically, unlocking the steering wheel with
the ignition switch in the LOCK position is
impossible when the vehicle battery is comple-
tely discharged. Pay special attention that the
vehicle battery is not completely discharged.
As many as 4 Intelligent Keys can be registered
and used with one vehicle. For information about
the purchase and use of additional Intelligent
Keys, contact a NISSAN dealer.
CAUTION
.
Do not allow the Intelligent Key,
which contains electrical compo-
nents, to come into contact with
water or salt water. This could affect
the system function.
. Do not drop the Intelligent Key.
. Do not strike the Intelligent Key
sharply against another object.
. Do not change or modify the Intel-
ligent Key.
. Wetting may damage the Intelligent
Key. If the Intelligent Key gets wet,
immediately wipe until it is comple-
tely dry.
. If the outside temperature is below
148F( �108 C) , the battery of the Intelligent Key may not function
properly.
. Do not place the Intelligent Key for
an extended period in an area where
temperatures exceed 140 8F (60 8C) .
. Do not attach the Intelligent Key
with a key holder that contains a
magnet.
. Do not place the Intelligent Key near
equipment that produces a mag-
netic field, such as a TV, audio
equipment, personal computer or
cellular phone.
If an Intelligent Key is lost or stolen, NISSAN
recommends erasing the ID code of that
Intelligent Key from the vehicle. This may prevent
the unauthorized use of the Intelligent Key to
operate the vehicle. For information regarding
the erasing procedure, contact a NISSAN deal-
er.
The Intelligent Key function can be disabled. For
information about disabling the Intelligent Key
function, contact a NISSAN dealer.
Pre-driving checks and adjustments
3-7
Page 154 of 419
Black plate (13,1)
4
Center display, heater, air conditioner,
audio, phone and voice recognition systems
Model "Z34-D" EDITED: 2010/ 7/ 28
Safety note....................................................... 4-2
Center multi-function control panel
(models with navigation system) ............................ 4-2
How to use multi-function controller ................... 4-3
How to use touch screen ................................. 4-3
Menu options ................................................ 4-5
How to select menus on the screen ................... 4-6
Vehicle information and settings
(models with navigation system) ............................ 4-6
How to use STATUS button .............................. 4-6
How to use brightness control and display ON/
OFF button ................................................... 4-6
How to use INFO button. ................................. 4-6
How to use SETTING button .......................... 4-10
RearView monitor (models with navigation
system) .......................................................... 4-17
How to read displayed lines ............................ 4-18
How to park with predicted course lines ............ 4-18
Difference between predicted and actual
distances ................................................... 4-20
How to adjust screen .................................... 4-22
Operating tips ............................................. 4-22
Ventilators ...................................................... 4-23
Center ventilators ......................................... 4-23
Side ventilators ............................................ 4-23
Heater and air conditioner .................................. 4-24
Automatic air conditioner (Type A) .................... 4-25Automatic air conditioner (Type B)
.................... 4-27
Operating tips ............................................. 4-29
In-cabin microfilter ........................................ 4-29
Servicing air conditioner ................................ 4-30
Audio system .................................................. 4-30
Audio operation precautions ........................... 4-30
FM-AM radio with Compact Disc (CD) player . .... 4-42
FM-AM-SAT radio with Compact Disc (CD)
changer (models without navigation system) . . . .... 4-47
FM-AM-SAT radio with Compact Disc (CD)
player (models with navigation system) .............. 4-51
DVD (Digital Versatile Disc) player operation
(models with navigation system) ...................... 4-55
USB memory operation
(models with navigation system) ...................... 4-58
Bluetooth
®streaming audio
(models with navigation system) ...................... 4-62
iPod
®player operation
(models with navigation system) ...................... 4-67
Music Box
®(models with navigation system) . . . .... 4-69
Auxiliary input jacks
(models with navigation system) ...................... 4-75
CD/DVD/USB memory care and cleaning .......... 4-76
Steering-wheel-mounted controls for audio ........ 4-77
Antenna ..................................................... 4-79
Car phone or CB radio ...................................... 4-80
Page 224 of 419
Black plate (220,1)
Model "Z34-D" EDITED: 2010/ 7/ 27
SAA2514
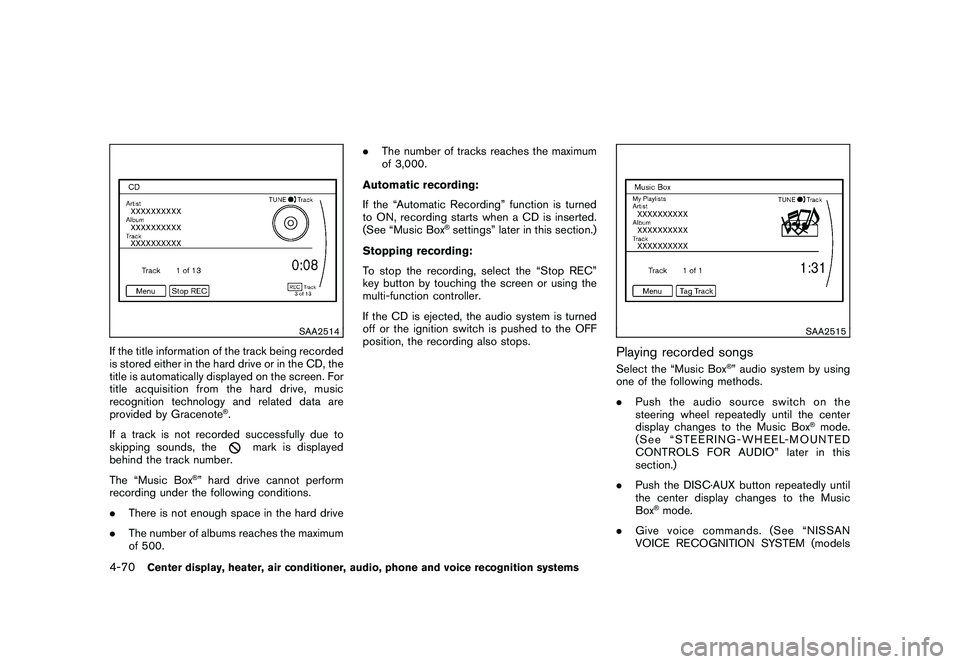
If the title information of the track being recorded
is stored either in the hard drive or in the CD, the
title is automatically displayed on the screen. For
title acquisition from the hard drive, music
recognition technology and related data are
provided by Gracenote
®.
If a track is not recorded successfully due to
skipping sounds, the
mark is displayed
behind the track number.
The “Music Box
®” hard drive cannot perform
recording under the following conditions.
. There is not enough space in the hard drive
. The number of albums reaches the maximum
of 500. .
The number of tracks reaches the maximum
of 3,000.
Automatic recording:
If the “Automatic Recording” function is turned
to ON, recording starts when a CD is inserted.
(See “Music Box
®settings” later in this section.)
Stopping recording:
To stop the recording, select the “Stop REC”
key button by touching the screen or using the
multi-function controller.
If the CD is ejected, the audio system is turned
off or the ignition switch is pushed to the OFF
position, the recording also stops.
SAA2515
Playing recorded songsSelect the “Music Box
®” audio system by using
one of the following methods.
. Push the audio source switch on the
steering wheel repeatedly until the center
display changes to the Music Box
®mode.
(See “STEERING-WHEEL-MOUNTED
CONTROLS FOR AUDIO” later in this
section.)
. Push the DISC·AUX button repeatedly until
the center display changes to the Music
Box
®mode.
. Give voice commands. (See “NISSAN
VOICE RECOGNITION SYSTEM (models
4-70
Center display, heater, air conditioner, audio, phone and voice recognition systems
Page 241 of 419
Black plate (237,1)
Model "Z34-D" EDITED: 2010/ 7/ 27
.Dial Number
Input the phone number manually using the
keypad displayed on the screen. (See
“HOW TO USE TOUCH SCREEN” earlier
in this section.)
SAA2525
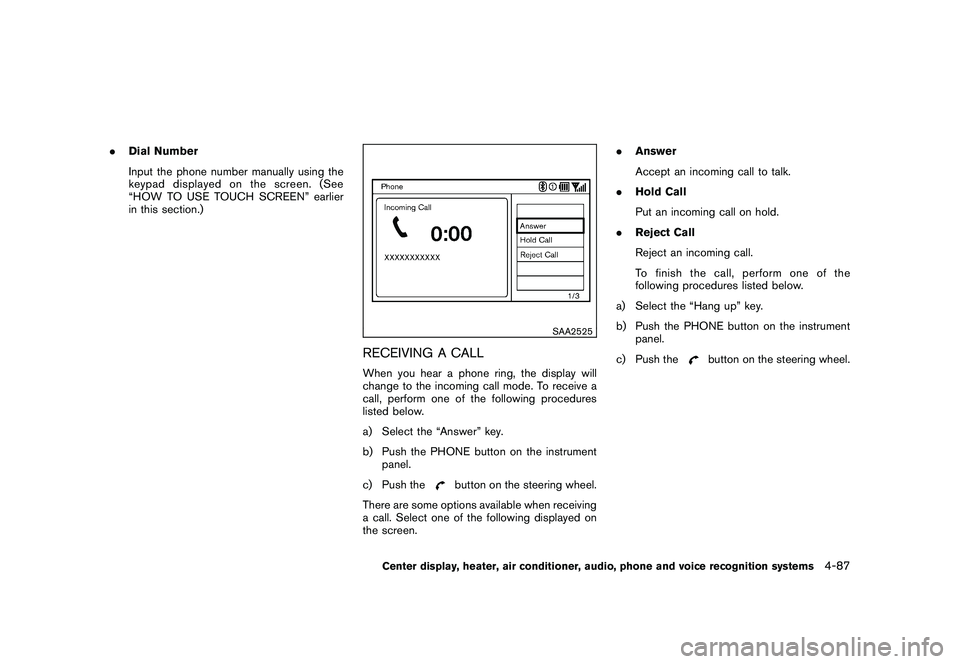
RECEIVING A CALLWhen you hear a phone ring, the display will
change to the incoming call mode. To receive a
call, perform one of the following procedures
listed below.
a) Select the “Answer” key.
b) Push the PHONE button on the instrument
panel.
c) Push the
button on the steering wheel.
There are some options available when receiving
a call. Select one of the following displayed on
the screen. .
Answer
Accept an incoming call to talk.
. Hold Call
Put an incoming call on hold.
. Reject Call
Reject an incoming call.
To finish the call, perform one of the
following procedures listed below.
a) Select the “Hang up” key.
b) Push the PHONE button on the instrument panel.
c) Push the
button on the steering wheel.
Center display, heater, air conditioner, audio, phone and voice recognition systems
4-87
Page 249 of 419
Black plate (245,1)
Model "Z34-D" EDITED: 2010/ 7/ 27
SAA2557
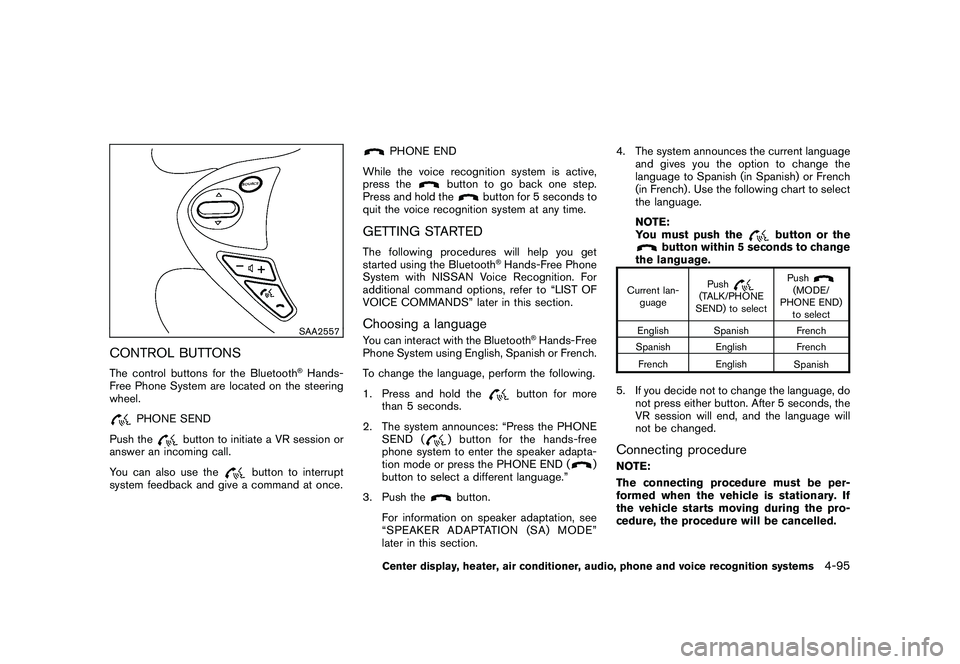
CONTROL BUTTONSThe control buttons for the Bluetooth
®Hands-
Free Phone System are located on the steering
wheel.
PHONE SEND
Push the
button to initiate a VR session or
answer an incoming call.
You can also use the
button to interrupt
system feedback and give a command at once.
PHONE END
While the voice recognition system is active,
press the
button to go back one step.
Press and hold the
button for 5 seconds to
quit the voice recognition system at any time.
GETTING STARTEDThe following procedures will help you get
started using the Bluetooth
®Hands-Free Phone
System with NISSAN Voice Recognition. For
additional command options, refer to “LIST OF
VOICE COMMANDS” later in this section.
Choosing a languageYou can interact with the Bluetooth
®Hands-Free
Phone System using English, Spanish or French.
To change the language, perform the following.
1. Press and hold the
button for more
than 5 seconds.
2. The system announces: “Press the PHONE SEND (
) button for the hands-free
phone system to enter the speaker adapta-
tion mode or press the PHONE END (
)
button to select a different language.”
3. Push the
button.
For information on speaker adaptation, see
“SPEAKER ADAPTATION (SA) MODE”
later in this section. 4. The system announces the current language
and gives you the option to change the
language to Spanish (in Spanish) or French
(in French) . Use the following chart to select
the language.
NOTE:
You must push the
button or the
button within 5 seconds to change
the language.
Current lan-
guage Push
(TALK/PHONE
SEND) to select Push
(MODE/
PHONE END) to select
English Spanish French
Spanish English French
French English Spanish
5. If you decide not to change the language, do
not press either button. After 5 seconds, the
VR session will end, and the language will
not be changed.Connecting procedureNOTE:
The connecting procedure must be per-
formed when the vehicle is stationary. If
the vehicle starts moving during the pro-
cedure, the procedure will be cancelled.
Center display, heater, air conditioner, audio, phone and voice recognition systems
4-95
Page 250 of 419
Black plate (246,1)
Model "Z34-D" EDITED: 2010/ 7/ 27
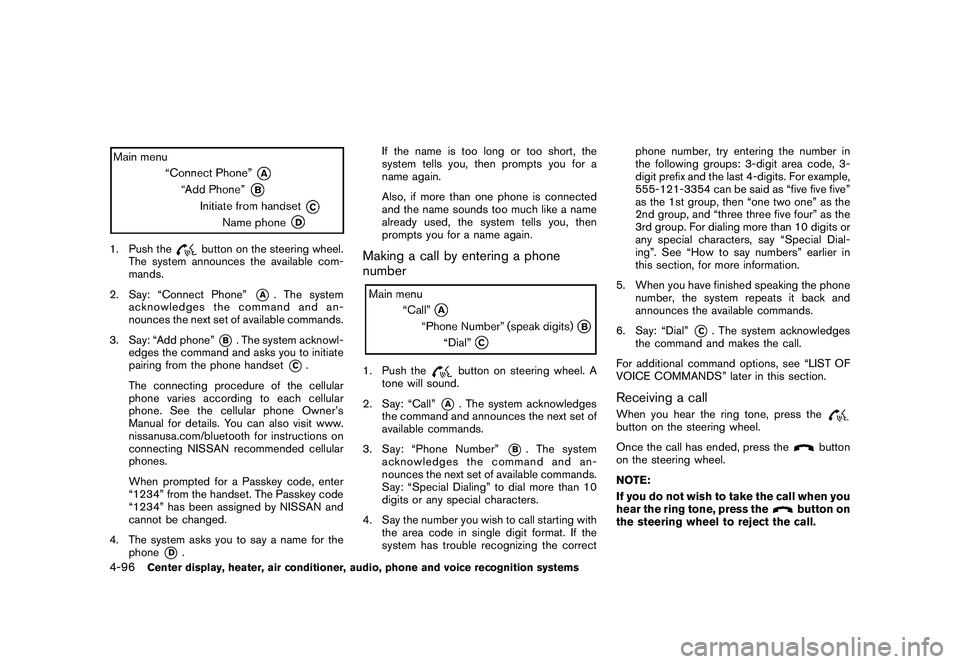
1. Push the
button on the steering wheel.
The system announces the available com-
mands.
2. Say: “Connect Phone”
*A
. The system
acknowledges the command and an-
nounces the next set of available commands.
3. Say: “Add phone”
*B. The system acknowl-
edges the command and asks you to initiate
pairing from the phone handset
*C.
The connecting procedure of the cellular
phone varies according to each cellular
phone. See the cellular phone Owner’s
Manual for details. You can also visit www.
nissanusa.com/bluetooth for instructions on
connecting NISSAN recommended cellular
phones.
When prompted for a Passkey code, enter
“1234” from the handset. The Passkey code
“1234” has been assigned by NISSAN and
cannot be changed.
4. The system asks you to say a name for the phone
*D
. If the name is too long or too short, the
system tells you, then prompts you for a
name again.
Also, if more than one phone is connected
and the name sounds too much like a name
already used, the system tells you, then
prompts you for a name again.
Making a call by entering a phone
number1. Push the
button on steering wheel. A
tone will sound.
2. Say: “Call”
*A
. The system acknowledges
the command and announces the next set of
available commands.
3. Say: “Phone Number”
*B
. The system
acknowledges the command and an-
nounces the next set of available commands.
Say: “Special Dialing” to dial more than 10
digits or any special characters.
4. Say the number you wish to call starting with the area code in single digit format. If the
system has trouble recognizing the correct phone number, try entering the number in
the following groups: 3-digit area code, 3-
digit prefix and the last 4-digits. For example,
555-121-3354 can be said as “five five five”
as the 1st group, then “one two one” as the
2nd group, and “three three five four” as the
3rd group. For dialing more than 10 digits or
any special characters, say “Special Dial-
ing”. See “How to say numbers” earlier in
this section, for more information.
5. When you have finished speaking the phone number, the system repeats it back and
announces the available commands.
6. Say: “Dial”
*C. The system acknowledges
the command and makes the call.
For additional command options, see “LIST OF
VOICE COMMANDS” later in this section.
Receiving a callWhen you hear the ring tone, press thebutton on the steering wheel.
Once the call has ended, press the
button
on the steering wheel.
NOTE:
If you do not wish to take the call when you
hear the ring tone, press the
button on
the steering wheel to reject the call.
4-96
Center display, heater, air conditioner, audio, phone and voice recognition systems