2011 NISSAN 370Z COUPE heater
[x] Cancel search: heaterPage 280 of 419
Black plate (276,1)
Model "Z34-D" EDITED: 2010/ 7/ 27
SAA2552
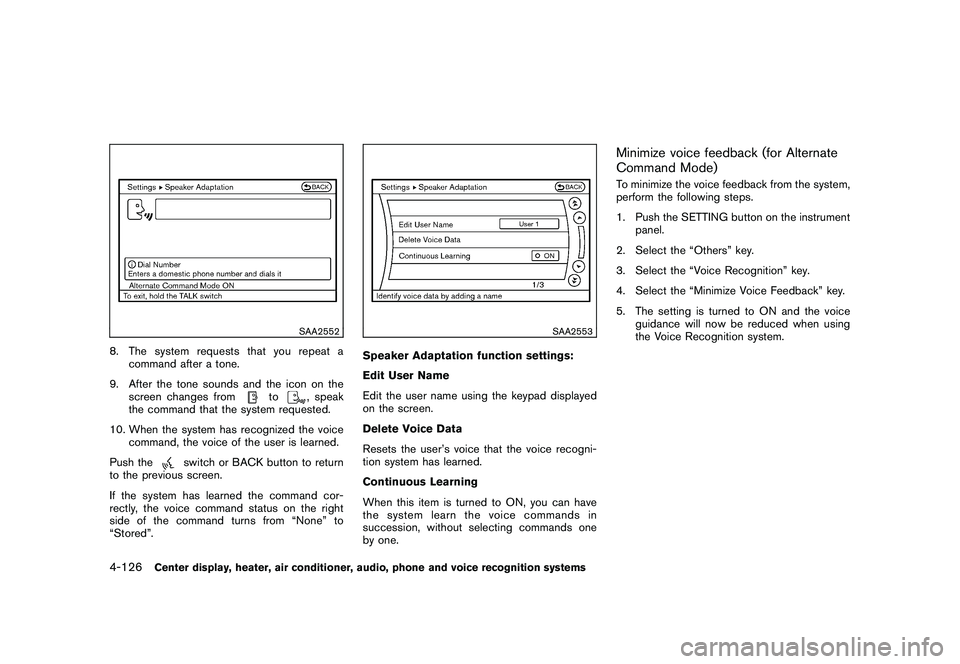
8. The system requests that you repeat acommand after a tone.
9. After the tone sounds and the icon on the screen changes from
to
, speak
the command that the system requested.
10. When the system has recognized the voice command, the voice of the user is learned.
Push the
switch or BACK button to return
to the previous screen.
If the system has learned the command cor-
rectly, the voice command status on the right
side of the command turns from “None” to
“Stored”.
SAA2553
Speaker Adaptation function settings:
Edit User Name
Edit the user name using the keypad displayed
on the screen.
Delete Voice Data
Resets the user’s voice that the voice recogni-
tion system has learned.
Continuous Learning
When this item is turned to ON, you can have
the system learn the voice commands in
succession, without selecting commands one
by one.
Minimize voice feedback (for Alternate
Command Mode)To minimize the voice feedback from the system,
perform the following steps.
1. Push the SETTING button on the instrument panel.
2. Select the “Others” key.
3. Select the “Voice Recognition” key.
4. Select the “Minimize Voice Feedback” key.
5. The setting is turned to ON and the voice guidance will now be reduced when using
the Voice Recognition system.
4-126
Center display, heater, air conditioner, audio, phone and voice recognition systems
Page 281 of 419
Black plate (277,1)
Model "Z34-D" EDITED: 2010/ 7/ 27
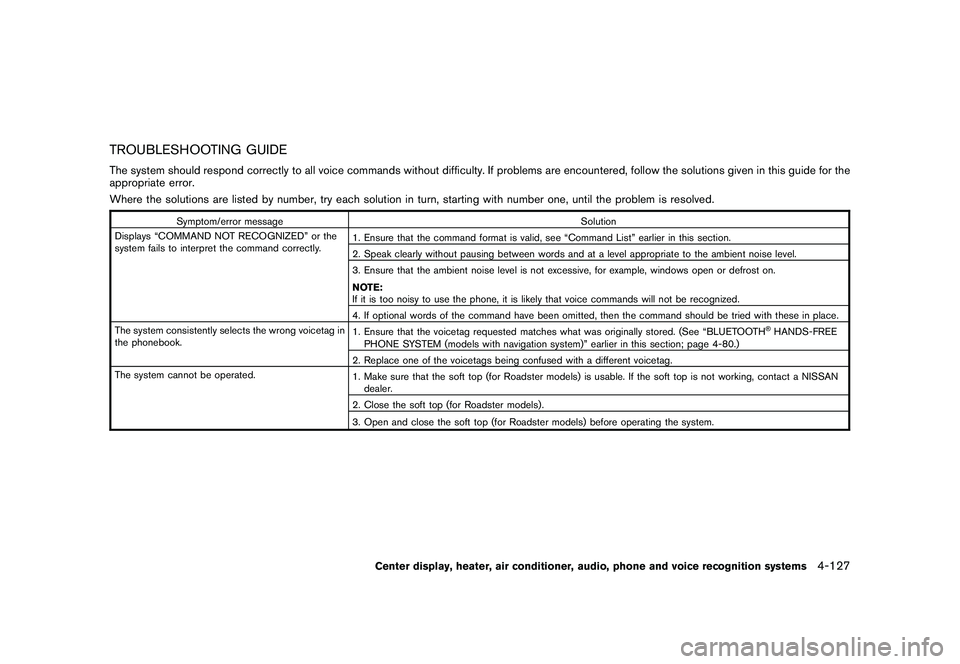
TROUBLESHOOTING GUIDEThe system should respond correctly to all voice commands without difficulty. If problems are encountered, follow the solutions given in this guide for the
appropriate error.
Where the solutions are listed by number, try each solution in turn, starting with number one, until the problem is resolved.
Symptom/error messageSolution
Displays “COMMAND NOT RECOGNIZED” or the
system fails to interpret the command correctly. 1. Ensure that the command format is valid, see “Command List” earlier in this section.
2. Speak clearly without pausing between words and at a level appropriate to the ambient noise level.
3. Ensure that the ambient noise level is not excessive, for example, windows open or defrost on.
NOTE:
If it is too noisy to use the phone, it is likely that voice commands will not be recognized.
4. If optional words of the command have been omitted, then the command should be tried with these in place.
The system consistently selects the wrong voicetag in
the phonebook. 1. Ensure that the voicetag requested matches what was originally stored. (See “BLUETOOTH
®HANDS-FREE
PHONE SYSTEM (models with navigation system)” earlier in this section; page 4-80.)
2. Replace one of the voicetags being confused with a different voicetag.
The system cannot be operated. 1. Make sure that the soft top (for Roadster models) is usable. If the soft top is not working, contact a NISSAN
dealer.
2. Close the soft top (for Roadster models) .
3. Open and close the soft top (for Roadster models) before operating the system.
Center display, heater, air conditioner, audio, phone and voice recognition systems
4-127
Page 282 of 419

Black plate (278,1)
Model "Z34-D" EDITED: 2010/ 7/ 27
MEMO4-128
Center display, heater, air conditioner, audio, phone and voice recognition systems
Page 283 of 419
Black plate (16,1)
5 Starting and driving
Model "Z34-D" EDITED: 2010/ 7/ 28
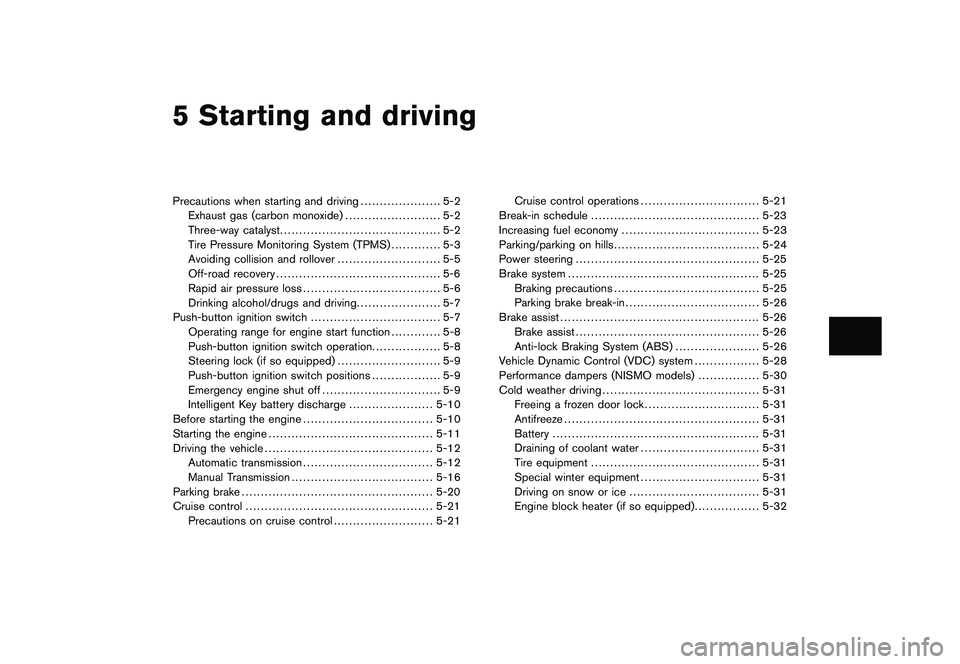
Precautions when starting and driving..................... 5-2
Exhaust gas (carbon monoxide) ......................... 5-2
Three-way catalyst .......................................... 5-2
Tire Pressure Monitoring System (TPMS) ............. 5-3
Avoiding collision and rollover ........................... 5-5
Off-road recovery ........................................... 5-6
Rapid air pressure loss .................................... 5-6
Drinking alcohol/drugs and driving ...................... 5-7
Push-button ignition switch .................................. 5-7
Operating range for engine start function ............. 5-8
Push-button ignition switch operation. ................. 5-8
Steering lock (if so equipped) ........................... 5-9
Push-button ignition switch positions .................. 5-9
Emergency engine shut off ............................... 5-9
Intelligent Key battery discharge ...................... 5-10
Before starting the engine .................................. 5-10
Starting the engine ........................................... 5-11
Driving the vehicle ............................................ 5-12
Automatic transmission .................................. 5-12
Manual Transmission ..................................... 5-16
Parking brake .................................................. 5-20
Cruise control ................................................. 5-21
Precautions on cruise control .......................... 5-21 Cruise control operations
............................... 5-21
Break-in schedule ............................................ 5-23
Increasing fuel economy .................................... 5-23
Parking/parking on hills ...................................... 5-24
Power steering ................................................ 5-25
Brake system .................................................. 5-25
Braking precautions ...................................... 5-25
Parking brake break-in ................................... 5-26
Brake assist .................................................... 5-26
Brake assist ................................................ 5-26
Anti-lock Braking System (ABS) ...................... 5-26
Vehicle Dynamic Control (VDC) system ................. 5-28
Performance dampers (NISMO models) ................ 5-30
Cold weather driving ......................................... 5-31
Freeing a frozen door lock .............................. 5-31
Antifreeze ................................................... 5-31
Battery ...................................................... 5-31
Draining of coolant water ............................... 5-31
Tire equipment ............................................ 5-31
Special winter equipment ............................... 5-31
Driving on snow or ice .................................. 5-31
Engine block heater (if so equipped) ................. 5-32
Page 314 of 419
Black plate (310,1)
Model "Z34-D" EDITED: 2010/ 7/ 27
.Watch for slippery spots (glare ice) .
These may appear on an otherwise
clear road in shaded areas. If a
patch of ice is seen ahead, brake
before reaching it. Try not to brake
while on the ice, and avoid any
sudden steering maneuvers.
. Do not use the cruise control on
slippery roads.
. Snow can trap dangerous exhaust
gases under your vehicle. Keep
snow clear of the exhaust pipe and
from around your vehicle.
ENGINE BLOCK HEATER (if so
equipped)Engine block heaters are used to assist with
cold temperature starting.
The engine block heater should be used when
the outside temperature is 20 8F( �7 8C) or lower.To use the engine block heater1. Turn the engine off.
2. Open the hood and unwrap the engine
block heater cord.
3. Plug the engine block heater cord into a grounded 3-wire, 3-pronged extension cord.
4. Plug the extension cord into a Ground Fault Interrupt (GFI) protected, grounded 110-
volt AC (VAC) outlet.
5. The engine block heater must be plugged in for at least 2 - 4 hours, depending on
outside temperatures, to properly warm the
engine coolant. Use an appropriate timer to
turn the engine block heater on.
6. Before starting the engine, unplug and properly store the cord to keep it away from
moving parts.
WARNING
.Do not use your engine block heater
with an ungrounded electrical sys-
tem or a 2-pronged adapter. You can
be seriously injured by an electrical
shock if you use an ungrounded
connection.
. Disconnect and properly store the
engine block heater cord before
starting the engine. Damage to the
cord could result in an electrical
shock and can cause serious injury.
. Use a heavy-duty 3-wire, 3-pronged
extension cord rated for at least
10A. Plug the extension cord into a
Ground Fault Interrupt (GFI) pro-
tected, grounded 110-VAC outlet.
Failure to use the proper extension
cord or a grounded outlet can result
in a fire or electrical shock and
cause serious personal injury.
5-32
Starting and driving
Page 328 of 419
Black plate (326,1)
Model "Z34-D" EDITED: 2010/ 7/ 27
SCE0791
WARNING
Always follow the instructions below.
Failure to do so could result in damage
to the charging system and cause
personal injury.
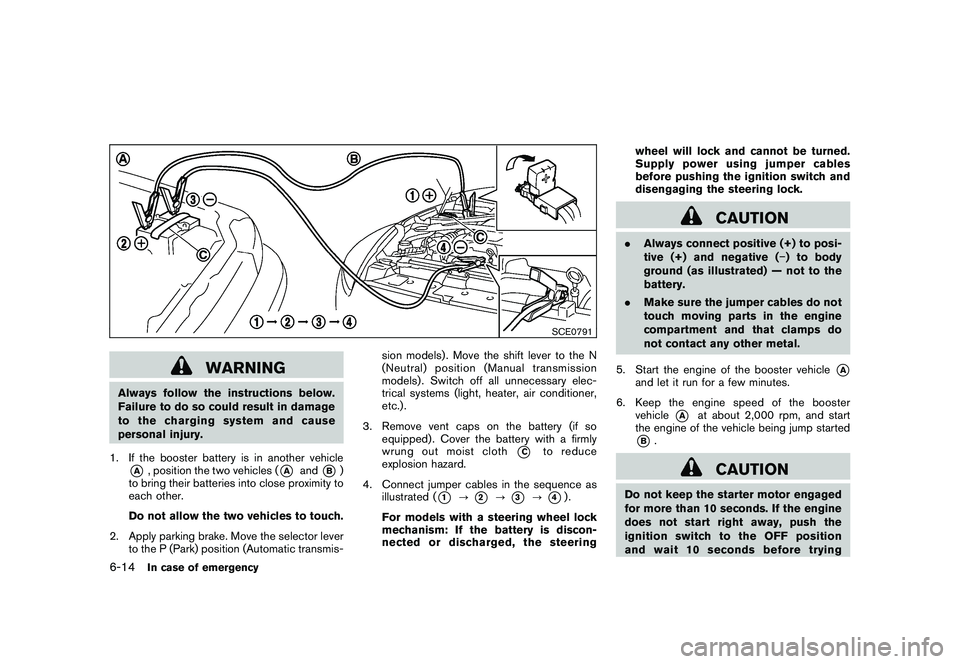
1. If the booster battery is in another vehicle*A
, position the two vehicles (
*A
and
*B)
to bring their batteries into close proximity to
each other.
Do not allow the two vehicles to touch.
2. Apply parking brake. Move the selector lever to the P (Park) position (Automatic transmis- sion models) . Move the shift lever to the N
(Neutral) position (Manual transmission
models) . Switch off all unnecessary elec-
trical systems (light, heater, air conditioner,
etc.) .
3. Remove vent caps on the battery (if so equipped) . Cover the battery with a firmly
wrung out moist cloth
*C
to reduce
explosion hazard.
4. Connect jumper cables in the sequence as illustrated (
*1
?
*2
?
*3
?
*4).
For models with a steering wheel lock
mechanism: If the battery is discon-
nected or discharged, the steering wheel will lock and cannot be turned.
Supply power using jumper cables
before pushing the ignition switch and
disengaging the steering lock.
CAUTION
.
Always connect positive (+) to posi-
tive (+) and negative ( �) to body
ground (as illustrated) — not to the
battery.
. Make sure the jumper cables do not
touch moving parts in the engine
compartment and that clamps do
not contact any other metal.
5. Start the engine of the booster vehicle
*A
and let it run for a few minutes.
6. Keep the engine speed of the booster vehicle
*A
at about 2,000 rpm, and start
the engine of the vehicle being jump started
*B.
CAUTION
Do not keep the starter motor engaged
for more than 10 seconds. If the engine
does not start right away, push the
ignition switch to the OFF position
and wait 10 seconds before trying
6-14
In case of emergency
Page 329 of 419
Black plate (327,1)
Model "Z34-D" EDITED: 2010/ 7/ 27
again.
7. After starting your engine, carefully discon- nect the negative cable and then the positive
cable (
*4
?
*3
?
*2
?
*1).
8. Replace the vent caps (if so equipped) . Be sure to dispose of the cloth used to cover
the vent holes as it may be contaminated
with corrosive acid.
9. Put the battery cover on. Do not attempt to start the engine by pushing.
CAUTION
.
Automatic transmission models
cannot be push-started or tow-
started. Attempting to do so may
cause transmission damage.
. Three way catalyst equipped models
should not be started by pushing
since the three way catalyst may be
damaged.
. Never try to start the vehicle by
towing it; when the engine starts,
the forward surge could cause the
vehicle to collide with the tow
vehicle.
CAUTION
.Do not continue to drive if your
vehicle overheats. Doing so could
cause engine damage or a vehicle
fire.
. To avoid the danger of being
scalded, never remove the radiator
cap while the engine is still hot.
When the radiator cap is removed,
pressurized hot water will spurt out,
possibly causing serious injury.
. Do not open the hood if steam is
coming out.
If your vehicle is overheating (indicated by an
extremely high temperature gauge reading) , or if
you feel a lack of engine power, detect abnormal
noise, etc., take the following steps:
1. Move the vehicle safely off the road, apply the parking brake and move the selector
lever to the P (Park) position (Automatic
transmission models) . Move the shift lever to
the N (Neutral) position (Manual transmis-
sion models) .
Do not stop the engine.
2. Turn off the air conditioner. Open all the windows, move the heater or air conditioner
PUSH STARTING IF YOUR VEHICLE OVERHEATS
In case of emergency
6-15
Page 348 of 419
Black plate (348,1)
Model "Z34-D" EDITED: 2010/ 7/ 27
Warning lights and chimes:Make sure that
all warning lights and chimes are operating
properly.
Windshield defroster: Check that the air
comes out of the defroster outlets properly and
in sufficient quantity when operating the heater
or air conditioner.
Windshield wiper and washer*: Check that
the wipers and washer operate properly and that
the wipers do not streak.Under the hood and vehicleThe maintenance items listed here should be
checked periodically (for example, each time you
check the engine oil or refuel) .
Battery*: Check the fluid level in each cell. It
should be between the MAX and MIN lines.
Vehicles operated in high temperatures or under
severe condition require frequent checks of the
battery fluid level.
Brake and clutch fluid levels*: Make sure
that the brake and clutch fluid levels are
between the MAX and MIN lines on the
reservoirs.
Engine coolant level*: Check the coolant level
when the engine is cold.
Engine drive belts*: Make sure that no belt is
frayed, worn, cracked or oily. Engine oil level*:
Check the level after parking
the vehicle on a level spot and turning off the
engine. Wait more than 15 minutes for the oil to
drain back into the oil pan.
Exhaust system: Make sure there are no loose
supports, cracks or holes. If the sound of the
exhaust seems unusual or there is a smell of
exhaust fumes, immediately have the exhaust
system inspected by a NISSAN dealer. (See
“PRECAUTIONS WHEN STARTING AND
DRIVING” in the “5. St arting and driving”
section for exhaust gas (carbon monoxide) .)
Fluid leaks: Check under the vehicle for fuel,
oil, water or other fluid leaks after the vehicle has
been parked for a while. Water dripping from the
air conditioner after use is normal. If you should
notice any leaks or if gasoline fumes are evident,
check for the cause and have it corrected
immediately.
Power steering fluid level* and lines: Check
the level with the engine off. Check the lines for
proper attachment, leaks, cracks, etc.
Radiator and hoses: Check the front of the
radiator and clean off any dirt, insects, leaves,
etc., that may have accumulated. Make sure the
hoses have no cracks, deformation, rot or loose
connections. Underbody:
The underbody is frequently ex-
posed to corrosive substances such as those
used on icy roads or to control dust. It is very
important to remove these substances, other-
wise rust will form on the floor pan, frame, fuel
lines and around the exhaust system. At the end
of winter, the underbody should be thoroughly
flushed with plain water, being careful to clean
those areas where mud and dirt may accumu-
late. For additional information, see “CLEANING
EXTERIOR” in the “7. Appearance and care”
section.
Windshield washer fluid*: Check that there is
adequate fluid in the reservoir.8-4
Maintenance and do-it-yourself