2011 NISSAN 370Z COUPE jacking
[x] Cancel search: jackingPage 318 of 419
Black plate (316,1)
Model "Z34-D" EDITED: 2010/ 7/ 27
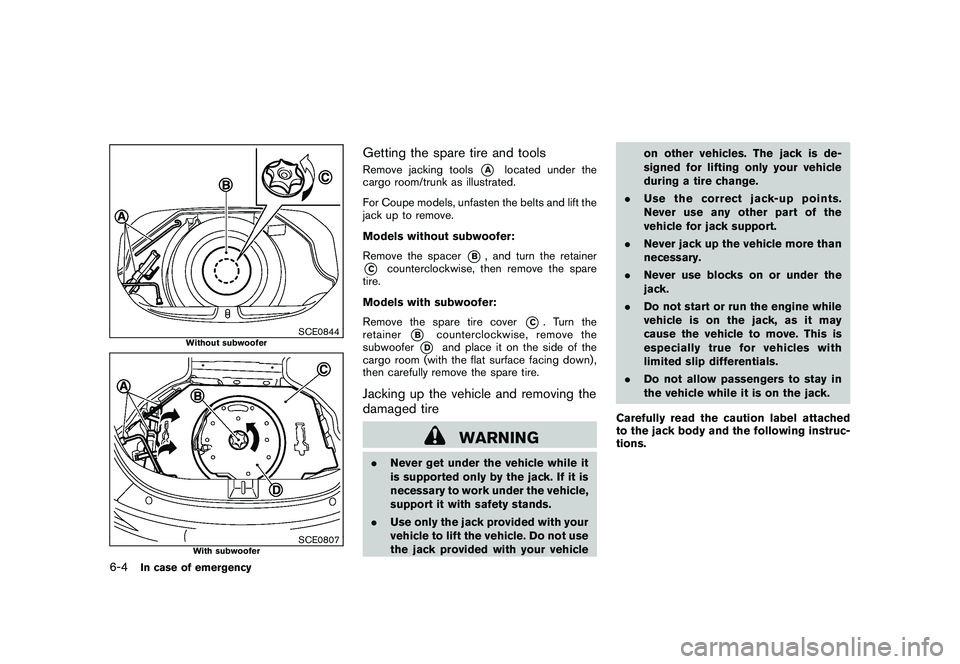
SCE0844
Without subwoofer
SCE0807
With subwoofer
Getting the spare tire and toolsRemove jacking tools
*A
located under the
cargo room/trunk as illustrated.
For Coupe models, unfasten the belts and lift the
jack up to remove.
Models without subwoofer:
Remove the spacer
*B, and turn the retainer
*C
counterclockwise, then remove the spare
tire.
Models with subwoofer:
Remove the spare tire cover
*C. Turn the
retainer
*B
counterclockwise, remove the
subwoofer
*D
and place it on the side of the
cargo room (with the flat surface facing down) ,
then carefully remove the spare tire.
Jacking up the vehicle and removing the
damaged tire
WARNING
. Never get under the vehicle while it
is supported only by the jack. If it is
necessary to work under the vehicle,
support it with safety stands.
. Use only the jack provided with your
vehicle to lift the vehicle. Do not use
the jack provided with your vehicle on other vehicles. The jack is de-
signed for lifting only your vehicle
during a tire change.
. Use the correct jack-up points.
Never use any other part of the
vehicle for jack support.
. Never jack up the vehicle more than
necessary.
. Never use blocks on or under the
jack.
. Do not start or run the engine while
vehicle is on the jack, as it may
cause the vehicle to move. This is
especially true for vehicles with
limited slip differentials.
. Do not allow passengers to stay in
the vehicle while it is on the jack.
Carefully read the caution label attached
to the jack body and the following instruc-
tions.
6-4
In case of emergency
Page 320 of 419
Black plate (318,1)
Model "Z34-D" EDITED: 2010/ 7/ 27
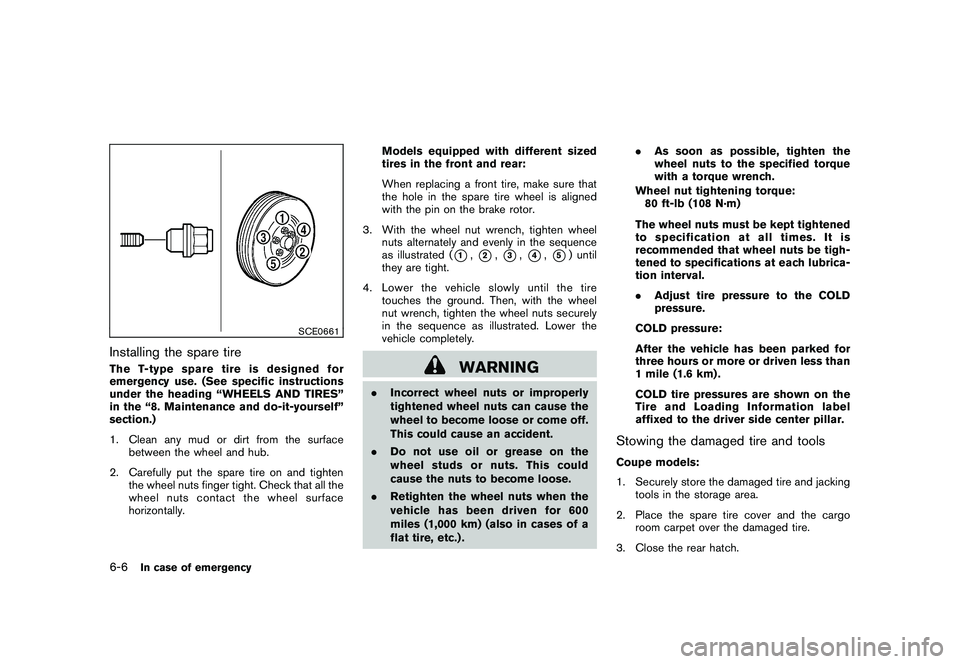
SCE0661
Installing the spare tireThe T-type spare tire is designed for
emergency use. (See specific instructions
under the heading “WHEELS AND TIRES”
in the “8. Maintenance and do-it-yourself”
section.)
1. Clean any mud or dirt from the surfacebetween the wheel and hub.
2. Carefully put the spare tire on and tighten the wheel nuts finger tight. Check that all the
wheel nuts contact the wheel surface
horizontally. Models equipped with different sized
tires in the front and rear:
When replacing a front tire, make sure that
the hole in the spare tire wheel is aligned
with the pin on the brake rotor.
3. With the wheel nut wrench, tighten wheel nuts alternately and evenly in the sequence
as illustrated (
*1,*2,*3,*4,*5) until
they are tight.
4. Lower the vehicle slowly until the tire touches the ground. Then, with the wheel
nut wrench, tighten the wheel nuts securely
in the sequence as illustrated. Lower the
vehicle completely.
WARNING
.Incorrect wheel nuts or improperly
tightened wheel nuts can cause the
wheel to become loose or come off.
This could cause an accident.
. Do not use oil or grease on the
wheel studs or nuts. This could
cause the nuts to become loose.
. Retighten the wheel nuts when the
vehicle has been driven for 600
miles (1,000 km) (also in cases of a
flat tire, etc.) . .
As soon as possible, tighten the
wheel nuts to the specified torque
with a torque wrench.
Wheel nut tightening torque: 80 ft-lb (108 N·m)
The wheel nuts must be kept tightened
to specification at all times. It is
recommended that wheel nuts be tigh-
tened to specifications at each lubrica-
tion interval.
. Adjust tire pressure to the COLD
pressure.
COLD pressure:
After the vehicle has been parked for
three hours or more or driven less than
1 mile (1.6 km) .
COLD tire pressures are shown on the
Tire and Loading Information label
affixed to the driver side center pillar.
Stowing the damaged tire and toolsCoupe models:
1. Securely store the damaged tire and jacking tools in the storage area.
2. Place the spare tire cover and the cargo room carpet over the damaged tire.
3. Close the rear hatch.
6-6
In case of emergency
Page 321 of 419
Black plate (319,1)
Model "Z34-D" EDITED: 2010/ 7/ 27
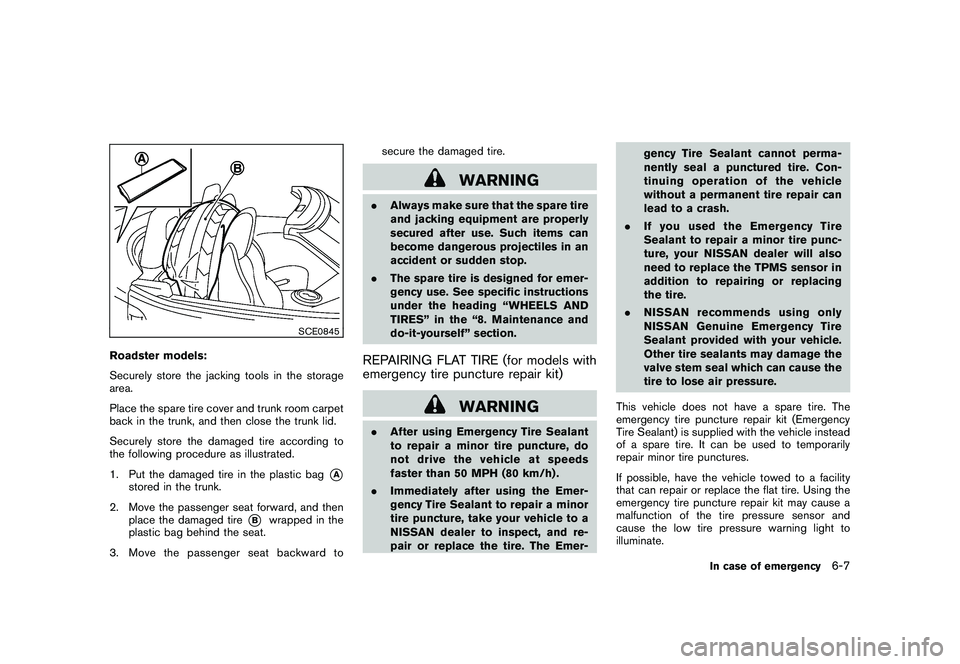
SCE0845
Roadster models:
Securely store the jacking tools in the storage
area.
Place the spare tire cover and trunk room carpet
back in the trunk, and then close the trunk lid.
Securely store the damaged tire according to
the following procedure as illustrated.
1. Put the damaged tire in the plastic bag
*A
stored in the trunk.
2. Move the passenger seat forward, and then place the damaged tire
*B
wrapped in the
plastic bag behind the seat.
3. Move the passenger seat backward to secure the damaged tire.
WARNING
.
Always make sure that the spare tire
and jacking equipment are properly
secured after use. Such items can
become dangerous projectiles in an
accident or sudden stop.
. The spare tire is designed for emer-
gency use. See specific instructions
under the heading “WHEELS AND
TIRES” in the “8. Maintenance and
do-it-yourself” section.REPAIRING FLAT TIRE (for models with
emergency tire puncture repair kit)
WARNING
.After using Emergency Tire Sealant
to repair a minor tire puncture, do
not drive the vehicle at speeds
faster than 50 MPH (80 km/h) .
. Immediately after using the Emer-
gency Tire Sealant to repair a minor
tire puncture, take your vehicle to a
NISSAN dealer to inspect, and re-
pair or replace the tire. The Emer- gency Tire Sealant cannot perma-
nently seal a punctured tire. Con-
tinuing operation of the vehicle
without a permanent tire repair can
lead to a crash.
. If you used the Emergency Tire
Sealant to repair a minor tire punc-
ture, your NISSAN dealer will also
need to replace the TPMS sensor in
addition to repairing or replacing
the tire.
. NISSAN recommends using only
NISSAN Genuine Emergency Tire
Sealant provided with your vehicle.
Other tire sealants may damage the
valve stem seal which can cause the
tire to lose air pressure.
This vehicle does not have a spare tire. The
emergency tire puncture repair kit (Emergency
Tire Sealant) is supplied with the vehicle instead
of a spare tire. It can be used to temporarily
repair minor tire punctures.
If possible, have the vehicle towed to a facility
that can repair or replace the flat tire. Using the
emergency tire puncture repair kit may cause a
malfunction of the tire pressure sensor and
cause the low tire pressure warning light to
illuminate.
In case of emergency
6-7
Page 323 of 419
Black plate (321,1)
Model "Z34-D" EDITED: 2010/ 7/ 27
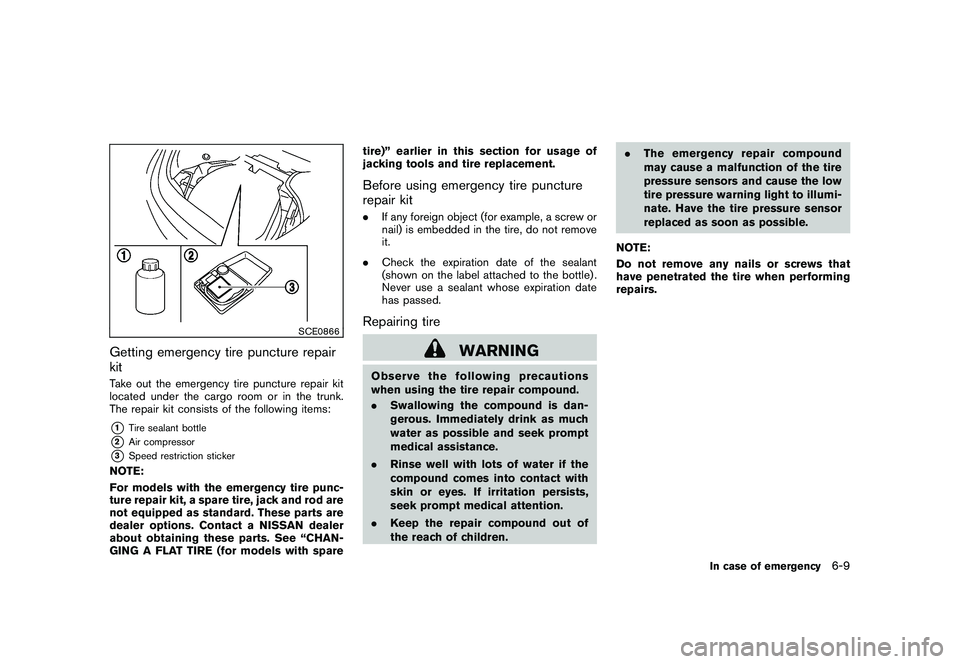
SCE0866
Getting emergency tire puncture repair
kitTake out the emergency tire puncture repair kit
located under the cargo room or in the trunk.
The repair kit consists of the following items:*1
Tire sealant bottle
*2
Air compressor
*3
Speed restriction sticker
NOTE:
For models with the emergency tire punc-
ture repair kit, a spare tire, jack and rod are
not equipped as standard. These parts are
dealer options. Contact a NISSAN dealer
about obtaining these parts. See “CHAN-
GING A FLAT TIRE (for models with sparetire)” earlier in this section for usage of
jacking tools and tire replacement.
Before using emergency tire puncture
repair kit.
If any foreign object (for example, a screw or
nail) is embedded in the tire, do not remove
it.
. Check the expiration date of the sealant
(shown on the label attached to the bottle) .
Never use a sealant whose expiration date
has passed.Repairing tire
WARNING
Observe the following precautions
when using the tire repair compound.
.Swallowing the compound is dan-
gerous. Immediately drink as much
water as possible and seek prompt
medical assistance.
. Rinse well with lots of water if the
compound comes into contact with
skin or eyes. If irritation persists,
seek prompt medical attention.
. Keep the repair compound out of
the reach of children. .
The emergency re pair compound
may cause a malfunction of the tire
pressure sensors and cause the low
tire pressure warning light to illumi-
nate. Have the tire pressure sensor
replaced as soon as possible.
NOTE:
Do not remove any nails or screws that
have penetrated the tire when performing
repairs.
In case of emergency
6-9
Page 334 of 419
Black plate (332,1)
Model "Z34-D" EDITED: 2010/ 7/ 27
SCE0793
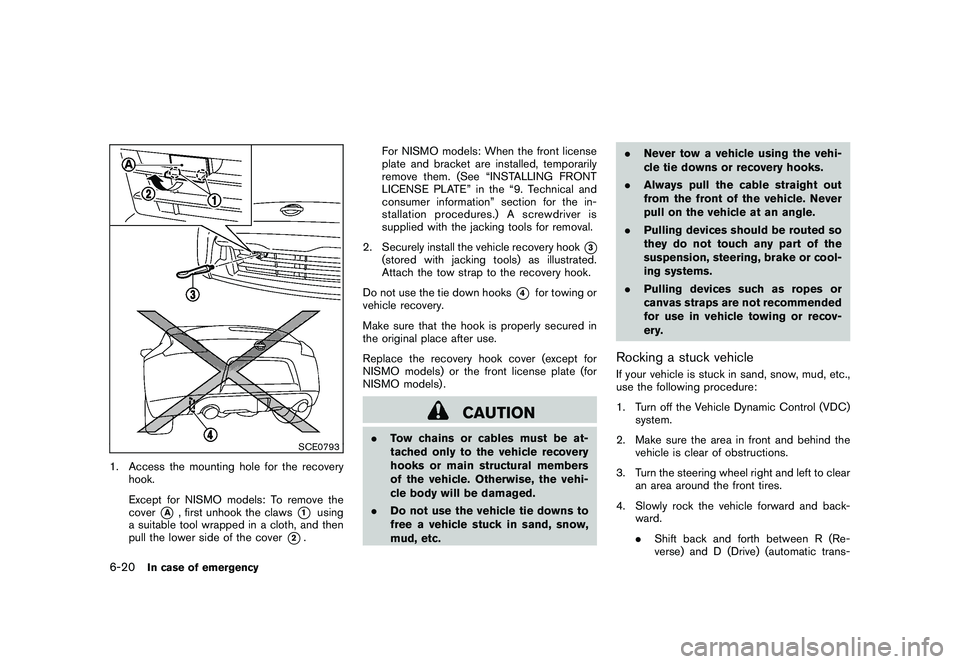
1. Access the mounting hole for the recoveryhook.
Except for NISMO models: To remove the
cover
*A
, first unhook the claws
*1
using
a suitable tool wrapped in a cloth, and then
pull the lower side of the cover
*2. For NISMO models: When the front license
plate and bracket are installed, temporarily
remove them. (See “INSTALLING FRONT
LICENSE PLATE” in the “9. Technical and
consumer information” section for the in-
stallation procedures.) A screwdriver is
supplied with the jacking tools for removal.
2. Securely install the vehicle recovery hook
*3
(stored with jacking tools) as illustrated.
Attach the tow strap to the recovery hook.
Do not use the tie down hooks
*4
for towing or
vehicle recovery.
Make sure that the hook is properly secured in
the original place after use.
Replace the recovery hook cover (except for
NISMO models) or the front license plate (for
NISMO models) .
CAUTION
. Tow chains or cables must be at-
tached only to the vehicle recovery
hooks or main structural members
of the vehicle. Otherwise, the vehi-
cle body will be damaged.
. Do not use the vehicle tie downs to
free a vehicle stuck in sand, snow,
mud, etc. .
Never tow a vehicle using the vehi-
cle tie downs or recovery hooks.
. Always pull the cable straight out
from the front of the vehicle. Never
pull on the vehicle at an angle.
. Pulling devices should be routed so
they do not touch any part of the
suspension, steering, brake or cool-
ing systems.
. Pulling devices such as ropes or
canvas straps are not recommended
for use in vehicle towing or recov-
ery.
Rocking a stuck vehicleIf your vehicle is stuck in sand, snow, mud, etc.,
use the following procedure:
1. Turn off the Vehicle Dynamic Control (VDC)
system.
2. Make sure the area in front and behind the vehicle is clear of obstructions.
3. Turn the steering wheel right and left to clear an area around the front tires.
4. Slowly rock the vehicle forward and back- ward.
.Shift back and forth between R (Re-
verse) and D (Drive) (automatic trans-
6-20
In case of emergency