2011 NISSAN 370Z COUPE center console
[x] Cancel search: center consolePage 97 of 419
Black plate (93,1)
Model "Z34-D" EDITED: 2010/ 7/ 27
.Any liquid spilled on the heated seat
should be removed immediately
with a dry cloth.
. When cleaning the seat, never use
gasoline, thinner, or any similar
materials.
. If any abnormalities are found or the
heated seat does not operate, turn
the switch off and have the system
checked by a NISSAN dealer.
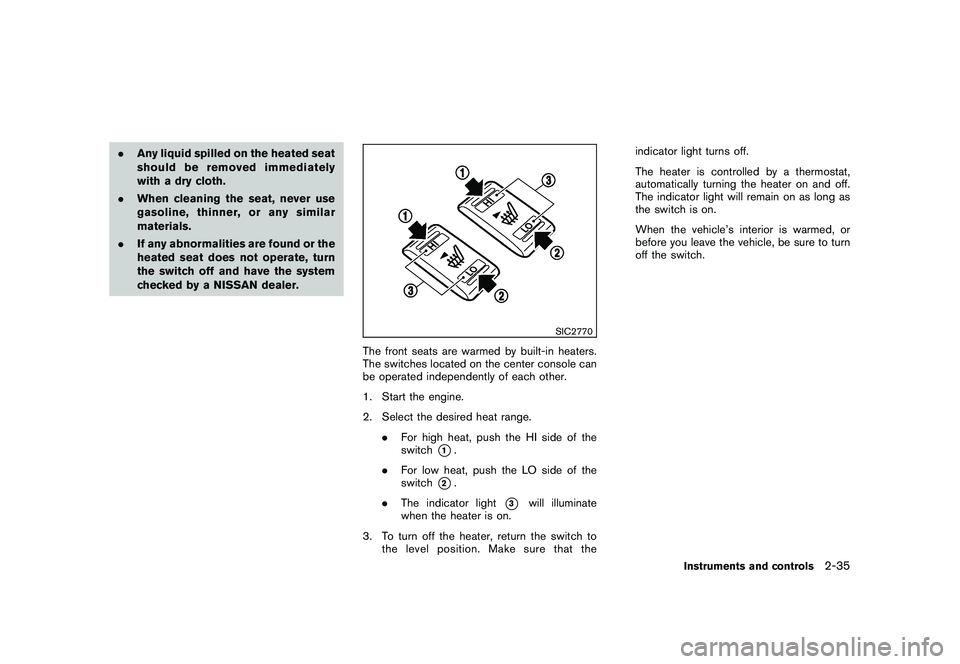
SIC2770
The front seats are warmed by built-in heaters.
The switches located on the center console can
be operated independently of each other.
1. Start the engine.
2. Select the desired heat range.
.For high heat, push the HI side of the
switch
*1.
. For low heat, push the LO side of the
switch
*2.
. The indicator light
*3
will illuminate
when the heater is on.
3. To turn off the heater, return the switch to the level position. Make sure that the indicator light turns off.
The heater is controlled by a thermostat,
automatically turning the heater on and off.
The indicator light will remain on as long as
the switch is on.
When the vehicle’s interior is warmed, or
before you leave the vehicle, be sure to turn
off the switch.
Instruments and controls
2-35
Page 98 of 419
Black plate (94,1)
Model "Z34-D" EDITED: 2010/ 7/ 27
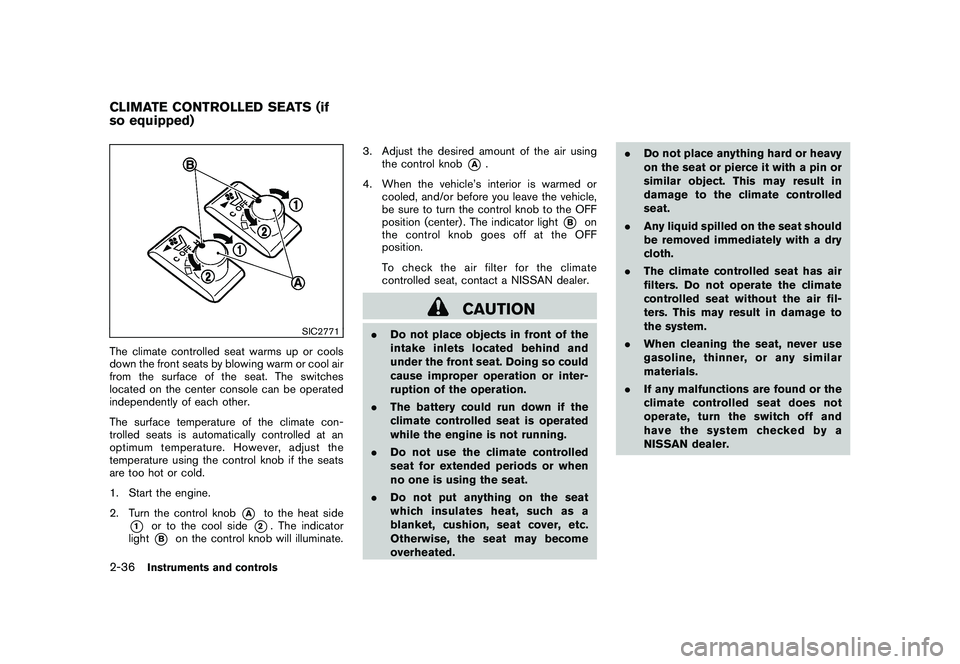
SIC2771
The climate controlled seat warms up or cools
down the front seats by blowing warm or cool air
from the surface of the seat. The switches
located on the center console can be operated
independently of each other.
The surface temperature of the climate con-
trolled seats is automatically controlled at an
optimum temperature. However, adjust the
temperature using the control knob if the seats
are too hot or cold.
1. Start the engine.
2. Turn the control knob
*A
to the heat side
*1
or to the cool side
*2. The indicator
light
*B
on the control knob will illuminate. 3. Adjust the desired amount of the air using
the control knob
*A
.
4. When the vehicle’s interior is warmed or cooled, and/or before you leave the vehicle,
be sure to turn the control knob to the OFF
position (center) . The indicator light
*B
on
the control knob goes off at the OFF
position.
To check the air filter for the climate
controlled seat, contact a NISSAN dealer.
CAUTION
. Do not place objects in front of the
intake inlets located behind and
under the front seat. Doing so could
cause improper operation or inter-
ruption of the operation.
. The battery could run down if the
climate controlled seat is operated
while the engine is not running.
. Do not use the climate controlled
seat for extended periods or when
no one is using the seat.
. Do not put anything on the seat
which insulates heat, such as a
blanket, cushion, seat cover, etc.
Otherwise, the seat may become
overheated. .
Do not place anything hard or heavy
on the seat or pierce it with a pin or
similar object. This may result in
damage to the climate controlled
seat.
. Any liquid spilled on the seat should
be removed immediately with a dry
cloth.
. The climate controlled seat has air
filters. Do not operate the climate
controlled seat without the air fil-
ters. This may result in damage to
the system.
. When cleaning the seat, never use
gasoline, thinner, or any similar
materials.
. If any malfunctions are found or the
climate controlled seat does not
operate, turn the switch off and
have the system checked by a
NISSAN dealer.
CLIMATE CONTROLLED SEATS (if
so equipped)2-36
Instruments and controls
Page 99 of 419
Black plate (95,1)
Model "Z34-D" EDITED: 2010/ 7/ 27
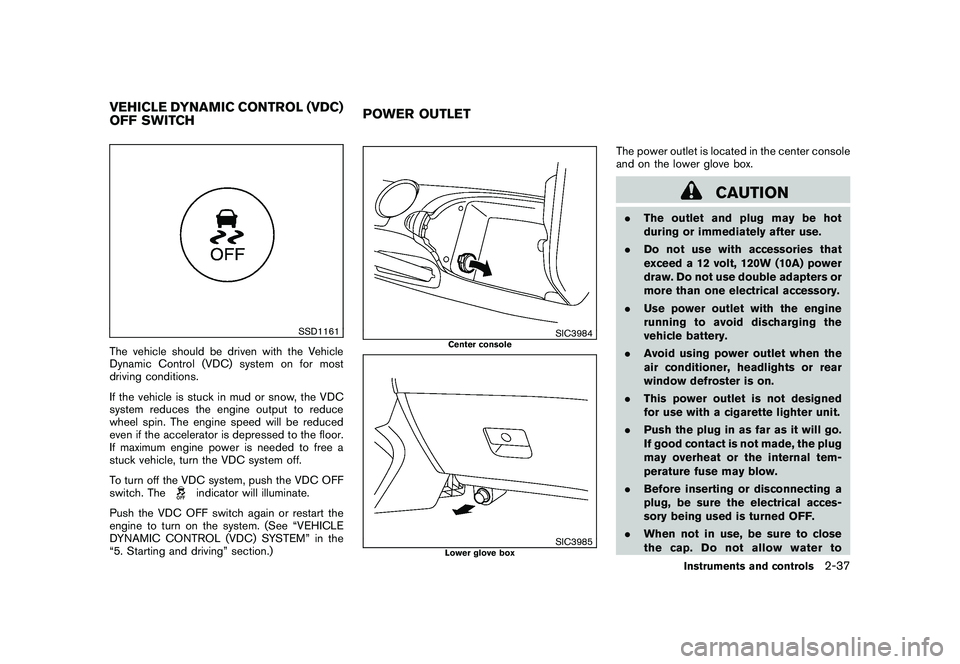
SSD1161
The vehicle should be driven with the Vehicle
Dynamic Control (VDC) system on for most
driving conditions.
If the vehicle is stuck in mud or snow, the VDC
system reduces the engine output to reduce
wheel spin. The engine speed will be reduced
even if the accelerator is depressed to the floor.
If maximum engine power is needed to free a
stuck vehicle, turn the VDC system off.
To turn off the VDC system, push the VDC OFF
switch. The
indicator will illuminate.
Push the VDC OFF switch again or restart the
engine to turn on the system. (See “VEHICLE
DYNAMIC CONTROL (VDC) SYSTEM” in the
“5. Starting and driving” section.)
SIC3984
Center console
SIC3985
Lower glove box
The power outlet is located in the center console
and on the lower glove box.
CAUTION
. The outlet and plug may be hot
during or immediately after use.
. Do not use with accessories that
exceed a 12 volt, 120W (10A) power
draw. Do not use double adapters or
more than one electrical accessory.
. Use power outlet with the engine
running to avoid discharging the
vehicle battery.
. Avoid using power outlet when the
air conditioner, headlights or rear
window defroster is on.
. This power outlet is not designed
for use with a cigarette lighter unit.
. Push the plug in as far as it will go.
If good contact is not made, the plug
may overheat or the internal tem-
perature fuse may blow.
. Before inserting or disconnecting a
plug, be sure the electrical acces-
sory being used is turned OFF.
. When not in use, be sure to close
the cap. Do not allow water to
VEHICLE DYNAMIC CONTROL (VDC)
OFF SWITCH POWER OUTLET
Instruments and controls
2-37
Page 101 of 419
Black plate (97,1)
Model "Z34-D" EDITED: 2010/ 7/ 27
SIC4071
A cup holder is located on the center console.
SIC3988
Soft bottle holder
CAUTION
.Do not use bottle holder for any
other objects that could be thrown
about in the vehicle and possibly
injure people during sudden braking
or an accident.
. Do not use bottle holder for open
liquid containers.
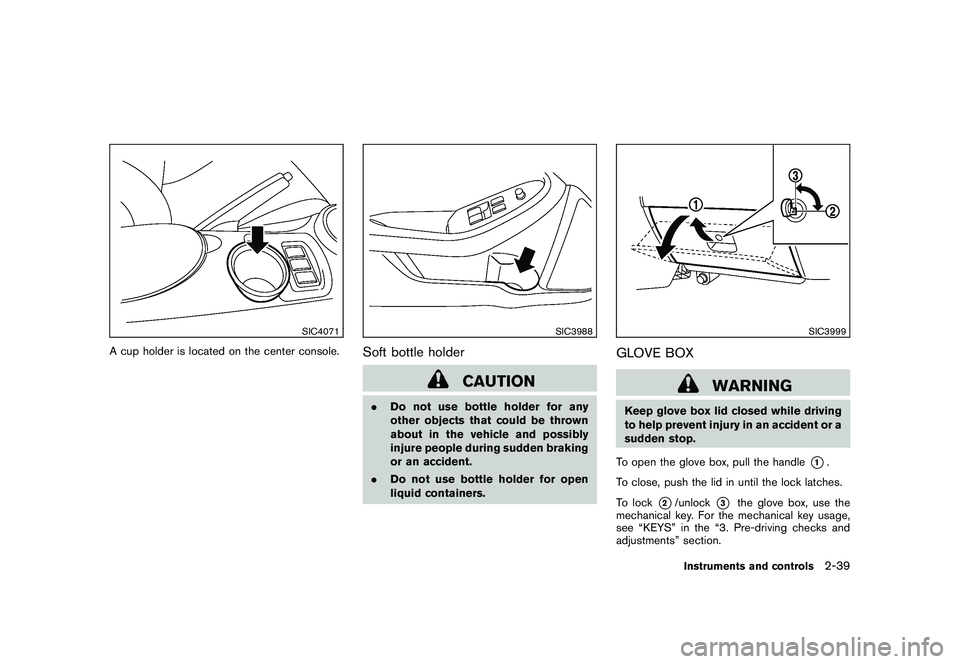
SIC3999
GLOVE BOX
WARNING
Keep glove box lid closed while driving
to help prevent injury in an accident or a
sudden stop.
To open the glove box, pull the handle
*1.
To close, push the lid in until the lock latches.
To lock
*2/unlock
*3
the glove box, use the
mechanical key. For the mechanical key usage,
see “KEYS” in the “3. Pre-driving checks and
adjustments” section.
Instruments and controls
2-39
Page 135 of 419

Black plate (131,1)
Model "Z34-D" EDITED: 2010/ 7/ 27
SPA2683
SECONDARY TRUNK LID RELEASEThe secondary trunk lid release mechanism
allows opening the trunk lid in the event of
discharged battery or emergency.
1. Open the rear parcel box.
2. Remove the cap
*1
with a suitable tool
*2.
3. Insert the key into the key cylinder and turn it counterclockwise. The trunk lid will open.
SPA2685
Interior/exterior view
1. Soft top indicator light (on the combination meter)
2. Soft top operating switch
3. Top lock hole
4. Soft top
5. Top storage lid
6. Trunk lid
7. Rear window
BEFORE OPERATING THE TOPThe soft top of this vehicle is electrically
operated. You can fully open or close the top
only by pressing the operating switch located on
the center console.
The soft top operating switch must be operated
under all of the following conditions:
.When the trunk is closed.
. When the vehicle is stopped.
. When the engine is running.
. When the ignition switch is in the ON
position.
SOFT TOP (Roadster models)
Pre-driving checks and adjustments
3-21
Page 212 of 419
Black plate (208,1)
Model "Z34-D" EDITED: 2010/ 7/ 27
be changed to the one specified.
Display:
To adjust the image quality of the screen, select
the preferred adjustment items.
Audio:
Select the preferred language for audio.
Subtitle (DVD-VIDEO, DVD-VR):
Select the preferred language for subtitles.
Display Mode (DVD-VIDEO, VIDEO-CD,
DVD-VR):
Select from the “Full”, “Wide”, “Normal” or
“Cinema” modes.
Title List (DVD-VR):
Select the preferred title from the list.
Play Mode:
Select the preferred play mode.
PG/PL Mode (DVD-VR):
Select the “PG” or “PL” mode.
SAA2499
USB MEMORY OPERATION (models
with navigation system)
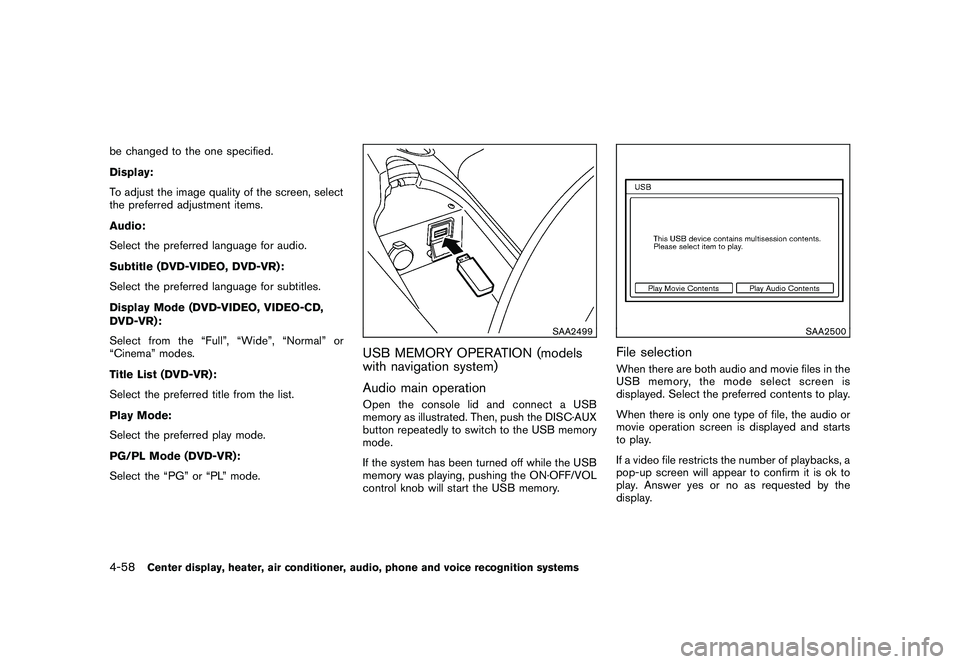
Audio main operationOpen the console lid and connect a USB
memory as illustrated. Then, push the DISC·AUX
button repeatedly to switch to the USB memory
mode.
If the system has been turned off while the USB
memory was playing, pushing the ON·OFF/VOL
control knob will start the USB memory.
SAA2500
File selectionWhen there are both audio and movie files in the
USB memory, the mode select screen is
displayed. Select the preferred contents to play.
When there is only one type of file, the audio or
movie operation screen is displayed and starts
to play.
If a video file restricts the number of playbacks, a
pop-up screen will appear to confirm it is ok to
play. Answer yes or no as requested by the
display.
4-58
Center display, heater, air conditioner, audio, phone and voice recognition systems
Page 221 of 419
Black plate (217,1)
Model "Z34-D" EDITED: 2010/ 7/ 27
(models with navigation system)” later in this
section.
SAA2512
iPod
®PLAYER OPERATION (models
with navigation system)
Connecting iPod
®
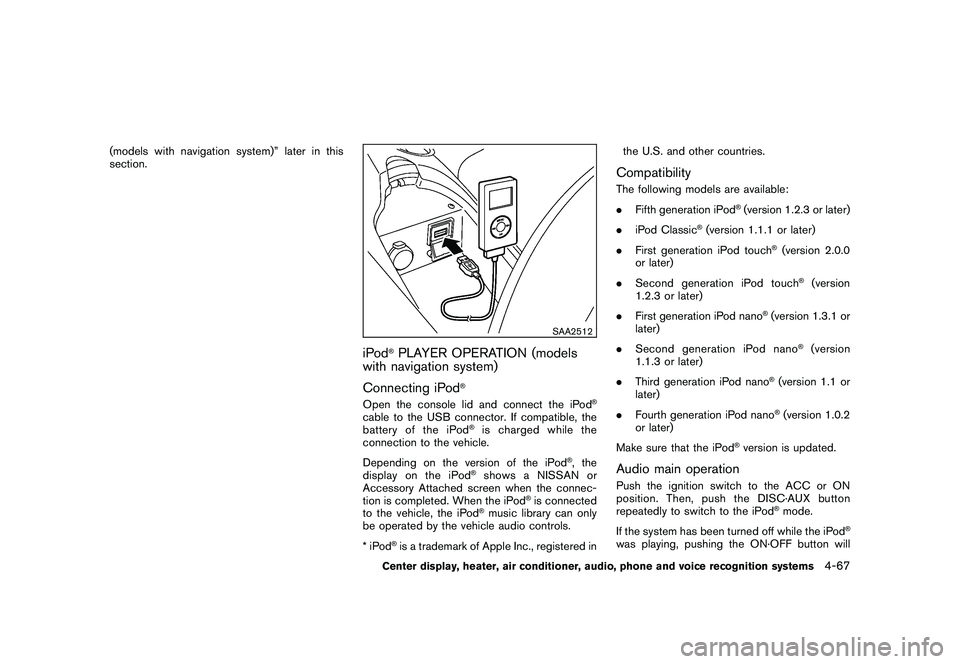
Open the console lid and connect the iPod
®
cable to the USB connector. If compatible, the
battery of the iPod
®is charged while the
connection to the vehicle.
Depending on the version of the iPod
®, the
display on the iPod
®shows a NISSAN or
Accessory Attached screen when the connec-
tion is completed. When the iPod
®is connected
to the vehicle, the iPod
®music library can only
be operated by the vehicle audio controls.
*iPod
®is a trademark of Apple Inc., registered in the U.S. and other countries.
CompatibilityThe following models are available:
.
Fifth generation iPod
®(version 1.2.3 or later)
. iPod Classic
®(version 1.1.1 or later)
. First generation iPod touch
®(version 2.0.0
or later)
. Second generation iPod touch
®(version
1.2.3 or later)
. First generation iPod nano
®(version 1.3.1 or
later)
. Second generation iPod nano
®(version
1.1.3 or later)
. Third generation iPod nano
®(version 1.1 or
later)
. Fourth generation iPod nano®(version 1.0.2
or later)
Make sure that the iPod
®version is updated.
Audio main operationPush the ignition switch to the ACC or ON
position. Then, push the DISC·AUX button
repeatedly to switch to the iPod
®mode.
If the system has been turned off while the iPod
®
was playing, pushing the ON·OFF button will
Center display, heater, air conditioner, audio, phone and voice recognition systems
4-67
Page 229 of 419
Black plate (225,1)
Model "Z34-D" EDITED: 2010/ 7/ 27
marks of Gracenote. The Gracenote logo and
logotype, and the “Powered by Gracenote” logo
are trademarks of Gracenote.
SAA2282
AUXILIARY INPUT JACKS (models with
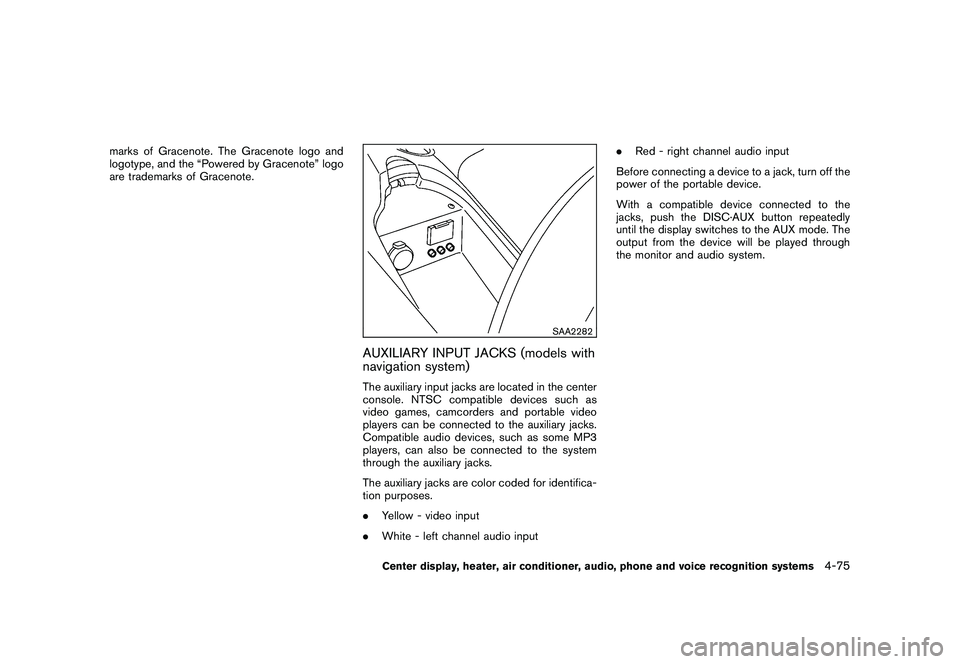
navigation system)The auxiliary input jacks are located in the center
console. NTSC compatible devices such as
video games, camcorders and portable video
players can be connected to the auxiliary jacks.
Compatible audio devices, such as some MP3
players, can also be connected to the system
through the auxiliary jacks.
The auxiliary jacks are color coded for identifica-
tion purposes.
.Yellow - video input
. White - left channel audio input .
Red - right channel audio input
Before connecting a device to a jack, turn off the
power of the portable device.
With a compatible device connected to the
jacks, push the DISC·AUX button repeatedly
until the display switches to the AUX mode. The
output from the device will be played through
the monitor and audio system.
Center display, heater, air conditioner, audio, phone and voice recognition systems
4-75