Page 193 of 330

NOTEl Set the temperature at about 22 (Type 1) or
25 (Type 2) under normal conditions.
l When the temperature is set to the highest or
the lowest setting under the AUTO opera-
tion, the air selection, mode selection, blower
speed and the air conditioning will be auto-
matically changed as follows.
Also, if manually operated after an automatic
changeover, manual operation will be selec-
ted. •Quick Heating (When the temperature is
set to the highest setting)
Outside air will be introduced, the air
flow will select foot position, and the air
conditioning will stop.
• Quick Cooling (When the temperature is
set to the lowest setting)
Inside air will be recirculated, the air
flow will select face position, and the air
conditioning will operate.Operating the system in manual mode E00704200040
Blower speed and ventilator mode may be control-
led manually by setting the blower speed selection
dial and the mode selection dial to the desired posi-
tions. To return to automatic operation, set the dials
to the “AUTO” position.
Demisting of the windscreen and door windows E00704300689CAUTIONlFor safety, make sure you have a clear
view through all the windows.To remove frost or mist from the windscreen and
door windows, use the mode selection dial (“”
or “”).
For ordinary demisting
Use this setting to keep the windscreen and door
windows clear of mist, and to keep the leg area heat-
ed (when driving in rain or snow).
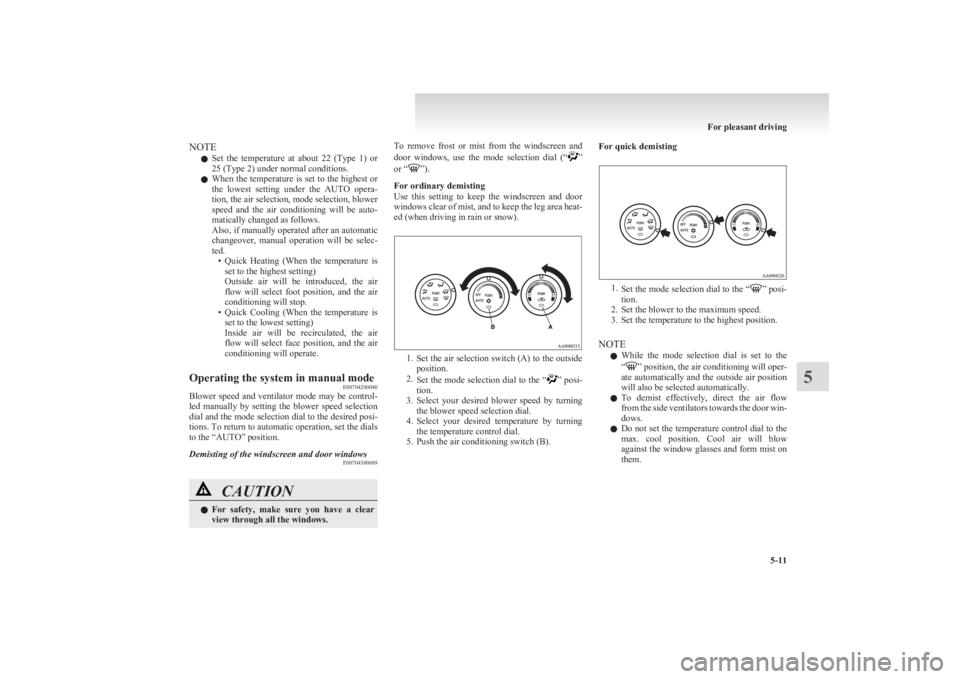
1. Set the air selection switch (A) to the outside
position.
2. Set the mode selection dial to the “
” posi-
tion.
3. Select your desired blower speed by turning
the blower speed selection dial.
4. Select your desired temperature by turning
the temperature control dial.
5. Push the air conditioning switch (B).
For quick demisting
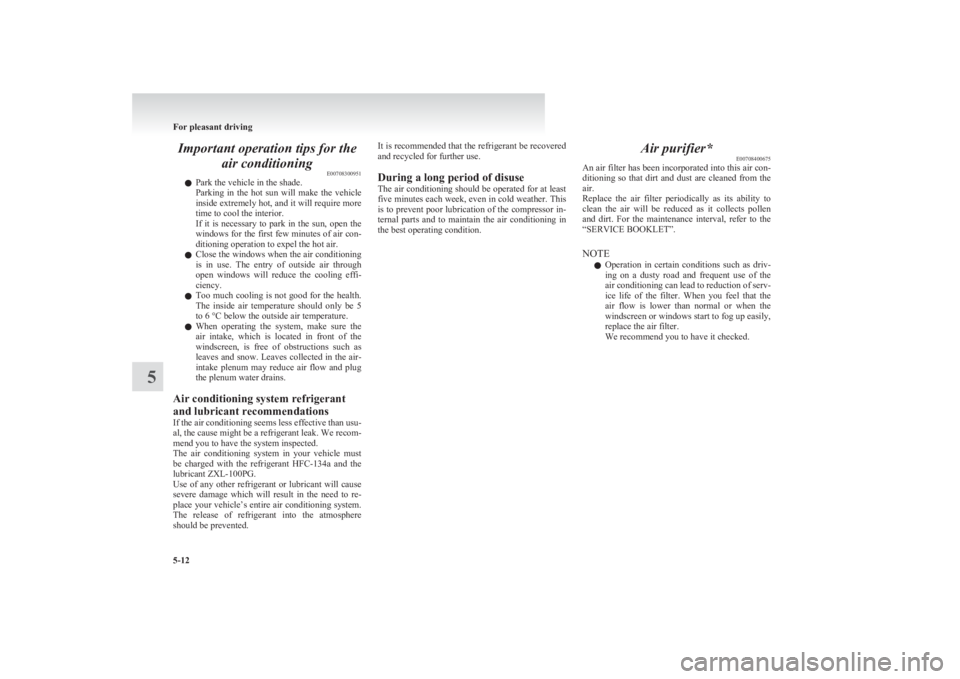
1. Set the mode selection dial to the “” posi-
tion.
2. Set the blower to the maximum speed.
3. Set the temperature to the highest position.
NOTE l While the mode selection dial is set to the
“
” position, the air conditioning will oper-
ate automatically and the outside air position
will also be selected automatically.
l To demist effectively, direct the air flow
from the side ventilators towards the door win-
dows.
l Do not set the temperature control dial to the
max. cool position. Cool air will blow
against the window glasses and form mist on
them.
For pleasant driving
5-11
5
Page 194 of 330

Important operation tips for theair conditioning E00708300951
l Park the vehicle in the shade.
Parking in the hot sun will make the vehicle
inside extremely hot, and it will require more
time to cool the interior.
If it is necessary to park in the sun, open the
windows for the first few minutes of air con-
ditioning operation to expel the hot air.
l Close the windows when the air conditioning
is in use. The entry of outside air through
open windows will reduce the cooling effi-
ciency.
l Too much cooling is not good for the health.
The inside air temperature should only be 5
to 6 °C below the outside air temperature.
l When operating the system, make sure the
air intake, which is located in front of the
windscreen, is free of obstructions such as
leaves and snow. Leaves collected in the air-
intake plenum may reduce air flow and plug
the plenum water drains.
Air conditioning system refrigerant
and lubricant recommendations
If the air conditioning seems less effective than usu-
al, the cause might be a refrigerant leak. We recom-
mend you to have the system inspected.
The air conditioning system in your vehicle must
be charged with the refrigerant HFC-134a and the
lubricant ZXL-100PG.
Use of any other refrigerant or lubricant will cause
severe damage which will result in the need to re-
place your vehicle’s entire air conditioning system.
The release of refrigerant into the atmosphere
should be prevented.It is recommended that the refrigerant be recovered
and recycled for further use.
During a long period of disuse
The air conditioning should be operated for at least
five minutes each week, even in cold weather. This
is to prevent poor lubrication of the compressor in-
ternal parts and to maintain the air conditioning in
the best operating condition.Air purifier* E00708400675
An air filter has been incorporated into this air con-
ditioning so that dirt and dust are cleaned from the
air.
Replace the air filter periodically as its ability to
clean the air will be reduced as it collects pollen
and dirt. For the maintenance interval, refer to the
“SERVICE BOOKLET”.
NOTE l Operation in certain conditions such as driv-
ing on a dusty road and frequent use of the
air conditioning can lead to reduction of serv-
ice life of the filter. When you feel that the
air flow is lower than normal or when the
windscreen or windows start to fog up easily,
replace the air filter.
We recommend you to have it checked.
For pleasant driving
5-12
5
Page 195 of 330

LW/MW/FM electronic tuning radio with CD player*E00708501745
The audio system can be used when the ignition switch is in the “ON” or “ACC” position.A- Display windowB- Audio system
NOTE
l To listen to the audio system while the engine is stopped, turn the ignition key to the “ACC” position.
l If a cellular phone is used inside the vehicle, it may create noise from the audio equipment. This does not mean that anything is wrong with your audio
equipment. In such a case, use the cellular phone at a place as far away as possible from the audio equipment.
l If foreign objects or water get into the audio equipment, or if smoke or a strange odour comes from it, immediately turn off the audio system. We recom-
mend your to have it checked. Never try to repair it by yourself. Avoid continuous usage without inspection by a qualified person.
l The audio system’s control knob can be removed to deter thieves. For details, refer to “Audio system anti-theft feature” on page 5-32.
l The audio amplifier (if so equipped) is located under the front right seat.
Do not subject the amplifier to a strong impact.
It could damage the amplifier or malfunctioning could result.
For pleasant driving
5-13
5
Page 198 of 330
Radio control panel and displayE007089010841- PWR (On-Off) switch
2- Memory select buttons
3- TUNE/SEEK (Down-step/Down-seek) button
4- TUNE/SEEK (Up-step/Up-seek) button
5- AM/FM (FM/MW/LW selection) button6- FM/MW/LW indicator
7- Preset memory number display
8- ST (Stereo) indicator
9- Frequency display window
For pleasant driving
5-16
5
Page 238 of 330
Type 2
A- ToolsB- Jack handle
C- Jack
Club cab
A- Tools B- Jack
C- Jack handle
Double cab
Except for vehicles with rear retractable power
windowType 1
A- Tool (wheel nut wrench) B- Jack handle
C- Jack
Type 2
A- Tools B- Jack handle
C- Jack
Vehicles with rear retractable power windowType 1
A- Tool (wheel nut wrench) B- Jack
C- Jack handle
Type 2
A- Tools B- Jack
C- Wheel nut wrench
D- Jack handle
For emergencies
6-08
6
Page 240 of 330

NOTEl When stowing the jack handle, align the black-
marked part (I) of the jack handle with the
holder (J).
Club cab
The tools, jack, and jack handle are stored under
the floor on the left-hand side of the cargo space. 1.Raise the left side seat cushion. Refer to
“ Folding up the seat cushion (Club cab)” on
page 2-07.
Tip forward the seatback of the driver seat.
Slide the driver seat forward.
2. Open the lid.
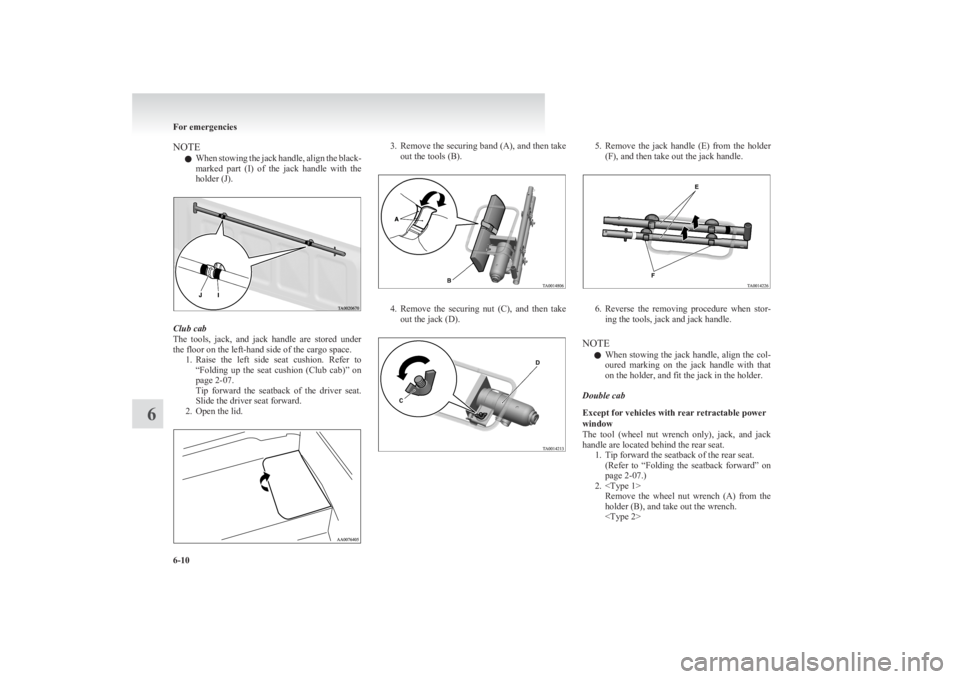
3. Remove the securing band (A), and then take
out the tools (B).
4. Remove the securing nut (C), and then take
out the jack (D).
5. Remove the jack handle (E) from the holder
(F), and then take out the jack handle.
6. Reverse the removing procedure when stor-
ing the tools, jack and jack handle.
NOTE l When stowing the jack handle, align the col-
oured marking on the jack handle with that
on the holder, and fit the jack in the holder.
Double cab
Except for vehicles with rear retractable power
window
The tool (wheel nut wrench only), jack, and jack
handle are located behind the rear seat. 1. Tip forward the seatback of the rear seat.(Refer to “Folding the seatback forward” on
page 2-07.)
2. Remove the wheel nut wrench (A) from the
holder (B), and take out the wrench.
For emergencies
6-10
6
Page 241 of 330
Remove the securing band (C), and then take
out the tools (D).
3. Remove the securing nut (E), and then take
out the jack (F).
4. Remove the jack handle (G) from the holder
(H), and take out the handle.
5. Reverse the removing procedure when stor-
ing the tool, jack and jack handle.
NOTE l When stowing the jack handle, align the black-
marked part (I) of the jack handle with the
holder (H).
Vehicles with rear retractable power window
The tools, jack, and jack handle are located behind
the rear seat.
1. Tip forward the seatback of the rear seat. (Refer to “Folding the seatback forward” on
page 2-07.)
2. Remove the wheel nut wrench (A) from the
holder of the back panel (B), and take out the
wrench.
Take out the tools (C) from the rear back
trim (D).
3. Remove the securing nut (E), and then take
out the jack (F).
For emergencies
6-11
6
Page 242 of 330
4.Remove the jack handle (G) from the holder
of the back panel (H), and take out the handle.
5. Reverse the removing procedure when stor-
ing the tool, jack and jack handle.
NOTE l When stowing the wheel nut wrench, insert it
into the holder on the back panel as illustrated.
To use the jack handle (Club cab, Dou-
ble cab with rear retractable power
window only) E00802400124
1. While pressing the snap pin (A) on the han-
dle that has a black marking, withdraw and re-
move the inner handle (B).
2. Reverse the inner handle (B) then, while press-
ing the snap pin (C), insert it into the outer
handle (D) until it is locked by snap pin as il-
lustrated.
3. While pressing the snap pin (F) on the assem-
bled handle (E), insert the white-marked han-
dle (G) until it is locked by snap pin as illus-
trated.
For emergencies
6-12
6