2011 MITSUBISHI L200 transmission
[x] Cancel search: transmissionPage 164 of 330

4-wheel drive operationE00606600920
By selecting 4-wheel drive, both axles of the vehi-
cle are rigidly connected with each other. This im-
proves the traction characteristics. When turning
sharp corners or moving forward and backward re-
peatedly, however, the drive line is stressed, which
is felt as a braking effect. A 4-wheel drive vehicle
can accelerate more quickly and smoothly.
However, note that the braking distance is not short-
er than that of a rear-wheel drive vehicle.
When using 4-wheel drive on rough roads (snow,
mud, sand, etc.), it is important to operate the vehi-
cle correctly.
NOTE l The driving posture should be more upright
and closer to the wheel than usual; adjust the
seat to a good position for easy steering and
pedal operation. Be sure to wear the seat belt.
l After driving on rough roads, check each
part of the vehicle and wash it thoroughly
with water. Refer to the “Vehicle care” sec-
tion and “Inspection and maintenance follow-
ing rough road operation” on page 4-40.
Driving on dry paved road and highway
Select “2H” position (easy select 4WD), “2H” or
“4H” position (super select 4WD) to drive on the
dry paved road. Especially on dry highway, never
select the “4H” or “4L” position (easy select
4WD), “4HLc” or “4LLc” position (super select
4WD).CAUTIONl Selecting “4H” or “4L” position (easy se-
lect 4WD), “4HLc” or “4LLc” position (su-
per select 4WD) to drive on dry paved
road will increase the fuel consumption
with possible noise generation and early
tyre wear.
It may also increase the differential oil
temperature, resulting in possible dam-
age to the driving system.
Further, the drive train will be subjected
to excessive loading, possibly leading to
oil leakage, component seizure, or other
serious faults.
Driving on snowy or icy roads
Set the transfer shift lever to “4H” or “4L” position
(easy select 4WD), “4H” or “4HLc” position (su-
per select 4WD) in accordance with the road condi-
tions, and then gradually depress the accelerator ped-
al for a smooth start.
NOTE l The use of snow tyres and/or tyre chains is
recommended.
l Maintain a safe distance between vehicles,
avoid sudden braking, and use engine brak-
ing (downshifting).
CAUTIONl Avoid sudden braking, sudden accelera-
tion, and sharp turning; such operations
could cause skidding and spinouts.Driving on sandy or muddy roads
Set the transfer shift lever to “4H” or “4L” position
(easy select 4WD), “4HLc” or “4LLc” position (su-
per select 4WD) and then gradually depress the ac-
celerator pedal for a smooth start. Keep the pres-
sure on the accelerator pedal as constant as possi-
ble, and drive at low speed.CAUTIONl Do not force the vehicle or drive reckless-
ly on sandy surfaces. In comparison with
normal road surfaces, the engine and oth-
er drive-system components are put un-
der excessive strain when driving on such
a surface, and this could lead to accidents.
l If any of following conditions occur while
the vehicle is being driven, immediately
park your vehicle in a safe place and fol-
low these procedures: •The needle in the temperature gauge
approaches the overheating zone.
Refer to “Engine overheating” on
page 6-04.
• Automatic transmission fluid temper-
ature warning lamp comes on.
Refer to “When the A/T (automatic
transmission) fluid temperature warn-
ing lamp comes on” on pages 4-18,
4-23.
Starting and driving
4-38
4
Page 166 of 330

Crossing a stream
4-wheel drive vehicles are not necessarily water-
proof. If the electrical circuits become wet, further
operation of the vehicle will be impossible; there-
fore, avoid crossing streams unless absolutely nec-
essary. If crossing a stream is unavoidable, use the
following procedure: 1.Check depths of a stream and geographical
features before attempting to cross a stream
and ford the stream where the water is as shal-
low as practicable.
2. Set the transfer shift lever to “4L” position
(easy select 4WD), “4LLc” position (super se-
lect 4WD).
3. Drive slowly at a speed of approximately
5 km/h (3 mph) to avoid splashing too much
water.CAUTIONl Never cross a stream where the water is
deep.
Do not change gears while crossing the
stream.
Frequent crossing of streams can adverse-
ly affect the life span of the vehicle; we rec-
ommend you to take the necessary meas-
ures to prepare, inspect, and repair the ve-
hicle.
After crossing a stream, apply the brakes to be sure
they are functioning properly. If the brakes are wet
and not functioning properly, dry them out by driv-
ing slowly while lightly depressing the brake pedal.
Inspect each part of the vehicle carefully.
Inspection and maintenance
following rough road operation E00606700048
After operating the vehicle in rough road condi-
tions, be sure to perform the following inspection
and maintenance procedures:
l Check that the vehicle has not been damaged
by rocks, gravel, etc.
l Carefully wash the vehicle with water.
After washing, drive the vehicle slowly
while lightly depressing the brake pedal in or-
der to dry out the brakes. If the brakes still
do not function properly, we recommend you
to have the brakes checked as soon as possible.
l Remove the insects, dried grass, etc. clog-
ging the radiator core.
l After crossing a stream, be sure to have the
following items inspected at a MITSUBISHI
MOTORS Authorized Service Point and take
the necessary measures. •Check the brake system and, if necessary,
have it serviced.
• Check the engine, transmission, transfer,
and differential oil or grease level and tur-
bidity. If the oil or grease is milky, it indi-
cates water contamination. Replace it
with new oil or grease.
• Grease the propeller shaft.
• Check the inside of the vehicle. If ingress
of water is found, dry the carpet etc.
• Inspect the headlamps. If the headlamp
bulb is flooded with water, we recom-
mend you to have it drained.Cautions on handling of 4-wheel
drive vehicles E00606800368
Tyres and wheels
Since the driving torque can be applied to the 4
wheels, the performance of the vehicle when oper-
ating in 4-wheel drive is greatly affected by the con-
dition of the tyres.
Pay close attention to the tyres.
l Install specified tyres on all wheels. Refer to
“Tyres and wheels” on page 9-17.
l Be sure to fit all 4 tyres and wheels of the
same size and type.
When replacement of any of the tyres or
wheels is necessary, replace all of them.
l All tyres should be rotated whenever the
wear difference between the front and rear
tyres is recognizable.
Good vehicle performance cannot be expected if
there is a difference in wear between tyres. Refer to
“Tyre rotation” on page 8-13.
l Check the tyre inflation pressure regularly.
Starting and driving
4-40
4
Page 167 of 330
CAUTIONlAlways use tyres of the same size, same
type, and same brand, and which have no
wear differences. Using tyres of different
size, type, brands or degree of wear, will
increase the differential oil temperature,
resulting in possible damage to the driv-
ing system. Further, the drive train will
be subjected to excessive loading, possibly
leading to oil leakage, component seizure,
or other serious faults.
Towing
If towing is necessary, we recommend you to have
it done by your MITSUBISHI MOTORS Author-
ized Service Point or a commercial tow truck service.
In the following cases, transport the vehicle using a
tow truck.
l The engine runs but the vehicle does not
move or abnormal noise is produced.
l Inspection of the vehicle’s underside reveals
that oil or some other fluid is leaking.
Only when you cannot receive a towing service
from a MITSUBISHI MOTORS Authorized Serv-
ice Point or commercial tow truck service, tow
your vehicle carefully in accordance with the in-
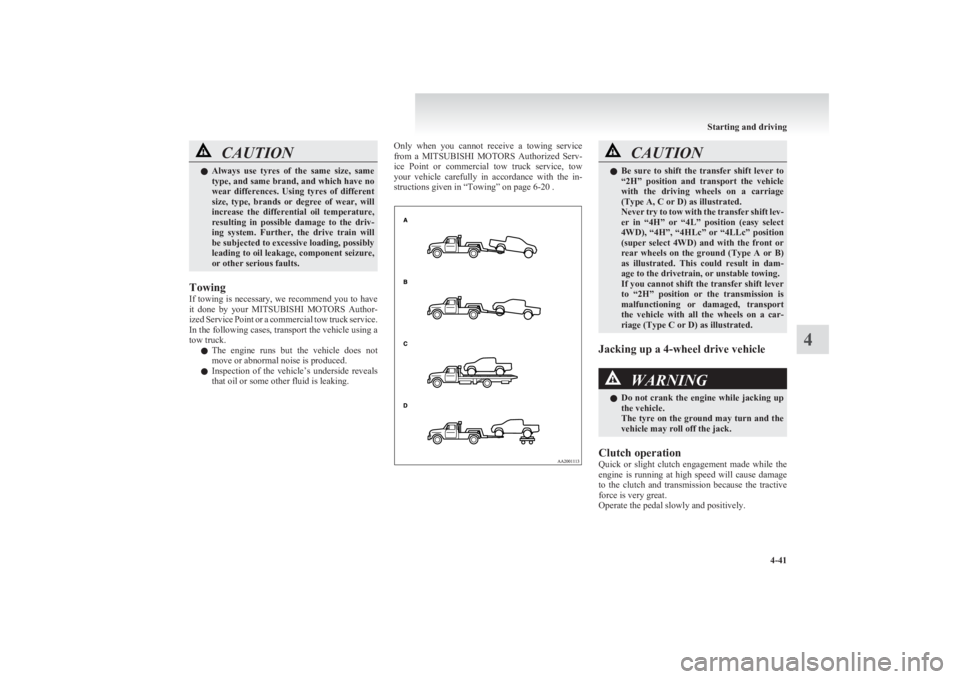
structions given in “Towing” on page 6-20 .CAUTIONl Be sure to shift the transfer shift lever to
“2H” position and transport the vehicle
with the driving wheels on a carriage
(Type A, C or D) as illustrated.
Never try to tow with the transfer shift lev-
er in “4H” or “4L” position (easy select
4WD), “4H”, “4HLc” or “4LLc” position
(super select 4WD) and with the front or
rear wheels on the ground (Type A or B)
as illustrated. This could result in dam-
age to the drivetrain, or unstable towing.
If you cannot shift the transfer shift lever
to “2H” position or the transmission is
malfunctioning or damaged, transport
the vehicle with all the wheels on a car-
riage (Type C or D) as illustrated.
Jacking up a 4-wheel drive vehicle
WARNINGl Do not crank the engine while jacking up
the vehicle.
The tyre on the ground may turn and the
vehicle may roll off the jack.
Clutch operation
Quick or slight clutch engagement made while the
engine is running at high speed will cause damage
to the clutch and transmission because the tractive
force is very great.
Operate the pedal slowly and positively.
Starting and driving
4-41
4
Page 174 of 330

CAUTION•If the temperature in the braking sys-
tem continues to increase due to con-
tinuous brake control on a slippery
road surface, the
indication lamp
will illuminate, and operation of the
Active Stability Control function and
active traction control function will be
suspended to protect the brake sys-
tem. (Normal operation of the vehicle
will not be affected.) Park your vehi-
cle in a safe place. When the tempera-
ture in the braking system has come
down, the
indication lamp will go
off and the Active Stability Control
function and active traction control
function will start operating again.
• If the
indication lamp does not go
out even though the above procedure
is followed, there could be a problem
in the system.
Stop the engine and start the engine
again and check whether the
indi-
cation lamp goes out. If the indication
lamp goes out, there is no abnormal
condition.
If the
indication lamp illuminates
even after your vehicle is driven a
short distance after restarting the en-
gine, we recommend you to have your
vehicle checked as soon as possible.
CAUTIONl If the vehicle is towed with the ignition
switch in the “ON” position and only the
front wheels or only the rear wheels
raised off the ground, the ASTC may op-
erate, resulting in an accident. When tow-
ing the vehicle with the front wheels
raised, keep the ignition switch in the
“LOCK” or “ACC” position. When tow-
ing the vehicle with the rear wheels
raised, keep the ignition switch in the
“ACC” position.
Refer to “Towing” on page 6-20.Cruise control* E00609100779
Cruise control is an automatic speed control system
that keeps a set speed. It can be activated at about
40 km/h (25 mph) or more.CAUTIONl When you do not wish to drive at a set
speed, turn off the cruise control for safety.
l Do not use cruise control when driving
conditions will not allow you to stay at
the same speed, such as in heavy traffic
or on roads that are winding, icy, snow-
covered, wet, slippery, on a steep down-
hill slope.
l On vehicles with manual transmission, do
not move the gearshift lever to the “N”
(Neutral) position while driving at a set
speed without depressing the clutch ped-
al. The engine will run too fast and might
be damaged.
NOTE
l Cruise control may not be able to keep your
speed on uphills or downhills.
l Your speed may decrease on a steep uphill.
You may use the accelerator pedal if you
want to stay at your set speed.
l Your speed may increase to more than the
set speed on a steep downhill. You must use
the brake to control your speed. As a result,
the set speed driving is deactivated.
Starting and driving
4-48
4
Page 181 of 330

Additional precautions for vehicles equipped with
an automatic transmission
It is recommended the “2” (SECOND) position
(4A/T ) or 2nd
gear in sports mode ( 5A/T) on slopes
or at low speed. Use the “L” (LOW) position
(4A/T ) or 1st
gear in sports mode ( 5A/T) in moun-
tainous areas in order to make better use of engine
braking and to assist the brake system. However,
be sure that the speed does not exceed the maxi-
mum speed limit for the selected gear.
Starting and driving
4-55
4
Page 232 of 330

If the vehicle breaks downE00800101166
If the vehicle breaks down on the road, move it to
the shoulder and use the hazard warning flashers and/
or the warning triangle etc.
Refer to “Hazard warning flasher switch” on page
3-34.
If the engine stops/fails
Vehicle operation and control are affected if the en-
gine stops.
Before moving the vehicle to a safe area, be aware
of the following:
l The brake booster becomes inoperative and
the pedal effort will increase. Press down the
brake pedal harder than usual.
l Since the power steering pump is no longer
operative, the steering wheel feels heavy
when turning it.Emergency starting E00800502112
If the engine cannot be started because the battery
is weak or dead, the battery from another vehicle
can be used with jumper cables to start the engine.WARNINGl To start the engine using jumper cables
connected from another vehicle, perform
the correct procedures according to the in-
struction manual. Incorrect procedures
could result in a fire or explosion or dam-
age to the vehicles.
1. Get the vehicles close enough so the jumper
cables can reach, but be sure the vehicles
aren’t touching each other.
If they are, it could cause a ground connec-
tion you don’t want. The vehicle will not
start, and the bad grounding could damage
the electrical systems.
CAUTIONl Check the other vehicle. It must have a 12-
volt battery.
If the other system isn’t 12-volt, shorting
can damage both vehicles.
2. You could be injured if the vehicles move.
Set the parking brake firmly on each vehicle.
Put an automatic transmission in “P”
(PARK) or a manual transmission in “N”
(Neutral). Turn off the ignition switch.
WARNINGl Turn off the ignition on both vehicles be-
forehand.
Make sure that the cables or your clothes
cannot be caught by the fan or drive belt.
Personal injury could result.
NOTE
l Turn off all lamps, heater and other electrical
loads. This will avoid sparks and help save
both batteries.
3. Make sure battery electrolyte is at the proper
level.
Refer to “Battery” on page 8-09.
WARNINGl If electrolyte fluid is not visible, or ap-
pears to be frozen, Do Not Attempt Jump
Starting!
A battery might rupture or explode if the
temperature is below the freezing point
or if it is not filled to the proper level.
4. Connect one end of one jumper cable to the
positive (+) terminal of the discharged bat-
tery (A), and the other end to the positive (+)
terminal of the booster battery (B).
For emergencies
6-02
6
Page 243 of 330
Jacking up the vehicleE00801001436
1. Park the vehicle on level and stable ground.
2. Set the parking brake firmly.
3. On vehicles with manual transmission, turn
the ignition key to the “LOCK” position,
move the gearshift lever to the “R” (Reverse)
position.
On vehicles with automatic transmission,
move the selector lever to the “P” (PARK) po-
sition, turn the ignition key to the “LOCK”
position.
4. Turn on the hazard warning flashers and set
up a warning triangle, flashing signal lamp,
etc., at an adequate distance from the vehi-
cle, and have all your passengers leave the ve-
hicle.
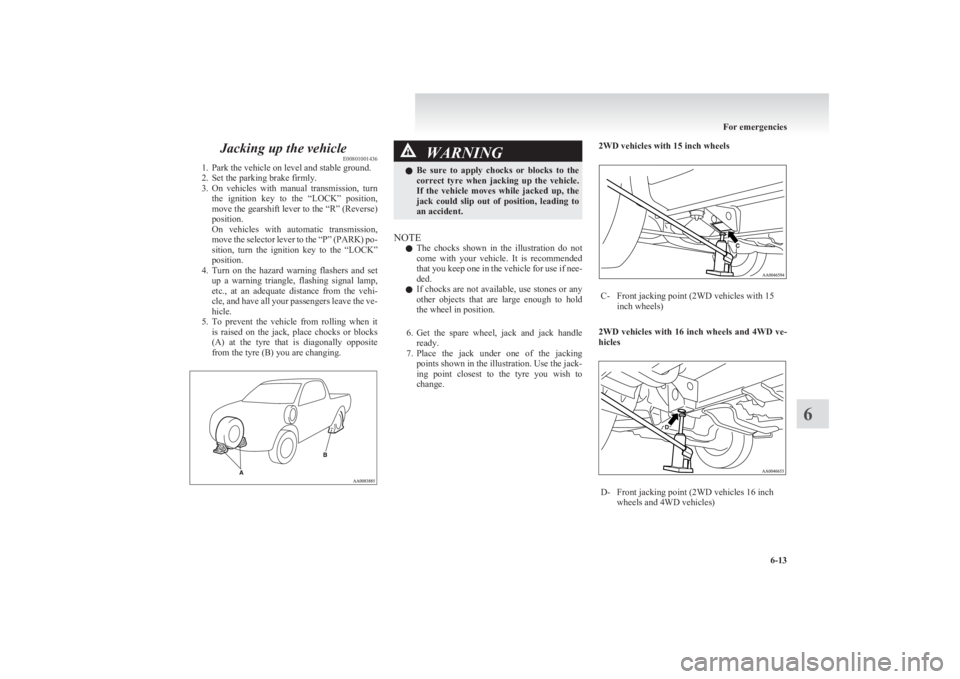
5. To prevent the vehicle from rolling when it
is raised on the jack, place chocks or blocks
(A) at the tyre that is diagonally opposite
from the tyre (B) you are changing.WARNINGl Be sure to apply chocks or blocks to the
correct tyre when jacking up the vehicle.
If the vehicle moves while jacked up, the
jack could slip out of position, leading to
an accident.
NOTE
l The chocks shown in the illustration do not
come with your vehicle. It is recommended
that you keep one in the vehicle for use if nee-
ded.
l If chocks are not available, use stones or any
other objects that are large enough to hold
the wheel in position.
6. Get the spare wheel, jack and jack handle
ready.
7. Place the jack under one of the jacking
points shown in the illustration. Use the jack-
ing point closest to the tyre you wish to
change.
2WD vehicles with 15 inch wheelsC-Front jacking point (2WD vehicles with 15
inch wheels)
2WD vehicles with 16 inch wheels and 4WD ve-
hicles
D-Front jacking point (2WD vehicles 16 inch
wheels and 4WD vehicles)
For emergencies
6-13
6
Page 247 of 330

5.Remove the hanger disc (G) from the spare
wheel.
To install
1.Install the hanger disc (A) in the wheel disc
hole.
2. Turn the wheel nut wrench (B) clockwise to
wind up the chain.
NOTE
l Confirm that the hanger disc is securely fit-
ted in the wheel disc hole when the wheel is
just lifted off the ground.
3. After winding up the spare wheel sufficient-
ly, make sure it is not loose (the tightening
torque should be approximately 40 Nm) then
withdraw the jack handle, taking care not to
turn it in the reverse direction.
CAUTIONl The spare wheel should always be secure-
ly in position.
If a flat tyre is changed, put the flat tyre
in the spare wheel mounting position
with the wheel outer surface upward, and
use the wheel nut wrench to secure it firm-
ly.How to change a tyre E00801202653
Before changing a tyre, first stop your vehicle in a
safe, flat location. 1. Park the vehicle on level and stable ground.
2. Set the parking brake firmly.
3. On vehicles with manual transmission, turn
the ignition key to the “LOCK” position,
move the gearshift lever to the “R” (Reverse)
position.
On vehicles with automatic transmission,
move the selector lever to the “P” (PARK) po-
sition, turn the ignition key to the “LOCK”
position.
4. Turn on the hazard warning flashers and set
up a warning triangle, flashing signal lamp,
etc., at an adequate distance from the vehi-
cle, and have all your passengers leave the ve-
hicle.
5. To prevent the vehicle from rolling when it
is raised on the jack, place chocks or blocks
(A) at the tyre that is diagonally opposite
from the tyre (B) you are changing.
For emergencies
6-17
6