2011 MITSUBISHI L200 change wheel
[x] Cancel search: change wheelPage 231 of 330

If the vehicle breaks down............................................................ 6-02
Emergency starting ....................................................................... 6-02
Engine overheating ....................................................................... 6-04
Bleeding the fuel system...............................................................6-05
Removal of water from the fuel filter ...........................................6-06
Tools, jack and jack handle .......................................................... 6-07
Jacking up the vehicle...................................................................6-13
Spare wheel...................................................................................6-16
How to change a tyre .................................................................... 6-17
Towing .......................................................................................... 6-20
Operation under adverse driving conditions .................................6-24For emergencies6
Page 243 of 330

Jacking up the vehicleE00801001436
1. Park the vehicle on level and stable ground.
2. Set the parking brake firmly.
3. On vehicles with manual transmission, turn
the ignition key to the “LOCK” position,
move the gearshift lever to the “R” (Reverse)
position.
On vehicles with automatic transmission,
move the selector lever to the “P” (PARK) po-
sition, turn the ignition key to the “LOCK”
position.
4. Turn on the hazard warning flashers and set
up a warning triangle, flashing signal lamp,
etc., at an adequate distance from the vehi-
cle, and have all your passengers leave the ve-
hicle.
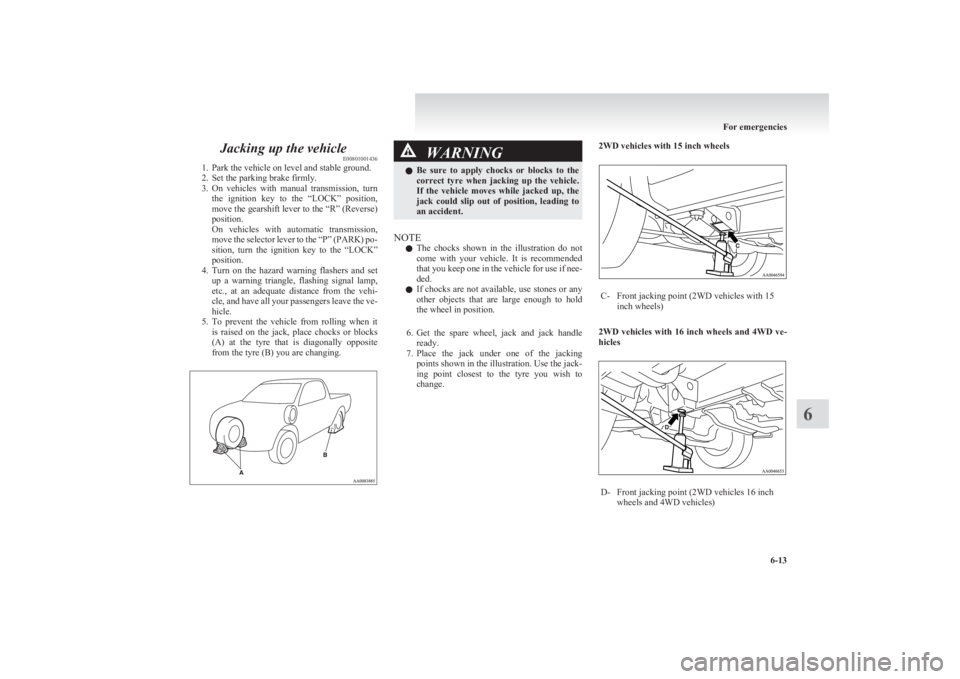
5. To prevent the vehicle from rolling when it
is raised on the jack, place chocks or blocks
(A) at the tyre that is diagonally opposite
from the tyre (B) you are changing.WARNINGl Be sure to apply chocks or blocks to the
correct tyre when jacking up the vehicle.
If the vehicle moves while jacked up, the
jack could slip out of position, leading to
an accident.
NOTE
l The chocks shown in the illustration do not
come with your vehicle. It is recommended
that you keep one in the vehicle for use if nee-
ded.
l If chocks are not available, use stones or any
other objects that are large enough to hold
the wheel in position.
6. Get the spare wheel, jack and jack handle
ready.
7. Place the jack under one of the jacking
points shown in the illustration. Use the jack-
ing point closest to the tyre you wish to
change.
2WD vehicles with 15 inch wheelsC-Front jacking point (2WD vehicles with 15
inch wheels)
2WD vehicles with 16 inch wheels and 4WD ve-
hicles
D-Front jacking point (2WD vehicles 16 inch
wheels and 4WD vehicles)
For emergencies
6-13
6
Page 245 of 330

2.Using the jack handle, turn the release valve
anticlockwise slowly to lower the ram and re-
move the jack.
3. Press the piston down all the way, and turn
the release valve clockwise as far as possible.
4. Store jack, jack handle and chocks.
WARNINGl Be sure to open the release valve slowly.
If it is opened quickly, the vehicle will
drop abruptly and the jack may come out
of position, causing a serious accident.CAUTIONl If the release valve is loosened too much
(2 or more turns) in the anticlockwise di-
rection, the jack’s oil will leak and the
jack cannot be used.CAUTIONl Close the release valve slowly when lower-
ing the vehicle, or the valve may be dam-
aged.
NOTE
l Occasionally when the vehicle is jacked up,
the grooved portion of the designated point
will not come off. When this happens, rock
the vehicle to lower the ram.
l If the jack is difficult to remove by hand, in-
sert the jack handle (L) into the bracket (M).
Then using the handle, remove the jack.
WARNINGl Stop jacking up the vehicle as soon as the
tyre is raised off the ground. It is danger-
ous to raise the vehicle any higher.
l Do not get under your vehicle while using
the jack.WARNINGl Do not bump the raised vehicle or leave it
sitting on the jack for a long time. Both
are very dangerous.
l Do not use a jack except the one that
came with your vehicle.
l The jack should not be used for any pur-
pose other than to change a tyre.
l No one should be in your vehicle when us-
ing the jack.
l Do not start or run the engine while your
vehicle is on the jack.
l Do not turn the raised wheel. The tyres
still on the ground could turn and make
your vehicle fall off the jack.
For emergencies
6-15
6
Page 247 of 330

5.Remove the hanger disc (G) from the spare
wheel.
To install
1.Install the hanger disc (A) in the wheel disc
hole.
2. Turn the wheel nut wrench (B) clockwise to
wind up the chain.
NOTE
l Confirm that the hanger disc is securely fit-
ted in the wheel disc hole when the wheel is
just lifted off the ground.
3. After winding up the spare wheel sufficient-
ly, make sure it is not loose (the tightening
torque should be approximately 40 Nm) then
withdraw the jack handle, taking care not to
turn it in the reverse direction.
CAUTIONl The spare wheel should always be secure-
ly in position.
If a flat tyre is changed, put the flat tyre
in the spare wheel mounting position
with the wheel outer surface upward, and
use the wheel nut wrench to secure it firm-
ly.How to change a tyre E00801202653
Before changing a tyre, first stop your vehicle in a
safe, flat location. 1. Park the vehicle on level and stable ground.
2. Set the parking brake firmly.
3. On vehicles with manual transmission, turn
the ignition key to the “LOCK” position,
move the gearshift lever to the “R” (Reverse)
position.
On vehicles with automatic transmission,
move the selector lever to the “P” (PARK) po-
sition, turn the ignition key to the “LOCK”
position.
4. Turn on the hazard warning flashers and set
up a warning triangle, flashing signal lamp,
etc., at an adequate distance from the vehi-
cle, and have all your passengers leave the ve-
hicle.
5. To prevent the vehicle from rolling when it
is raised on the jack, place chocks or blocks
(A) at the tyre that is diagonally opposite
from the tyre (B) you are changing.
For emergencies
6-17
6
Page 249 of 330

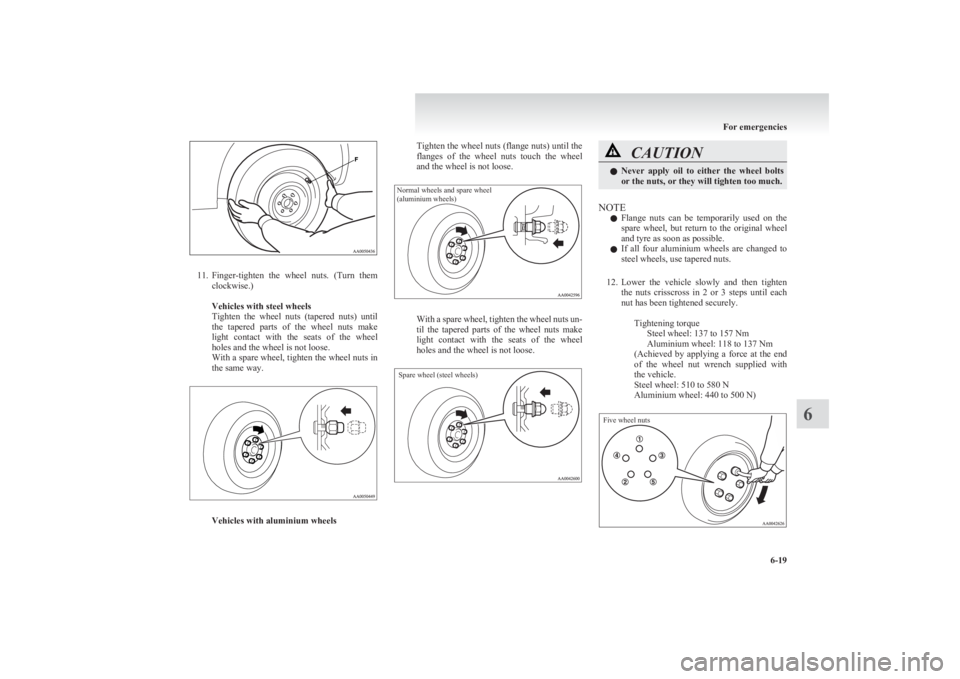
11.Finger-tighten the wheel nuts. (Turn them
clockwise.)
Vehicles with steel wheels
Tighten the wheel nuts (tapered nuts) until
the tapered parts of the wheel nuts make
light contact with the seats of the wheel
holes and the wheel is not loose.
With a spare wheel, tighten the wheel nuts in
the same way.
Vehicles with aluminium wheels
Tighten the wheel nuts (flange nuts) until the
flanges of the wheel nuts touch the wheel
and the wheel is not loose.Normal wheels and spare wheel
(aluminium wheels)
With a spare wheel, tighten the wheel nuts un-
til the tapered parts of the wheel nuts make
light contact with the seats of the wheel
holes and the wheel is not loose.
Spare wheel (steel wheels)
CAUTIONl Never apply oil to either the wheel bolts
or the nuts, or they will tighten too much.
NOTE
l Flange nuts can be temporarily used on the
spare wheel, but return to the original wheel
and tyre as soon as possible.
l If all four aluminium wheels are changed to
steel wheels, use tapered nuts.
12. Lower the vehicle slowly and then tighten
the nuts crisscross in 2 or 3 steps until each
nut has been tightened securely.
Tightening torqueSteel wheel: 137 to 157 Nm
Aluminium wheel: 118 to 137 Nm
( Achieved by applying a force at the end
of the wheel nut wrench supplied with
the vehicle.
Steel wheel: 510 to 580 N
Aluminium wheel: 440 to 500 N)
Five wheel nuts
For emergencies
6-19
6
Page 276 of 330

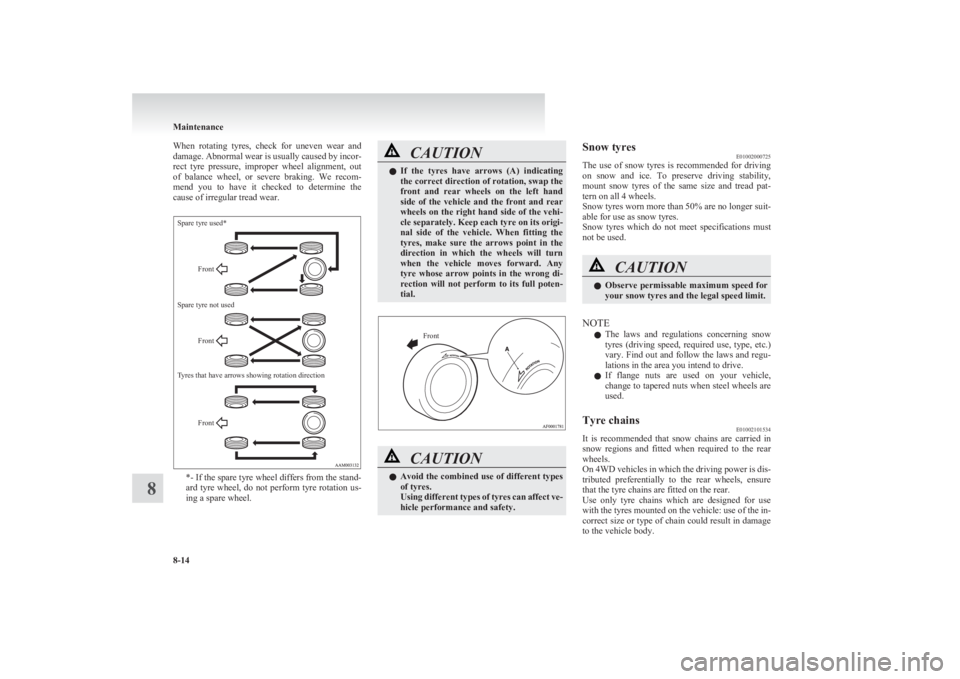
When rotating tyres, check for uneven wear and
damage. Abnormal wear is usually caused by incor-
rect tyre pressure, improper wheel alignment, out
of balance wheel, or severe braking. We recom-
mend you to have it checked to determine the
cause of irregular tread wear.Spare tyre used*Spare tyre not usedFrontFrontFrontTyres that have arrows showing rotation direction
*- If the spare tyre wheel differs from the stand-
ard tyre wheel, do not perform tyre rotation us-
ing a spare wheel.
CAUTIONl If the tyres have arrows (A) indicating
the correct direction of rotation, swap the
front and rear wheels on the left hand
side of the vehicle and the front and rear
wheels on the right hand side of the vehi-
cle separately. Keep each tyre on its origi-
nal side of the vehicle. When fitting the
tyres, make sure the arrows point in the
direction in which the wheels will turn
when the vehicle moves forward. Any
tyre whose arrow points in the wrong di-
rection will not perform to its full poten-
tial.Front
CAUTIONl Avoid the combined use of different types
of tyres.
Using different types of tyres can affect ve-
hicle performance and safety.Snow tyres E01002000725
The use of snow tyres is recommended for driving
on snow and ice. To preserve driving stability,
mount snow tyres of the same size and tread pat-
tern on all 4 wheels.
Snow tyres worn more than 50% are no longer suit-
able for use as snow tyres.
Snow tyres which do not meet specifications must
not be used.CAUTIONl Observe permissable maximum speed for
your snow tyres and the legal speed limit.
NOTE
l The laws and regulations concerning snow
tyres (driving speed, required use, type, etc.)
vary. Find out and follow the laws and regu-
lations in the area you intend to drive.
l If flange nuts are used on your vehicle,
change to tapered nuts when steel wheels are
used.
Tyre chains E01002101534
It is recommended that snow chains are carried in
snow regions and fitted when required to the rear
wheels.
On 4WD vehicles in which the driving power is dis-
tributed preferentially to the rear wheels, ensure
that the tyre chains are fitted on the rear.
Use only tyre chains which are designed for use
with the tyres mounted on the vehicle: use of the in-
correct size or type of chain could result in damage
to the vehicle body.
Maintenance
8-14
8
Page 321 of 330

4
4-wheel drive operation 4-38A
Accessory (Installation) 04
Accessory socket 5-38
Active Stability & Traction Control (ASTC) 4-46
Additional equipment 8-19
Air conditioning Automatic air conditioning 5-08
Important operation tips for the air condition-
ing 5-12
Manual air conditioning 5-03
Air purifier 5-12
Airbag 2-27
Antenna 5-34
Anti-lock brake system (ABS) 4-43 Warning lamp 4-44
Armrest (Double cab) 2-07
Ashtray 5-36
Audio Audio system anti-theft feature 5-32
Error codes 5-30
Handling of compact discs 5-32
LW/MW/FM electronic tuning radio with CD
player 5-13
Steering wheel remote control switch 5-28
Automatic air conditioning 5-08
Automatic transmission 4A/T 4-16 Fluid 8-06,9-21
Overdrive control switch 4-17
Selector lever operation 4-16,4-20
Selector lever position 4-17
Selector lever position indicator 4-16
Automatic transmission Sports Mode 5A/T 4-20 Fluid 8-06,9-21
Selector lever operation 4-20
Selector lever position indicator 4-21
Selector lever positions 4-21
Sports mode 4-22
Sports mode indicator 4-22
B
Battery 8-09Discharged battery (Emergency starting) 6-02
Specification 9-16
Bleeding the fuel system 6-05
Bonnet 8-03
Bottle holder 5-45
Brake Anti-lock brake 4-43
Braking 4-42
Fluid 8-07,9-21
Parking brake 4-07
Parking brake lever stroke 8-16
Pedal free play 8-16
Warning lamp 3-08
C
Cargo loads 4-52
Catalytic converter 8-02
Cautions on handling of 4-wheel drive vehi-
cles 4-40
Central door locks 1-07
Centre console downlight 5-41 Bulb capacity 8-24
Replacement 8-34
Centre information display 3-10
Changing a fuse 8-22
Changing gears 4-14
Check engine warning lamp 3-08
Child restraint 2-13
Child-protection rear doors 1-08
Cigarette lighter 5-37
Cleaning Exterior of your vehicle 7-03
Genuine leather 7-02
Interior of your vehicle 7-02
Plastic, vinyl leather, etc 7-02
Sunroof 7-05
Waxing 7-04
Clock 3-19,5-39
Clutch Fluid 8-08,9-21
Pedal free play 8-15
Coat hook 5-46
Combination headlamps and dipper switch 3-30
Convenient hook 5-46
Coolant (engine) 8-05,9-21
Cruise control 4-48 Switch 4-49
Cup holder 5-44
Curtain airbag system 2-35
D
Demister (rear window) 3-40
Differential oil 9-21
Digital clock 3-19,5-39
Dimensions 9-03
Dipper (High/Low beam change) 3-31
Door courtesy lamps 5-41 Replacement 8-33
Doors Central door locks 1-07
Child-protection 1-08
Lock and unlock 1-06
Driving, alcohol and drugs 4-02
E
Easy select 4WD 4-25
Alphabetical index
1
Page 324 of 330

Heated seats 2-06
Rear seat 2-07
Secret box 5-43
Service precaution 8-02
Side airbag system 2-35
Side turn-signal lamps Bulb capacity 8-24
Replacement 8-28
Snow tyres 8-14
Spare wheel 6-16
Spark plug 9-16
Specifications 9-02
Speedometer 3-03
Starting 4-13
Steering Power steering fluid 8-09,9-21
Power steering system 4-45
Steering wheel height adjustment 4-09
Steering wheel lock 4-12
Steering wheel remote control switch 5-28
Stop lamps Bulb capacity 8-23
Replacement 8-30
Storage spaces 5-41
Sun visors 5-35
Sunglasses holder 5-43
Sunroof 1-13 Safety mechanism 1-14
Sunshade 1-14
Switch 1-13
Super select 4WD 4-29
Supplemental restraint system 2-27 How the Supplemental Restraint System
works 2-29
Servicing 2-39
Warning lamp 2-38
T
Tachometer 3-03
Tail lamps Bulb capacity 8-24
Replacement 8-30
Tank capacity 02
Ticket holder 5-35
Tools 6-09 Storage 6-07
Towing 6-20
Trailer towing 4-53
Transfer oil 9-21
Transmission Automatic transmission 4A/T 4-16
Automatic transmission Sports Mode 5A/
T 4-20
Fluid 8-06,9-21
Manual transmission 4-14
Specifications 9-15
Tripmeter 3-03
Turn-signal indication lamps 3-07
Turn-signals lever 3-33
Tyres 8-11 How to change a tyre 6-17
Inflation pressures 8-12
Rotation 8-13
Size (tyre and wheel) 9-17
Snow tyres 8-14
Tyre chains 8-14
Wheel condition 8-13
U
Used engine oils safety instructions and disposal in-
formation 05
Utility box 5-43
V
Vanity mirror 5-36
Vehicle care precautions 7-02
Vehicle dimensions 9-03
Vehicle identification number 9-02
Vehicle identification number plate 9-02
Vehicle information code plate 9-02
Vehicle labeling 9-02
Vehicle performance 9-09
Vehicle weight 9-10
Ventilators 5-02
W
Warning lamps 3-08
Washer Fluid 8-07,9-21
Switch 3-36,3-39
Washing 7-03
Water temperature gauge 3-05
Waxing 7-04
Weatherstripping 8-19
Weight 9-10
Wheel condition 8-13
Wheel Specification 9-17
Wiper Switch 3-36
Wiper blade rubber replacement 8-17
Wiper blades 8-17
Alphabetical index
4