2011 MERCEDES-BENZ SLS engine
[x] Cancel search: enginePage 103 of 436
vehicle battery is no longer powerful
enough, COMAND may shut off
automatically during the process to protect
the battery. In this case, restart the update
with the engine running.
You can interrupt the update process and
continue it at later time. If you cancel the
update process, the navigation system is
not ready for operation.
GWarning
Never leave the engine running in an enclosed
space. The exhaust gases contain carbon
monoxide. Inhaling exhaust gases constitutes
a health hazard and could lead to loss of
consciousness or even death.
Loading DVDs into DVD Changer
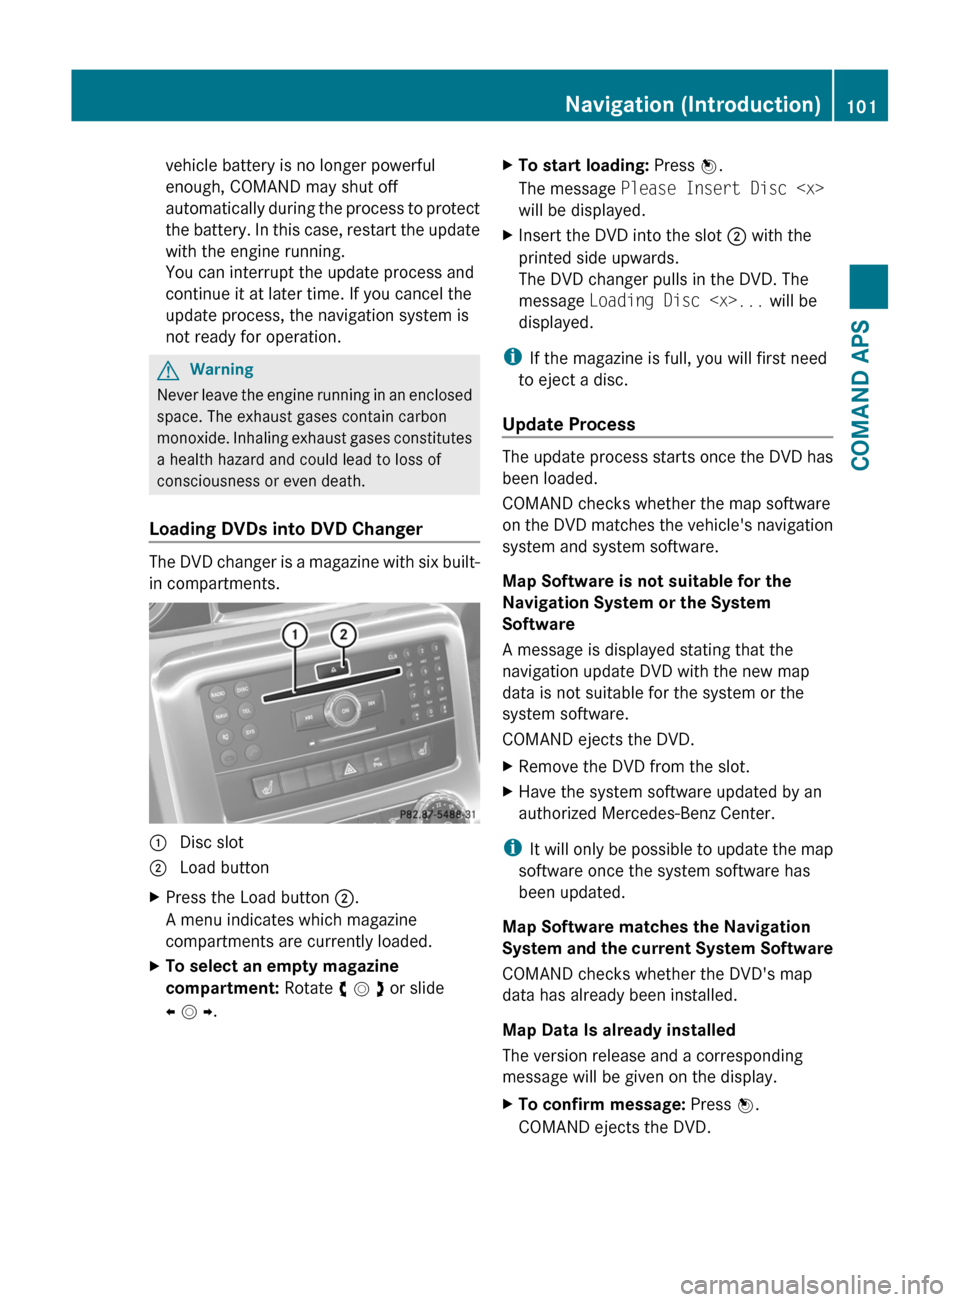
The DVD changer is a magazine with six built-
in compartments.
1 Disc slot2 Load buttonXPress the Load button 2.
A menu indicates which magazine
compartments are currently loaded.
XTo select an empty magazine
compartment: Rotate y m z or slide
o m p.
XTo start loading: Press n.
The message Please Insert Disc
will be displayed.
XInsert the DVD into the slot 2 with the
printed side upwards.
The DVD changer pulls in the DVD. The
message Loading Disc
displayed.
iIf the magazine is full, you will first need
to eject a disc.
Update Process
The update process starts once the DVD has
been loaded.
COMAND checks whether the map software
on the DVD matches the vehicle's navigation
system and system software.
Map Software is not suitable for the
Navigation System or the System
Software
A message is displayed stating that the
navigation update DVD with the new map
data is not suitable for the system or the
system software.
COMAND ejects the DVD.
XRemove the DVD from the slot.XHave the system software updated by an
authorized Mercedes-Benz Center.
iIt will only be possible to update the map
software once the system software has
been updated.
Map Software matches the Navigation
System and the current System Software
COMAND checks whether the DVD's map
data has already been installed.
Map Data Is already installed
The version release and a corresponding
message will be given on the display.
XTo confirm message: Press n.
COMAND ejects the DVD.
Navigation (Introduction)101COMAND APSBA 197 USA, CA Edition A 2011; 1; 27, en-UShereepeVersion: 3.0.3.52010-03-24T15:31:10+01:00 - Seite 101Z
Page 139 of 436
As soon as the vehicle location is found again,
route guidance continues in the usual
manner.
Navigation Announcements
GWarning
Navigation announcements are intended to
direct you while driving without diverting your
attention from the road and driving.
Please always use this feature instead of
consulting the map display for directions.
Consulting the symbols or map display for
directions may cause you to divert your
attention from driving and increase your risk
of an accident.
i During an active telephone call, the
navigation announcements are
suppressed.
If you have missed an announcement, you can
call up the current announcement at any
time.
XTo request current announcement: In
map view with the menu system
( Y page 106) displayed, select RPT.XTo switch off navigation
announcements: During the
announcement, press the B button.
You will briefly see the message: The
driving instructions have been
muted .XTo switch navigation announcements
back on manually: In map view with the
menu system ( Y page 106) displayed,
select RPT.
or
XStart a new route calculation
( Y page 121).
or
XIf COMAND is switched on again or the
engine is restarted.XTo set the volume of the
announcements: Set the volume during
the automatic announcement ( Y page 89).
or
XCall up an announcement manually by
selecting RPT in map view with the menu
system displayed.XAdjust the volume.
Audio Fadeout
The Audio Fadeout function, if activated,
lowers the volume of the current audio source
when a navigation announcement is issued.
As soon as the navigation announcement has
ended, the audio source will be played with
the previous volume ( Y page 89).
Canceling Route Guidance
XIn the map display with the menu system
displayed ( Y page 106) select
Destination £ Cancel Route
Guidance .
Resuming Route Guidance
XSelect Destination £ Continue
Route Guidance in map view with the
menu system displayed.
COMAND calculates the route.
Detour Function
i The Detour function blocks a route
segment ahead. You can set the length of
the block. COMAND calculates a detour
route if possible.
XSelect Route £ Detour in map view with
the menu system displayed.Navigation (Route Guidance)137COMAND APSBA 197 USA, CA Edition A 2011; 1; 27, en-UShereepeVersion: 3.0.3.52010-03-24T15:31:10+01:00 - Seite 137Z
Page 240 of 436

XHave the SmartKey deactivated by an
authorized Mercedes-Benz Center.
XReport the loss of the SmartKey or the
mechanical key to your car insurance
company immediately.
XHave the mechanical lock replaced if
necessary.
Any authorized Mercedes-Benz Center will be
glad to supply you with a replacement. For
information on replacing the SmartKey, see
“Replacing the SmartKey” (Y page 238).
Replacing the SmartKey
Only you, or someone authorized by you can
order a replacement key from any Mercedes-
Benz Center. In order to do so, the Mercedes-
Benz Center will require proof of identity and
vehicle ownership with original documents,
including the following:
If you are the current owner of the vehicle:
Rthe vehicle’s current state registration
Ra current identity card, passport, or drivers
license
If you are an authorized person:
Rthe vehicle’s current state registration
Ra current identity card, passport, or drivers
license for the authorized individual
Rsigned and dated authorization from the
owner of the vehicle for which the key is
being requested
iDuplicated or photocopied
documentation will not be accepted.
Activating the key
Once you, or an authorized person, has
provided the appropriate documents, the
Mercedes-Benz Center will need to
synchronize the key to your vehicle before it
can be used. In order to do so, the Mercedes-
Benz Center need access to your vehicle.
Doors
! The doors swing up when opened. Make
sure there is sufficient space above the
vehicle.
Opening from the outside
GObserve Safety notes, see page 238.XAim transmitter eye of the SmartKey at
driver’s outside door handle :.
XPress button % on the SmartKey.
Outside door handle : moves out.
XLift the door using outside door handle :
and swing it up as far as it will go.
Closing from the outside
XPull the door down at its outer edge or the
inside door handle and let it engage in the
lower position.
Opening from the inside
GObserve Safety notes, see page 238.
You can open a door from the inside only
when the door is unlocked.
Open door only when conditions are safe to
do so.
The doors are unlocked automatically when
you turn off the engine after driving.
238Locking and unlockingControls in detail
BA 197 USA, CA Edition A 2011; 1; 27, en-UShereepeVersion: 3.0.3.52010-03-24T15:31:10+01:00 - Seite 238
Page 241 of 436
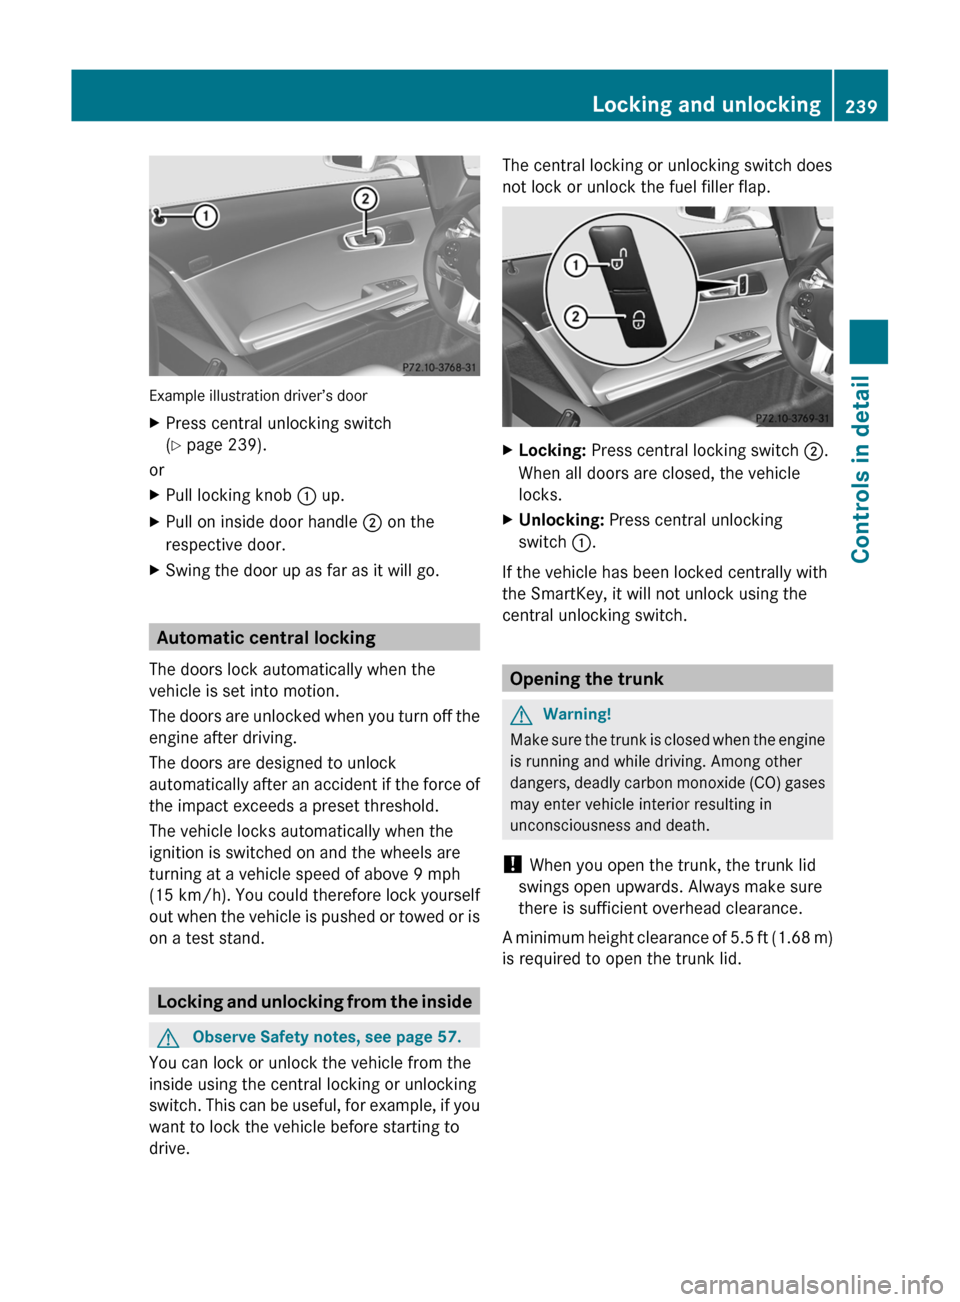
Example illustration driver’s door
XPress central unlocking switch
( Y page 239).
or
XPull locking knob : up.XPull on inside door handle ; on the
respective door.XSwing the door up as far as it will go.
Automatic central locking
The doors lock automatically when the
vehicle is set into motion.
The doors are unlocked when you turn off the
engine after driving.
The doors are designed to unlock
automatically after an accident if the force of
the impact exceeds a preset threshold.
The vehicle locks automatically when the
ignition is switched on and the wheels are
turning at a vehicle speed of above 9 mph
(15 km/h) . You could therefore lock yourself
out when the vehicle is pushed or towed or is
on a test stand.
Locking and unlocking from the inside
GObserve Safety notes, see page 57.
You can lock or unlock the vehicle from the
inside using the central locking or unlocking
switch. This can be useful, for example, if you
want to lock the vehicle before starting to
drive.
The central locking or unlocking switch does
not lock or unlock the fuel filler flap.XLocking: Press central locking switch ;.
When all doors are closed, the vehicle
locks.XUnlocking: Press central unlocking
switch :.
If the vehicle has been locked centrally with
the SmartKey, it will not unlock using the
central unlocking switch.
Opening the trunk
GWarning!
Make sure the trunk is closed when the engine
is running and while driving. Among other
dangers, deadly carbon monoxide (CO) gases
may enter vehicle interior resulting in
unconsciousness and death.
! When you open the trunk, the trunk lid
swings open upwards. Always make sure
there is sufficient overhead clearance.
A minimum height clearance of 5.5 ft (1.68 m)
is required to open the trunk lid.
Locking and unlocking239Controls in detailBA 197 USA, CA Edition A 2011; 1; 27, en-UShereepeVersion: 3.0.3.52010-03-24T15:31:10+01:00 - Seite 239Z
Page 242 of 436
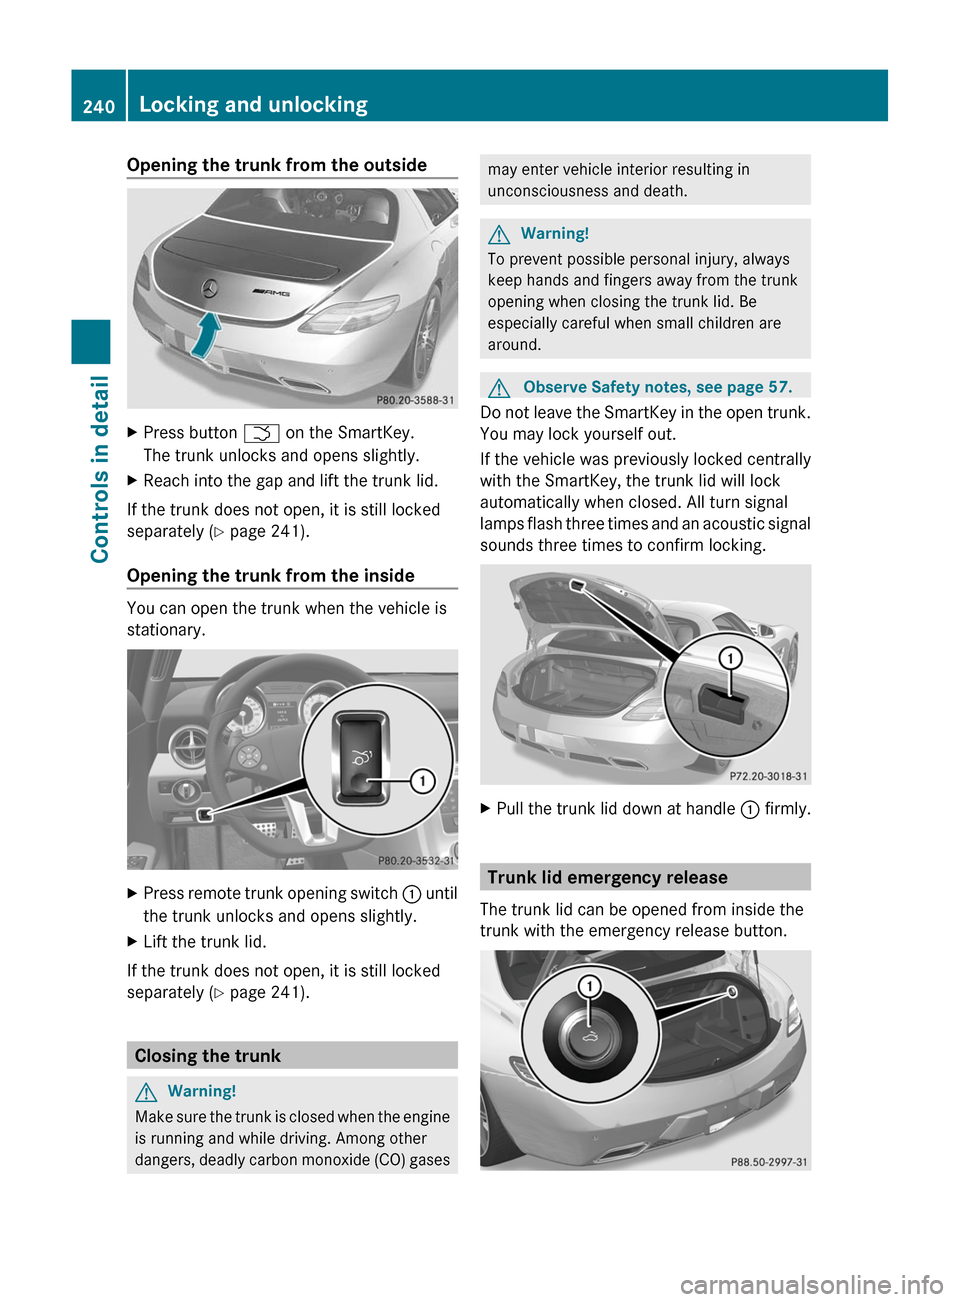
Opening the trunk from the outsideXPress button F on the SmartKey.
The trunk unlocks and opens slightly.
XReach into the gap and lift the trunk lid.
If the trunk does not open, it is still locked
separately (Y page 241).
Opening the trunk from the inside
You can open the trunk when the vehicle is
stationary.
XPress remote trunk opening switch : until
the trunk unlocks and opens slightly.
XLift the trunk lid.
If the trunk does not open, it is still locked
separately (Y page 241).
Closing the trunk
GWarning!
Make sure the trunk is closed when the engine
is running and while driving. Among other
dangers, deadly carbon monoxide (CO) gases
may enter vehicle interior resulting in
unconsciousness and death.
GWarning!
To prevent possible personal injury, always
keep hands and fingers away from the trunk
opening when closing the trunk lid. Be
especially careful when small children are
around.
GObserve Safety notes, see page 57.
Do not leave the SmartKey in the open trunk.
You may lock yourself out.
If the vehicle was previously locked centrally
with the SmartKey, the trunk lid will lock
automatically when closed. All turn signal
lamps flash three times and an acoustic signal
sounds three times to confirm locking.
XPull the trunk lid down at handle : firmly.
Trunk lid emergency release
The trunk lid can be opened from inside the
trunk with the emergency release button.
240Locking and unlockingControls in detail
BA 197 USA, CA Edition A 2011; 1; 27, en-UShereepeVersion: 3.0.3.52010-03-24T15:31:10+01:00 - Seite 240
Page 243 of 436

XBriefly press emergency release
button :.
The trunk lid unlocks and opens slightly.
XPush up the trunk lid to fully open.
The emergency release button unlocks the
trunk while the vehicle is standing still or in
motion.
Illumination of the emergency release button:
RThe button flashes for 30 minutes after
opening the trunk.
RThe button flashes for 60 minutes after
closing the trunk.
The emergency release button does not
unlock the trunk, if the vehicle battery is
discharged or disconnected.
If the vehicle has previously been locked
centrally with the SmartKey, opening the
trunk from the inside using the emergency
release button will trigger the anti-theft alarm
system.
To cancel the alarm, see (Y page 67).
Valet locking
You can lock the trunk separately with the
mechanical key. This denies unauthorized
access to the trunk, e.g. when you valet park
the vehicle.
XLeave only the SmartKey less its
mechanical key with the vehicle.
XValet locking: Close the trunk
(Y page 240).
XRemove the mechanical key from the
SmartKey (Y page 397).
XOpen the rear storage compartment in the
center console (Y page 304).
XInsert the mechanical key into trunk lid
lock :.
XTurn the mechanical key clockwise as far
as it will go.
XIn this position, pull out the mechanical
key.
XCheck whether the trunk is locked.
The trunk remains locked even when the
vehicle is centrally unlocked.
You can then only open the trunk with the
mechanical key.
XCanceling: Insert the mechanical into
trunk lid lock :.
XTurn the mechanical key counterclockwise
as far as it will go.
XIn this position, pull out the mechanical
key.
You can now open the trunk.
Starter switch positions
KEYLESS-GO
GObserve Safety notes, see page 57.
You can start the engine and turn it off again
using the KEYLESS-GO start/stop button.
The KEYLESS-GO start/stop button is located
in the center console. The KEYLESS-GO
start/stop button is illuminated when the
vehicle is unlocked.
The SmartKey must be located in the vehicle.
It will, however, not be detected in the trunk.
Pressing the KEYLESS-GO start/stop button
without depressing the brake pedal
Starter switch positions241Controls in detailBA 197 USA, CA Edition A 2011; 1; 27, en-UShereepeVersion: 3.0.3.52010-03-24T15:31:10+01:00 - Seite 241Z
Page 244 of 436
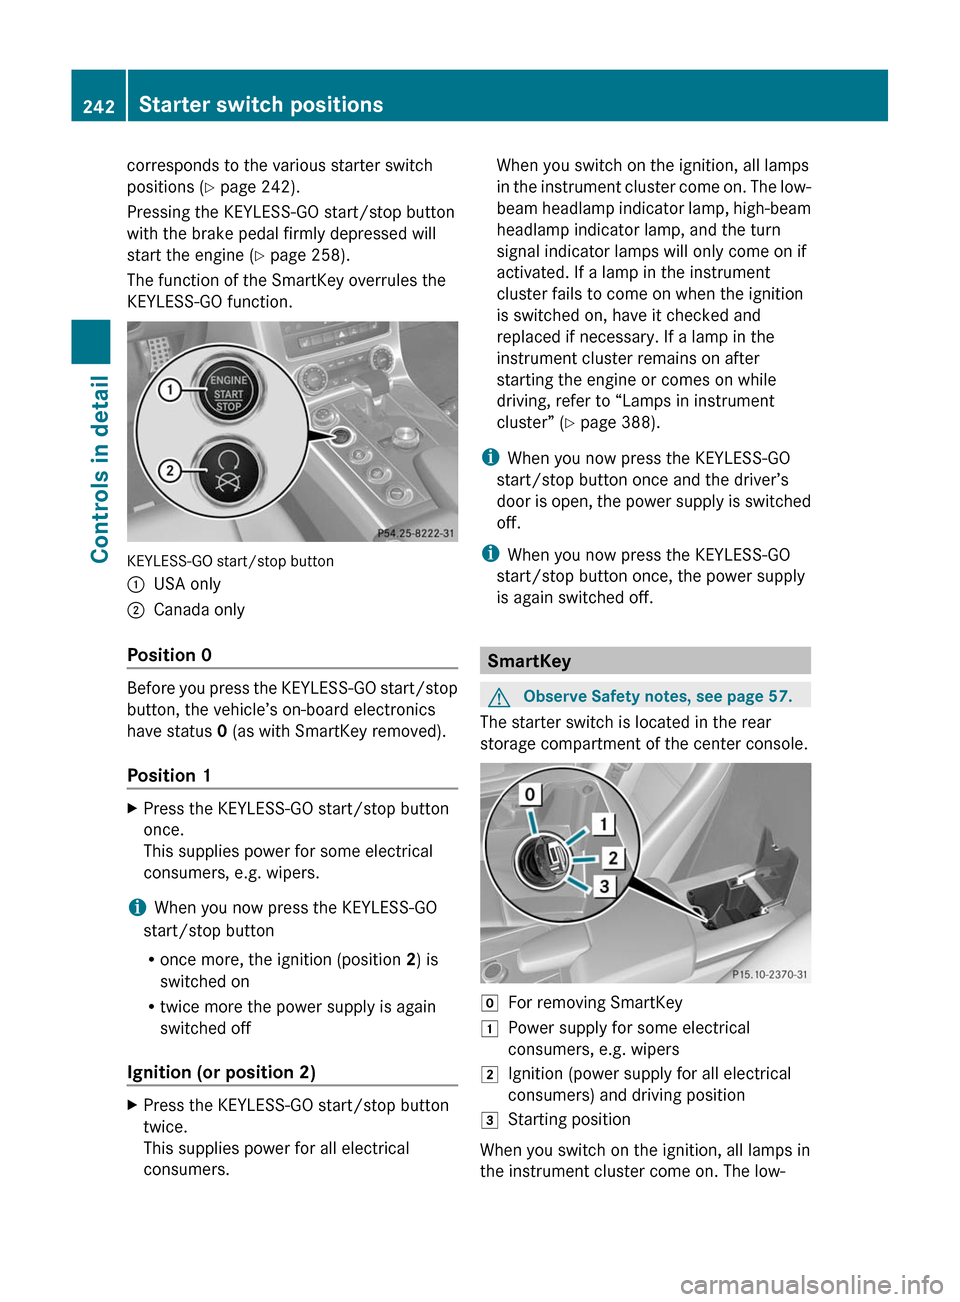
corresponds to the various starter switch
positions (Y page 242).
Pressing the KEYLESS-GO start/stop button
with the brake pedal firmly depressed will
start the engine (Y page 258).
The function of the SmartKey overrules the
KEYLESS-GO function.
KEYLESS-GO start/stop button
:USA only;Canada only
Position 0
Before you press the KEYLESS-GO start/stop
button, the vehicle’s on-board electronics
have status 0 (as with SmartKey removed).
Position 1
XPress the KEYLESS-GO start/stop button
once.
This supplies power for some electrical
consumers, e.g. wipers.
iWhen you now press the KEYLESS-GO
start/stop button
Ronce more, the ignition (position 2) is
switched on
Rtwice more the power supply is again
switched off
Ignition (or position 2)
XPress the KEYLESS-GO start/stop button
twice.
This supplies power for all electrical
consumers.
When you switch on the ignition, all lamps
in the instrument cluster come on. The low-
beam headlamp indicator lamp, high-beam
headlamp indicator lamp, and the turn
signal indicator lamps will only come on if
activated. If a lamp in the instrument
cluster fails to come on when the ignition
is switched on, have it checked and
replaced if necessary. If a lamp in the
instrument cluster remains on after
starting the engine or comes on while
driving, refer to “Lamps in instrument
cluster” (Y page 388).
iWhen you now press the KEYLESS-GO
start/stop button once and the driver’s
door is open, the power supply is switched
off.
iWhen you now press the KEYLESS-GO
start/stop button once, the power supply
is again switched off.
SmartKey
GObserve Safety notes, see page 57.
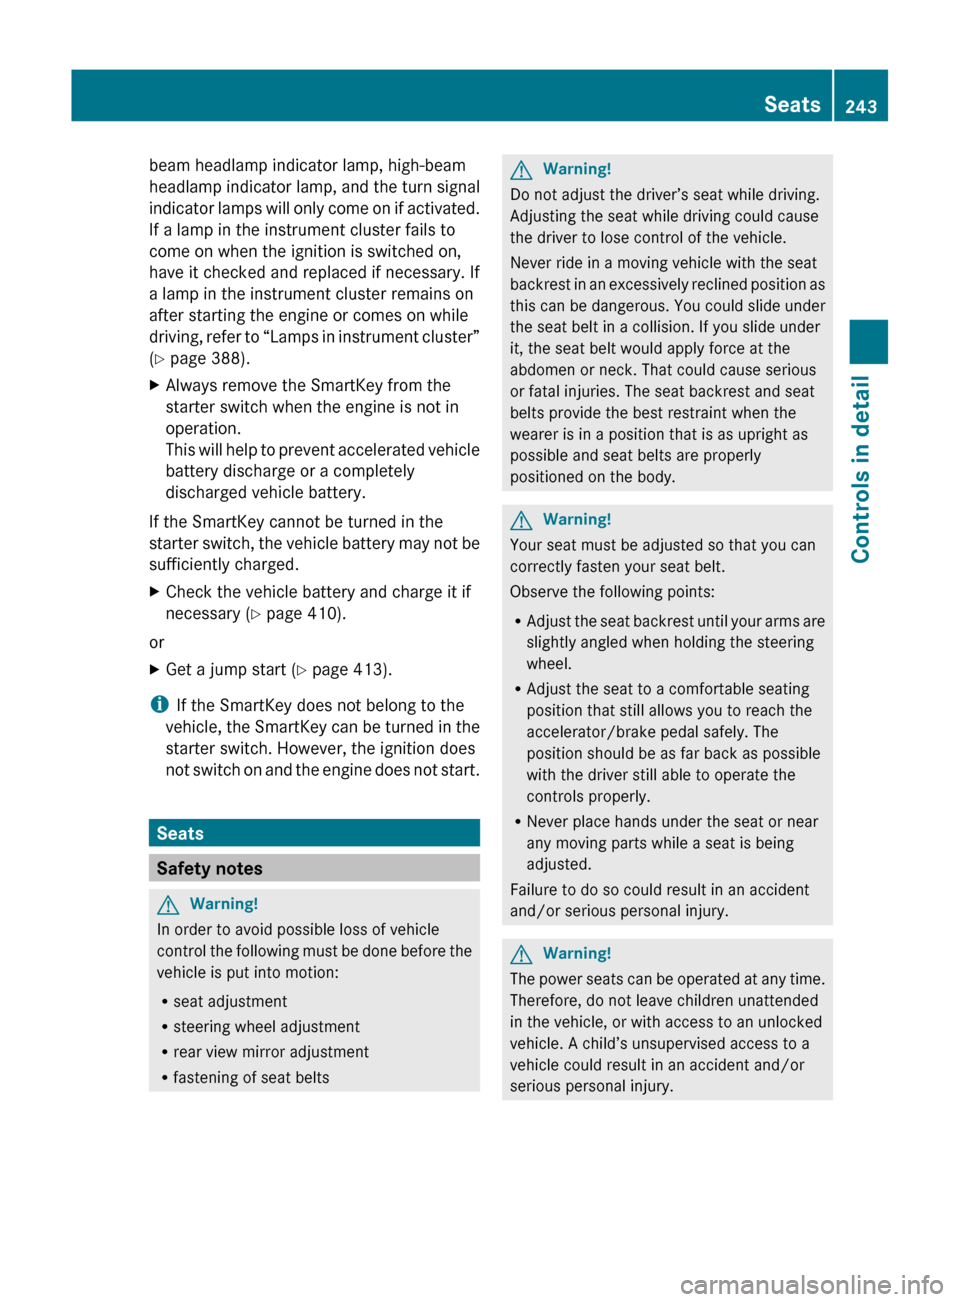
The starter switch is located in the rear
storage compartment of the center console.
gFor removing SmartKey1Power supply for some electrical
consumers, e.g. wipers
2Ignition (power supply for all electrical
consumers) and driving position
3Starting position
When you switch on the ignition, all lamps in
the instrument cluster come on. The low-
242Starter switch positionsControls in detail
BA 197 USA, CA Edition A 2011; 1; 27, en-UShereepeVersion: 3.0.3.52010-03-24T15:31:10+01:00 - Seite 242
Page 245 of 436
beam headlamp indicator lamp, high-beam
headlamp indicator lamp, and the turn signal
indicator lamps will only come on if activated.
If a lamp in the instrument cluster fails to
come on when the ignition is switched on,
have it checked and replaced if necessary. If
a lamp in the instrument cluster remains on
after starting the engine or comes on while
driving, refer to “Lamps in instrument cluster”
( Y page 388).XAlways remove the SmartKey from the
starter switch when the engine is not in
operation.
This will help to prevent accelerated vehicle
battery discharge or a completely
discharged vehicle battery.
If the SmartKey cannot be turned in the
starter switch, the vehicle battery may not be
sufficiently charged.
XCheck the vehicle battery and charge it if
necessary ( Y page 410).
or
XGet a jump start ( Y page 413).
i
If the SmartKey does not belong to the
vehicle, the SmartKey can be turned in the
starter switch. However, the ignition does
not switch on and the engine does not start.
Seats
Safety notes
GWarning!
In order to avoid possible loss of vehicle
control the following must be done before the
vehicle is put into motion:
R seat adjustment
R steering wheel adjustment
R rear view mirror adjustment
R fastening of seat belts
GWarning!
Do not adjust the driver’s seat while driving.
Adjusting the seat while driving could cause
the driver to lose control of the vehicle.
Never ride in a moving vehicle with the seat
backrest in an excessively reclined position as
this can be dangerous. You could slide under
the seat belt in a collision. If you slide under
it, the seat belt would apply force at the
abdomen or neck. That could cause serious
or fatal injuries. The seat backrest and seat
belts provide the best restraint when the
wearer is in a position that is as upright as
possible and seat belts are properly
positioned on the body.
GWarning!
Your seat must be adjusted so that you can
correctly fasten your seat belt.
Observe the following points:
R Adjust the seat backrest until your arms are
slightly angled when holding the steering
wheel.
R Adjust the seat to a comfortable seating
position that still allows you to reach the
accelerator/brake pedal safely. The
position should be as far back as possible
with the driver still able to operate the
controls properly.
R Never place hands under the seat or near
any moving parts while a seat is being
adjusted.
Failure to do so could result in an accident
and/or serious personal injury.
GWarning!
The power seats can be operated at any time.
Therefore, do not leave children unattended
in the vehicle, or with access to an unlocked
vehicle. A child’s unsupervised access to a
vehicle could result in an accident and/or
serious personal injury.
Seats243Controls in detailBA 197 USA, CA Edition A 2011; 1; 27, en-UShereepeVersion: 3.0.3.52010-03-24T15:31:10+01:00 - Seite 243Z