2011 MERCEDES-BENZ SLS engine
[x] Cancel search: enginePage 270 of 436
iYou cannot shift with the steering wheel
gearshift control when the transmission is
in park position P, neutral position N, or
reverse gear R.
Limiting gear range GWarning!
On slippery road surfaces, never downshift in
order to obtain braking action. This could
result in drive wheel slip and reduced vehicle
control. Your vehicle’s ABS will not prevent
this type of loss of control.
XBriefly pull left gearshift control :.
or
XMove the gear selector lever forward briefly
( Y page 263).
The transmission will shift into the next
lower gear as permitted by the shift
program. This action simultaneously limits
the gear range of the transmission.
i To avoid overrevving the engine when
downshifting, the transmission will not shift
into a lower gear if the engine’s maximum
speed would be exceeded.
Extending gear range
XBriefly pull right gearshift control ;.
or
XMove the gear selector lever back briefly
( Y page 263).
The transmission will shift into the next
higher gear as permitted by the shift
program. This action simultaneously
extends the gear range of the transmission.
i If you press on the accelerator pedal
when the engine has reached the
revolution limit of the current gear range,
the transmission will upshift beyond any
gear range limit selected.
Canceling gear range limitXPull and hold right gearshift control ; until
the gear range indicator disappears from
the multifunction display.
or
XMove the gear selector lever back and hold
it there until the numeral for the current
gear disappears from the multifunction
display.
The transmission will shift from the current
gear range directly into drive position D.
Shifting into optimal gear range
XPull and hold left gearshift control :.
or
XMove the gear selector lever forward and
hold it there.
The transmission will select the gear range
suited for optimal acceleration and
deceleration automatically. This will involve
shifting down one or more gears.
Manual shift program
Manual program mode M differs with regard
to spontaneity, response time, and shifting
smoothness from automatic program modes
S or S+.
In manual program mode M, system-
controlled automatic gearshifting is switched
off. You need to change the gears by manually
upshifting or downshifting using the gear
selector lever or the steering wheel gearshift
control.
268AMG SPEEDSHIFT DCT 7-SPEED TransmissionControls in detail
BA 197 USA, CA Edition A 2011; 1; 27, en-UShereepeVersion: 3.0.3.52010-03-24T15:31:10+01:00 - Seite 268
Page 271 of 436
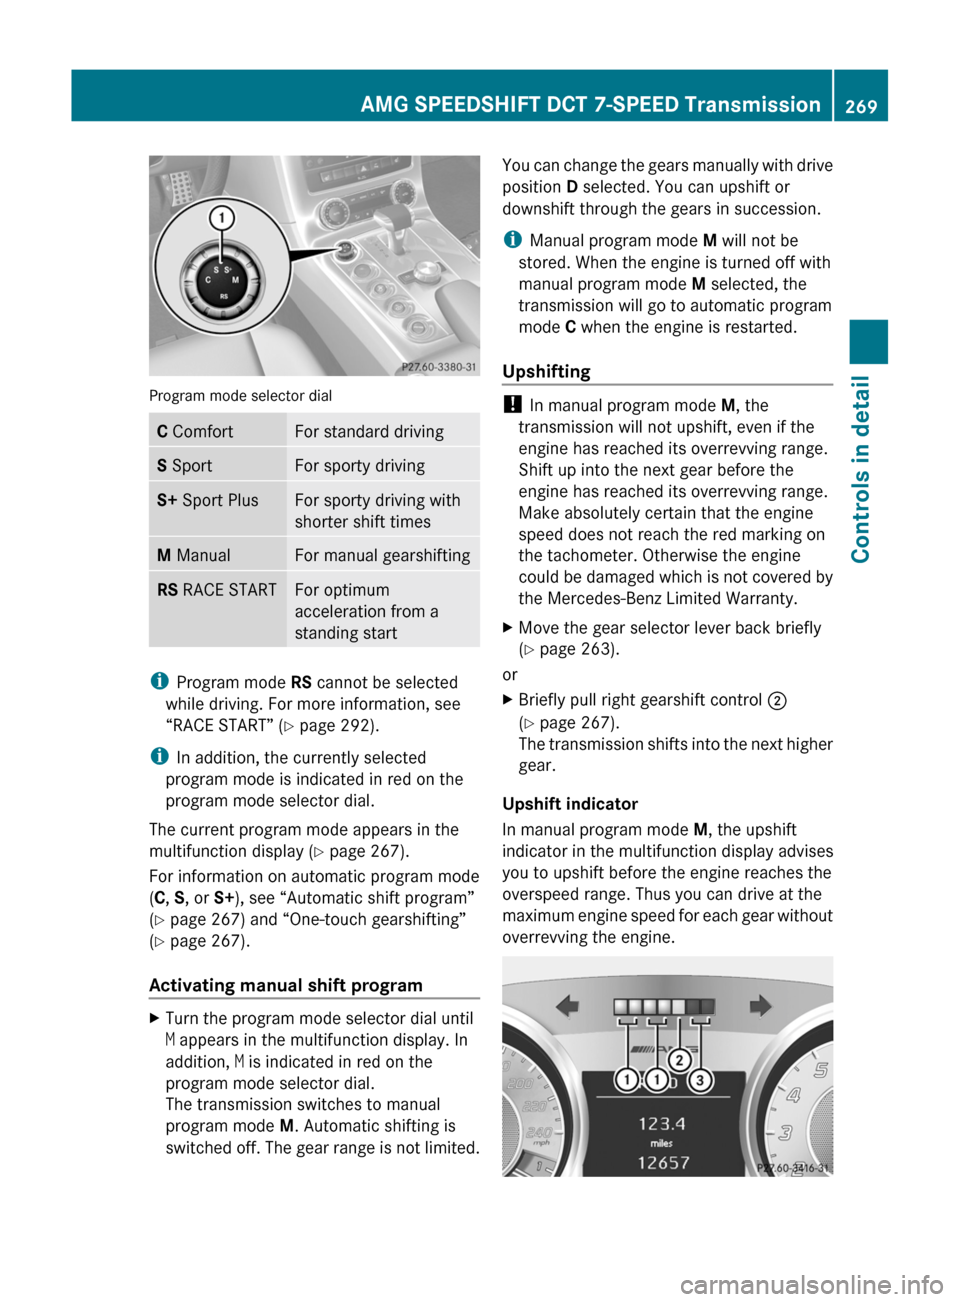
Program mode selector dial
C ComfortFor standard drivingS SportFor sporty drivingS+ Sport PlusFor sporty driving with
shorter shift times
M ManualFor manual gearshiftingRS RACE STARTFor optimum
acceleration from a
standing start
iProgram mode RS cannot be selected
while driving. For more information, see
“RACE START” (Y page 292).
iIn addition, the currently selected
program mode is indicated in red on the
program mode selector dial.
The current program mode appears in the
multifunction display (Y page 267).
For information on automatic program mode
(C, S, or S+), see “Automatic shift program”
(Y page 267) and “One-touch gearshifting”
(Y page 267).
Activating manual shift program
XTurn the program mode selector dial until
M appears in the multifunction display. In
addition, M is indicated in red on the
program mode selector dial.
The transmission switches to manual
program mode M. Automatic shifting is
switched off. The gear range is not limited.
You can change the gears manually with drive
position D selected. You can upshift or
downshift through the gears in succession.
iManual program mode M will not be
stored. When the engine is turned off with
manual program mode M selected, the
transmission will go to automatic program
mode C when the engine is restarted.
Upshifting
! In manual program mode M, the
transmission will not upshift, even if the
engine has reached its overrevving range.
Shift up into the next gear before the
engine has reached its overrevving range.
Make absolutely certain that the engine
speed does not reach the red marking on
the tachometer. Otherwise the engine
could be damaged which is not covered by
the Mercedes-Benz Limited Warranty.
XMove the gear selector lever back briefly
(Y page 263).
or
XBriefly pull right gearshift control ;
(Y page 267).
The transmission shifts into the next higher
gear.
Upshift indicator
In manual program mode M, the upshift
indicator in the multifunction display advises
you to upshift before the engine reaches the
overspeed range. Thus you can drive at the
maximum engine speed for each gear without
overrevving the engine.
AMG SPEEDSHIFT DCT 7-SPEED Transmission269Controls in detailBA 197 USA, CA Edition A 2011; 1; 27, en-UShereepeVersion: 3.0.3.52010-03-24T15:31:10+01:00 - Seite 269Z
Page 272 of 436
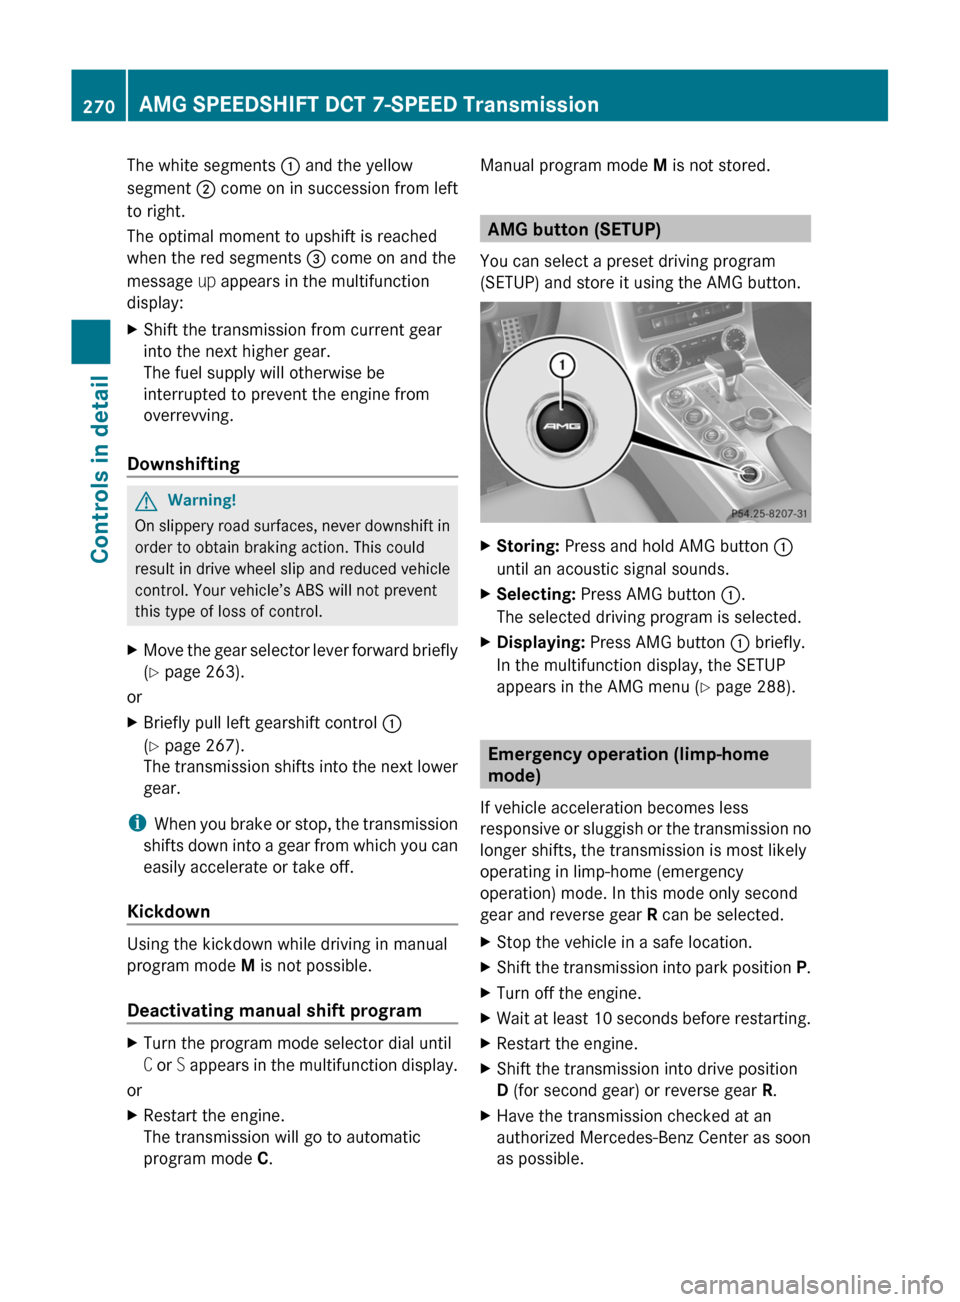
The white segments : and the yellow
segment ; come on in succession from left
to right.
The optimal moment to upshift is reached
when the red segments = come on and the
message up appears in the multifunction
display:
XShift the transmission from current gear
into the next higher gear.
The fuel supply will otherwise be
interrupted to prevent the engine from
overrevving.
Downshifting
GWarning!
On slippery road surfaces, never downshift in
order to obtain braking action. This could
result in drive wheel slip and reduced vehicle
control. Your vehicle’s ABS will not prevent
this type of loss of control.
XMove the gear selector lever forward briefly
(Y page 263).
or
XBriefly pull left gearshift control :
(Y page 267).
The transmission shifts into the next lower
gear.
iWhen you brake or stop, the transmission
shifts down into a gear from which you can
easily accelerate or take off.
Kickdown
Using the kickdown while driving in manual
program mode M is not possible.
Deactivating manual shift program
XTurn the program mode selector dial until
C or S appears in the multifunction display.
or
XRestart the engine.
The transmission will go to automatic
program mode C.
Manual program mode M is not stored.
AMG button (SETUP)
You can select a preset driving program
(SETUP) and store it using the AMG button.
XStoring: Press and hold AMG button :
until an acoustic signal sounds.
XSelecting: Press AMG button :.
The selected driving program is selected.
XDisplaying: Press AMG button : briefly.
In the multifunction display, the SETUP
appears in the AMG menu (Y page 288).
Emergency operation (limp-home
mode)
If vehicle acceleration becomes less
responsive or sluggish or the transmission no
longer shifts, the transmission is most likely
operating in limp-home (emergency
operation) mode. In this mode only second
gear and reverse gear R can be selected.
XStop the vehicle in a safe location.XShift the transmission into park position P.XTurn off the engine.XWait at least 10 seconds before restarting.XRestart the engine.XShift the transmission into drive position
D (for second gear) or reverse gear R.
XHave the transmission checked at an
authorized Mercedes-Benz Center as soon
as possible.
270AMG SPEEDSHIFT DCT 7-SPEED TransmissionControls in detail
BA 197 USA, CA Edition A 2011; 1; 27, en-UShereepeVersion: 3.0.3.52010-03-24T15:31:10+01:00 - Seite 270
Page 273 of 436
Instrument cluster
Introduction
For a full view illustration of the instrument
cluster, see “Instrument cluster”
( Y page 34).
GWarning!
No messages will be displayed if either the
instrument cluster or the multifunction
display is inoperative.
As a result, you will not be able to see
information about your driving conditions,
such as
R speed
R outside temperature
R warning/indicator lamps
R malfunction/warning messages
R failure of any systems
Driving characteristics may be impaired.
If you must continue to drive, do so with added
caution. Contact an authorized Mercedes-
Benz Center as soon as possible.
The language setting for the multifunction
display can be changed via COMAND system
( Y page 99).
Activating the instrument cluster
The instrument cluster is activated when you
R open the driver’s door
R switch on the ignition
R switch on the exterior lamps
Engine oil temperature gauge
The engine oil temperature gauge is located
in the instrument cluster. The engine oil
temperature may rise up to 140† under
normal driving conditions.
! The engine should not be operated with
the engine oil temperature above 140†.
Doing so may cause serious damage which
is not covered by the Mercedes-Benz
Limited Warranty.
The temperature of the transmission fluid and
coolant are displayed in the AMG menu
( Y page 287).
Tachometer
The red marking on the tachometer
( Y page 34) denotes excessive engine speed.
! Avoid driving at excessive engine speeds,
as it may result in serious engine damage
that is not covered by the Mercedes-Benz
Limited Warranty.
To help protect the engine, the fuel supply is
interrupted if the engine is operated within
the red marking.
Outside temperature indicator
The outside temperature indicator is
displayed in the multifunction display
( Y page 273).
GWarning!
The outside temperature indicator is not
designed to serve as an ice-warning device
and is therefore unsuitable for that purpose.
Indicated temperatures just above the
freezing point do not guarantee that the road
surface is free of ice. The road may still be icy,
especially in wooded areas or on bridges.
Fuel gauge
The fuel gauge is on the left-hand side of the
instrument cluster (Y page 34). Once the fuel
level has fallen below the reserve mark, the
yellow fuel tank reserve warning lamp 8
for the fuel reserve comes on.
Instrument cluster271Controls in detailBA 197 USA, CA Edition A 2011; 1; 27, en-UShereepeVersion: 3.0.3.52010-03-24T15:31:10+01:00 - Seite 271Z
Page 278 of 436
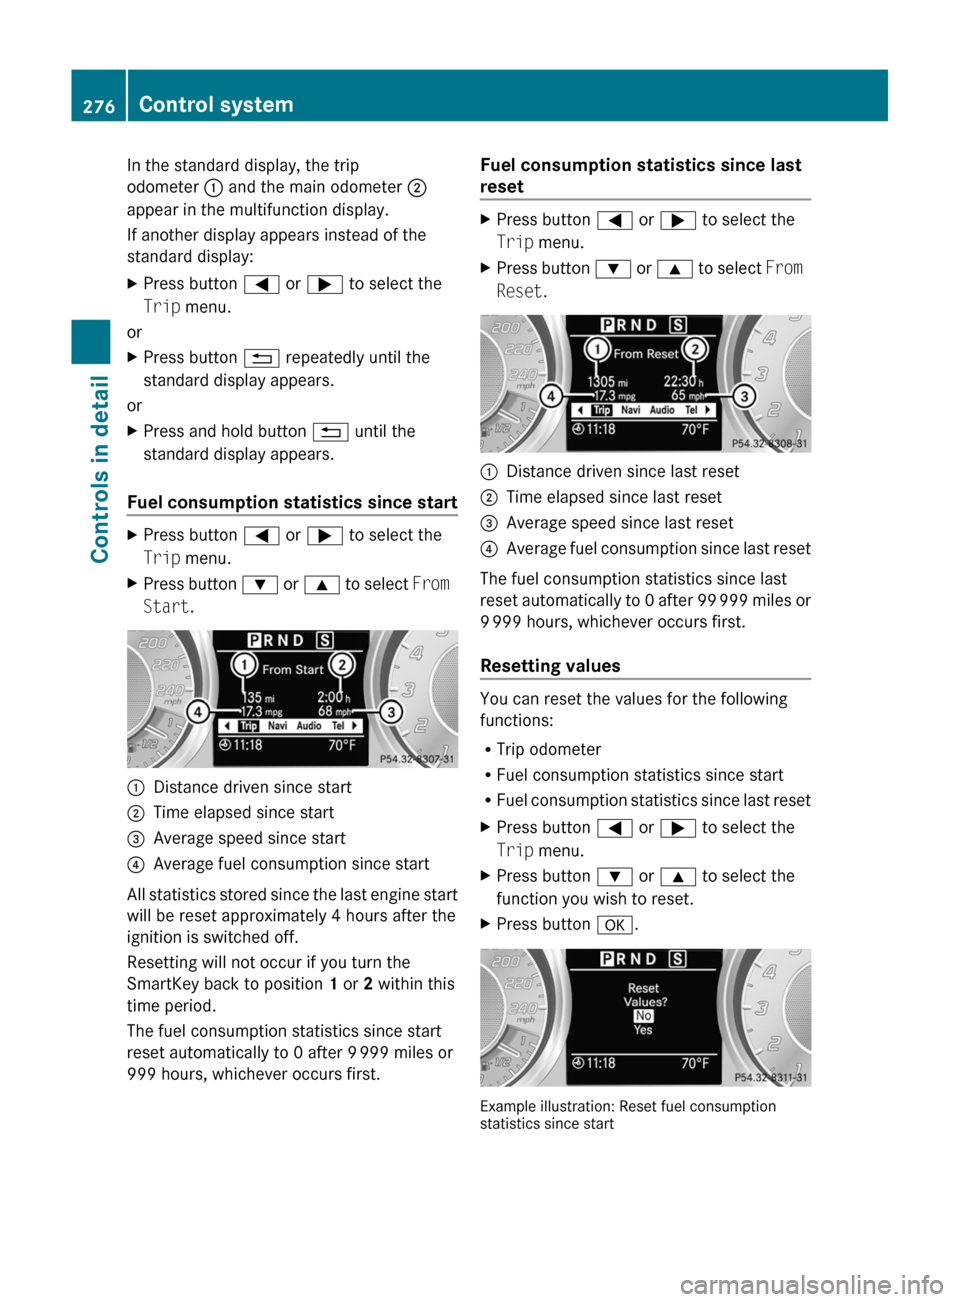
In the standard display, the trip
odometer : and the main odometer ;
appear in the multifunction display.
If another display appears instead of the
standard display:XPress button = or ; to select the
Trip menu.
or
XPress button % repeatedly until the
standard display appears.
or
XPress and hold button % until the
standard display appears.
Fuel consumption statistics since start
XPress button = or ; to select the
Trip menu.XPress button : or 9 to select From
Start .:Distance driven since start;Time elapsed since start=Average speed since start?Average fuel consumption since start
All statistics stored since the last engine start
will be reset approximately 4 hours after the
ignition is switched off.
Resetting will not occur if you turn the
SmartKey back to position 1 or 2 within this
time period.
The fuel consumption statistics since start
reset automatically to 0 after 9 999 miles or
999 hours, whichever occurs first.
Fuel consumption statistics since last
resetXPress button = or ; to select the
Trip menu.XPress button : or 9 to select From
Reset .:Distance driven since last reset;Time elapsed since last reset=Average speed since last reset?Average fuel consumption since last reset
The fuel consumption statistics since last
reset automatically to 0 after 99 999 miles or
9 999 hours, whichever occurs first.
Resetting values
You can reset the values for the following
functions:
R Trip odometer
R Fuel consumption statistics since start
R Fuel consumption statistics since last reset
XPress button = or ; to select the
Trip menu.XPress button : or 9 to select the
function you wish to reset.XPress button a.
Example illustration: Reset fuel consumption
statistics since start
276Control systemControls in detail
BA 197 USA, CA Edition A 2011; 1; 27, en-UShereepeVersion: 3.0.3.52010-03-24T15:31:10+01:00 - Seite 276
Page 284 of 436

RVehicle status message memory
( Y page 282)
R Checking tire inflation pressure
electronically with the Advanced TPMS
( Y page 329)
R Calling up the maintenance service
indicator display ( Y page 353)
Vehicle status message memory
Use the vehicle status message memory
function to scan malfunction and warning
messages that may be stored in the system.
Such messages appear in the multifunction
display and are based on conditions or
system status the vehicle’s system has
recorded.
GWarning!
Malfunction and warning messages are only
indicated for certain systems and are
intentionally not very detailed. The
malfunction and warning messages are
simply a reminder with respect to the
operation of certain systems. They do not
replace the owner’s and/or driver’s
responsibility to maintain the vehicle’s
operating safety. Have all required
maintenance and safety checks performed on
the vehicle. Bring the vehicle to an authorized
Mercedes-Benz Center to address the
malfunction and warning messages.
XPress button = or ; to select the
Service menu.
If conditions have occurred causing status
messages to be recorded, the number of
messages appears in the multifunction
display:XPress button : or 9 to select the
Messages function.XPress button a to confirm.
The stored messages will now be displayed
in the order in which they have occurred.
For malfunction and warning messages,
see “Vehicle status messages in the
multifunction display” ( Y page 364).XUse button : or 9 to scroll through
the messages.
If you turn off the engine by pressing the
KEYLESS-GO start/stop button and then
open the driver’s door, all messages will be
deleted from the message memory.
Settings menu
Introduction
In the Settings menu there are two
functions: The function Factory Setting
( Y page 282), with which you can reset the
settings to the original factory settings and a
collection of submenus ( Y page 283) with
which you can make individual settings for
your vehicle.
Resetting to factory settings
You can reset most of the settings of the
submenus to the factory settings.
For safety reasons, the function Daytime
Running Lights in the Lights submenu
cannot be reset while driving.
XPress button = or ; to select the
Settings menu.XPress button : or 9 to select the
Factory Setting function.XPress button a.
The function Reset All Settings?
appears in the multifunction display.282Control systemControls in detail
BA 197 USA, CA Edition A 2011; 1; 27, en-UShereepeVersion: 3.0.3.52010-03-24T15:31:10+01:00 - Seite 282
Page 287 of 436
position $ or c , the daytime running
lamps are switched on when the engine is
running.
In low ambient light conditions the following
lamps will come on additionally:
R Low-beam headlamps
R Parking lamps
R Tail lamps
R License plate lamps
R Side marker lamps
For more information on the daytime running
lamp mode, see ( Y page 251).
i Make sure the exterior lamp switch is set
to M or c when you switch off the
daytime running lamps while driving at
night.
For safety reasons, resetting all the functions
of all submenus to the factory settings while
driving ( Y page 282) will not deactivate the
daytime running lamp mode.
The following message appears in the
multifunction display:
Cannot Be Completely Reset to
Factory Settings while Driving. .
Adjusting illumination brightness for
display and switches
Use this function to adjust the brightness of
the multifunction display and switches.XPress button = or ; to select the
Settings menu.XPress button : or 9 to select the
Lights submenu.XPress button a.XPress button : or 9 to set the
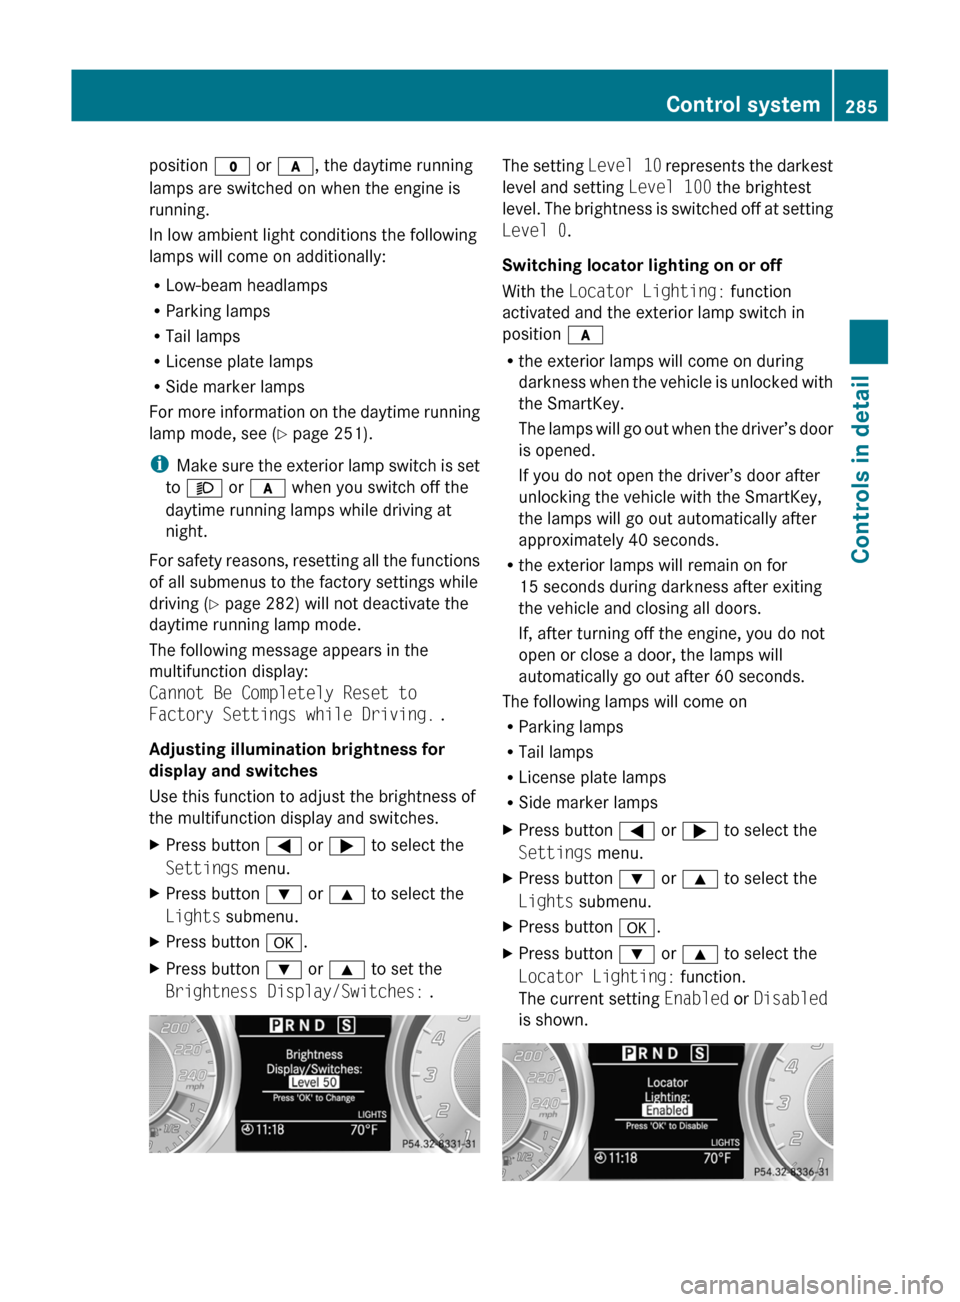
Brightness Display/Switches: .The setting Level 10 represents the darkest
level and setting Level 100 the brightest
level. The brightness is switched off at setting
Level 0 .
Switching locator lighting on or off
With the Locator Lighting: function
activated and the exterior lamp switch in
position c
R the exterior lamps will come on during
darkness when the vehicle is unlocked with
the SmartKey.
The lamps will go out when the driver’s door
is opened.
If you do not open the driver’s door after
unlocking the vehicle with the SmartKey,
the lamps will go out automatically after
approximately 40 seconds.
R the exterior lamps will remain on for
15 seconds during darkness after exiting
the vehicle and closing all doors.
If, after turning off the engine, you do not
open or close a door, the lamps will
automatically go out after 60 seconds.
The following lamps will come on
R Parking lamps
R Tail lamps
R License plate lamps
R Side marker lampsXPress button = or ; to select the
Settings menu.XPress button : or 9 to select the
Lights submenu.XPress button a.XPress button : or 9 to select the
Locator Lighting: function.
The current setting Enabled or Disabled
is shown.Control system285Controls in detailBA 197 USA, CA Edition A 2011; 1; 27, en-UShereepeVersion: 3.0.3.52010-03-24T15:31:10+01:00 - Seite 285Z
Page 288 of 436
XPress button a to change the current
status.
Depending on the previous status, the
Locator Lighting: function will be
Enabled or Disabled .
You can temporarily deactivate the
headlamps delayed shut-off feature:
XBefore exiting the vehicle, set the starter
switch to position 0 using the KEYLESS-GO
start/stop button.XSet the starter switch to position 2 and
back to position 0 using the KEYLESS-GO
start/stop button.
The headlamps delayed shut-off feature is
deactivated. It will reactivate as soon as
you start the engine.
Switching interior lighting delayed shut-
off on or off
Use this function to set whether you would
like the interior lighting to remain on for
10 seconds during darkness after you have
set the starter switch to position 0 using the
KEYLESS-GO start/stop button.
XPress button = or ; to select the
Settings menu.XPress button : or 9 to select the
Lights submenu.XPress button a.XPress button : or 9 to select the
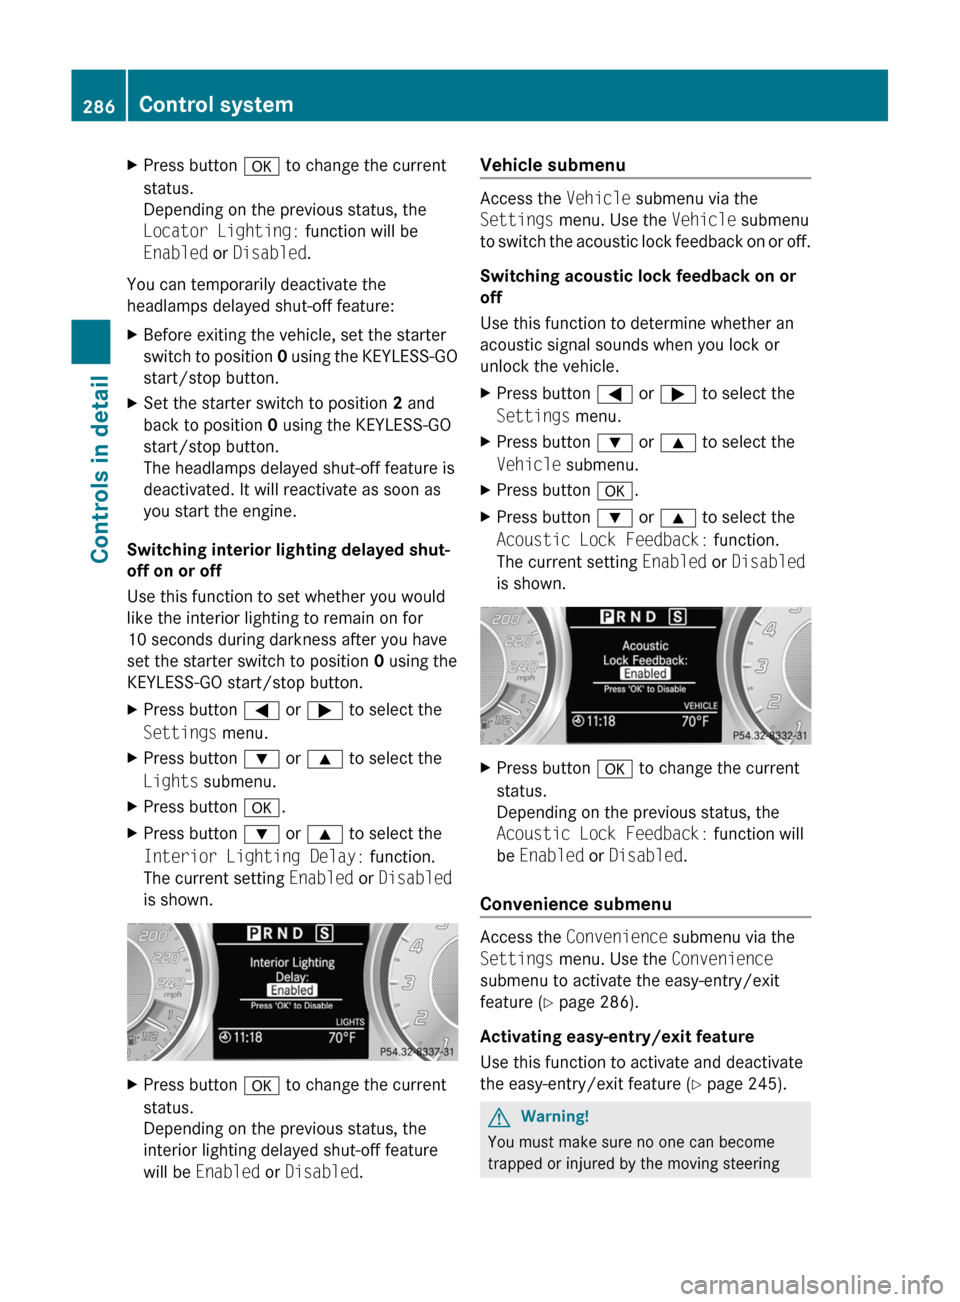
Interior Lighting Delay: function.
The current setting Enabled or Disabled
is shown.XPress button a to change the current
status.
Depending on the previous status, the
interior lighting delayed shut-off feature
will be Enabled or Disabled .Vehicle submenu
Access the Vehicle submenu via the
Settings menu. Use the Vehicle submenu
to switch the acoustic lock feedback on or off.
Switching acoustic lock feedback on or
off
Use this function to determine whether an
acoustic signal sounds when you lock or
unlock the vehicle.
XPress button = or ; to select the
Settings menu.XPress button : or 9 to select the
Vehicle submenu.XPress button a.XPress button : or 9 to select the
Acoustic Lock Feedback: function.
The current setting Enabled or Disabled
is shown.XPress button a to change the current
status.
Depending on the previous status, the
Acoustic Lock Feedback: function will
be Enabled or Disabled .
Convenience submenu
Access the Convenience submenu via the
Settings menu. Use the Convenience
submenu to activate the easy-entry/exit
feature ( Y page 286).
Activating easy-entry/exit feature
Use this function to activate and deactivate
the easy-entry/exit feature ( Y page 245).
GWarning!
You must make sure no one can become
trapped or injured by the moving steering
286Control systemControls in detail
BA 197 USA, CA Edition A 2011; 1; 27, en-UShereepeVersion: 3.0.3.52010-03-24T15:31:10+01:00 - Seite 286