2011 MERCEDES-BENZ SLS change time
[x] Cancel search: change timePage 159 of 436
Saving in the Address Book as a New EntryXSelect the list entry.XSelect Options £ Save £ New Entry.
i Save has no function if the selected list
entry is already stored in the address book.
XSelect a number category, e.g. Home.XSelect a telephone category, e.g. Mobile
Phone.
Number categoryDisplay (phone
and address book)
Not classified°Home@Work\Phone categoryDisplay (phone
and address book)
Not classified°Mobile¢Car^PagerïXSelect Save.
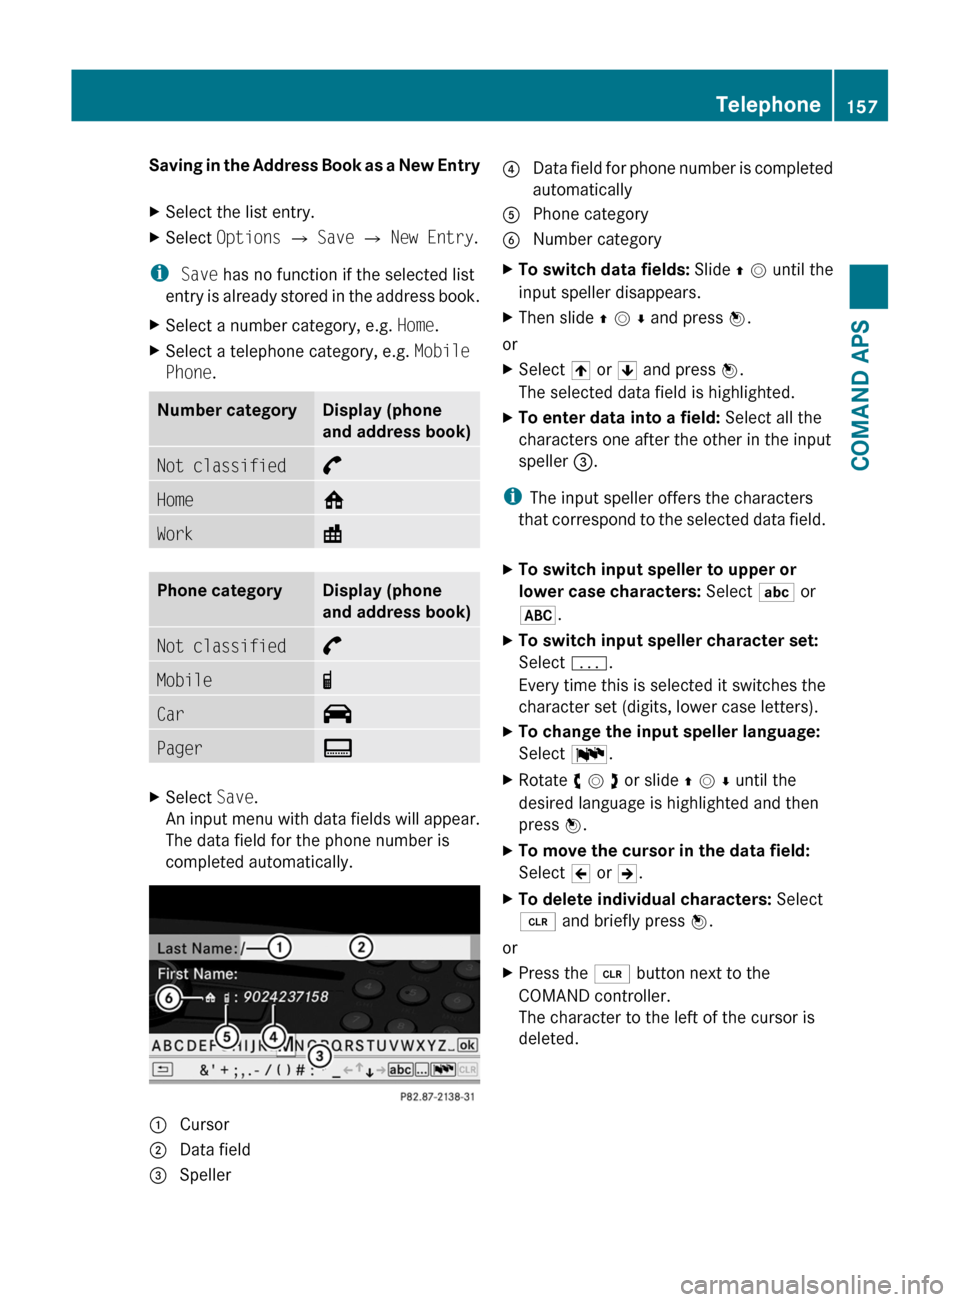
An input menu with data fields will appear.
The data field for the phone number is
completed automatically.
1 Cursor2 Data field3 Speller4 Data field for phone number is completed
automatically
5 Phone category6 Number categoryXTo switch data fields: Slide q m until the
input speller disappears.
XThen slide q m r and press n.
or
XSelect [ or ] and press n.
The selected data field is highlighted.
XTo enter data into a field: Select all the
characters one after the other in the input
speller 3.
iThe input speller offers the characters
that correspond to the selected data field.
XTo switch input speller to upper or
lower case characters: Select ( or
&.
XTo switch input speller character set:
Select k.
Every time this is selected it switches the
character set (digits, lower case letters).
XTo change the input speller language:
Select !.
XRotate y m z or slide q m r until the
desired language is highlighted and then
press n.
XTo move the cursor in the data field:
Select Y or Z.
XTo delete individual characters: Select
õ and briefly press n.
or
XPress the 2 button next to the
COMAND controller.
The character to the left of the cursor is
deleted.
Telephone157COMAND APSBA 197 USA, CA Edition A 2011; 1; 27, en-UShereepeVersion: 3.0.3.52010-03-24T15:31:10+01:00 - Seite 157Z
Page 164 of 436
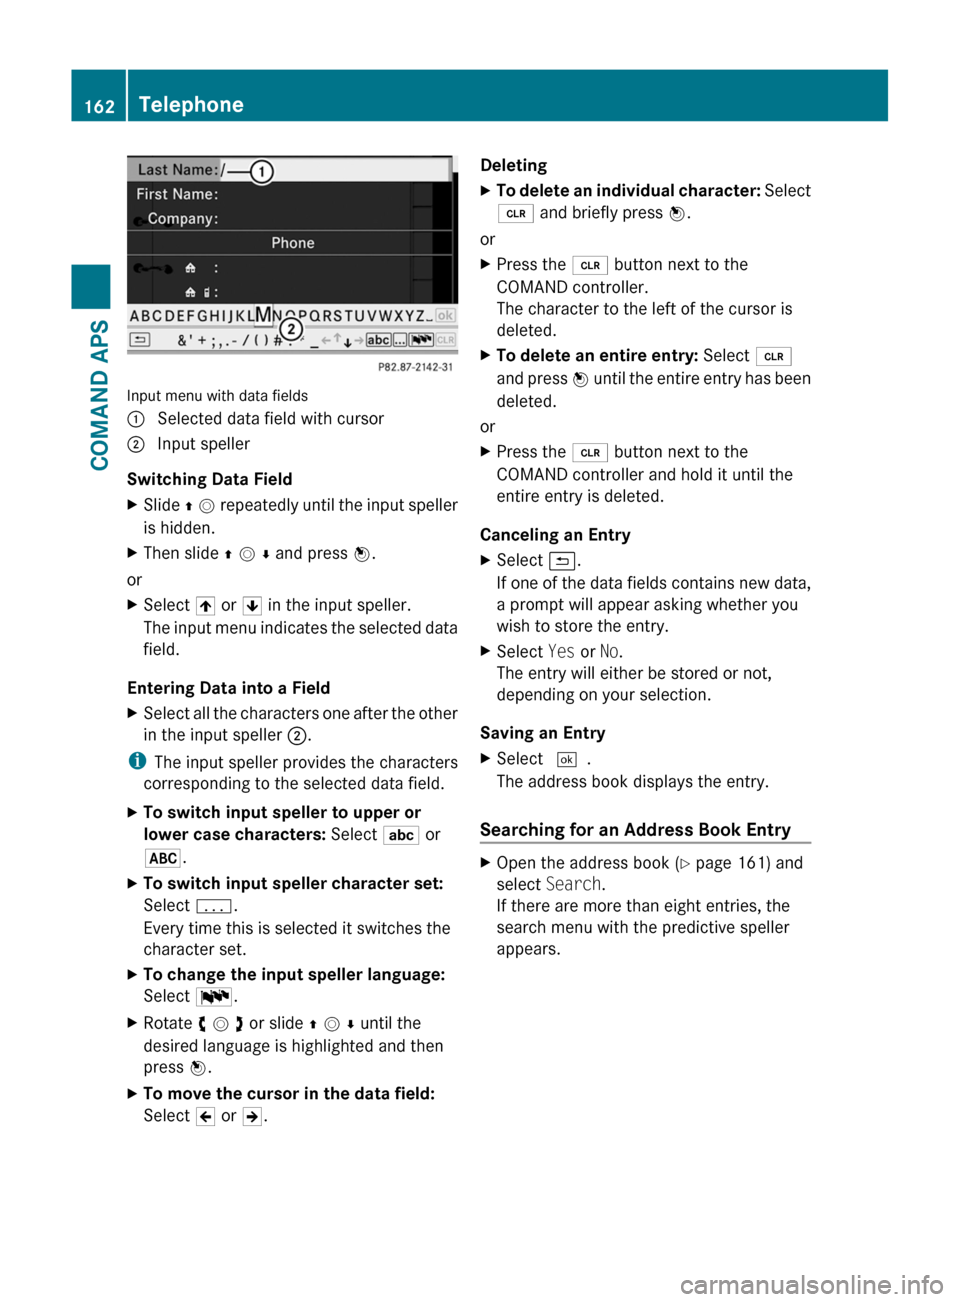
Input menu with data fields
1 Selected data field with cursor2 Input speller
Switching Data Field
XSlide q m repeatedly until the input speller
is hidden.
XThen slide q m r and press n.
or
XSelect [ or ] in the input speller.
The input menu indicates the selected data
field.
Entering Data into a Field
XSelect all the characters one after the other
in the input speller 2.
iThe input speller provides the characters
corresponding to the selected data field.
XTo switch input speller to upper or
lower case characters: Select ( or
&.
XTo switch input speller character set:
Select k.
Every time this is selected it switches the
character set.
XTo change the input speller language:
Select !.
XRotate y m z or slide q m r until the
desired language is highlighted and then
press n.
XTo move the cursor in the data field:
Select Y or Z.
DeletingXTo delete an individual character: Select
õ and briefly press n.
or
XPress the 2 button next to the
COMAND controller.
The character to the left of the cursor is
deleted.
XTo delete an entire entry: Select õ
and press n until the entire entry has been
deleted.
or
XPress the 2 button next to the
COMAND controller and hold it until the
entire entry is deleted.
Canceling an Entry
XSelect á.
If one of the data fields contains new data,
a prompt will appear asking whether you
wish to store the entry.
XSelect Yes or No.
The entry will either be stored or not,
depending on your selection.
Saving an Entry
XSelect d.
The address book displays the entry.
Searching for an Address Book Entry
XOpen the address book (Y page 161) and
select Search.
If there are more than eight entries, the
search menu with the predictive speller
appears.
162TelephoneCOMAND APS
BA 197 USA, CA Edition A 2011; 1; 27, en-UShereepeVersion: 3.0.3.52010-03-24T15:31:10+01:00 - Seite 162
Page 165 of 436
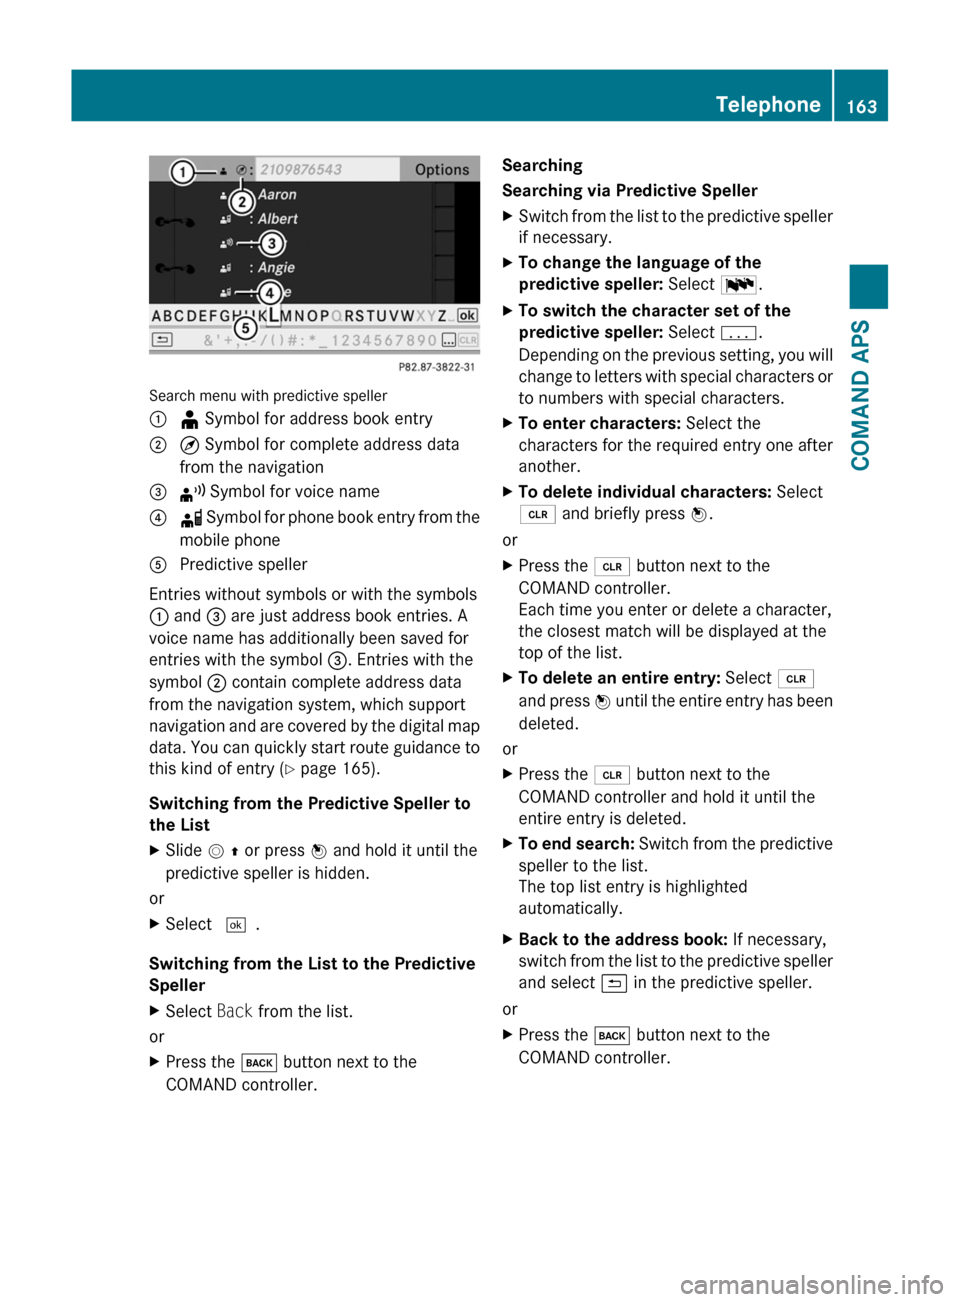
Search menu with predictive speller
1 ¥ Symbol for address book entry2 ¤ Symbol for complete address data
from the navigation
3 ¦ Symbol for voice name4 å Symbol for phone book entry from the
mobile phone
5 Predictive speller
Entries without symbols or with the symbols
1 and 3 are just address book entries. A
voice name has additionally been saved for
entries with the symbol 3. Entries with the
symbol 2 contain complete address data
from the navigation system, which support
navigation and are covered by the digital map
data. You can quickly start route guidance to
this kind of entry (Y page 165).
Switching from the Predictive Speller to
the List
XSlide m q or press n and hold it until the
predictive speller is hidden.
or
XSelect d.
Switching from the List to the Predictive
Speller
XSelect Back from the list.
or
XPress the k button next to the
COMAND controller.
Searching
Searching via Predictive Speller
XSwitch from the list to the predictive speller
if necessary.
XTo change the language of the
predictive speller: Select !.
XTo switch the character set of the
predictive speller: Select k.
Depending on the previous setting, you will
change to letters with special characters or
to numbers with special characters.
XTo enter characters: Select the
characters for the required entry one after
another.
XTo delete individual characters: Select
õ and briefly press n.
or
XPress the 2 button next to the
COMAND controller.
Each time you enter or delete a character,
the closest match will be displayed at the
top of the list.
XTo delete an entire entry: Select õ
and press n until the entire entry has been
deleted.
or
XPress the 2 button next to the
COMAND controller and hold it until the
entire entry is deleted.
XTo end search: Switch from the predictive
speller to the list.
The top list entry is highlighted
automatically.
XBack to the address book: If necessary,
switch from the list to the predictive speller
and select á in the predictive speller.
or
XPress the k button next to the
COMAND controller.
Telephone163COMAND APSBA 197 USA, CA Edition A 2011; 1; 27, en-UShereepeVersion: 3.0.3.52010-03-24T15:31:10+01:00 - Seite 163Z
Page 175 of 436

Program Information
iThis feature is only available for analog
FM and programs.
Information on the current program is
normally displayed above the submenu line.
XTo display the program information in
the main area: Select Info in the radio
display submenu.
Information on the program currently tuned
to is now displayed in the main area. The
content and scope of the information
depends on the radio station.
Satellite Radio
Important Notes
In this chapter, you will find detailed
information regarding
Rselecting a channel and a program category
Rmemory functions
Rsound adjustments
If you have not done so already, please
familiarize yourself with these functions by
reading chapter “At a glance”.
iOptional satellite radio equipment and a
subscription to satellite radio service
provider are required for the satellite radio
operation described here.
iNote that categories and channels shown
in illustrations are dependent on
programming content delivered by the
service provider. Programming content is
subject to change. Therefore, channel and
categories shown in illustrations and
descriptions contained in this manual may
differ from the channels and categories
delivered by the service provider.
Satellite radio service may be unavailable
or interrupted from time to time for a
variety of reasons, such as environmental
or topographic conditions and other things
we cannot control. Service might also not
be available in certain places (e.g., in
tunnels, parking garages, or within or next
to buildings) or near other technologies.
iSIRIUS XM Satellite Radio provides over
130 channels of digital-quality radio,
including 100% commercial-free music,
sports, news and entertainment.
SIRIUS XM Satellite Radio uses a fleet of
high-power satellites to broadcast 24 hours
per day, coast-to-coast, in the contiguous
U.S and Canada.
This diverse, satellite-delivered
programming is available for a monthly
subscription fee. For more information, call
the SIRIUS XM Service Center
(Y page 177) or contact
http://www.sirius.com (USA) or
http://www.siriuscanada.com
(Canada).
Subscribing
Subscribing to Satellite Radio
To switch to satellite radio operation:
XFrom another main function: Select
Audio £ Audio £ SatRadio.
iIf radio mode was active last, you only
need to select Audio.
XWithin the audio function: Select Audio
£ SatRadio.
If the satellite radio service is not activated,
the Satellite radio main menu appears and
Audio173COMAND APSBA 197 USA, CA Edition A 2011; 1; 27, en-UShereepeVersion: 3.0.3.52010-03-24T15:31:10+01:00 - Seite 173Z
Page 187 of 436
Within the Audio FunctionXSelect Audio £ Disc or Memory card in
the audio menu display.
i Disc accesses audio discs in the DVD
changer. Memory Card selects the slot for
the PCMCIA memory card.
XSelect CD/DVD Audio/MP3 as required
(Y page 186).
The desired disc mode is activated.
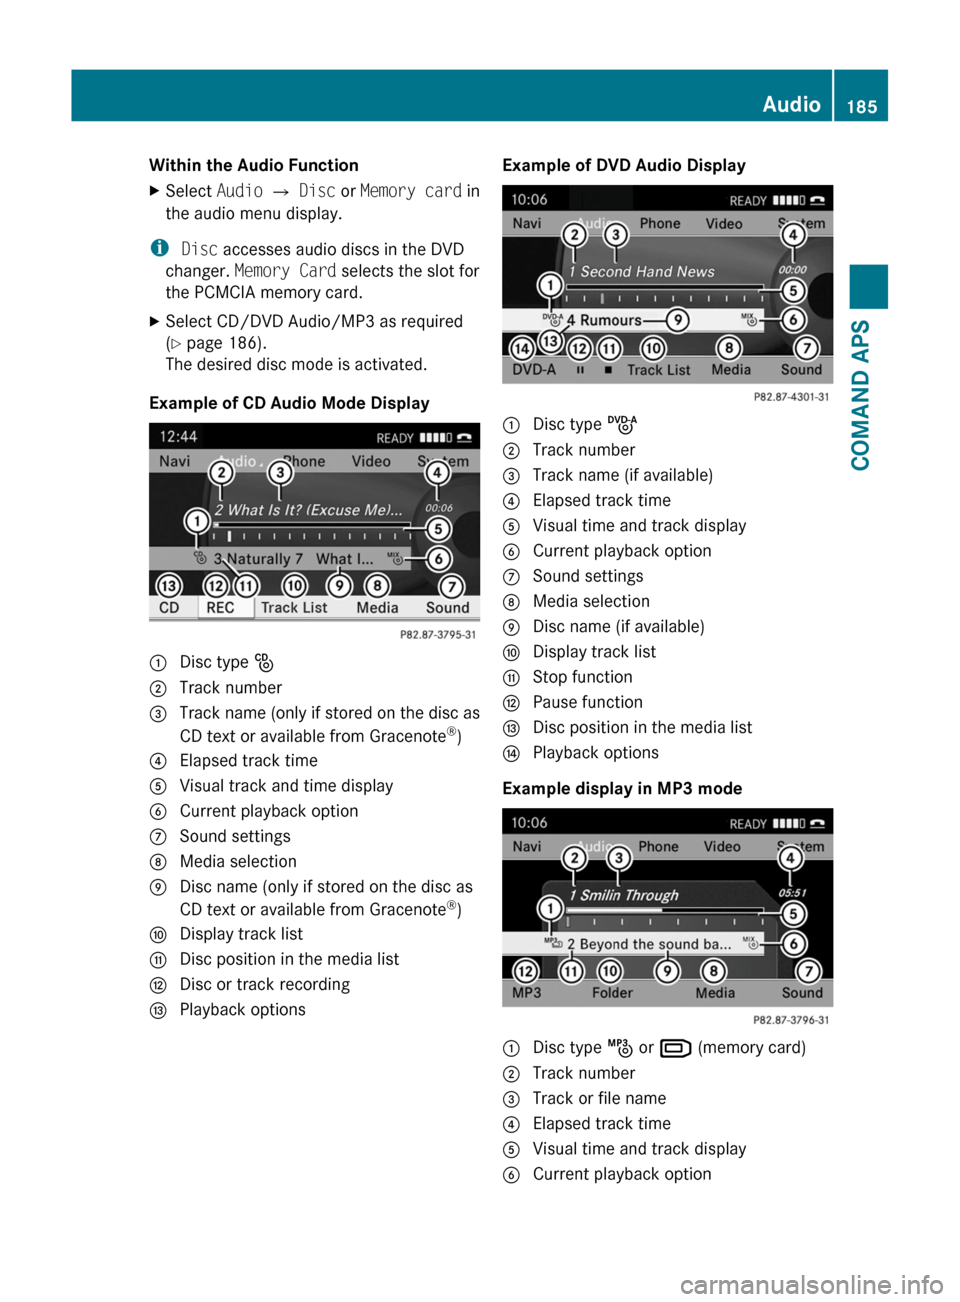
Example of CD Audio Mode Display
1 Disc type _2 Track number3 Track name (only if stored on the disc as
CD text or available from Gracenote®)
4 Elapsed track time5 Visual track and time display6 Current playback option7 Sound settings8 Media selection9 Disc name (only if stored on the disc as
CD text or available from Gracenote®)
a Display track listb Disc position in the media listc Disc or track recordingd Playback optionsExample of DVD Audio Display1 Disc type ü2 Track number3 Track name (if available)4 Elapsed track time5 Visual time and track display6 Current playback option7 Sound settings8 Media selection9 Disc name (if available)a Display track listb Stop functionc Pause functiond Disc position in the media liste Playback options
Example display in MP3 mode
1 Disc type þ or º (memory card)2 Track number3 Track or file name4 Elapsed track time5 Visual time and track display6 Current playback optionAudio185COMAND APSBA 197 USA, CA Edition A 2011; 1; 27, en-UShereepeVersion: 3.0.3.52010-03-24T15:31:10+01:00 - Seite 185Z
Page 191 of 436
center by means of a DVD or perform the
update process yourself.
i The Gracenote ®
Media Database is
updated at the same time as the map
software ( Y page 100).
Setting Audio Format
It is only possible to set the audio format in
DVD Audio mode. The number of available
audio formats depends on the DVD. The
content of a DVD Audio is called the “album”,
which can be divided into a maximum of nine
groups. A group may contain, for example,
music of different sound qualities (stereo and
multi-channel formats) or bonus tracks. Each
group can include up to 99 tracks. If a DVD
Audio only comprises one audio format, the
“Group” menu item(s) cannot be selected.
XSwitch to DVD Audio mode ( Y page 184).XSelect DVD-A £ Group .
The list of available audio formats appears.
The dot R indicates the format currently
selected.XTo change setting: Rotate y m z or slide
q m r .XPress n.
Playback Options
The following options are available:
R Normal Track Sequence
You will hear the tracks in the normal order
(e.g. track 1, 2, 3, etc.).
R Random Tracks
You will hear the tracks in random order
(e.g. track 3, 8, 5, etc.).
R Random Folder (MP3 mode only)
You hear the tracks in the currently active
folder and any subfolders in random order.
XTo select an option: Switch to CD Audio,
DVD Audio or MP3 mode ( Y page 184).XSelect CD or DVD-A or MP3 .
The option list appears. A dot R indicates
the option selected.XSelect an option.
The option is activated. For all options
except Normal Track Sequence , you will
see a corresponding display in the main
area.
i The Normal Track Sequence option is
automatically selected when you change
the medium you are currently listening to
or when you select a different medium. If
an option is selected, it remains selected
after COMAND is switched on or off.
Music Register
You can record tracks from Audio CDs and
store them in the Music Register. The
memory capacity is 6 GB.
! Keep your original music files in a safe
place. A fault with the COMAND may cause
the music files stored in the Music Register
to be lost. Mercedes-Benz USA, LLC is not
liable for any loss of data.
Switching to the Music Register
From Another Main Function
XSelect Audio £ Audio £ Music
Register in the Audio menu display.
i
If Music Register was the last mode,
you only need to select Audio.
Within the Audio Function
XSelect Audio £ Music Register .
Music Register is loaded. The Music
Register display appears.
No music files available:
A message will be displayed.
XFirst record music files from an Audio CD
( Y page 190).Audio189COMAND APSBA 197 USA, CA Edition A 2011; 1; 27, en-UShereepeVersion: 3.0.3.52010-03-24T15:31:10+01:00 - Seite 189Z
Page 194 of 436
Deleting Folders/TrackXSelect Folder .XTo select a folder/track: Rotate y m z or
slide q m r .XSelect Options £ Delete .
A query appears. No is highlighted.XDo not delete: Press the n button.XTo delete: Select Yes and press n.
A message appears.
Playback Options
The following options are available:
R Normal Track Sequence
You will hear the tracks in the normal
sequence (e.g. track 1, 2, 3 etc.).
R Random Tracks:
You hear the tracks in random order.
R Random Folder
The tracks of the currently active folder and
any subfolders are heard in random order.
XTo select an option: Switch to Music
Register ( Y page 189).XSelect Music Register in the submenu.
The option list appears. A R dot indicates
the activated option.XSelect an option.
The option is activated. A corresponding
display will appear in the main area for all
options except Normal Track Sequence .
i
The option Normal Track Sequence is
automatically activated if you change the
medium which is currently being played or
if you select another medium. An activated
option remains active after COMAND is
switched on or off.
Media Interface
Important Notes
Connection Options
Via the UCI connection (Universal Consumer
Interface) you can connect the following
media to COMAND:
R iPods
R MP3 player
R USB devices
Supported iPod ®
Versions
The following iPod ®
versions are fully
supported:
R iPod ®
mini
R iPod ®
nano
R iPod ®
classic
R iPod ®
touch
Supported USB Devices
The following USB devices are supported:
R USB sticks (flash memory)
R USB hard drives (1-inch, 1.8-inch and
2.5-inch drives) with a starting/continuous
current rating of maximum 800 mA
(otherwise a separate power supply will be
necessary)
i The Media Interface supports USB
storage media of "USB Device Subclass 6".
You can obtain information about the "USB
Device Subclass 6" from the manufacturer.
Further Information on Supported
Devices
Further information on compatible
multimedia devices is available via the
Internet at
http://www.mbusa-mobile.com . Or call
the Mercedes-Benz Customer Assistance
Center at 1-800-FOR-MERCedes
(1-800-367-6372) (US), or Customer
Relations at 1-800-387-0100 (Canada).
192AudioCOMAND APS
BA 197 USA, CA Edition A 2011; 1; 27, en-UShereepeVersion: 3.0.3.52010-03-24T15:31:10+01:00 - Seite 192
Page 201 of 436
Vehicle Equipment
iThis Operator’s Manual describes all
features, standard or optional, potentially
available for your vehicle at the time of
purchase. Please be aware that your
vehicle might not be equipped with all
features described in this manual.
Automatic Picture Switch-off
The video picture is only displayed if the
gearshift lever is in “P” position.
When the gearshift lever is moved out of the
“P” position, the following message is
displayed: In order not to distract
you from the traffic situation, the
picture is faded out while the
vehicle is in motion.
When the gearshift lever is moved back into
the “P” position, the picture switches back
on.
Notes on Storage Media
i When playing copied discs, problems may
occur with the playback. A wide variety of
disc-writing software and writers are
available. Due to this variety we cannot
guarantee that the system will be able to
play discs that you have written/copied
yourself.
! Do not affix stickers or labels to the discs,
as they could peel off and damage
COMAND. Stickers can cause the disc to
bend, which can result in read errors and
disc recognition problems.
! COMAND is designed to hold discs which
comply with the EN 60908 standard. You
can therefore only use discs with a
maximum thickness of 1.3 mm.
If you insert thicker discs, e.g. those that
contain data on both sides (DVD on one
side and audio data on the other), they
cannot be ejected and can damage
COMAND.
Do not use discs with a diameter of 8 cm,
even with an adapter. Only use round discs
with a diameter of 12 cm.
Notes on the Care of Discs
R Only hold discs by the edge.
R Handle discs with care in order to prevent
malfunctions during playback.
R Avoid scratching, leaving fingerprints and
dust on the discs.
R Clean the discs occasionally with a
commercially available cleaning cloth.
Always wipe in a straight line from the
inside outwards, never in a circular motion.
R The discs must only be labelled using pens
specially designed for this purpose.
R After use, replace the discs into the sleeve.
R Protect the discs from heat and direct
sunlight.
DVD Playback Conditions
Some DVDs may not comply with the NTSC
or PAL TV playback standards. Sound, picture
and other playback problems may occur
when you play such DVDs.
As standard, COMAND can play video DVDs
which meet the following criteria:
R Region code 1 or region code 0 (all regions)
i With a video DVD having another region
code, a corresponding message will be
displayed.
R PAL or NTSC TV standard
Information on this can usually be found
either on the DVD itself or on the DVD sleeve.
i The factory setting for COMAND is region
code 1. An authorized Mercedes-Benz
Center can change this setting up to five
times. This will enable you to play video
DVDs with other region codes, provided
that they have been made to the PAL or
NTSC TV standard.
Video199COMAND APSBA 197 USA, CA Edition A 2011; 1; 27, en-UShereepeVersion: 3.0.3.52010-03-24T15:31:10+01:00 - Seite 199Z