2011 MERCEDES-BENZ SLS change time
[x] Cancel search: change timePage 16 of 436

Lighting .............................................. 249
Daytime running lamp mode ..........251
Exterior .......................................... 250
Interior ........................................... 253
Limp-home mode .............................. 270
Listing address book contents ........ 220
Load index (tires) ...................... 341, 345
Loading CDs and DVDs main system .................................. 180
Local voice control commands ........ 207
Location of vehicle, current see Vehicle location (current)
Locator lighting ................................. 285
Locking and unlocking Notes ............................................. 236
Locking the vehicle
Manually ........................................ 398
SmartKey ....................................... 236
Loss of
Key ................................................ 237
Service and Warranty Information
booklet .......................................... 420
Loudness
see Volume
Low-beam headlamps ....................... 250
Exterior lamp switch ......................250
Indicator lamp .................................. 35
Switching on .................................. 250
Lubricants .......................................... 425
M
Magazine compartments, DVD
changer .............................................. 180
Main function display see Display, main
Main function menus
list of ................................................ 74
navigation mode, switching to .......105
opening ............................................ 85
Main menu, overview of ..................... 74
Maintenance ........................................ 27
Maintenance System Service indicator display ................353
Service indicator message .............352
Service term exceeded ..................353
Maneuver phase (driving
maneuvers) ........................................ 134
Manual headlamp mode (Low-
beam headlamps) .............................. 250
Manual shift program ....................... 268
Upshift indicator ............................ 269
Map display (See also Navigation) ... 108
blocked area for route ...................112
destination information .................. 138
driving maneuver preparation ........133
entering destination on ..................123
entering POI from .......................... 132
general information, at bottom ......110
hiding crosshairs ........................... 107
setting scale .................................. 106
topographic map ............................ 111
traffic information ..........................109
traffic lane recommendations ........135
traffic notifications in .....................139
updating map software ..................100
Maximum engine speed
see Vehicle specification
Maximum loaded vehicle weight ..... 346
Maximum load rating (tires) ............. 345
Maximum permissible tire
inflation pressure .............................. 346
mbrace ....................................... 125, 308
Emergency calls ............................. 309
Information button .........................311
Initiating an emergency call
manually ........................................ 310
Messages in the multifunction
display ........................................... 377
Remote door lock .......................... 313
Search & Send ............................... 313
SOS button .................................... 310
Stolen Vehicle Recovery Services ..313
System self-test ............................. 309
Wrench button ............................... 311
Measurement units, navigation ....... 103
Mechanical key see Key, Mechanical
Media interface ......................... 192, 304
data formats .................................. 193
voice control with ..................225, 230
Media Interface
connecting devices ........................193
selecting category/playlist/folder . 195
selecting files ................................. 195
switching to ................................... 19414IndexBA 197 USA, CA Edition A 2011; 1; 27, en-UShereepeVersion: 3.0.3.52010-03-24T15:31:10+01:00 - Seite 14
Page 29 of 436
Rhode Island, and Vermont Emission
Control System Warranty
R State Warranty Enforcement Laws (Lemon
Laws)
Important notice for California retail
buyers and lessees of Mercedes-Benz
automobiles
Under California law you may be entitled to a
replacement of your vehicle or a refund of the
purchase price or lease price, if after a
reasonable number of repair attempts
Mercedes-Benz USA, LLC and/or its
authorized repair or service facilities fail to fix
one or more substantial defects or
malfunctions in the vehicle that are covered
by its express warranty. During the period of
18 months from original delivery of the
vehicle or the accumulation of 18 000 miles
(approximately 29 000 km) on the odometer
of the vehicle, whichever occurs first, a
reasonable number of repair attempts is
presumed for a retail buyer or lessee if one or
more of the following occurs:
(1)the same substantial defect or
malfunction results in a condition that is
likely to cause death or serious bodily
injury if the vehicle is driven, that defect
or malfunction has been subject to repair
two or more times, and you have directly
notified Mercedes-Benz USA, LLC in
writing of the need for its repair,(2)the same substantial defect or
malfunction of a less serious nature than
category (1) has been subject to repair
four or more times and you have directly
notified us in writing of the need for its
repair, or(3)the vehicle is out of service by reason of
repair of the same or different substantial
defects or malfunctions for a cumulative
total of more than 30 calendar days.
Written notification should not be sent to a
dealer, it should be addressed to
Mercedes-Benz USA, LLC
Customer Assistance Center
One Mercedes Drive
Montvale, NJ 07645-0350
Maintenance
The Maintenance Booklet describes all the
necessary maintenance work which should
be performed at regular intervals.
Always have the Maintenance Booklet with
you when you take the vehicle to an
authorized Mercedes-Benz Center for
service. The service advisor will record each
service in the booklet for you.
Roadside Assistance
The Mercedes-Benz Roadside Assistance
Program provides factory-trained technical
help in the event of a breakdown. Calls to the
toll-free Roadside Assistance number
1-800-FOR-MERCedes (1-800-367-6372)
(in the USA) 1-800-387-0100 (in Canada)
will be answered by Mercedes-Benz
Customer Assistance Representatives
24 hours a day, 365 days a year.
For additional information refer to the
Mercedes-Benz Roadside Assistance
Program brochure (in the USA) or the
Roadside Assistance section of the Service
and Warranty Information Booklet (in
Canada) in your vehicle literature portfolio.
Change of address or ownership
If you change your address, be sure to send
in the “Change of Address Notice” found in
the Service and Warranty Information
Booklet, or simply call the Mercedes-Benz
Customer Assistance Center (in the USA) at
1-800-FOR-MERCedes (1-800-367-6372), or
Customer Service (in Canada) at
1-800-387-0100. This will assist us in
contacting you in a timely manner should the
need arise.
Introduction27BA 197 USA, CA Edition A 2011; 1; 27, en-UShereepeVersion: 3.0.3.52010-03-24T15:31:10+01:00 - Seite 27
Page 60 of 436

Unsecured or improperly positioned cargo
increases a child’s risk of injury in the event
of
R strong braking maneuvers
R sudden changes of direction
R an accident
Infant and child restraint systemsGObserve Safety notes, see page 57.
We recommend all infants and children be
properly restrained at all times while the
vehicle is in motion.
The passenger lap/shoulder belt has a
special seat belt retractor for secure
fastening of child restraints.
To fasten a child restraint, follow the child
restraint manufacturer’s instructions for
mounting.
To activate the special seat belt retractor:
XPull the shoulder belt out completely and
let it retract.
During seat belt retraction, a ratcheting
sound can be heard to indicate that the
special seat belt retractor is activated.
The seat belt is now locked.XPush down on child restraint to take up any
slack.
To deactivate the special seat belt retractor:
XRelease the seat belt buckle and let the
seat belt retract completely.
The seat belt can then again be used in the
usual manner.GWarning!
Never release the seat belt buckle while the
vehicle is in motion, since the special seat belt
retractor will be deactivated.
The use of infant or child restraints is required
by law in all 50 states, the District of
Columbia, the U.S. territories and all
Canadian provinces.
Infants and small children should be seated
in an appropriate infant or child restraint
system. They must be properly secured by a
lap/shoulder belt in accordance with the
manufacturer’s instructions for the child
restraint. All infant or child restraint systems
must comply with U.S. Federal Motor Vehicle
Safety Standards 213 and 225 and Canadian
Motor Vehicle Safety Standards 213 and
210.2.
A statement by the child restraint
manufacturer of compliance with these
standards can be found on the instruction
label on the restraint and in the instruction
manual provided with the restraint.
When using any infant restraint, toddler
restraint, or booster seat, make sure to
carefully read and follow all manufacturer’s
instructions for installation and use.
Please read and observe warning labels
affixed to the inside of the vehicle and to
infant or child restraints.GWarning!
Children 12 years old and under must be
seated and properly secured in an appropriate
infant restraint, toddler restraint, or booster
seat recommended for the size and weight of
the child.
The infant or child restraint must be properly
secured with the vehicle’s seat belt fully in
accordance with the child seat
manufacturer’s instructions.
Occupants, especially children, should always
sit as upright as possible, wear the seat belt
properly and use an appropriately sized infant
restraint, toddler restraint, or booster seat
recommended for the size and weight of the
child.
Children can be killed or seriously injured by
an inflating air bag. Note the following
important information:
R Your vehicle is equipped with air bag
technology designed to deactivate the
passenger front air bag in your vehicle
when the system senses the weight of a
typical 12-month-old child or less along
58Occupant safetySafety and security
BA 197 USA, CA Edition A 2011; 1; 27, en-UShereepeVersion: 3.0.3.52010-03-24T15:31:10+01:00 - Seite 58
Page 74 of 436
is operated in a commercial environment.
This equipment generates, uses and can
radiate radio frequency energy and, if not
installed and used in accordance with the
instruction manual, may cause harmful
interference to radio communications.
GWarning
This transmitter must not be co-located or
operated in conjunction with any other
antenna or transmitter.
GWarning
This equipment complies with FCC radiation
exposure limits set forth for uncontrolled
equipment and meets the FCC radio
frequency (RF) Exposure Guidelines in
Supplement C to OET65.
This equipment has very low levels of RF
energy that is deemed to comply without
maximum permissive exposure evaluation
(MPE). But it is desirable that it should be
installed and operated with at least 8 inches
(20 cm) and more between the radiator and a
person's body (excluding extremities: hands,
wrists, feet and legs.)
At a glance
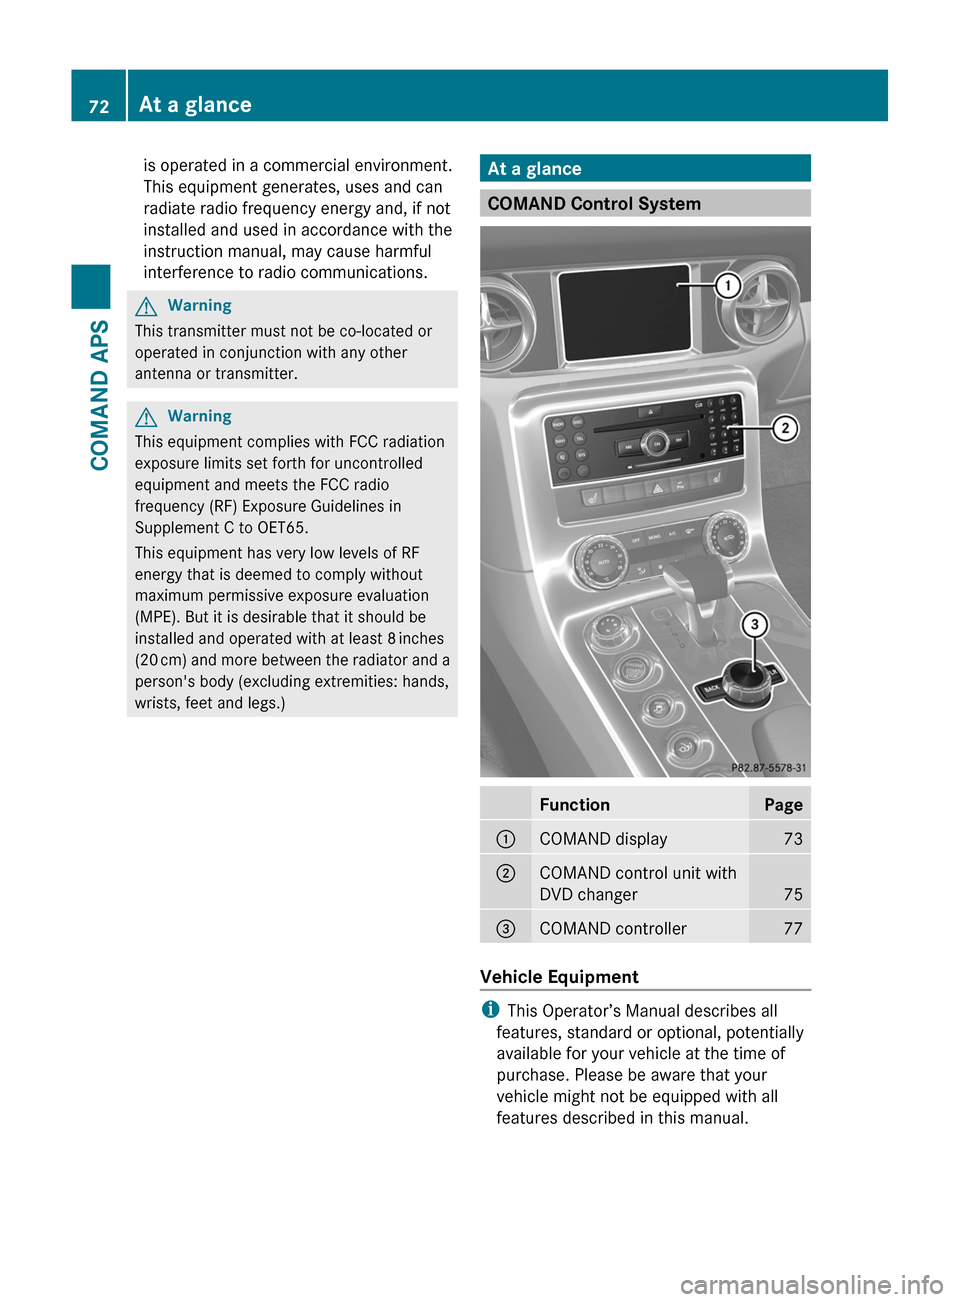
COMAND Control System
FunctionPage1COMAND display732COMAND control unit with
DVD changer75
3COMAND controller77
Vehicle Equipment
iThis Operator’s Manual describes all
features, standard or optional, potentially
available for your vehicle at the time of
purchase. Please be aware that your
vehicle might not be equipped with all
features described in this manual.
72At a glanceCOMAND APS
BA 197 USA, CA Edition A 2011; 1; 27, en-UShereepeVersion: 3.0.3.52010-03-24T15:31:10+01:00 - Seite 72
Page 75 of 436
Components of COMAND
COMAND comprises:
Rthe COMAND display
Rthe COMAND control unit with DVD
changer
Rthe COMAND controller with the Back and
Clear button
You can use COMAND to operate the
following main functions:
Rthe navigation system
Rthe audio function with the radio, SatRadio,
disc (CD audio, DVD audio or MP3 mode),
PCMCIA memory card (MP3 mode), Music
Register and Audio Aux modes
Rthe telephone and the address book
function
RDVD Video
Rsystems settings
You can call up the main functions:
Rusing the corresponding function buttons
Rusing the main function line in the
COMAND display
COMAND Display
iDo not touch the COMAND display. The
display has a very sensitive high-gloss
surface; there is a risk of scratching. Should
the display need cleaning, use a mild
cleaning agent and a soft, antistatic, lint-
free cloth. Commercially available alcohol
and ammonia-free TFT or LCD cleaners are
recommended.
The COMAND display shows the function
currently selected and its associated menus.
The COMAND display is divided into several
areas.
The radio display is shown in the example.
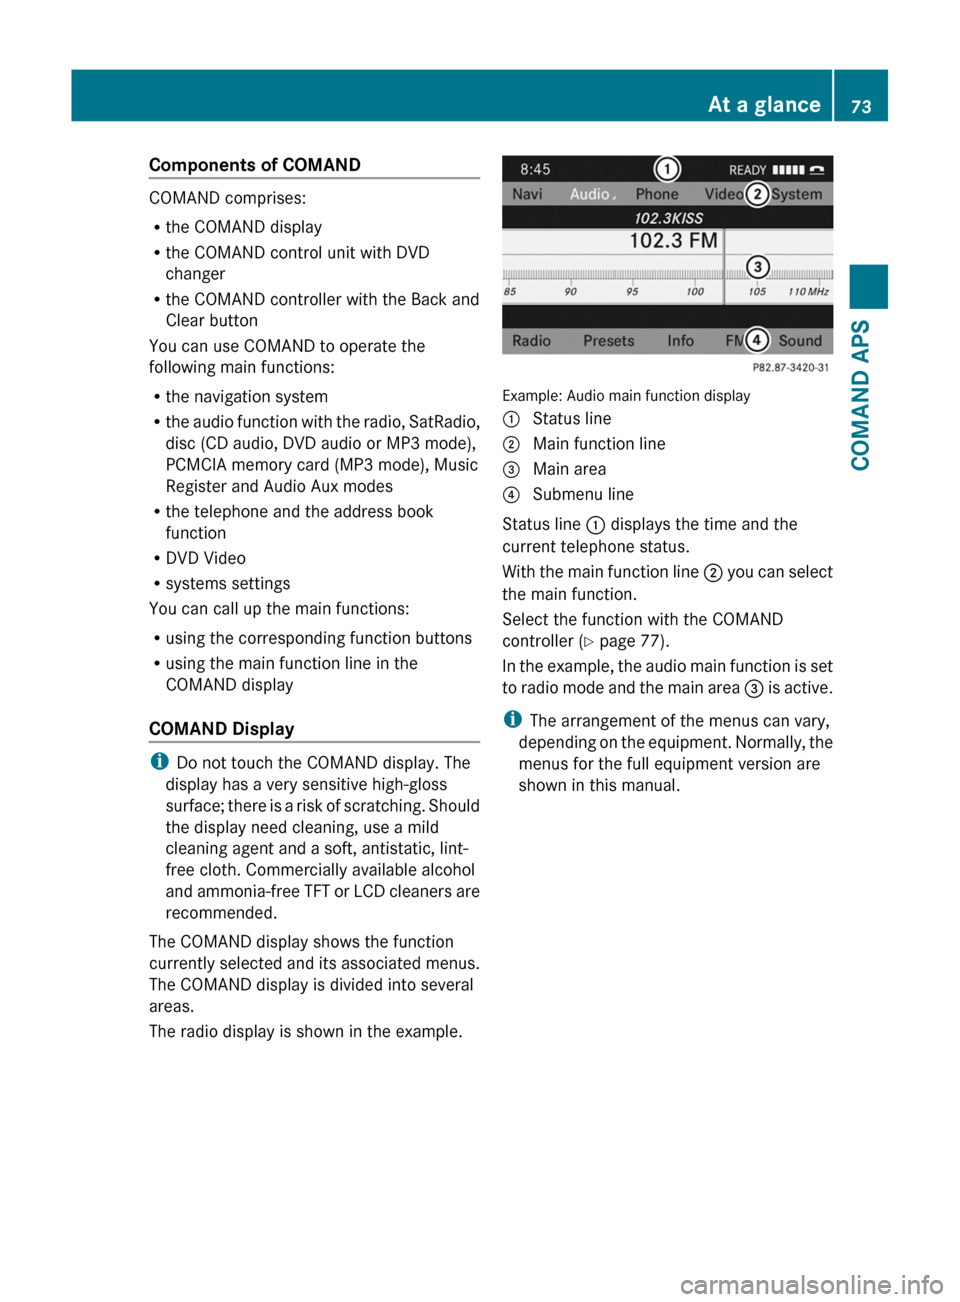
Example: Audio main function display
1 Status line2 Main function line3 Main area4 Submenu line
Status line 1 displays the time and the
current telephone status.
With the main function line 2 you can select
the main function.
Select the function with the COMAND
controller (Y page 77).
In the example, the audio main function is set
to radio mode and the main area 3 is active.
iThe arrangement of the menus can vary,
depending on the equipment. Normally, the
menus for the full equipment version are
shown in this manual.
At a glance73COMAND APSBA 197 USA, CA Edition A 2011; 1; 27, en-UShereepeVersion: 3.0.3.52010-03-24T15:31:10+01:00 - Seite 73Z
Page 89 of 436
A possible option:XTo switch predictive speller language
(character set): Select !.
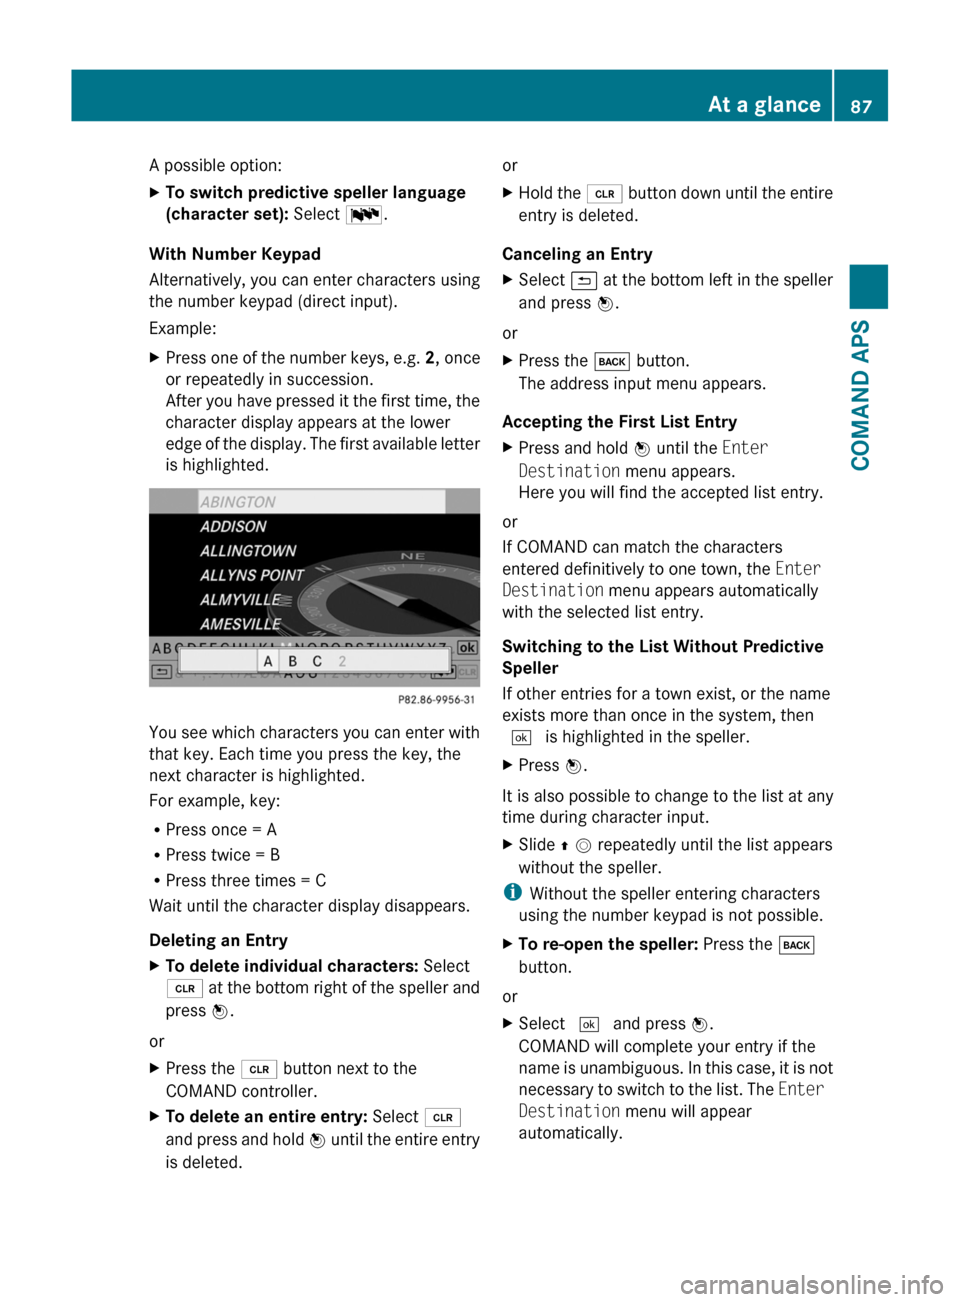
With Number Keypad
Alternatively, you can enter characters using
the number keypad (direct input).
Example:
XPress one of the number keys, e.g. 2, once
or repeatedly in succession.
After you have pressed it the first time, the
character display appears at the lower
edge of the display. The first available letter
is highlighted.
You see which characters you can enter with
that key. Each time you press the key, the
next character is highlighted.
For example, key:
RPress once = A
RPress twice = B
RPress three times = C
Wait until the character display disappears.
Deleting an Entry
XTo delete individual characters: Select
õ at the bottom right of the speller and
press n.
or
XPress the 2 button next to the
COMAND controller.
XTo delete an entire entry: Select õ
and press and hold n until the entire entry
is deleted.
orXHold the 2 button down until the entire
entry is deleted.
Canceling an Entry
XSelect á at the bottom left in the speller
and press n.
or
XPress the k button.
The address input menu appears.
Accepting the First List Entry
XPress and hold n until the Enter
Destination menu appears.
Here you will find the accepted list entry.
or
If COMAND can match the characters
entered definitively to one town, the Enter
Destination menu appears automatically
with the selected list entry.
Switching to the List Without Predictive
Speller
If other entries for a town exist, or the name
exists more than once in the system, then
d is highlighted in the speller.
XPress n.
It is also possible to change to the list at any
time during character input.
XSlide q m repeatedly until the list appears
without the speller.
iWithout the speller entering characters
using the number keypad is not possible.
XTo re-open the speller: Press the k
button.
or
XSelect d and press n.
COMAND will complete your entry if the
name is unambiguous. In this case, it is not
necessary to switch to the list. The Enter
Destination menu will appear
automatically.
At a glance87COMAND APSBA 197 USA, CA Edition A 2011; 1; 27, en-UShereepeVersion: 3.0.3.52010-03-24T15:31:10+01:00 - Seite 87Z
Page 96 of 436

1 Sets the time2 Current dateXTo set value: Rotate y m z or slide
q m r.
XTo save setting: Press n.
iIf you adjust the time in 30-minute
increments, the previously selected time
zone and automatic time-zone switching
between daylight saving time and standard
time settings are lost (Y page 94).
iThe increment value for setting the
minutes depends on the equipment
installed. They are 30-minute increments in
vehicles equipped with a navigation
system. They are minute increments in
vehicles without a navigation system. The
following operational steps depend on
whether the navigation system has GPS
reception.
Setting the Date/Time Format
XSelect System £ System settings £
Time £ Format.
The format list appears. The R dots show
the current settings.
iThe abbreviations mean:
Date format: DD - Day, MM - Month, YY/
YYYY - Year
Time format: HH - Hour, MM - Minute for
either 24-hour clock or AM/PM format
XTo change the format: Rotate y m z or
slide q m r.
XTo confirm the change: Press n.XTo store the setting and exit the menu:
Slide o m p.
Setting the Time Zone and Switching
Between Daylight Saving Time and
Standard Time
iThe correct time zone and daylight
saving/standard time must be set for the
following navigation system functions to
operate correctly:
RCalculation of expected time of arrival
RTime stamps for calls received and calls
dialed
XTo set the time zone: Select System £
Settings £ Time £ Time Zone.
A time zone list appears. The R dot
indicates the current setting.
XSelect the appropriate time zone.XTo switch between Daylight Saving and
standard time: Select Daylight Saving
Time (Summer) or Standard Time
(Winter).
The R dot indicates the current setting.
XTo store setting and exit menu:
Slide o m p.
Read-Out
Setting Reading Speed
XSelect System £ Settings £ Text
Reader Speed.
The list of possible settings appears. The
R dot indicates the current setting.
XTo select the setting: Rotate y m z or
slide q m r.
XTo confirm your selection: Press n.94System SettingsCOMAND APS
BA 197 USA, CA Edition A 2011; 1; 27, en-UShereepeVersion: 3.0.3.52010-03-24T15:31:10+01:00 - Seite 94
Page 99 of 436
The volume of telephone conversations can
change after the phone has been
connected.
You can connect up to ten devices to
COMAND.
The connection process includes searching
for the device and its subsequent
authorization.
Calling up the Bluetooth Device List and
Searching for Devices
iYou must first switch on Bluetooth to be
able to call up the list of Bluetooth devices
(Y page 96).
XTo call up the list: Select System £
Settings £ Bluetooth £ Bluetooth
Device List.
XTo start the search: Select Update.
COMAND starts the search for devices
within reception range. The device list
appears after a short time.
iIf you call up the device list again, it may
not display all devices as you may have
removed one from the car for a while, for
example. In this case, start a new search to
update the device list.
XTo cancel the search: Select Cancel.
The device list can contain the following
devices:
RAll (available) devices detected, whether
authorized or not
RAll authorized devices, whether they have
been detected (are available) or not.
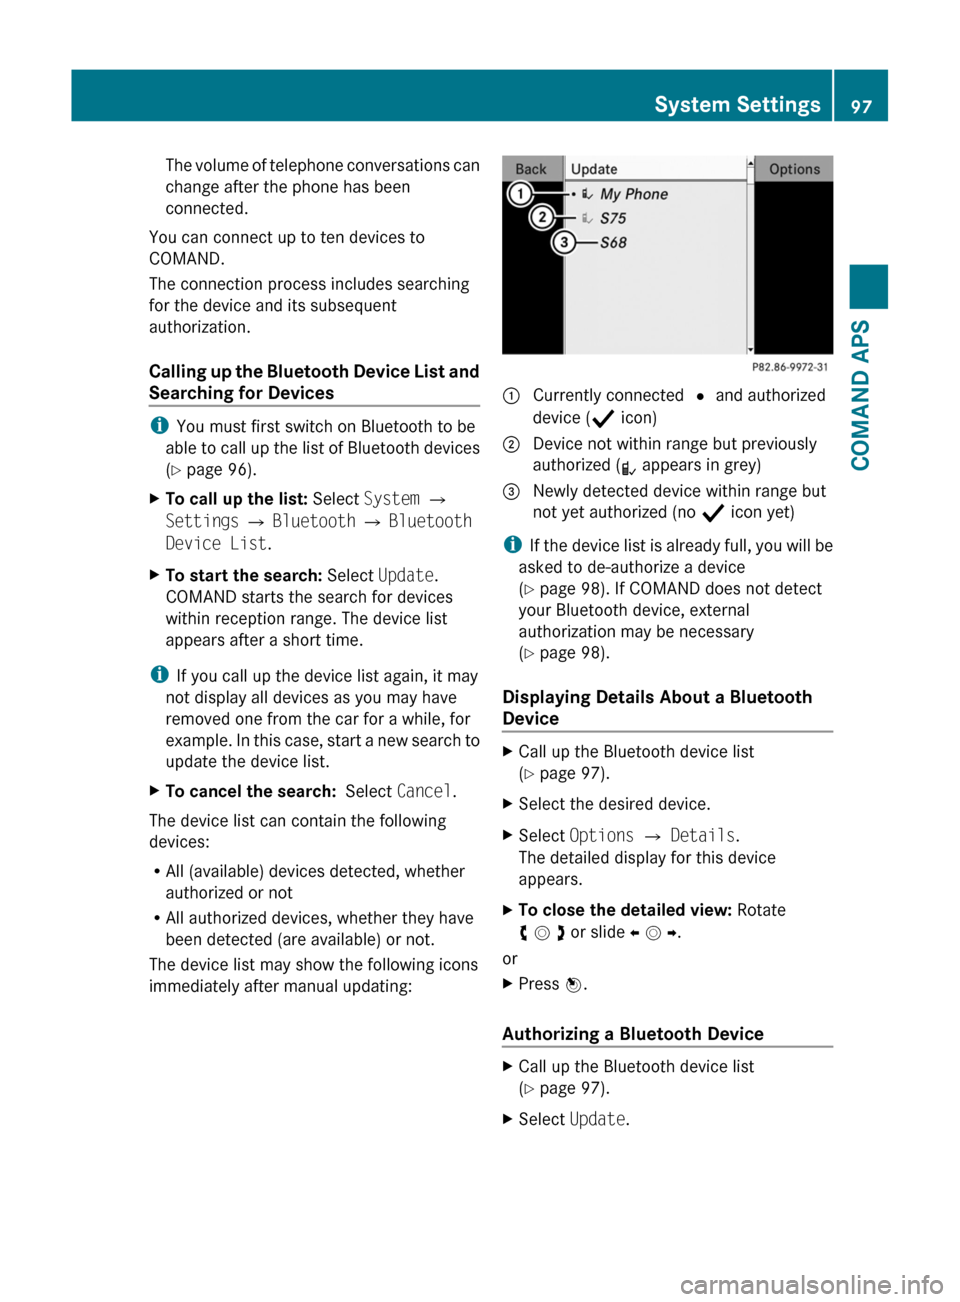
The device list may show the following icons
immediately after manual updating:
1 Currently connected R and authorized
device (Ò icon)
2 Device not within range but previously
authorized (¿ appears in grey)
3 Newly detected device within range but
not yet authorized (no Ò icon yet)
iIf the device list is already full, you will be
asked to de-authorize a device
(Y page 98). If COMAND does not detect
your Bluetooth device, external
authorization may be necessary
(Y page 98).
Displaying Details About a Bluetooth
Device
XCall up the Bluetooth device list
(Y page 97).
XSelect the desired device.XSelect Options £ Details.
The detailed display for this device
appears.
XTo close the detailed view: Rotate
y m z or slide o m p.
or
XPress n.
Authorizing a Bluetooth Device
XCall up the Bluetooth device list
(Y page 97).
XSelect Update.System Settings97COMAND APSBA 197 USA, CA Edition A 2011; 1; 27, en-UShereepeVersion: 3.0.3.52010-03-24T15:31:10+01:00 - Seite 97Z