2011 MERCEDES-BENZ SLS ECO mode
[x] Cancel search: ECO modePage 116 of 436
Navigation (Destination Input)
Introduction to Destination Input
GWarning!
For safety reasons, only enter a new
destination when the vehicle is stationary.
iIt is possible to enter a destination
regardless of whether route guidance is
active or inactive.
The following destination entry options are
available:
REntering a destination via the address
(Y page 114)
REntering a destination from the destination
memory (Y page 122)
REntering a destination from the last
destinations (Y page 123)
REntering a POI (Y page 126)
REntering a destination via the map
(Y page 123)
REntering a stopover destination
(Y page 124)
REntering a destination via “Search & Send”
(Y page 125)
Entering a Destination via the
Address
iIn some countries it is not possible to
enter addresses at vehicle speeds above
approx. 3 mph. The function becomes
available again as soon as the speed falls
below approx. 2 mph.
The following options are available for
entering a destination via an address:
REntering state/province, city/zip code and
street
REntering state/province, city and city
center
REntering state/province, city/zip code and
street and house number
REntering state/province, city/zip code and
street and junction
REntering street, state/province, city/zip
code and house number
Route calculation can then be started
(Y page 121).
Opening Enter Destination Menu
XIf necessary switch to navigation mode and
display menu system (Y page 105).
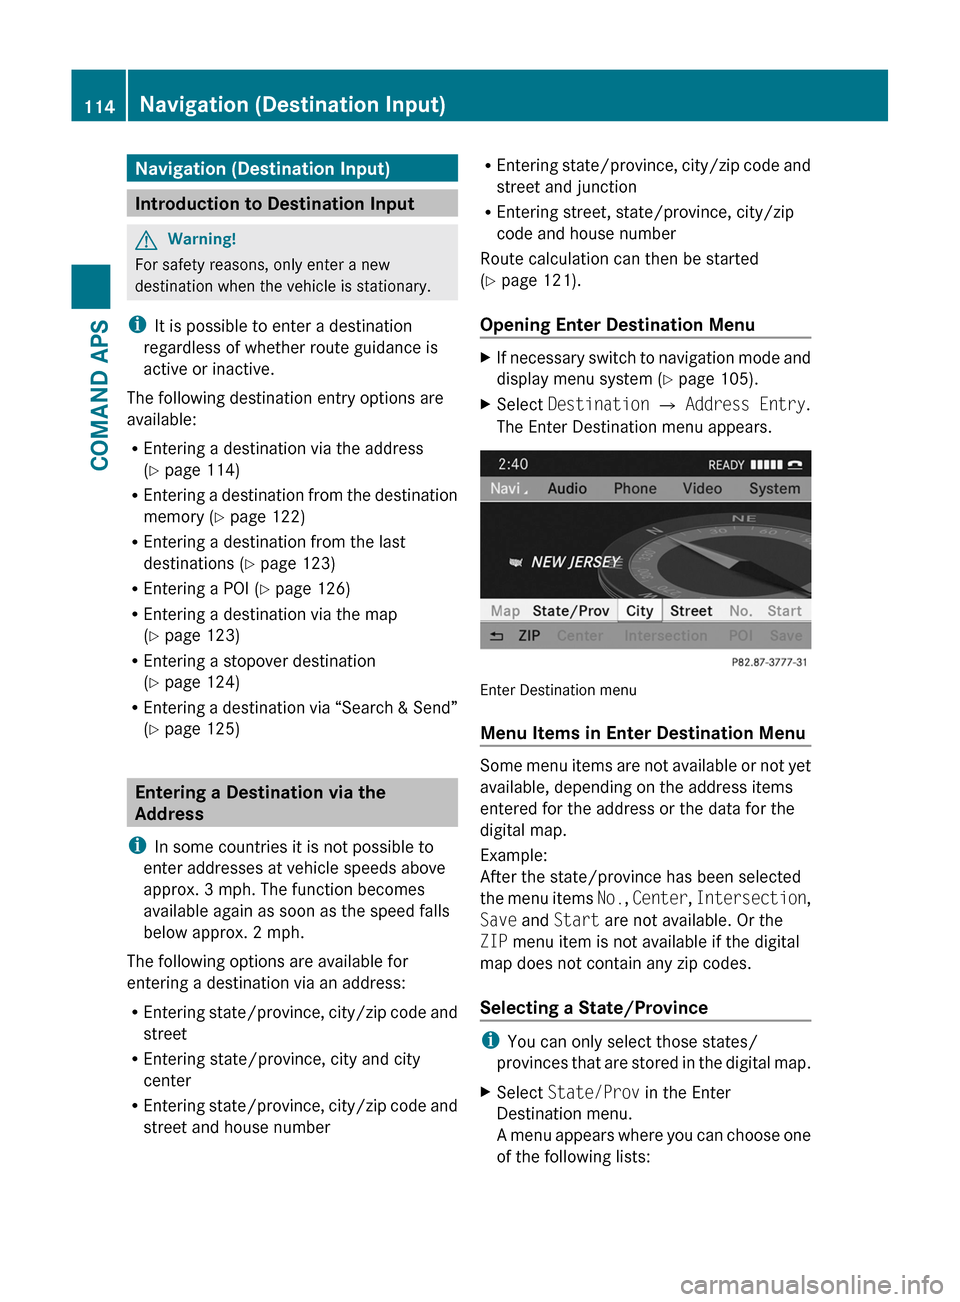
XSelect Destination £ Address Entry.
The Enter Destination menu appears.
Enter Destination menu
Menu Items in Enter Destination Menu
Some menu items are not available or not yet
available, depending on the address items
entered for the address or the data for the
digital map.
Example:
After the state/province has been selected
the menu items No., Center, Intersection,
Save and Start are not available. Or the
ZIP menu item is not available if the digital
map does not contain any zip codes.
Selecting a State/Province
iYou can only select those states/
provinces that are stored in the digital map.
XSelect State/Prov in the Enter
Destination menu.
A menu appears where you can choose one
of the following lists:
114Navigation (Destination Input)COMAND APS
BA 197 USA, CA Edition A 2011; 1; 27, en-UShereepeVersion: 3.0.3.52010-03-24T15:31:10+01:00 - Seite 114
Page 125 of 436
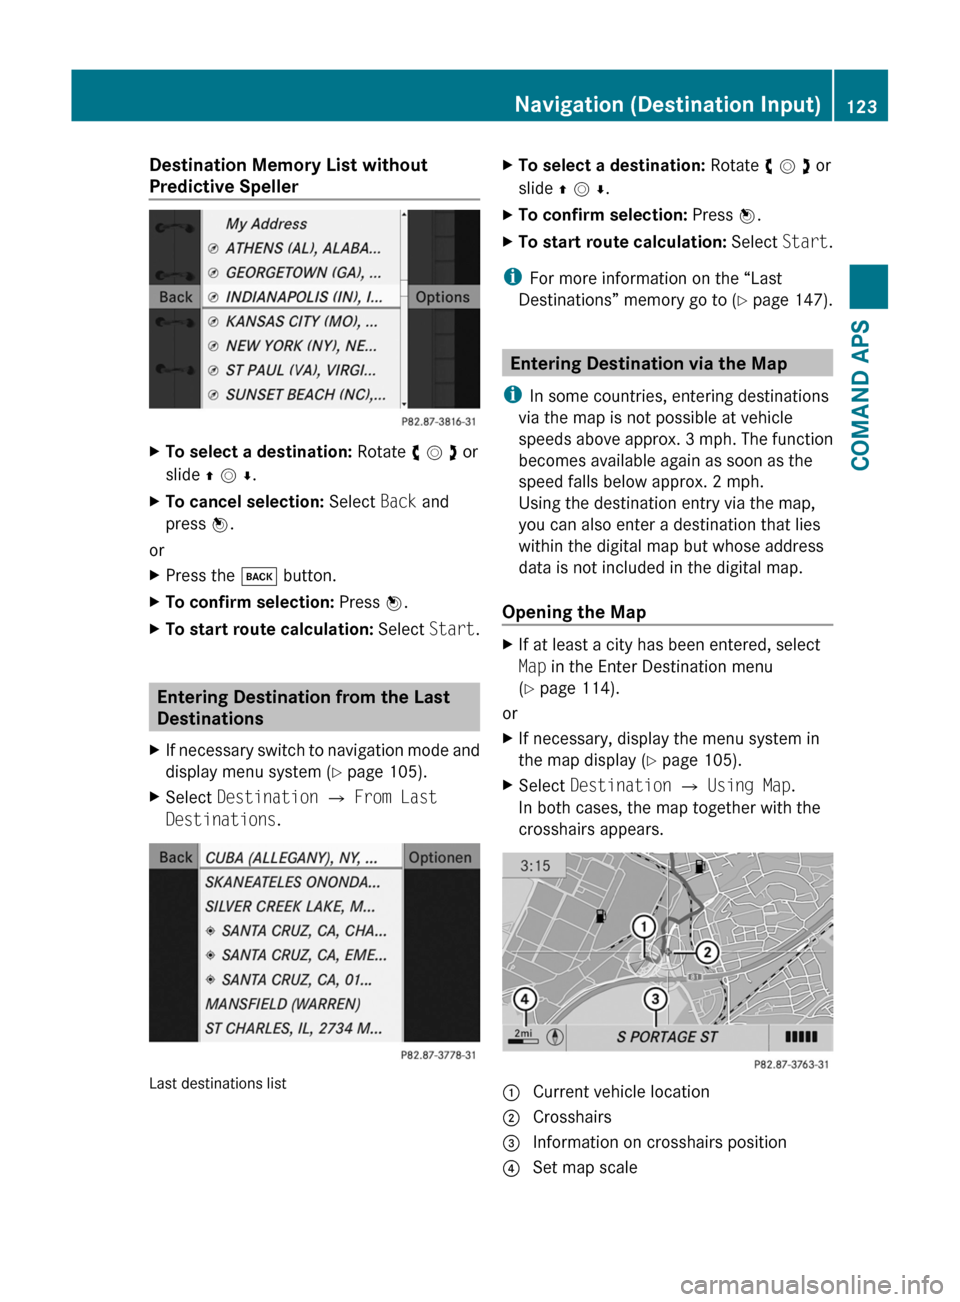
Destination Memory List without
Predictive Speller
XTo select a destination: Rotate y m z or
slide q m r.
XTo cancel selection: Select Back and
press n.
or
XPress the k button.XTo confirm selection: Press n.XTo start route calculation: Select Start.
Entering Destination from the Last
Destinations
XIf necessary switch to navigation mode and
display menu system (Y page 105).
XSelect Destination £ From Last
Destinations.
Last destinations list
XTo select a destination: Rotate y m z or
slide q m r.
XTo confirm selection: Press n.XTo start route calculation: Select Start.
iFor more information on the “Last
Destinations” memory go to (Y page 147).
Entering Destination via the Map
iIn some countries, entering destinations
via the map is not possible at vehicle
speeds above approx. 3 mph. The function
becomes available again as soon as the
speed falls below approx. 2 mph.
Using the destination entry via the map,
you can also enter a destination that lies
within the digital map but whose address
data is not included in the digital map.
Opening the Map
XIf at least a city has been entered, select
Map in the Enter Destination menu
(Y page 114).
or
XIf necessary, display the menu system in
the map display (Y page 105).
XSelect Destination £ Using Map.
In both cases, the map together with the
crosshairs appears.
1 Current vehicle location2 Crosshairs3 Information on crosshairs position4 Set map scaleNavigation (Destination Input)123COMAND APSBA 197 USA, CA Edition A 2011; 1; 27, en-UShereepeVersion: 3.0.3.52010-03-24T15:31:10+01:00 - Seite 123Z
Page 135 of 436

regulations during your journey. Road and
traffic rules and regulations always have
priority over the navigation commands
generated by the system.
COMAND guides you to the destination by
means of driving recommendations in the
form of navigation announcements or route
guidance displays.
iThe route guidance displays only appear
if the display has been switched to
navigation mode.
If, for some reason, you do not follow the
navigation announcements or if you leave the
calculated route, COMAND automatically
calculates a new route to the destination.
If the map data contains corresponding
information during route guidance, COMAND
tries to avoid roads with limited passability,
e.g. roads that are blocked for through-traffic
and are for residents only.
Driving Maneuver
Driving maneuvers are given in three phases:
RPreparation phase
RAnnouncement phase
RManeuver phase
Preparation Phase
COMAND prepares you for the next driving
maneuver. Based on the example display
shown below, the announcement is made
using Prepare to turn right. The display
is not split and displays the map over the
entire width.
1 Next road to be taken2 Point at which the driving maneuver
takes place (dot)
3 Current vehicle location, the tip of the
triangle points in the vehicle’s direction
of travel
4 Road currently being driven down
iDepending on the basic setting selection
in “Information on map” you will see in 4
RInformation on “Arrival time/distance”
RRoad currently being driven down
RGeo-coordinate display.
If you have selected the None menu item,
the display is hidden.
Announcement Phase
COMAND announces the imminent driving
maneuver. Based on the example display
shown below, the announcement is made
400 ft. ahead of the driving maneuver using
Please turn left in 400 ft. and
follow the ’road name’.
iThe announced distance to the maneuver
depends on the class of road and its speed
limit category.
The display is now split into two sectors. In
the left half, you see the normal map view.
The right side shows an enlarged section of
the area around the junction (Crossing Zoom)
or a 3D image of the road's course with the
route indicating the next maneuver.
The example illustrated below shows the
junction zoom in the right-hand half.
Navigation (Route Guidance)133COMAND APSBA 197 USA, CA Edition A 2011; 1; 27, en-UShereepeVersion: 3.0.3.52010-03-24T15:31:10+01:00 - Seite 133Z
Page 154 of 436
XTo set the volume: Slide q m r.
The red bar moves up or down.
XTo confirm selection: Press n.
“911” Emergency Call
GWarning
The 911 emergency call system is a public
service. Using it without due cause is a
criminal offense.
The following conditions must be met for a
“911” emergency call:
RPhone switched on
RMobile phone network available
RValid SIM card in the phone (not required
on all mobile phone networks)
RMobile phone connected with COMAND via
Bluetooth®
If you are unable to make an emergency call,
you will have to initiate rescue measures
yourself.
The “911” emergency number is a public
service. Any abuse is punishable by law.
XEnter the digits on the COMAND control
unit (Y page 159).
XPress the 6 button.
The phone establishes the connection.
XWait until the emergency call center
answers, then describe the emergency.
Submenu Overview
PhoneCall lists or Mic
On/Off
Bluetooth PhonesDisplays or deletes
call lists
Download ContactsSwitches hands-free
microphone on/off
(during a call)
Delete ContactsPhone Main Menu
Switching to Phone Mode
XPress the function button ÷ on the
COMAND control unit.
iIf you press the ÷ button with the phone
main menu already open, the call list “Calls
Dialed” appears (Y page 156).
or
From another Main Function
XSelect Phone £ Phone £ Phone.
iIf phone mode was active last, you only
need to select “Phone”.
Within the Phone Function
XSelect Phone £ Phone.
or
XIn the phone mode press the k button
repeatedly until the phone main menu
appears.
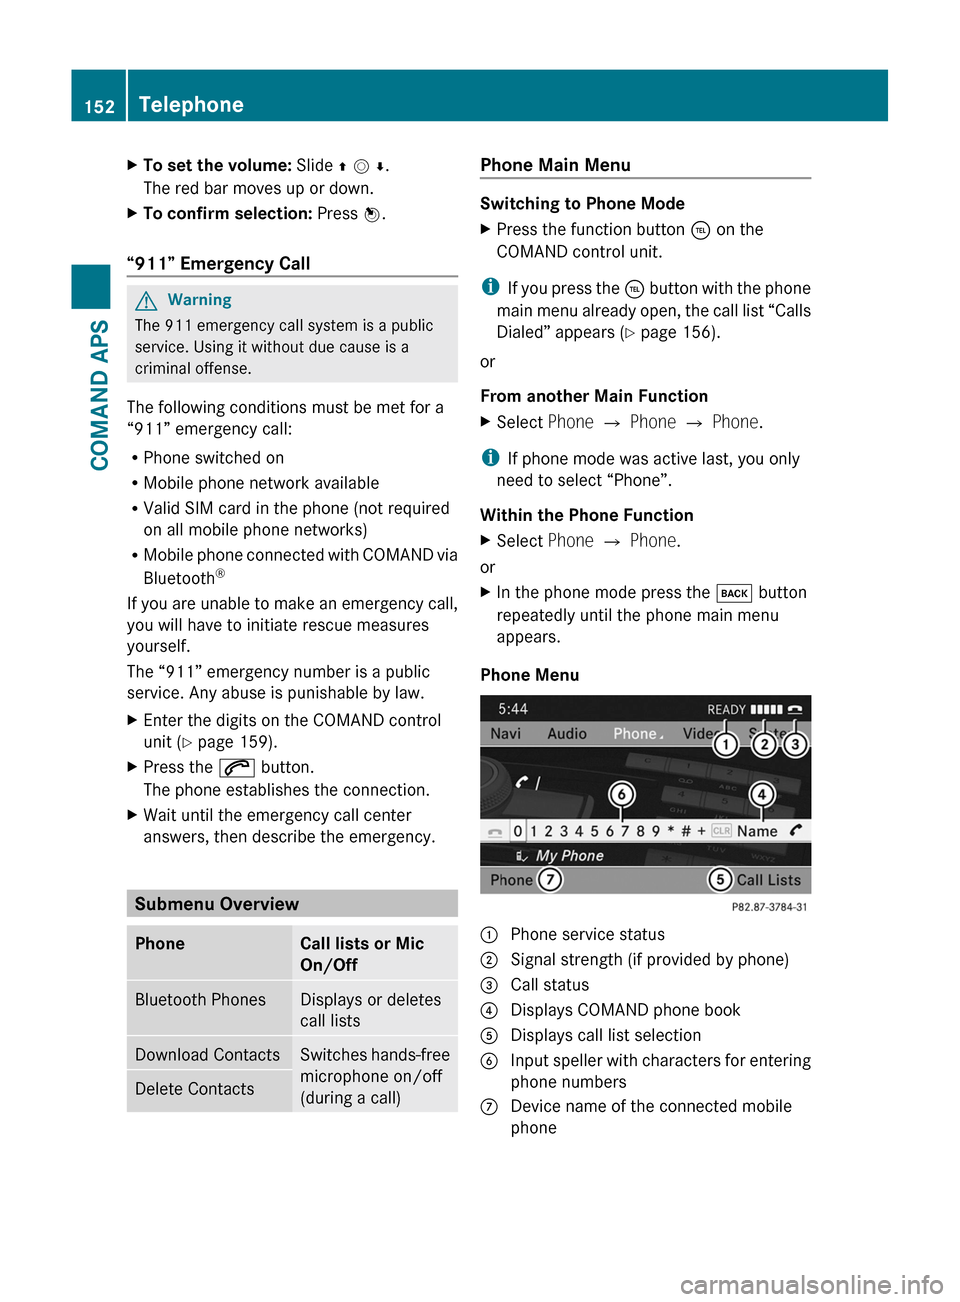
Phone Menu
1 Phone service status2 Signal strength (if provided by phone)3 Call status4 Displays COMAND phone book5 Displays call list selection6 Input speller with characters for entering
phone numbers
7 Device name of the connected mobile
phone
152TelephoneCOMAND APS
BA 197 USA, CA Edition A 2011; 1; 27, en-UShereepeVersion: 3.0.3.52010-03-24T15:31:10+01:00 - Seite 152
Page 158 of 436

made during phone mode when a mobile
phone is connected to COMAND.
The particular menu item can only be
selected if calls have already been received
or made from COMAND.
The display of missed calls in the COMAND
display is not possible with all mobile
phones.
iThe menu item Call lists is not active
if no mobile phone is connected to
COMAND.
iIf the mobile phone does not support
PBAP, COMAND automatically deletes the
call lists if a mobile phone other than the
last used is connected.
iThe instrument cluster control system
displays a list of the last dialed calls.
iFor many operating functions you can
also use the buttons on the multifunction
steering wheel, e.g. the =, ;,
9, :, a, 6 or ~ buttons,
for selecting a menu, scrolling through lists
or initiating or ending a call (Y page 84).
Calling up the List
XIn the phone main menu select Call
Lists.
A menu appears.
XSelect Calls Received or Calls
Dialed.
The appropriate list appears.
or
XWhen the main telephone menu is
displayed, press the K button on
COMAND or the 6 button on the multi-
function steering wheel.
A list of the last dialed calls appears.
List of incoming calls
1 List of calls received2 Date/time of the highlighted entry3 List entry options menuXTo select a list entry: Rotate y m z or slide
q m r.
XTo close list: Select Back.
or
XPress the k button next to the
COMAND controller.
Displaying Details on a List Entry
COMAND can also fully display an
abbreviated list entry.
XSelect the list entry.XSelect Options £ Details.
The details screen appears.
XBack to the list: Slide o m p until the list
is highlighted.
or
XPress the k button next to the
COMAND controller.
Saving Unsaved List Entry
Unsaved list entries are displayed with the
phone number.
Saved list entries are displayed with the
name. They are saved in the COMAND phone
book.
156TelephoneCOMAND APS
BA 197 USA, CA Edition A 2011; 1; 27, en-UShereepeVersion: 3.0.3.52010-03-24T15:31:10+01:00 - Seite 156
Page 162 of 436
Initiating a Call to a Call List Entry or
COMAND Phone Book Entry
XCall up a call list and select an entry
(Y page 156).
or
XOpen the COMAND phone book and select
an entry (Y page 153).
XTo initiate call: Press n.
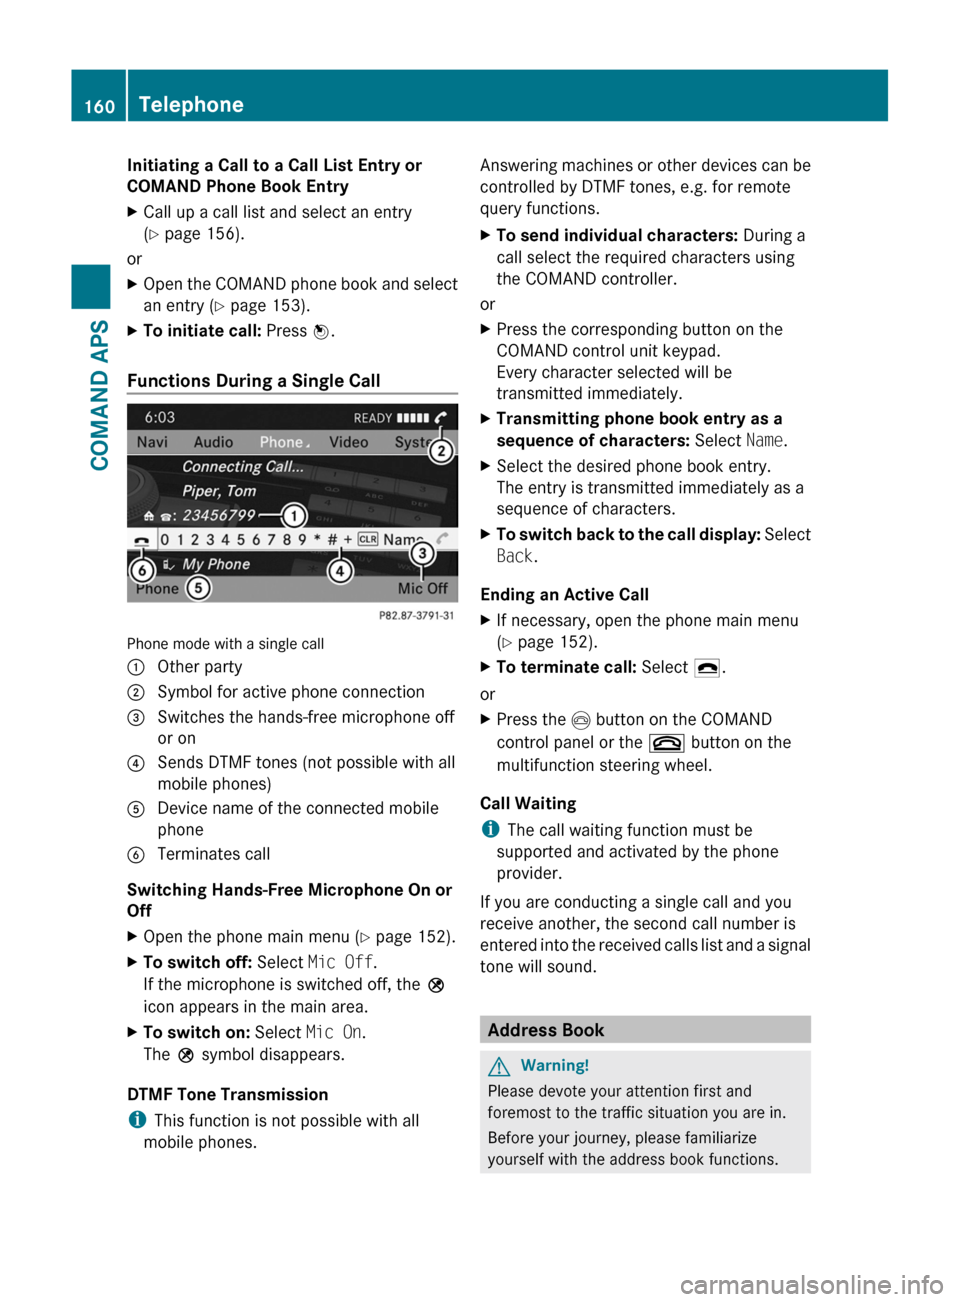
Functions During a Single Call
Phone mode with a single call
1 Other party2 Symbol for active phone connection3 Switches the hands-free microphone off
or on
4 Sends DTMF tones (not possible with all
mobile phones)
5 Device name of the connected mobile
phone
6 Terminates call
Switching Hands-Free Microphone On or
Off
XOpen the phone main menu (Y page 152).XTo switch off: Select Mic Off.
If the microphone is switched off, the >
icon appears in the main area.
XTo switch on: Select Mic On.
The > symbol disappears.
DTMF Tone Transmission
iThis function is not possible with all
mobile phones.
Answering machines or other devices can be
controlled by DTMF tones, e.g. for remote
query functions.
XTo send individual characters: During a
call select the required characters using
the COMAND controller.
or
XPress the corresponding button on the
COMAND control unit keypad.
Every character selected will be
transmitted immediately.
XTransmitting phone book entry as a
sequence of characters: Select Name.
XSelect the desired phone book entry.
The entry is transmitted immediately as a
sequence of characters.
XTo switch back to the call display: Select
Back.
Ending an Active Call
XIf necessary, open the phone main menu
(Y page 152).
XTo terminate call: Select 4.
or
XPress the I button on the COMAND
control panel or the ~ button on the
multifunction steering wheel.
Call Waiting
iThe call waiting function must be
supported and activated by the phone
provider.
If you are conducting a single call and you
receive another, the second call number is
entered into the received calls list and a signal
tone will sound.
Address Book
GWarning!
Please devote your attention first and
foremost to the traffic situation you are in.
Before your journey, please familiarize
yourself with the address book functions.
160TelephoneCOMAND APS
BA 197 USA, CA Edition A 2011; 1; 27, en-UShereepeVersion: 3.0.3.52010-03-24T15:31:10+01:00 - Seite 160
Page 180 of 436
Notes on MP3 Mode
Permissible Storage Media
R CD-R and CD-RW
R DVD+R and DVD+RW
R DVD-R and DVD-RW
R PCMCIA memory card
Permissible File Systems
R ISO9660/Joliet for CD storage media
R UDF for DVDs
R FAT16 or FAT32 for PCMCIA memory card
with storage medium
Multisession CDs
On multisession CDs, the content of the first
session determines how COMAND handles
the CD.
If the first session, for example, contains data
in CD Audio format and the second session
contains MP3 tracks, COMAND handles the
CD as a conventional Audio CD. This means
that the MP3 tracks cannot be accessed.
Similarly, if the first session contains MP3
tracks and the second session contains data
in CD Audio format, COMAND handles the CD
as an MP3 CD. Only the MP3 tracks can be
accessed.
File Structure of Storage Medium
When creating an MP3 storage medium, you
can organize MP3 tracks into folders. A folder
can also contain additional folders. A storage
medium may have a maximum of 255 folders
in total. A maximum of 255 tracks and 255
folders are permissible per folder. A
maximum of 4000 tracks in total are
permissible per storage medium.
Track Names and Folder Names
When creating an MP3 storage medium, you
can assign names to the MP3 tracks and to
the folders.
COMAND uses these names in MP3 mode for
the corresponding display. Empty folders or
folders containing data other than MP3 tracks
will not be displayed by COMAND.
If MP3 files are stored in the root directory
itself, the root directory also counts as a
folder. COMAND will then display the root
directory name as a folder name.
Please note the following when assigning
track names:
R Track names must contain at least one
character.
R Track names must have the extension
“mp3”.
R A period must appear between the track
name and the extension.
i COMAND does not support ID3 tags.
Permissible Formats
COMAND supports the following formats:
R MPEG1 audio layer 3 format
R Microsoft Windows ®
Media Audio V2, V7,
V8 and V9 (WMA).
Notes on Copyright
The music tracks that you can create for
playback in MP3 mode are generally
copyright-protected under applicable
international and national laws.
In many countries, the reproduction of
copyrighted material is not permitted even if
only for personal use without the express
prior consent of the copyright holder.
Please check the current copyright laws for
your country and comply with them.
These restrictions do not apply, for example,
to your own compositions and recordings or
for recordings for which authorization has
been obtained from the copyright holder.
Notes about DVD Audio Discs
COMAND can playback commercially
available, prerecorded Audio DVDs that bear
the following label. You will usually find the
label on the DVD booklet, the inlay or the DVD
itself.178AudioCOMAND APS
BA 197 USA, CA Edition A 2011; 1; 27, en-UShereepeVersion: 3.0.3.52010-03-24T15:31:10+01:00 - Seite 178
Page 187 of 436
Within the Audio FunctionXSelect Audio £ Disc or Memory card in
the audio menu display.
i Disc accesses audio discs in the DVD
changer. Memory Card selects the slot for
the PCMCIA memory card.
XSelect CD/DVD Audio/MP3 as required
(Y page 186).
The desired disc mode is activated.
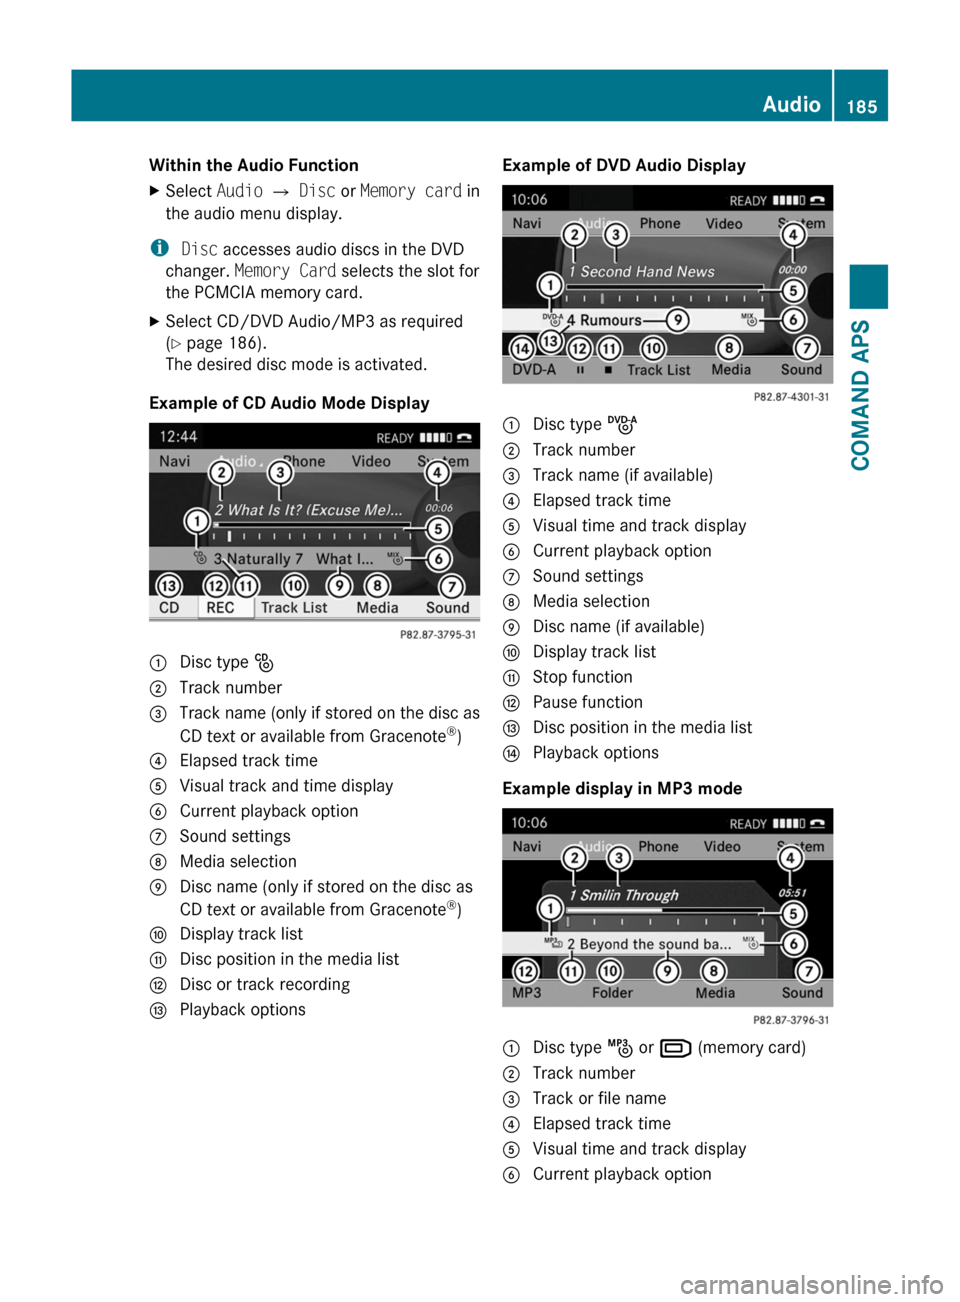
Example of CD Audio Mode Display
1 Disc type _2 Track number3 Track name (only if stored on the disc as
CD text or available from Gracenote®)
4 Elapsed track time5 Visual track and time display6 Current playback option7 Sound settings8 Media selection9 Disc name (only if stored on the disc as
CD text or available from Gracenote®)
a Display track listb Disc position in the media listc Disc or track recordingd Playback optionsExample of DVD Audio Display1 Disc type ü2 Track number3 Track name (if available)4 Elapsed track time5 Visual time and track display6 Current playback option7 Sound settings8 Media selection9 Disc name (if available)a Display track listb Stop functionc Pause functiond Disc position in the media liste Playback options
Example display in MP3 mode
1 Disc type þ or º (memory card)2 Track number3 Track or file name4 Elapsed track time5 Visual time and track display6 Current playback optionAudio185COMAND APSBA 197 USA, CA Edition A 2011; 1; 27, en-UShereepeVersion: 3.0.3.52010-03-24T15:31:10+01:00 - Seite 185Z