2011 MERCEDES-BENZ SLS ESP
[x] Cancel search: ESPPage 63 of 436

Driving safety systems
Introduction
This section contains information about the
following driving safety systems:
R ABS ( Antilock Brake System)
R Adaptive Brake
R BAS ( Brake Assist System)
R EBP ( Electronic Brake Proportioning)
R ESC ( Electronic Stability Control)
R Trunk Wing
Safety notes
GWarning!
The following factors increase the risk of
accidents:
R Excessive speed, especially in turns
R Wet and slippery road surfaces
R Following another vehicle too closely
The driving safety systems described in this
section cannot reduce these risks or prevent
the natural laws of physics from acting on the
vehicle. They cannot increase braking or
steering efficiency beyond that afforded by
the condition of the vehicle brakes and tires
or the traction afforded.
Only a safe, attentive, and skillful driver can
prevent accidents.
The capabilities of a vehicle equipped with the
driving safety systems described in this
section must never be exploited in a reckless
or dangerous manner which could jeopardize
the user’s safety or the safety of others.
Always adjust your driving style to the
prevailing road and weather conditions and
keep a safe distance from other road users
and objects on the street.
If a driving system malfunctions, other driving
safety systems may also switch off. Observe
indicator and warning lamps that may come
on as well as messages in the multifunction
display that may appear.
i In winter operation, the maximum
effectiveness of most of the driving
systems described in this section is only
achieved with winter tires, or snow chains
as required.
ABS
GObserve Safety notes, see page 61.GWarning!
Do not pump the brake pedal. Use firm, steady
brake pedal pressure instead. Pumping the
brake pedal defeats the purpose of the ABS
and significantly reduces braking
effectiveness.
The Antilock Brake System (ABS) regulates
the brake pressure so that the wheels do not
lock during braking. This allows you to
maintain the ability to steer your vehicle.
The ABS is functional above a speed of
approximately 5 mph (8 km/h) independent
of road surface conditions.
On slippery road surfaces, the ABS will
respond even to light brake pressure.
The ABS indicator lamp ! in the
instrument cluster comes on when you switch
on the ignition. It goes out when the engine
is running.
Braking
At the instant one of the wheels is about to
lock up, a slight pulsation can be felt in the
brake pedal. The pulsation indicates that the
ABS is in the regulating mode.
XKeep firm and steady pressure on the brake
pedal while you feel the pulsation.
Continuous, steady brake pedal pressure
yields the advantages provided by the ABS,
namely braking power and the ability to steer
the vehicle.
The pulsating brake pedal can be an
indication of hazardous road conditions and
Driving safety systems61Safety and securityBA 197 USA, CA Edition A 2011; 1; 27, en-UShereepeVersion: 3.0.3.52010-03-24T15:31:10+01:00 - Seite 61Z
Page 64 of 436

functions as a reminder to take extra care
while driving.
Emergency brake maneuverXKeep continuous full pressure on the brake
pedal.GWarning!
If the ABS malfunctions, other driving safety
systems such as the BAS or the ESC are also
switched off. Observe indicator and warning
lamps that may come on as well as messages
in the multifunction display that may appear.
If the ABS malfunctions, the wheels may lock
during hard braking, reducing steering
capability and extending the braking distance.
BAS
GObserve Safety notes, see page 61.
The Brake Assist System (BAS) operates in
emergency situations. If you apply the brakes
very quickly, the BAS provides full brake
boost automatically, thereby potentially
reducing the braking distance.
XApply continuous full braking pressure until
the emergency braking situation is over.
The ABS will prevent the wheels from
locking.
When you release the brake pedal, the brakes
function again as normal. The BAS is then
deactivated.
GWarning!
If the BAS malfunctions, the brake system still
functions, but without the additional brake
boost available that the BAS would normally
provide in an emergency braking maneuver.
Therefore, the braking distance may increase.
ESC
GObserve Safety notes, see page 61.
The Electronic Stability Control (ESC) is
operational as soon as the engine is running.
It monitors the vehicle’s traction (force of
adhesive friction between the tires and the
road surface) and handling.
The ESC recognizes that the vehicle deviates
from the direction of travel as intended by the
driver. By applying brakes to individual
wheels and by limiting the engine output, the
ESC works to stabilize the vehicle. The ESC is
especially useful while driving off and on wet
or slippery road surfaces. The ESC also
stabilizes the vehicle during braking and
steering maneuvers.
The ESC warning lamp ÷ in the instrument
cluster comes on when you switch on the
ignition. It goes out when the engine is
running.GWarning!
Never switch off the ESC when you see the
ESC warning lamp ÷ flashing in the
instrument cluster. In this case proceed as
follows:
R When driving off, apply as little throttle as
possible.
R While driving, ease up on the accelerator
pedal.
R Adapt your speed and driving style to the
prevailing road conditions.
Failure to observe these guidelines could
cause the vehicle to skid. The ESC cannot
prevent accidents resulting from excessive
speed.
! Because the ESC operates automatically,
the engine and ignition must be shut off
(KEYLESS-GO start/stop button in position
0 or 1, or SmartKey in starter switch
position 0 or 1) when the electronic parking
brake is being tested on a brake test
dynamometer or when the vehicle is being
towed with the rear axle raised.
Active braking action through the ESC may
otherwise seriously damage the brake
system which is not covered by the
Mercedes-Benz Limited Warranty.
62Driving safety systemsSafety and security
BA 197 USA, CA Edition A 2011; 1; 27, en-UShereepeVersion: 3.0.3.52010-03-24T15:31:10+01:00 - Seite 62
Page 65 of 436

! The ESC will only function properly if you
use wheels of the recommended tire size
as specified in the “Technical data” section
of this Operator’s Manual.
i The cruise control switches off
automatically when the ESC engages.
Electronic Traction System (ETS) GObserve Safety notes, see page 61.
The ETS (Electronic Traction System) is a
component of the ESC. The ETS improves the
vehicle’s ability to utilize available traction,
especially under slippery road conditions by
applying the brakes to a spinning wheel.
When you switch off the ESC, the ETS is still
enabled.
Switching ESC SPORT on or off
GWarning!
ESC SPORT should not be switched on during
normal driving.
Switching ESC SPORT on will result in the
following:
R no restriction to engine torque
R system-supported traction control is
limited
ESC SPORT is designed for driving on closed
tracks when the vehicle’s natural oversteer
and understeer characteristics are desired
and requires a highly skilled and experienced
driver able to handle these critical driving
situations.
You could lose control of your vehicle and
cause an accident.
Please be aware of these limits when you
switch on ESC SPORT.
Do not switch on ESC SPORT when a spare
wheel is mounted.
To improve the vehicle’s traction, switch on
ESC SPORT. This allows the drive wheels to
spin and thus cut into surfaces for better grip,
for example
R when driving with snow chains
R in deep snow
R in sand or gravelGWarning!
Switch off ESC SPORT and switch on the ESC
immediately if the aforementioned
circumstances do not apply anymore.
Otherwise ESC SPORT will only stabilize the
vehicle to a limited extent when it is starting
to skid or a wheel is spinning.
When you switch on ESC SPORT
R the ESC stabilizes the vehicle only to a
limited extent
R the engine output is limited, but only to the
extent that allows the drive wheels to spin
and thus cut into surfaces for better grip
R the ETS will still apply the brakes to a
spinning wheel
R the ESC continues to operate when you are
braking hard
R the cruise control cannot be activated
R the cruise control switches off if activated
i When ESC SPORT is switched on and one
or more drive wheels are spinning, the ESC
warning lamp ÷ in the instrument
cluster flashes. However, the ESC will then
stabilize the vehicle only to a limited extent.
Driving safety systems63Safety and securityBA 197 USA, CA Edition A 2011; 1; 27, en-UShereepeVersion: 3.0.3.52010-03-24T15:31:10+01:00 - Seite 63Z
Page 69 of 436
XArming: Lock the vehicle with the
SmartKey.
The turn signal lamps flash three times and
an acoustic warning sounds three times to
indicate that the vehicle is locked. Indicator
lamp : flashes to indicate that the alarm
system is armed.
i If the turn signal lamps do not flash three
times and the acoustic warning does not
sound three times, a door or the trunk may
not be properly closed.
Close the respective element.
XDisarming: Unlock the vehicle with the
SmartKey.
The turn signal lamps flash once and an
acoustic warning sounds once to indicate
that the alarm system is disarmed.
i Unless you open a door or the trunk within
approximately 40 seconds after unlocking
the vehicle:
R The vehicle will be locked again.
R The anti-theft alarm system will be
rearmed.
Canceling the alarm
To cancel the alarm, do one of the following:
XPress the KEYLESS-GO start/stop button.
The SmartKey must be inside the vehicle.
or
XPress button % or & on the
SmartKey.
or
XInsert the SmartKey into the starter switch.Anti-theft systems67Safety and securityBA 197 USA, CA Edition A 2011; 1; 27, en-UShereepeVersion: 3.0.3.52010-03-24T15:31:10+01:00 - Seite 67Z
Page 73 of 436
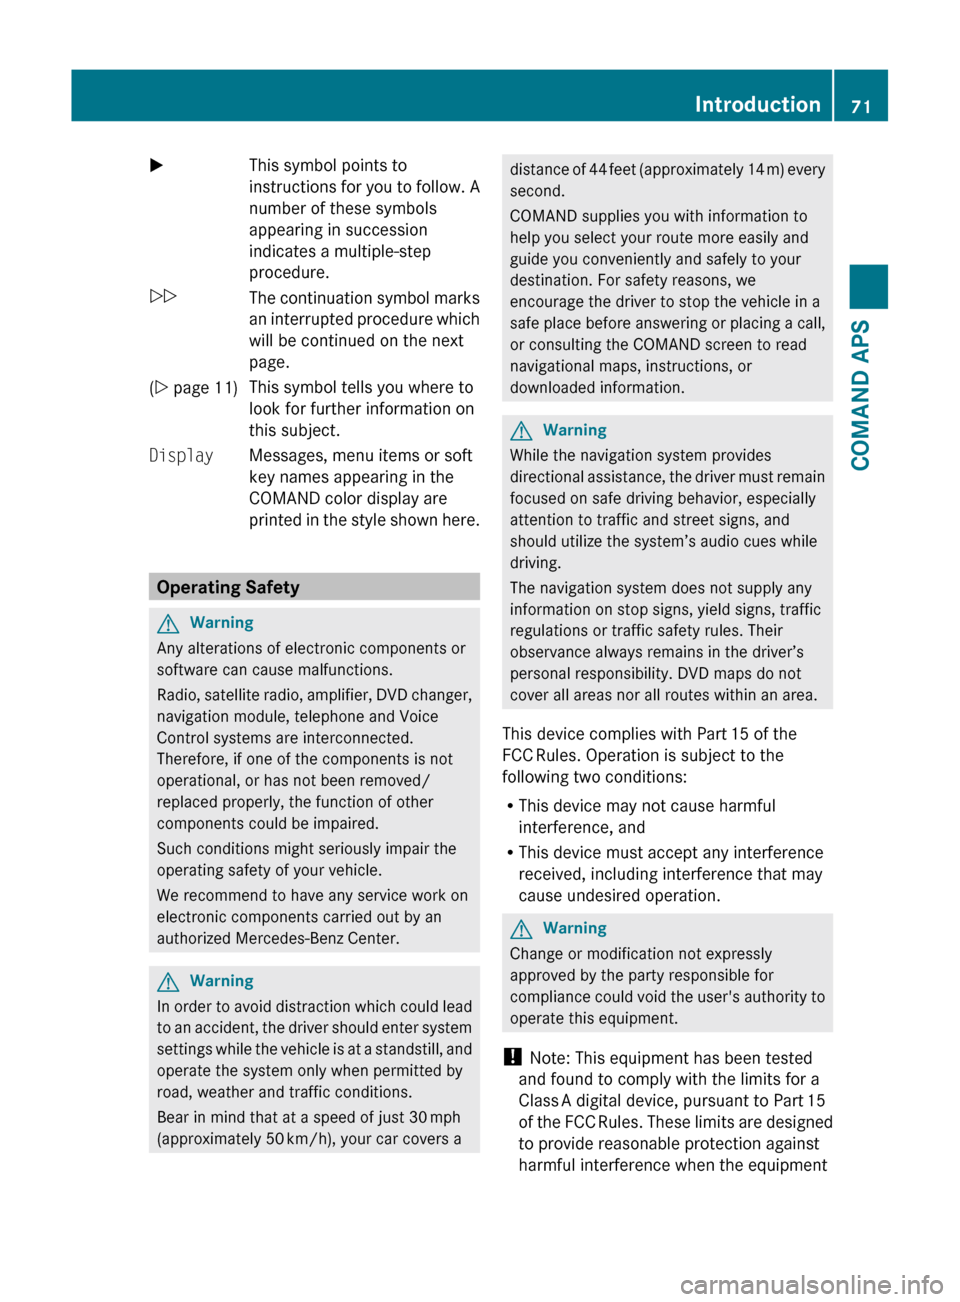
XThis symbol points to
instructions for you to follow. A
number of these symbols
appearing in succession
indicates a multiple-step
procedure.OThe continuation symbol marks
an interrupted procedure which
will be continued on the next
page.( Y page 11)This symbol tells you where to
look for further information on
this subject.DisplayMessages, menu items or soft
key names appearing in the
COMAND color display are
printed in the style shown here.
Operating Safety
GWarning
Any alterations of electronic components or
software can cause malfunctions.
Radio, satellite radio, amplifier, DVD changer,
navigation module, telephone and Voice
Control systems are interconnected.
Therefore, if one of the components is not
operational, or has not been removed/
replaced properly, the function of other
components could be impaired.
Such conditions might seriously impair the
operating safety of your vehicle.
We recommend to have any service work on
electronic components carried out by an
authorized Mercedes-Benz Center.
GWarning
In order to avoid distraction which could lead
to an accident, the driver should enter system
settings while the vehicle is at a standstill, and
operate the system only when permitted by
road, weather and traffic conditions.
Bear in mind that at a speed of just 30 mph
(approximately 50 km/h), your car covers a
distance of 44 feet (approximately 14 m) every
second.
COMAND supplies you with information to
help you select your route more easily and
guide you conveniently and safely to your
destination. For safety reasons, we
encourage the driver to stop the vehicle in a
safe place before answering or placing a call,
or consulting the COMAND screen to read
navigational maps, instructions, or
downloaded information.GWarning
While the navigation system provides
directional assistance, the driver must remain
focused on safe driving behavior, especially
attention to traffic and street signs, and
should utilize the system’s audio cues while
driving.
The navigation system does not supply any
information on stop signs, yield signs, traffic
regulations or traffic safety rules. Their
observance always remains in the driver’s
personal responsibility. DVD maps do not
cover all areas nor all routes within an area.
This device complies with Part 15 of the
FCC Rules. Operation is subject to the
following two conditions:
R This device may not cause harmful
interference, and
R This device must accept any interference
received, including interference that may
cause undesired operation.
GWarning
Change or modification not expressly
approved by the party responsible for
compliance could void the user's authority to
operate this equipment.
! Note: This equipment has been tested
and found to comply with the limits for a
Class A digital device, pursuant to Part 15
of the FCC Rules. These limits are designed
to provide reasonable protection against
harmful interference when the equipment
Introduction71COMAND APSBA 197 USA, CA Edition A 2011; 1; 27, en-UShereepeVersion: 3.0.3.52010-03-24T15:31:10+01:00 - Seite 71Z
Page 75 of 436
Components of COMAND
COMAND comprises:
Rthe COMAND display
Rthe COMAND control unit with DVD
changer
Rthe COMAND controller with the Back and
Clear button
You can use COMAND to operate the
following main functions:
Rthe navigation system
Rthe audio function with the radio, SatRadio,
disc (CD audio, DVD audio or MP3 mode),
PCMCIA memory card (MP3 mode), Music
Register and Audio Aux modes
Rthe telephone and the address book
function
RDVD Video
Rsystems settings
You can call up the main functions:
Rusing the corresponding function buttons
Rusing the main function line in the
COMAND display
COMAND Display
iDo not touch the COMAND display. The
display has a very sensitive high-gloss
surface; there is a risk of scratching. Should
the display need cleaning, use a mild
cleaning agent and a soft, antistatic, lint-
free cloth. Commercially available alcohol
and ammonia-free TFT or LCD cleaners are
recommended.
The COMAND display shows the function
currently selected and its associated menus.
The COMAND display is divided into several
areas.
The radio display is shown in the example.
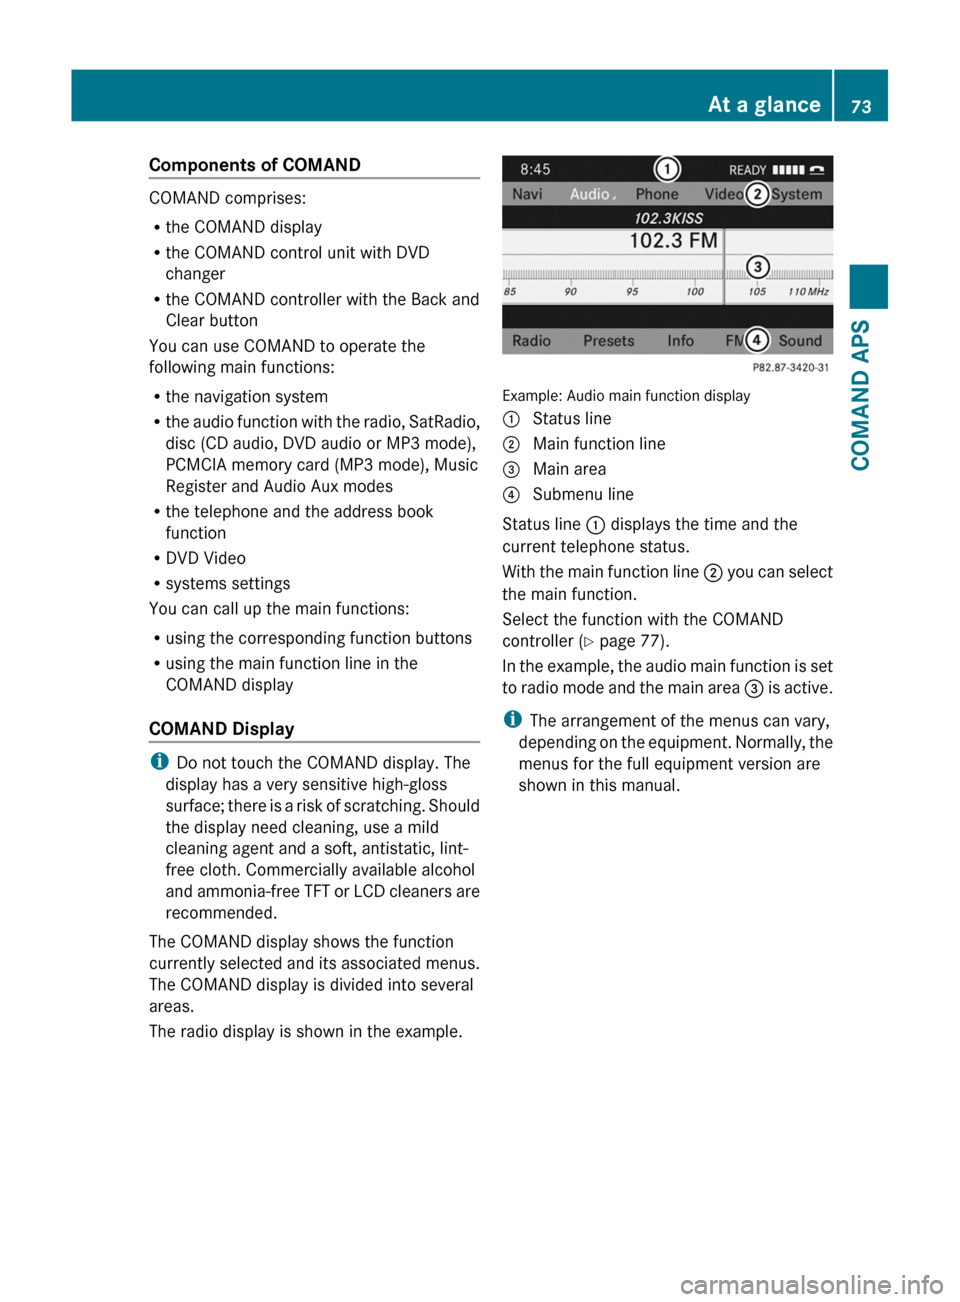
Example: Audio main function display
1 Status line2 Main function line3 Main area4 Submenu line
Status line 1 displays the time and the
current telephone status.
With the main function line 2 you can select
the main function.
Select the function with the COMAND
controller (Y page 77).
In the example, the audio main function is set
to radio mode and the main area 3 is active.
iThe arrangement of the menus can vary,
depending on the equipment. Normally, the
menus for the full equipment version are
shown in this manual.
At a glance73COMAND APSBA 197 USA, CA Edition A 2011; 1; 27, en-UShereepeVersion: 3.0.3.52010-03-24T15:31:10+01:00 - Seite 73Z
Page 82 of 436
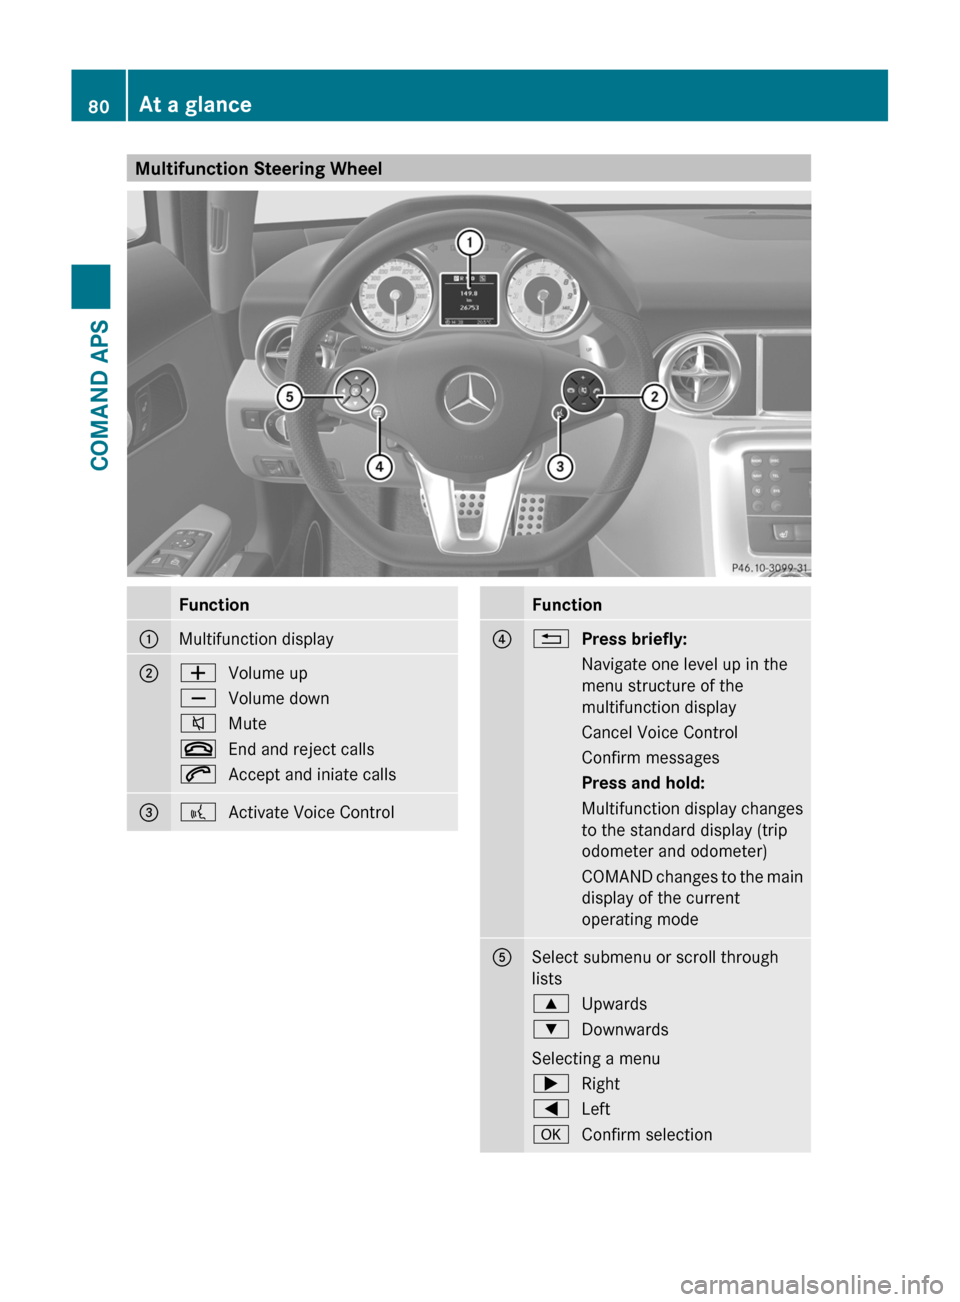
Multifunction Steering WheelFunction1Multifunction display2WVolume upXVolume down8Mute~End and reject calls6Accept and iniate calls3?Activate Voice ControlFunction4%Press briefly:Navigate one level up in the
menu structure of the
multifunction display
Cancel Voice ControlConfirm messagesPress and hold:Multifunction display changes
to the standard display (trip
odometer and odometer)
COMAND changes to the main
display of the current
operating mode
5Select submenu or scroll through
lists
9Upwards:Downwards
Selecting a menu
;Right=LeftaConfirm selection80At a glanceCOMAND APS
BA 197 USA, CA Edition A 2011; 1; 27, en-UShereepeVersion: 3.0.3.52010-03-24T15:31:10+01:00 - Seite 80
Page 97 of 436
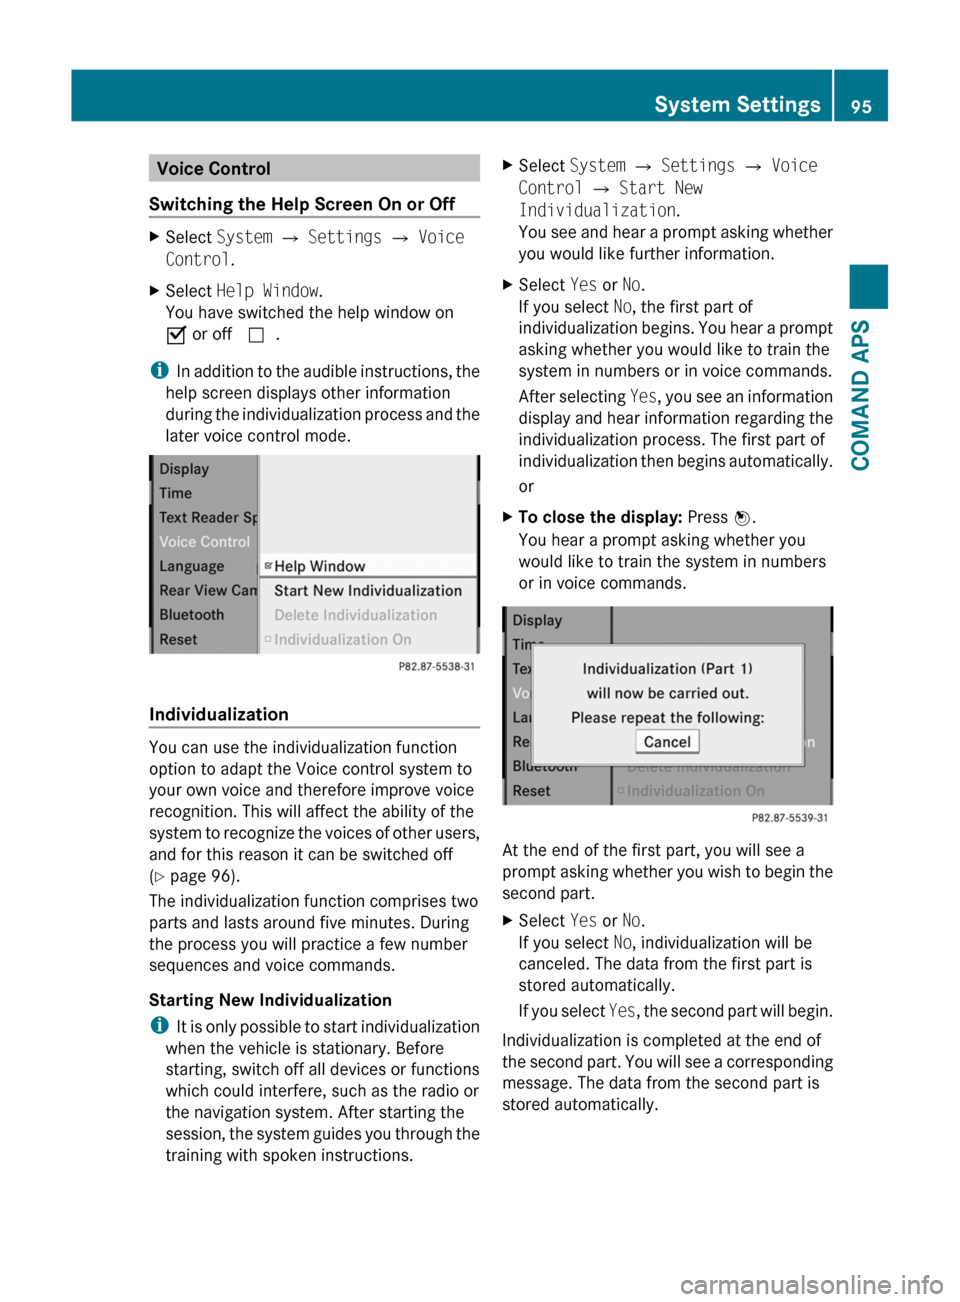
Voice Control
Switching the Help Screen On or Off
XSelect System £ Settings £ Voice
Control.
XSelect Help Window.
You have switched the help window on
Ç or off c.
iIn addition to the audible instructions, the
help screen displays other information
during the individualization process and the
later voice control mode.
Individualization
You can use the individualization function
option to adapt the Voice control system to
your own voice and therefore improve voice
recognition. This will affect the ability of the
system to recognize the voices of other users,
and for this reason it can be switched off
(Y page 96).
The individualization function comprises two
parts and lasts around five minutes. During
the process you will practice a few number
sequences and voice commands.
Starting New Individualization
iIt is only possible to start individualization
when the vehicle is stationary. Before
starting, switch off all devices or functions
which could interfere, such as the radio or
the navigation system. After starting the
session, the system guides you through the
training with spoken instructions.
XSelect System £ Settings £ Voice
Control £ Start New
Individualization.
You see and hear a prompt asking whether
you would like further information.
XSelect Yes or No.
If you select No, the first part of
individualization begins. You hear a prompt
asking whether you would like to train the
system in numbers or in voice commands.
After selecting Yes, you see an information
display and hear information regarding the
individualization process. The first part of
individualization then begins automatically.
or
XTo close the display: Press n.
You hear a prompt asking whether you
would like to train the system in numbers
or in voice commands.
At the end of the first part, you will see a
prompt asking whether you wish to begin the
second part.
XSelect Yes or No.
If you select No, individualization will be
canceled. The data from the first part is
stored automatically.
If you select Yes, the second part will begin.
Individualization is completed at the end of
the second part. You will see a corresponding
message. The data from the second part is
stored automatically.
System Settings95COMAND APSBA 197 USA, CA Edition A 2011; 1; 27, en-UShereepeVersion: 3.0.3.52010-03-24T15:31:10+01:00 - Seite 95Z