2011 MERCEDES-BENZ SLS wheel
[x] Cancel search: wheelPage 409 of 436
Removing the wheelGWarning!
When jacking up the vehicle, only use the jack
which has been specifically approved by
Mercedes-Benz for your vehicle.
The jack is designed exclusively for jacking up
the vehicle at the jack take-up brackets built
into both sides of the vehicle. Make sure the
jack arm is fully seated in the jack take-up
bracket. The jack must always be vertical
when in use, especially on inclines or
declines.
The jack is intended only for lifting the vehicle
briefly for wheel changes. It is not suited for
performing maintenance work under the
vehicle. To help avoid personal injury, use the
jack only to lift the vehicle during a wheel
change.
Never get beneath the vehicle while it is
supported by the jack. Keep hands and feet
away from the area under the lifted vehicle.
Always lower the vehicle onto sufficient
capacity jackstands before working under the
vehicle.
Always make sure the electronic parking
brake is engaged. In addition, block the
wheels with wheel chocks or other sizeable
objects before raising the vehicle with the
jack. Do not disengage the electronic parking
brake while the vehicle is raised.
Make sure that the ground on which the
vehicle is standing and where you place the
jack is solid, level and not slippery. If
necessary, use a large underlay. On slippery
surfaces, such as tiled floors, you should use
a non-slip underlay, for example a rubber mat.
Do not use wooden blocks or similar objects
to support the jack. Otherwise the jack may
not be able to achieve its load-bearing
capacity if it is not at its full height.
Never start the engine when the vehicle is
raised.
Also observe the notes on the jack.
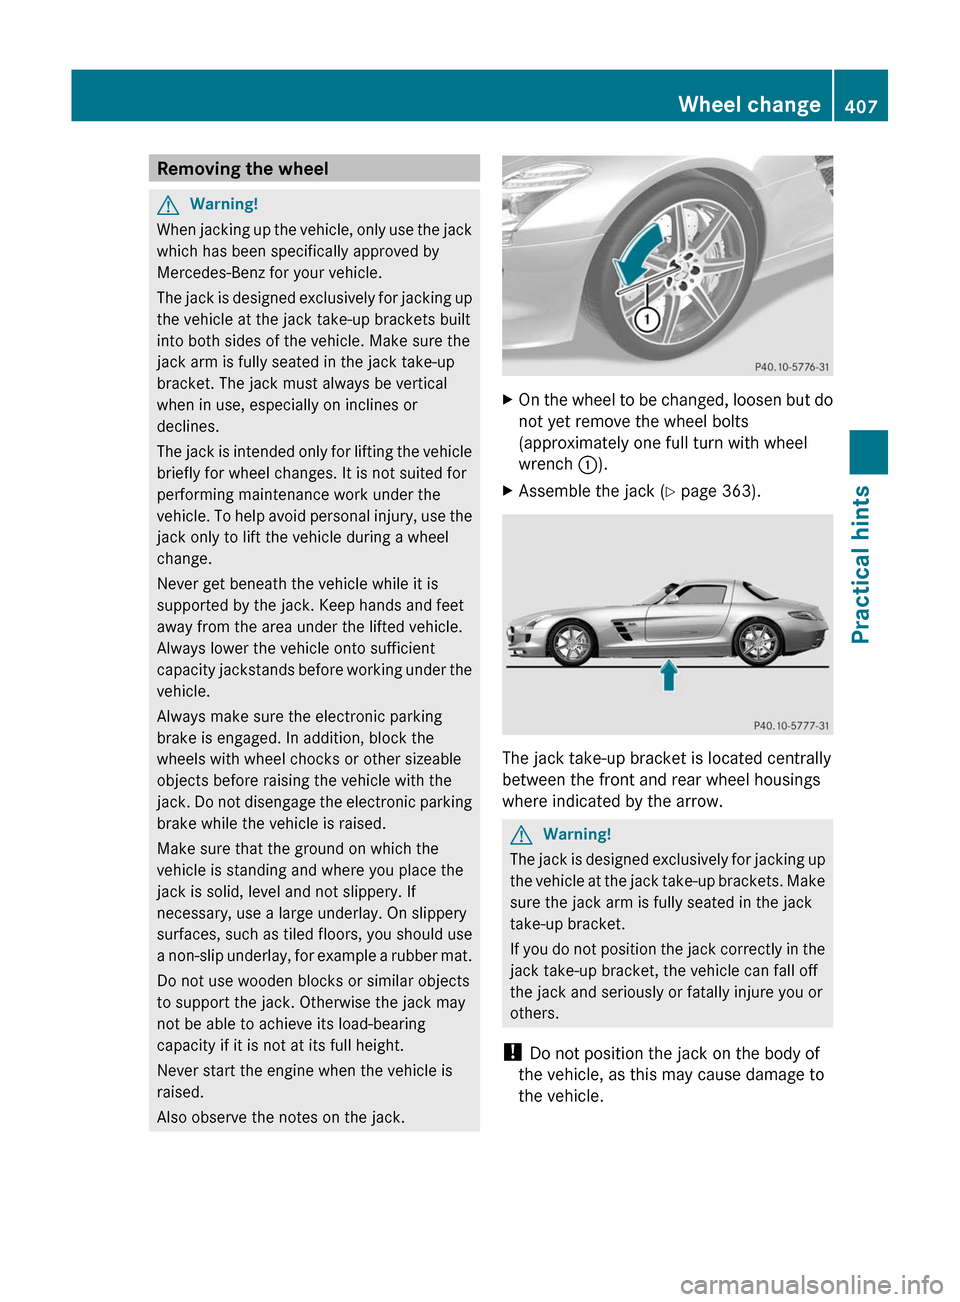
XOn the wheel to be changed, loosen but do
not yet remove the wheel bolts
(approximately one full turn with wheel
wrench :).
XAssemble the jack (Y page 363).
The jack take-up bracket is located centrally
between the front and rear wheel housings
where indicated by the arrow.
GWarning!
The jack is designed exclusively for jacking up
the vehicle at the jack take-up brackets. Make
sure the jack arm is fully seated in the jack
take-up bracket.
If you do not position the jack correctly in the
jack take-up bracket, the vehicle can fall off
the jack and seriously or fatally injure you or
others.
! Do not position the jack on the body of
the vehicle, as this may cause damage to
the vehicle.
Wheel change407Practical hintsBA 197 USA, CA Edition A 2011; 1; 27, en-UShereepeVersion: 3.0.3.52010-03-24T15:31:10+01:00 - Seite 407Z
Page 410 of 436

XPlace jack = on firm ground.XPosition jack = under take-up
bracket ; so that it is always vertical as
seen from the side, even if the vehicle is
parked on an incline.
XTurn crank ? clockwise until jack = is
fully seated in take-up bracket ; and the
jack base evenly meets the ground.
XJack up the vehicle until the wheel is a
maximum of 1.2 in (3 cm) from the ground.
! The rim could strike the ceramic
composite brake disk when removing and
attaching the wheel. The ceramic
composite brake disk could be damaged.
Exercise appropriate care and have a
second person assist you if possible or use
a second alignment bolt.
XUnscrew the uppermost wheel bolt and
remove it.
XReplace this wheel bolt with alignment bolt
A.
XRemove the remaining bolts.
! Do not place wheel bolts in sand or dirt.
This could result in damage to the wheel
bolts and wheel hub threads.
XRemove the wheel.
Mounting the wheel
GWarning!
Always replace wheel bolts that are damaged
or rusted.
Never apply oil or grease to wheel bolts.
Damaged wheel hub threads should be
repaired immediately. Do not continue to
drive under these circumstances! Contact an
authorized Mercedes-Benz Center or call
Roadside Assistance.
Incorrect wheel bolts or improperly tightened
wheel bolts can cause the wheel to come off.
This could cause an accident. Make sure to
use the correct wheel bolts.
GWarning!
Only use genuine Mercedes-Benz wheel bolts.
Other wheel bolts may come loose.
Do not tighten the wheel bolts when the
vehicle is raised. Otherwise the vehicle could
fall off the jack.
408Wheel changePractical hints
BA 197 USA, CA Edition A 2011; 1; 27, en-UShereepeVersion: 3.0.3.52010-03-24T15:31:10+01:00 - Seite 408
Page 411 of 436
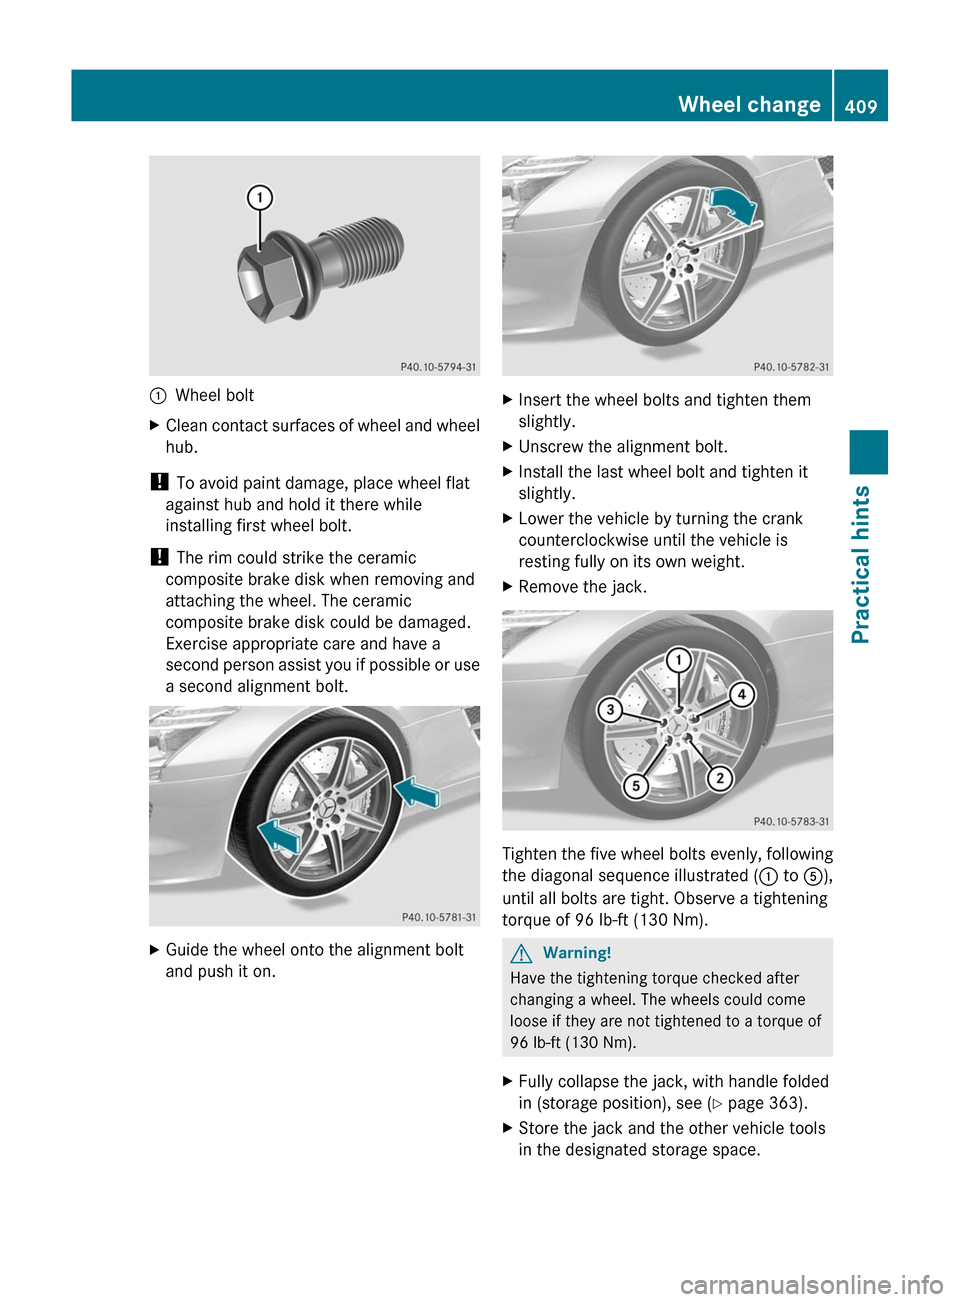
:Wheel boltXClean contact surfaces of wheel and wheel
hub.
! To avoid paint damage, place wheel flat
against hub and hold it there while
installing first wheel bolt.
! The rim could strike the ceramic
composite brake disk when removing and
attaching the wheel. The ceramic
composite brake disk could be damaged.
Exercise appropriate care and have a
second person assist you if possible or use
a second alignment bolt.
XGuide the wheel onto the alignment bolt
and push it on.
XInsert the wheel bolts and tighten them
slightly.
XUnscrew the alignment bolt.XInstall the last wheel bolt and tighten it
slightly.
XLower the vehicle by turning the crank
counterclockwise until the vehicle is
resting fully on its own weight.
XRemove the jack.
Tighten the five wheel bolts evenly, following
the diagonal sequence illustrated (: to A),
until all bolts are tight. Observe a tightening
torque of 96 lb-ft (130 Nm).
GWarning!
Have the tightening torque checked after
changing a wheel. The wheels could come
loose if they are not tightened to a torque of
96 lb-ft (130 Nm).
XFully collapse the jack, with handle folded
in (storage position), see (Y page 363).
XStore the jack and the other vehicle tools
in the designated storage space.
Wheel change409Practical hintsBA 197 USA, CA Edition A 2011; 1; 27, en-UShereepeVersion: 3.0.3.52010-03-24T15:31:10+01:00 - Seite 409Z
Page 417 of 436
Towing the vehicle
Safety notes
Mercedes-Benz recommends that the vehicle
be transported with all wheels off the ground
using flatbed or appropriate wheel lift/dolly
equipment. This method is preferable to other
types of towing.
! To prevent damage during transport, do
not tie down vehicle by its chassis or
suspension parts.
If circumstances do not permit the
recommended towing methods, the vehicle
may be towed with all wheels on the ground
or rear axle raised only so far as necessary to
have the vehicle moved to a safe location
where the recommended towing methods
can be employed.
! Before towing the vehicle observe the
following instructions:
RDo not tow-start the vehicle. You could
otherwise seriously damage the
transmission which is not covered by the
Mercedes-Benz Limited Warranty.
RDo not tow with sling-type equipment.
Towing with sling-type equipment over
bumpy roads will damage radiator and
supports.
RTowing of the vehicle should only be
done using the properly installed towing
eye bolt. Never attach a tow cable, tow
rope or tow rod to the vehicle chassis,
frame or suspension parts.
GWarning!
With the engine not running, there is no power
assistance for the brake and steering
systems. In this case, it is important to keep
in mind that a considerably higher degree of
effort is necessary to brake and steer the
vehicle. Adapt your driving accordingly.
! Avoid pulling the vehicle abruptly or
diagonally, since it could result in damage
to the chassis alignment.
! Do not use the towing eye bolt for
recovery, as this could damage the vehicle.
If in doubt, recover the vehicle with a crane.
iIf the battery is disconnected or
discharged
Rthe transmission will remain in park
position P
Rthe SmartKey will not turn in the starter
switch
For more information see “Battery”
(Y page 410) or “Jump starting”
(Y page 413).
Installing towing eye bolt
The towing eye bolt is supplied with the
vehicle tool kit, located in the storage
compartment underneath the trunk floor
(Y page 362).
XTake the towing eye bolt and the wheel
wrench out of the trunk.
Your vehicle is equipped with a front towing
eye bolt only. You cannot tow other vehicles
with your vehicle.
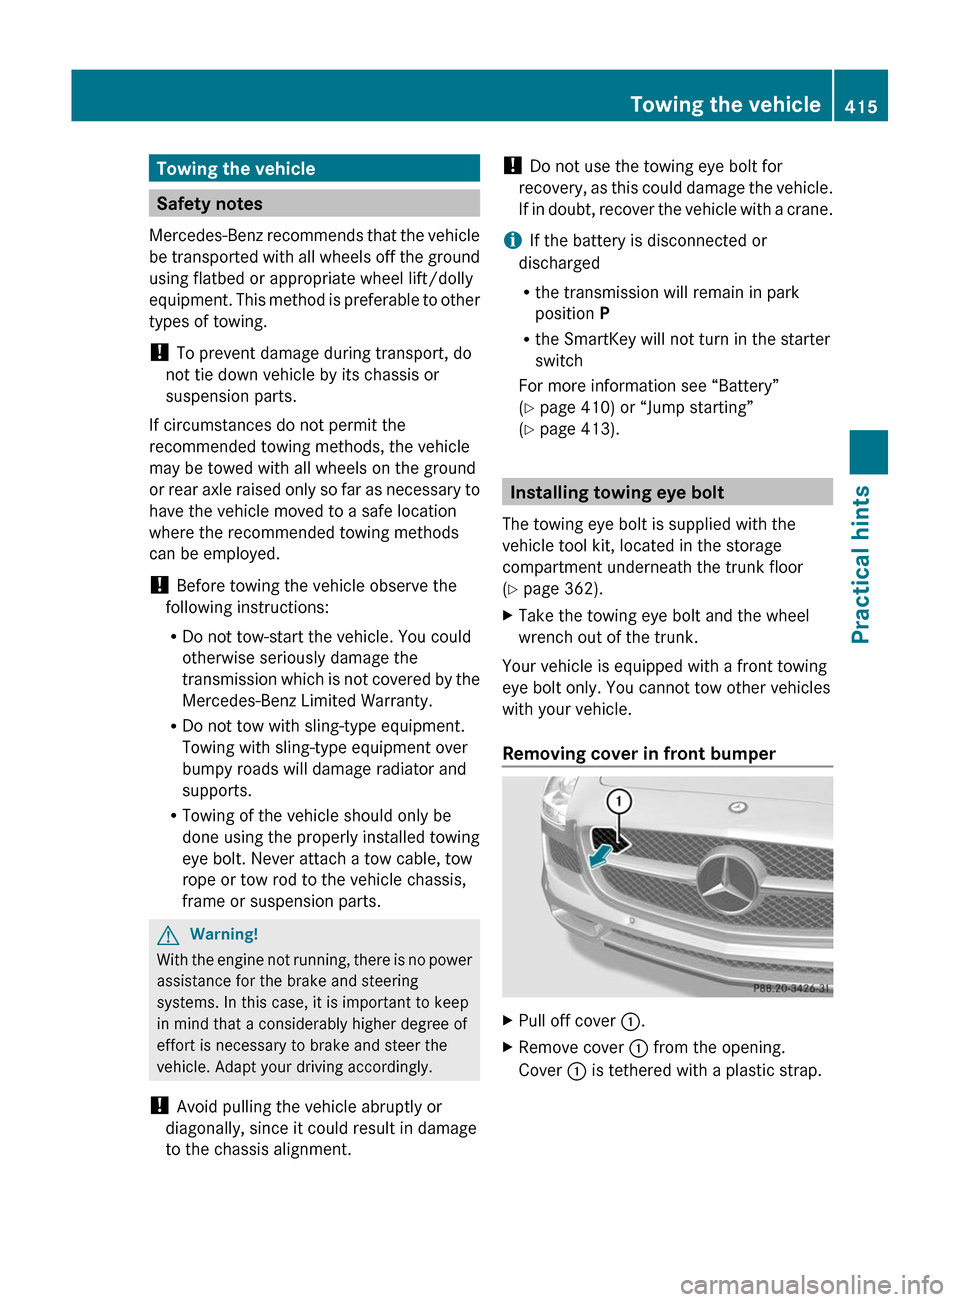
Removing cover in front bumper
XPull off cover :.XRemove cover : from the opening.
Cover : is tethered with a plastic strap.
Towing the vehicle415Practical hintsBA 197 USA, CA Edition A 2011; 1; 27, en-UShereepeVersion: 3.0.3.52010-03-24T15:31:10+01:00 - Seite 415Z
Page 418 of 436
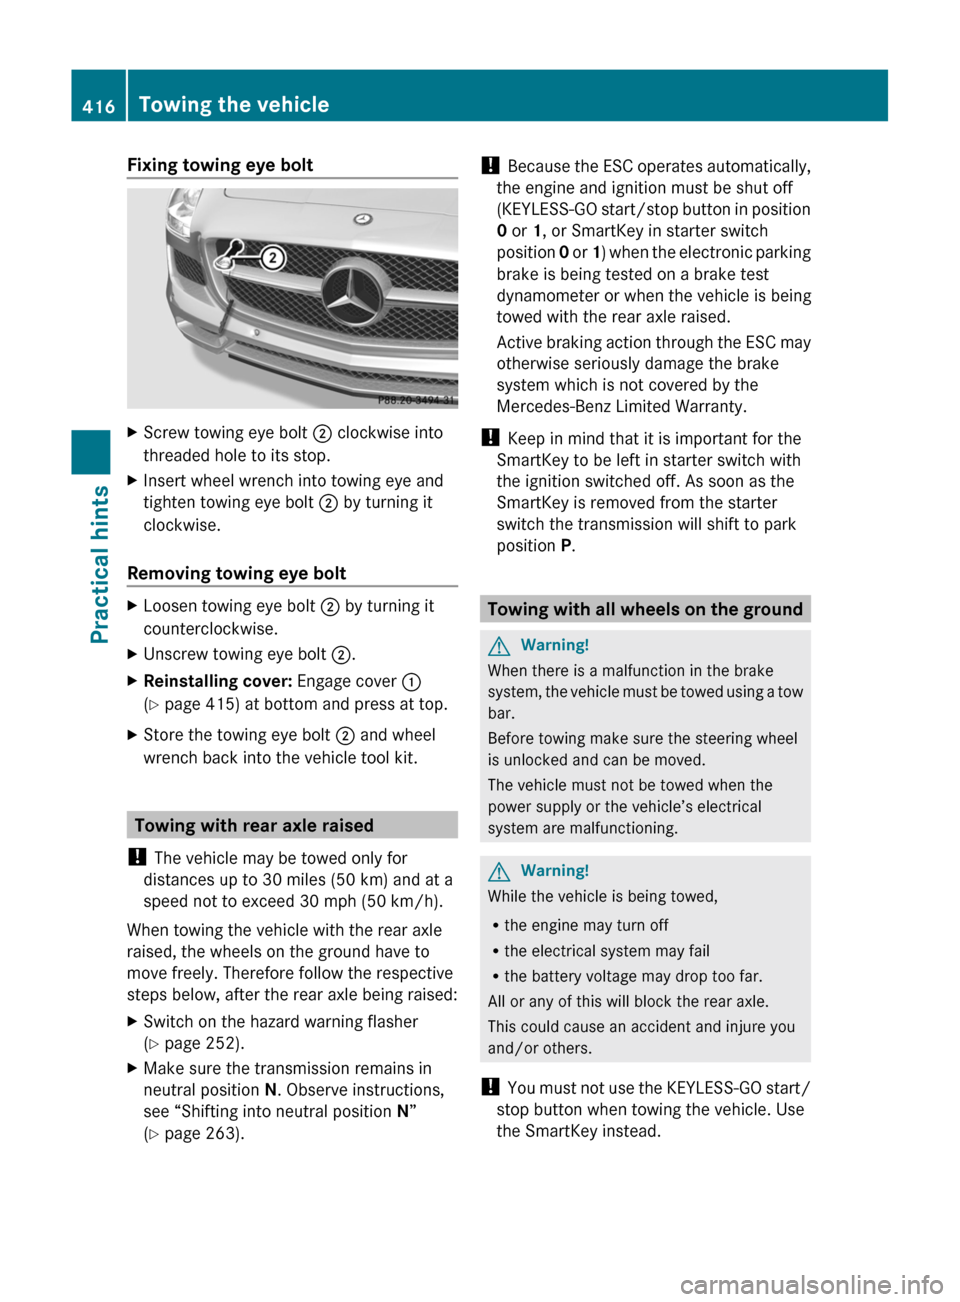
Fixing towing eye boltXScrew towing eye bolt ; clockwise into
threaded hole to its stop.XInsert wheel wrench into towing eye and
tighten towing eye bolt ; by turning it
clockwise.
Removing towing eye bolt
XLoosen towing eye bolt ; by turning it
counterclockwise.XUnscrew towing eye bolt ;.XReinstalling cover: Engage cover :
( Y page 415) at bottom and press at top.XStore the towing eye bolt ; and wheel
wrench back into the vehicle tool kit.
Towing with rear axle raised
! The vehicle may be towed only for
distances up to 30 miles (50 km) and at a
speed not to exceed 30 mph (50 km/h).
When towing the vehicle with the rear axle
raised, the wheels on the ground have to
move freely. Therefore follow the respective
steps below, after the rear axle being raised:
XSwitch on the hazard warning flasher
( Y page 252).XMake sure the transmission remains in
neutral position N. Observe instructions,
see “Shifting into neutral position N”
( Y page 263).!
Because the ESC operates automatically,
the engine and ignition must be shut off
(KEYLESS-GO start/stop button in position
0 or 1, or SmartKey in starter switch
position 0 or 1) when the electronic parking
brake is being tested on a brake test
dynamometer or when the vehicle is being
towed with the rear axle raised.
Active braking action through the ESC may
otherwise seriously damage the brake
system which is not covered by the
Mercedes-Benz Limited Warranty.
! Keep in mind that it is important for the
SmartKey to be left in starter switch with
the ignition switched off. As soon as the
SmartKey is removed from the starter
switch the transmission will shift to park
position P.
Towing with all wheels on the ground
GWarning!
When there is a malfunction in the brake
system, the vehicle must be towed using a tow
bar.
Before towing make sure the steering wheel
is unlocked and can be moved.
The vehicle must not be towed when the
power supply or the vehicle’s electrical
system are malfunctioning.
GWarning!
While the vehicle is being towed,
R the engine may turn off
R the electrical system may fail
R the battery voltage may drop too far.
All or any of this will block the rear axle.
This could cause an accident and injure you
and/or others.
! You must not use the KEYLESS-GO start/
stop button when towing the vehicle. Use
the SmartKey instead.
416Towing the vehiclePractical hints
BA 197 USA, CA Edition A 2011; 1; 27, en-UShereepeVersion: 3.0.3.52010-03-24T15:31:10+01:00 - Seite 416
Page 424 of 436
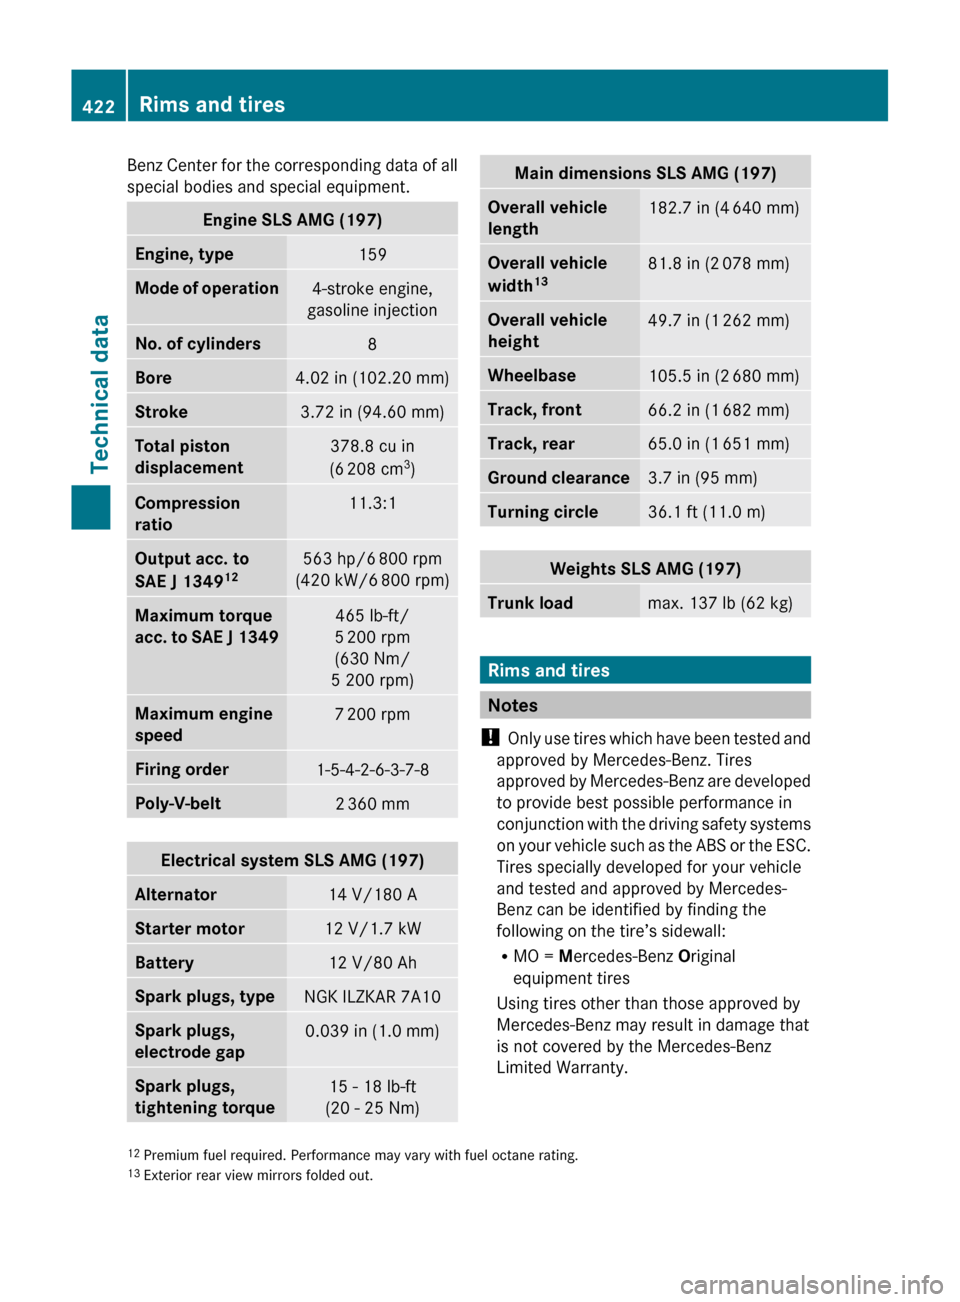
Benz Center for the corresponding data of all
special bodies and special equipment.Engine SLS AMG (197)Engine, type159Mode of operation4-stroke engine,
gasoline injectionNo. of cylinders8Bore4.02 in (102.20 mm)Stroke3.72 in (94.60 mm)Total piston
displacement378.8 cu in
(6 208 cm 3
)Compression
ratio11.3:1Output acc. to
SAE J 1349 12
563 hp/6 800 rpm
(420 kW/6 800 rpm)Maximum torque
acc. to SAE J 1349465 lb-ft/
5 200 rpm
(630 Nm/
5 200 rpm)Maximum engine
speed7 200 rpmFiring order1-5-4-2-6-3-7-8Poly-V-belt2 360 mmElectrical system SLS AMG (197)Alternator14 V/180 AStarter motor12 V/1.7 kWBattery12 V/80 AhSpark plugs, typeNGK ILZKAR 7A10Spark plugs,
electrode gap0.039 in (1.0 mm)Spark plugs,
tightening torque15 - 18 lb-ft
(20 - 25 Nm)Main dimensions SLS AMG (197)Overall vehicle
length182.7 in (4 640 mm)Overall vehicle
width 13
81.8 in (2 078 mm)Overall vehicle
height49.7 in (1 262 mm)Wheelbase105.5 in (2 680 mm)Track, front66.2 in (1 682 mm)Track, rear65.0 in (1 651 mm)Ground clearance3.7 in (95 mm)Turning circle36.1 ft (11.0 m)Weights SLS AMG (197)Trunk loadmax. 137 lb (62 kg)
Rims and tires
Notes
! Only use tires which have been tested and
approved by Mercedes-Benz. Tires
approved by Mercedes-Benz are developed
to provide best possible performance in
conjunction with the driving safety systems
on your vehicle such as the ABS or the ESC.
Tires specially developed for your vehicle
and tested and approved by Mercedes-
Benz can be identified by finding the
following on the tire’s sidewall:
R MO = Mercedes-Benz Original
equipment tires
Using tires other than those approved by
Mercedes-Benz may result in damage that
is not covered by the Mercedes-Benz
Limited Warranty.
12 Premium fuel required. Performance may vary with fuel octane rating.
13 Exterior rear view mirrors folded out.422Rims and tiresTechnical data
BA 197 USA, CA Edition A 2011; 1; 27, en-UShereepeVersion: 3.0.3.52010-03-24T15:31:10+01:00 - Seite 422
Page 425 of 436
! Using tires other than those approved by
Mercedes-Benz can have detrimental
effects, such as
R poor handling characteristics
R increased noise
R increased fuel consumption
Moreover, tires and rims not approved by
Mercedes-Benz may, under load, exhibit
dimensional variations and different tire
deformation characteristics that could
cause them to come into contact with the
vehicle body or axle parts. Damage to the
tires or the vehicle may be the result.
i Further information on tires and rims is
available at any authorized Mercedes-Benz
Center. The Tire and Loading Information
placard with the recommended tire
inflation pressures for cold tires is located
on the driver’s door B-pillar. Supplemental
tire inflation pressure information for
driving at high speeds or for vehicle loads
less than the maximum loaded vehicle
condition can be found on the tire inflation
pressure label. The tire inflation pressure
label is located on the inside of the fuel filler
flap. The tire inflation pressure should be
checked regularly and should only be
adjusted on cold tires. Follow tire
manufacturer’s maintenance
recommendation included with the vehicle.
For information on recommended tire
inflation pressure and supplemental tire
inflation pressure information for special
driving situations, see ( Y page 327).
i Please keep in mind that the vehicle must
be equipped
R with wheels of identical dimensions on
each axle (left and right)
R with tires of identical characteristics all
around, i.e. summer tires, winter tires, or
all-season tires etc.
i The following pages also list the approved
rim and tire sizes for equipping your vehicle
with winter tires. Winter tires are notavailable as standard or optional factory
equipment, but can be purchased from an
authorized Mercedes-Benz Center.
Equipping your vehicle with winter tires
approved for your vehicle model may
require the purchase of rims of the
recommended size for use with these
winter tires. This depends on vehicle model
and the standard or optional factory-
equipped wheel rim/tire configuration on
your vehicle. For more information contact
an authorized Mercedes-Benz Center.Rims and tires423Technical dataBA 197 USA, CA Edition A 2011; 1; 27, en-UShereepeVersion: 3.0.3.52010-03-24T15:31:10+01:00 - Seite 423
Page 426 of 436
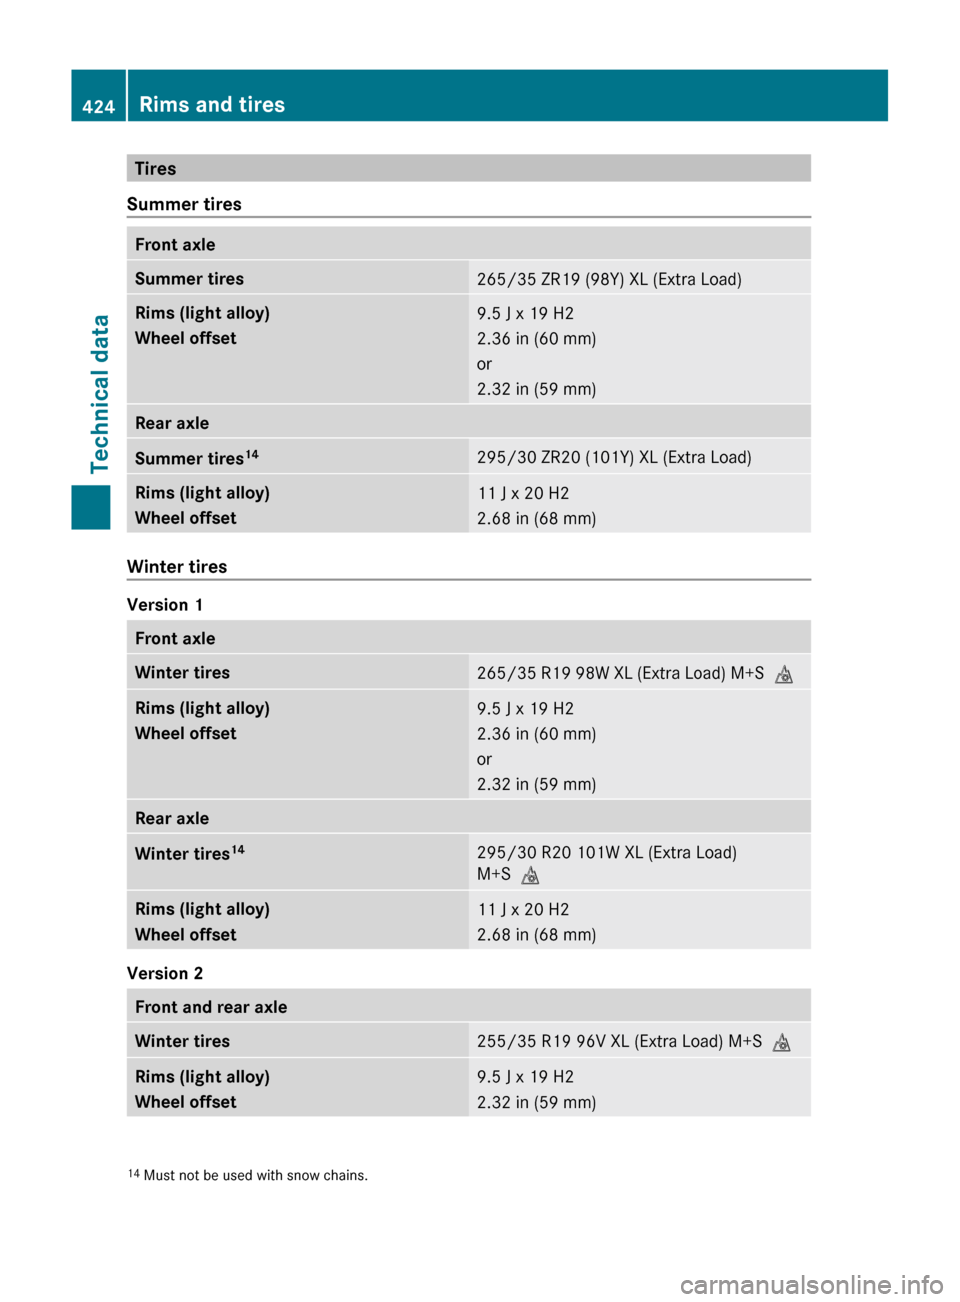
Tires
Summer tiresFront axleSummer tires265/35 ZR19 (98Y) XL (Extra Load)Rims (light alloy)
Wheel offset9.5 J x 19 H2
2.36 in (60 mm)
or
2.32 in (59 mm)Rear axleSummer tires 14295/30 ZR20 (101Y) XL (Extra Load)Rims (light alloy)
Wheel offset11 J x 20 H2
2.68 in (68 mm)
Winter tires
Version 1
Front axleWinter tires265/35 R19 98W XL (Extra Load) M+SiRims (light alloy)
Wheel offset9.5 J x 19 H2
2.36 in (60 mm)
or
2.32 in (59 mm)Rear axleWinter tires 14295/30 R20 101W XL (Extra Load)
M+S iRims (light alloy)
Wheel offset11 J x 20 H2
2.68 in (68 mm)
Version 2
Front and rear axleWinter tires255/35 R19 96V XL (Extra Load) M+S iRims (light alloy)
Wheel offset9.5 J x 19 H2
2.32 in (59 mm)14 Must not be used with snow chains.424Rims and tiresTechnical data
BA 197 USA, CA Edition A 2011; 1; 27, en-UShereepeVersion: 3.0.3.52010-03-24T15:31:10+01:00 - Seite 424