2011 MERCEDES-BENZ SLS engine
[x] Cancel search: enginePage 397 of 436

GWarning!
Driving when your engine is overheated can cause some fluids which may have leaked into the
engine compartment to catch fire. You could be seriously burned.
Steam from an overheated engine can cause serious burns which can occur just by opening the
engine hood. Stay away from the engine if you see or hear steam coming from it.
Stop the vehicle in a safe location away from other traffic. Turn off the engine, get out of the
vehicle and do not stand near the vehicle until the engine has cooled down.
! The engine should not be operated with the engine oil temperature above 140†. Doing
so may cause serious damage which is not covered by the Mercedes-Benz Limited Warranty.
Tires
ProblemPossible causes/consequences and M SolutionshUSA only:
Combination
low tire pressure
telltale/TPMS
malfunction
telltale for the
Advanced TPMS
illuminates
continuously.
Canada only:
Low tire
pressure telltale
for the
Advanced TPMS
illuminates
continuously.The Advanced TPMS detects a loss of pressure in at least one tire.XCarefully bring the vehicle to a halt, avoiding abrupt steering and
braking maneuvers. Observe the traffic situation around you.XRead and observe messages in the multifunction display
( Y page 364).
If the tire inflation pressure in the respective tire(s) has (have) been
corrected, the combination low tire pressure/TPMS malfunction
telltale goes out after a few minutes of driving.
hUSA only:
Combination
low tire pressure
telltale/TPMS
malfunction
telltale for the
Advanced TPMS
flashes 60
seconds and
then stays
illuminated.There is a malfunction in the Advanced TPMS.XRead and observe messages in the multifunction display
( Y page 364).XHave the Advanced TPMS checked at an authorized Mercedes-
Benz Center.
After the malfunction has been remedied, the combination low tire
pressure/TPMS malfunction telltale goes out after a few minutes
of driving.
What to do if...395Practical hintsBA 197 USA, CA Edition A 2011; 1; 27, en-UShereepeVersion: 3.0.3.52010-03-24T15:31:10+01:00 - Seite 395Z
Page 404 of 436

Flat tire
Notes
Your vehicle is equipped with a TIREFIT kit
(Y page 362).
Preparing the vehicle
XWhenever possible, park the vehicle in a
safe distance from moving traffic on a hard,
flat surface.
XTurn on the hazard warning flasher.XTurn the steering wheel so that the front
wheels are in a straight-ahead position.
XEngage the electronic parking brake.XShift the transmission into park position P.XTurn off the engine.XKEYLESS-GO: Open the driver’s door (this
puts the starter switch in position 0, same
as with the SmartKey removed from the
starter switch). The driver’s door can then
be closed again. Open doors only when
conditions are safe to do so.
or
XRemove the SmartKey from the starter
switch.
XHave any passenger exit the vehicle at a
safe distance from the roadway. Open
doors only when conditions are safe to do
so.
Sealing tires with TIREFIT
Small tire punctures, particularly those in the
tread, can be sealed with TIREFIT.
TIREFIT can be used in ambient temperatures
down to -40‡ (-40†).
GWarning!
TIREFIT is a limited repair device. TIREFIT
cannot be used for cuts or punctures larger
than approximately 0.16 in (4 mm) and tire
damage caused by driving with extremely low
tire inflation pressure, or on a flat tire, or a
damaged wheel.
Do not drive the vehicle under such
circumstances.
Contact the nearest authorized Mercedes-
Benz Center for assistance or call Roadside
Assistance.
XForeign objects (e.g. screws or nails)
should not be removed from the tire.
XTake the TIREFIT kit, the sticker, and the
electric air pump out of the trunk
(Y page 362).
XOpen the TIREFIT kit.XAttach upper part of sticker D where it will
be easily seen by the driver on the
instrument cluster.
XAttach lower part of sticker D to the
damaged tire (close to the tire valve).
GWarning!
Take care not to allow the contents of TIREFIT
to come in contact with hair, eyes or clothing.
TIREFIT is harmful if inhaled, swallowed or
absorbed through the skin - causes skin, eye
and respiratory irritation.
Any contact with eyes or skin should be
flushed immediately with plenty of water.
If clothing comes in contact with TIREFIT,
change clothing as soon as possible.
In case of allergic reaction or rash, consult a
physician immediately.
402Flat tirePractical hints
BA 197 USA, CA Edition A 2011; 1; 27, en-UShereepeVersion: 3.0.3.52010-03-24T15:31:10+01:00 - Seite 402
Page 405 of 436
GWarning!
Keep TIREFIT out of reach of children. If
swallowed, rinse mouth immediately with
plenty of water and drink plenty of water.
Do not induce vomiting!
Consult a physician immediately.
iIf sealant has leaked out, let it dry. You
can then peel it off.
If clothing has come in contact with
TIREFIT, have it dry-cleaned with
perchloroethylene as soon as possible.
GWarning!
Observe safety instructions on air pump label.
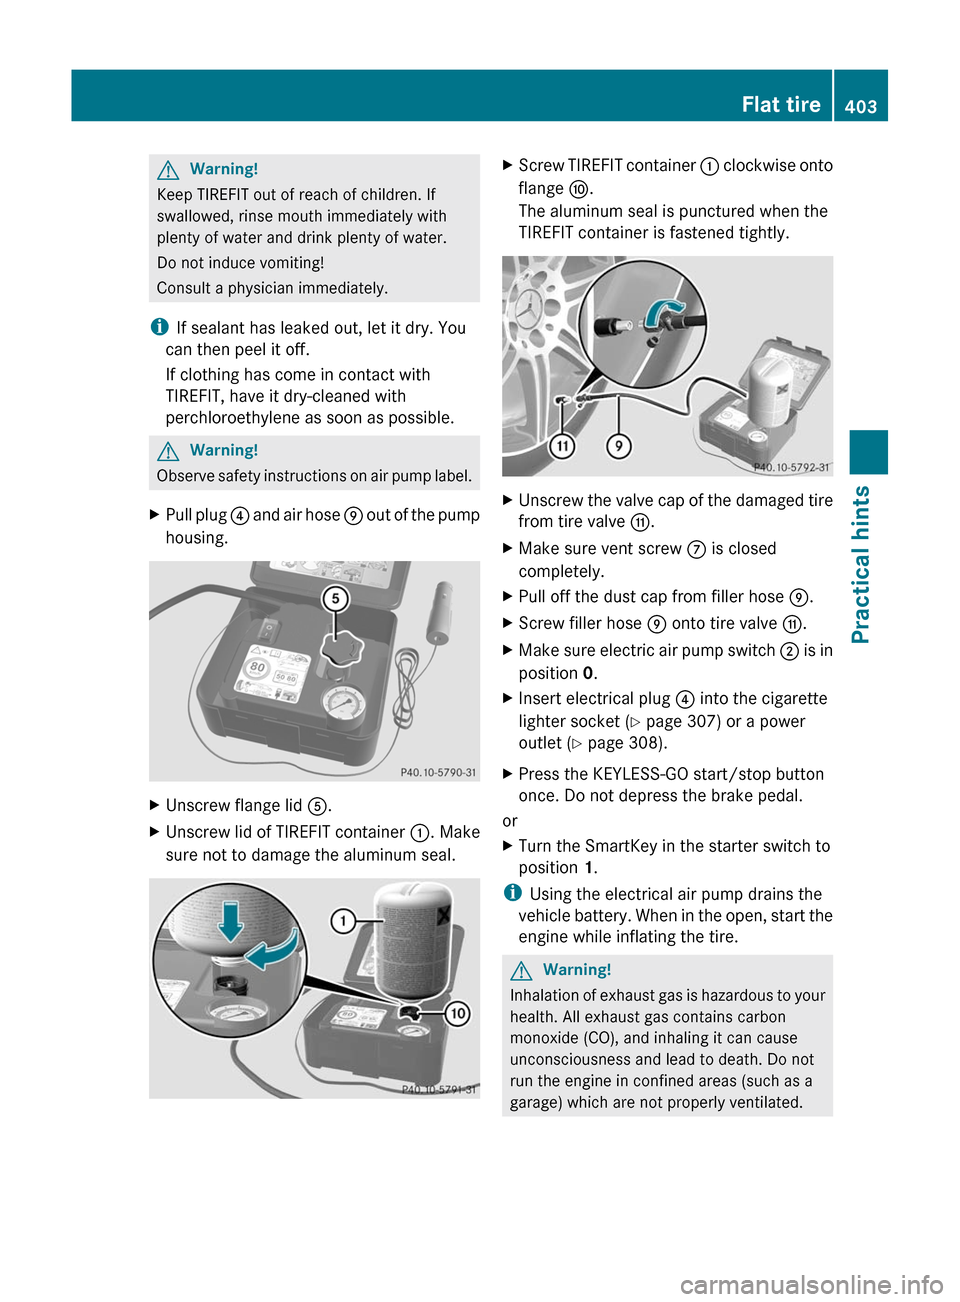
XPull plug ? and air hose E out of the pump
housing.
XUnscrew flange lid A.XUnscrew lid of TIREFIT container :. Make
sure not to damage the aluminum seal.
XScrew TIREFIT container : clockwise onto
flange F.
The aluminum seal is punctured when the
TIREFIT container is fastened tightly.
XUnscrew the valve cap of the damaged tire
from tire valve G.
XMake sure vent screw C is closed
completely.
XPull off the dust cap from filler hose E.XScrew filler hose E onto tire valve G.XMake sure electric air pump switch ; is in
position 0.
XInsert electrical plug ? into the cigarette
lighter socket (Y page 307) or a power
outlet (Y page 308).
XPress the KEYLESS-GO start/stop button
once. Do not depress the brake pedal.
or
XTurn the SmartKey in the starter switch to
position 1.
iUsing the electrical air pump drains the
vehicle battery. When in the open, start the
engine while inflating the tire.
GWarning!
Inhalation of exhaust gas is hazardous to your
health. All exhaust gas contains carbon
monoxide (CO), and inhaling it can cause
unconsciousness and lead to death. Do not
run the engine in confined areas (such as a
garage) which are not properly ventilated.
Flat tire403Practical hintsBA 197 USA, CA Edition A 2011; 1; 27, en-UShereepeVersion: 3.0.3.52010-03-24T15:31:10+01:00 - Seite 403Z
Page 407 of 436
GWarning!
Do not exceed a vehicle speed of 50 mph
( 80 km/h). A TIREFIT repair is not designed to
operate at higher speeds.
The sticker must be attached on the
instrument cluster where it will be easily seen
by the driver.
Vehicle handling characteristics of a TIREFIT
repaired tire may change. Adapt your driving
accordingly.
XAfter driving for approximately 5 miles
(3 km) or 10 minutes, stop the vehicle and
check the tire inflation pressure using the
electric air pump.
i The TIREFIT sealing may impair the
function of the sensors in the tire. Proper
operating sensors are necessary to check
the tire inflation pressure with the
Advanced Tire Pressure Monitoring
System. When the sensors are not
operating properly, the measured tire
inflation pressure may be inaccurate or the
tire inflation pressure may not be displayed
at all. Error messages may appear.
Therefore, check and adjust the tire
inflation pressure with pressure gauge B
on the electric air pump.
GWarning!
If tire inflation pressure has fallen below
130 kPA (1.3 bar, 20 psi) do not continue to
drive the vehicle.
Park your vehicle safely away from the
roadway and contact the nearest authorized
Mercedes-Benz Center or Roadside
Assistance.
Have the damaged tire replaced.
If the tire inflation pressure is at least 130 kPA
(1.3 bar, 20 psi), inflate or deflate the tire to
the correct tire inflation pressure (see Tire
and Loading Information placard on the
driver’s door B-pillar):XTo increase tire inflation pressure:
Switch on the electric air pump.XTo decrease tire inflation pressure:
Open vent screw C on air hose E.XDrive to the nearest qualified workshop,
e.g. an authorized Mercedes-Benz Center,
to have the damaged tire replaced.XContact an authorized Mercedes-Benz
Center as soon as possible to obtain a new
TIREFIT kit.XBring used TIREFIT materials to an
authorized Mercedes-Benz Center for
proper disposal.XReplace your TIREFIT container every
4 years. Replacement containers are
available at any authorized Mercedes-Benz
Center.
Wheel change
Preparing the vehicle
XPark the vehicle on a hard, flat surface.XTurn the steering wheel so that the front
wheels are in a straight-ahead position.XEngage the electronic parking brake.XShift the transmission into park position P.XTurn off the engine.XKEYLESS-GO: Open the driver’s door (this
puts the starter switch in position 0, same
as with the SmartKey removed from the
starter switch). The driver’s door can then
be closed again. Open doors only when
conditions are safe to do so.
or
XRemove the SmartKey from the starter
switch.XTake the following out of the vehicle:Wheel change405Practical hintsBA 197 USA, CA Edition A 2011; 1; 27, en-UShereepeVersion: 3.0.3.52010-03-24T15:31:10+01:00 - Seite 405Z
Page 409 of 436
Removing the wheelGWarning!
When jacking up the vehicle, only use the jack
which has been specifically approved by
Mercedes-Benz for your vehicle.
The jack is designed exclusively for jacking up
the vehicle at the jack take-up brackets built
into both sides of the vehicle. Make sure the
jack arm is fully seated in the jack take-up
bracket. The jack must always be vertical
when in use, especially on inclines or
declines.
The jack is intended only for lifting the vehicle
briefly for wheel changes. It is not suited for
performing maintenance work under the
vehicle. To help avoid personal injury, use the
jack only to lift the vehicle during a wheel
change.
Never get beneath the vehicle while it is
supported by the jack. Keep hands and feet
away from the area under the lifted vehicle.
Always lower the vehicle onto sufficient
capacity jackstands before working under the
vehicle.
Always make sure the electronic parking
brake is engaged. In addition, block the
wheels with wheel chocks or other sizeable
objects before raising the vehicle with the
jack. Do not disengage the electronic parking
brake while the vehicle is raised.
Make sure that the ground on which the
vehicle is standing and where you place the
jack is solid, level and not slippery. If
necessary, use a large underlay. On slippery
surfaces, such as tiled floors, you should use
a non-slip underlay, for example a rubber mat.
Do not use wooden blocks or similar objects
to support the jack. Otherwise the jack may
not be able to achieve its load-bearing
capacity if it is not at its full height.
Never start the engine when the vehicle is
raised.
Also observe the notes on the jack.
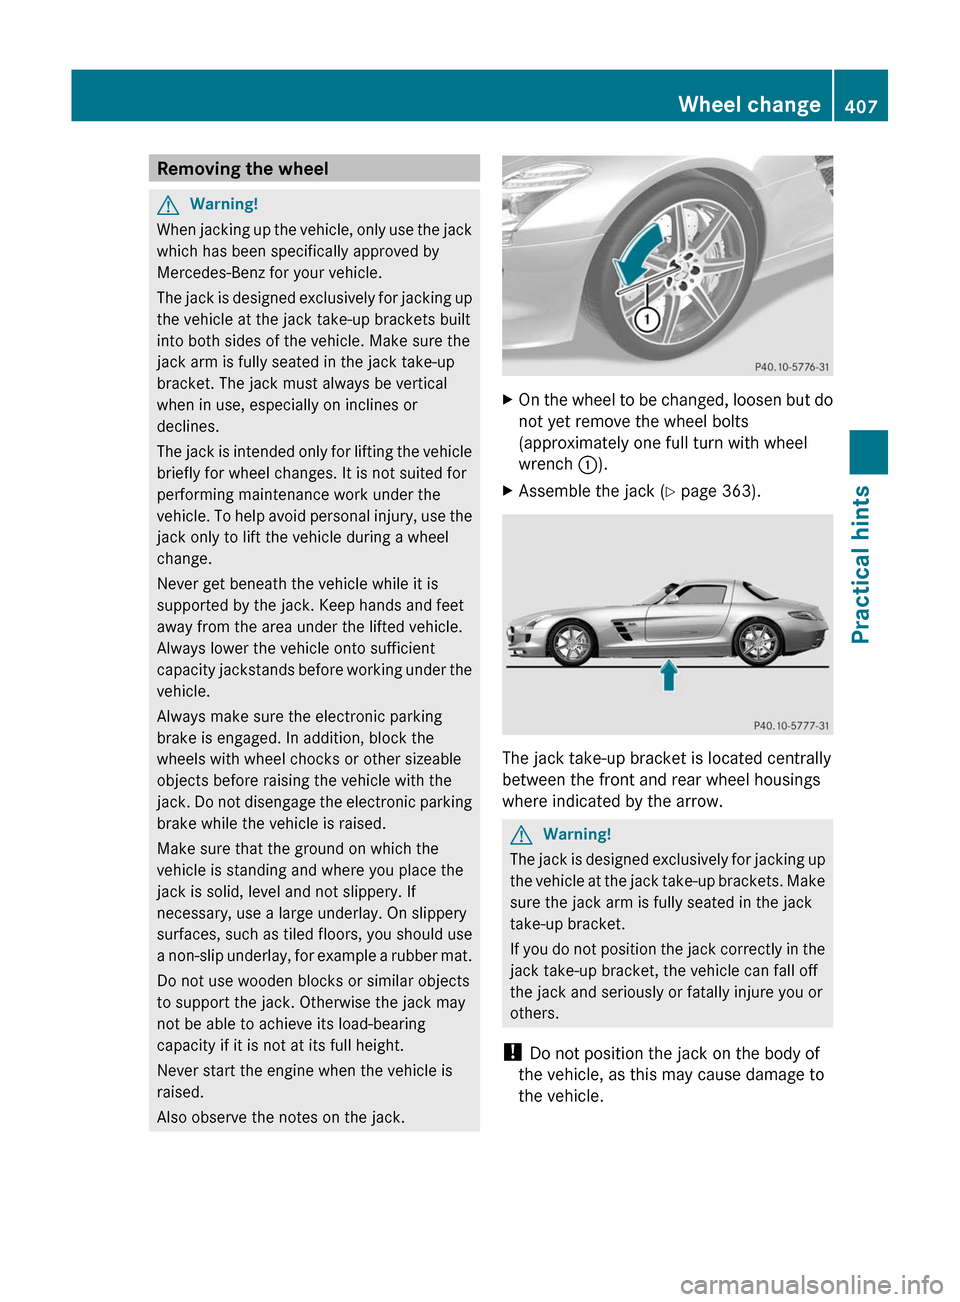
XOn the wheel to be changed, loosen but do
not yet remove the wheel bolts
(approximately one full turn with wheel
wrench :).
XAssemble the jack (Y page 363).
The jack take-up bracket is located centrally
between the front and rear wheel housings
where indicated by the arrow.
GWarning!
The jack is designed exclusively for jacking up
the vehicle at the jack take-up brackets. Make
sure the jack arm is fully seated in the jack
take-up bracket.
If you do not position the jack correctly in the
jack take-up bracket, the vehicle can fall off
the jack and seriously or fatally injure you or
others.
! Do not position the jack on the body of
the vehicle, as this may cause damage to
the vehicle.
Wheel change407Practical hintsBA 197 USA, CA Edition A 2011; 1; 27, en-UShereepeVersion: 3.0.3.52010-03-24T15:31:10+01:00 - Seite 407Z
Page 413 of 436
Do not rub the battery with rags or cloths. The
battery could explode if touched due to
electrostatic charge or due to spark
formation.
! The battery is a Valve-Regulated Lead
Acid (VRLA) battery, also referred to as
“fleece” battery.
Such batteries do not require topping-up of
the electrolyte level. VRLA batteries
therefore do not have cell caps and the
battery cover is non-removable. Do not
attempt to open the battery as otherwise
the battery will be damaged.
VRLA batteries do not require topping-up of
the electrolyte level. They cannot be
opened to check the electrolyte level.
However, the battery condition must be
checked periodically by performing a
battery conductance test. Refer to
Maintenance Booklet for battery condition
testing intervals.
The factory-equipped battery may only be
replaced with a battery that
Rhas the same security features
Ris of identical size
Ris of identical voltage
Ris of identical capacity
! As any other battery, the battery may
discharge if you do not operate the vehicle
for an extended period of time. Have the
battery disconnected at a qualified
workshop or an authorized Mercedes-Benz
Center in such a case. You may also
connect an accessory battery charge unit
expressly approved by Mercedes-Benz for
your vehicle model to maintain the battery
charge. Contact an authorized Mercedes-
Benz Center for further information.
The battery, the battery ventilation hose
and the lateral plug must always be
securely installed when the vehicle is in
operation.
! Never loosen or detach battery terminal
clamps while the engine is running or the
SmartKey is in the starter switch or
KEYLESS-GO button is in position 1.
Otherwise the alternator and other
electronic components could be severely
damaged.
Have the battery checked regularly at an
authorized Mercedes-Benz Center.
Refer to Maintenance Booklet for
maintenance intervals or contact an
authorized Mercedes-Benz Center for
further information.
iMake sure the vehicle’s on-board
electronics have status 0 when you turn off
the engine and no longer require any
electrical consumers. The vehicle then
uses very little power and the battery is
spared.
iIf the battery is discharged, you must use
the mechanical key to unlock the vehicle.
iAfter battery power was interrupted, do
the following:
RSynchronize the power windows
(Y page 256).
RSynchronize the exterior rear view
mirrors (Y page 248).
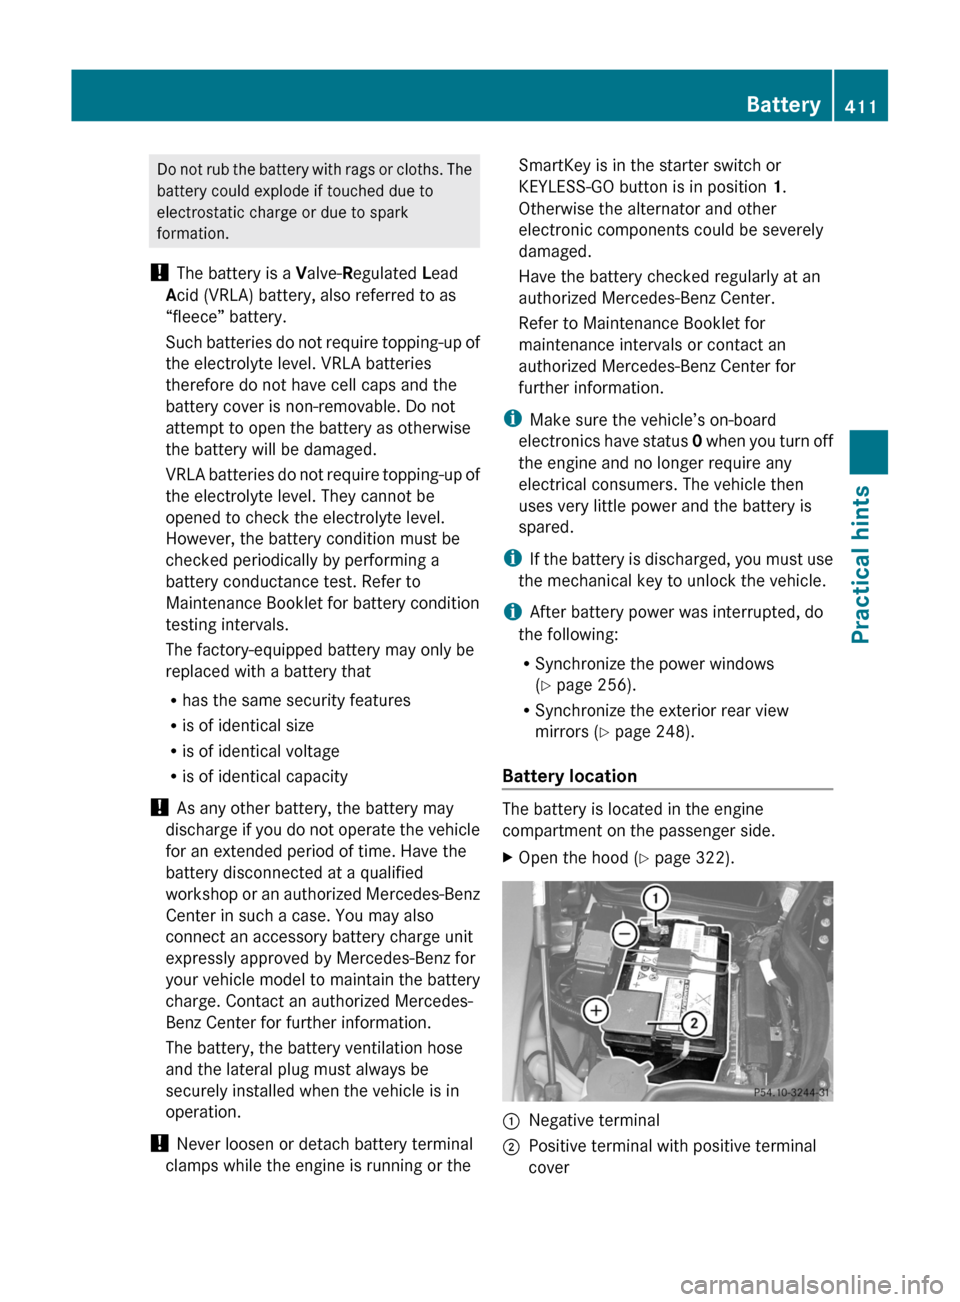
Battery location
The battery is located in the engine
compartment on the passenger side.
XOpen the hood (Y page 322).:Negative terminal;Positive terminal with positive terminal
cover
Battery411Practical hintsBA 197 USA, CA Edition A 2011; 1; 27, en-UShereepeVersion: 3.0.3.52010-03-24T15:31:10+01:00 - Seite 411Z
Page 415 of 436
Jump startingGWarning!
Failure to follow these directions will cause damage to the electronic components, and can lead
to a battery explosion and severe injury or death.
Never lean over batteries while connecting or jump starting. You might get injured.
Battery fluid contains sulfuric acid. Do not allow this fluid to come in contact with eyes, skin or
clothing. In case it does, immediately flush affected area with water, and seek medical help if
necessary.
A battery will also produce hydrogen gas, which is flammable and explosive. Keep flames or
sparks away from battery, avoid improper connection of jumper cables, smoking, etc.
Attempting to jump start a frozen battery can result in it exploding, causing personal injury.
Read all instructions before proceeding.
! Do not tow-start the vehicle. You could otherwise seriously damage the transmission which
is not covered by the Mercedes-Benz Limited Warranty.
! Avoid repeated and lengthy starting attempts.
Do not attempt to start the engine using a battery quick-charge unit.
If the engine does not run after several unsuccessful starting attempts, have it checked at
the nearest authorized Mercedes-Benz Center.
Excessive unburned fuel generated by repeated failed starting attempts may damage the
catalytic converter and may present a fire risk.
Make sure the jumper cables do not have loose or missing insulation.
Make sure the cable clamps do not touch any other metal part while the other end is still
attached to a battery.
If the battery is discharged, the engine can be started with jumper cables and the fully charged
battery of another vehicle or an equivalent starter pack. Observe the following:
R Access to the battery is not possible on all vehicles. If you cannot access the battery of the
other vehicle, provide jump start power by an external battery or starter pack.
R Jump starting should only be performed when the engine and catalytic converter are cold.
R Do not jump start the engine or charge the battery if the battery is frozen. Let the battery
thaw out first.
R Only jump start from batteries with the same voltage rating (12 V). Jump starting with a
more powerful battery could damage the vehicle’s electrical system. Such damage will not
be covered by the Mercedes-Benz Limited Warranty.
R Only use jumper cables with sufficient cross-section and insulated terminal clamps.
R Always make sure the jumper cables are not on or near pulleys, fans or other parts that
move when an engine is started or running.
R Should the battery be drained completely, let the donating power source charge the vehicle
for several minutes before reattempting the starting process.
The battery is located in the engine compartment on the passenger side.
Jump starting413Practical hintsBA 197 USA, CA Edition A 2011; 1; 27, en-UShereepeVersion: 3.0.3.52010-03-24T15:31:10+01:00 - Seite 413Z
Page 416 of 436
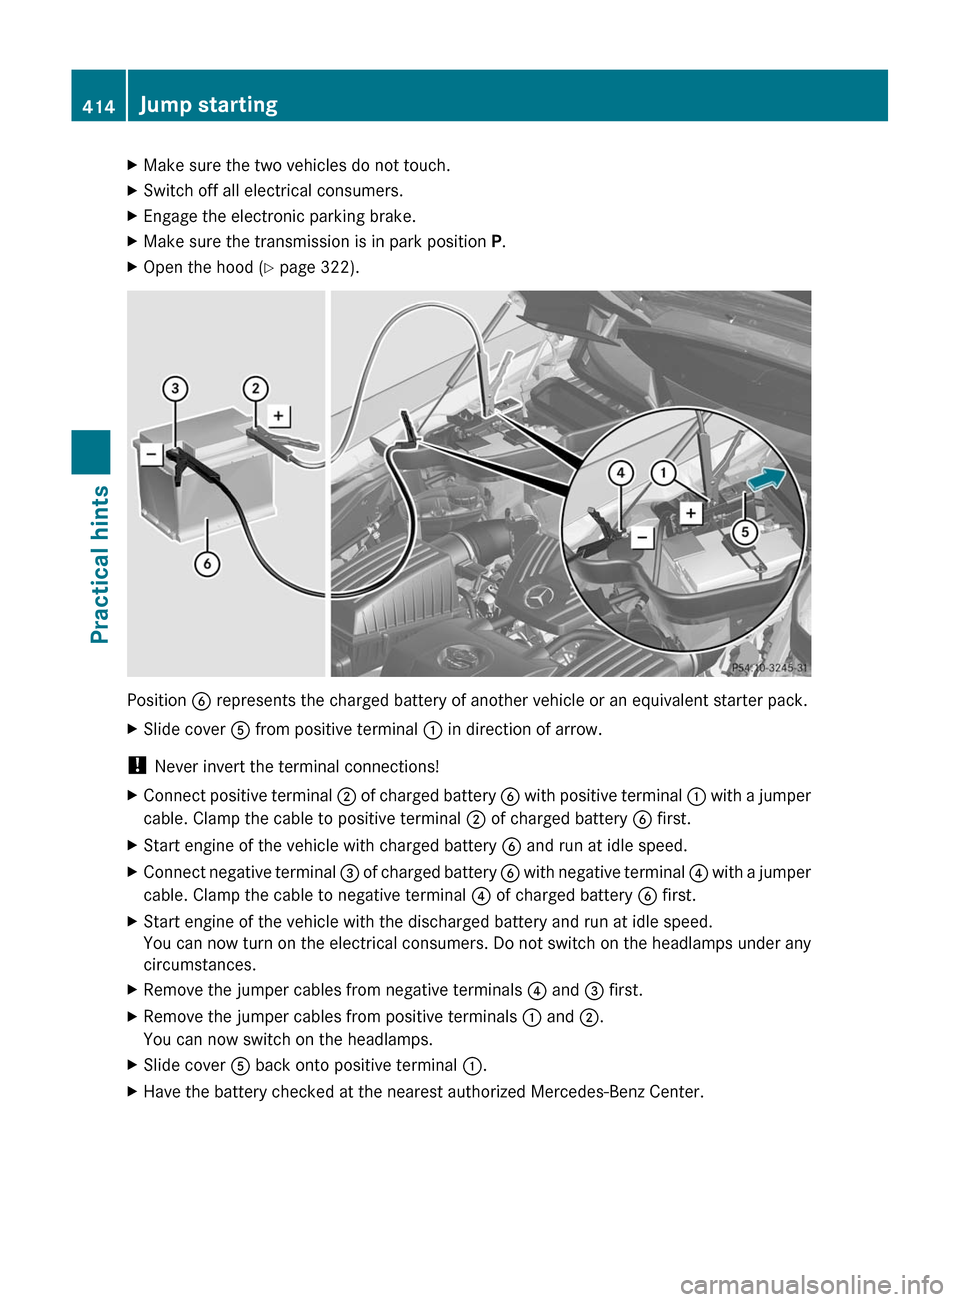
XMake sure the two vehicles do not touch.XSwitch off all electrical consumers.XEngage the electronic parking brake.XMake sure the transmission is in park position P.XOpen the hood (Y page 322).
Position B represents the charged battery of another vehicle or an equivalent starter pack.
XSlide cover A from positive terminal : in direction of arrow.
! Never invert the terminal connections!
XConnect positive terminal ; of charged battery B with positive terminal : with a jumper
cable. Clamp the cable to positive terminal ; of charged battery B first.
XStart engine of the vehicle with charged battery B and run at idle speed.XConnect negative terminal = of charged battery B with negative terminal ? with a jumper
cable. Clamp the cable to negative terminal ? of charged battery B first.
XStart engine of the vehicle with the discharged battery and run at idle speed.
You can now turn on the electrical consumers. Do not switch on the headlamps under any
circumstances.
XRemove the jumper cables from negative terminals ? and = first.XRemove the jumper cables from positive terminals : and ;.
You can now switch on the headlamps.
XSlide cover A back onto positive terminal :.XHave the battery checked at the nearest authorized Mercedes-Benz Center.414Jump startingPractical hints
BA 197 USA, CA Edition A 2011; 1; 27, en-UShereepeVersion: 3.0.3.52010-03-24T15:31:10+01:00 - Seite 414