2011 MERCEDES-BENZ SLS AMG ESP
[x] Cancel search: ESPPage 252 of 436
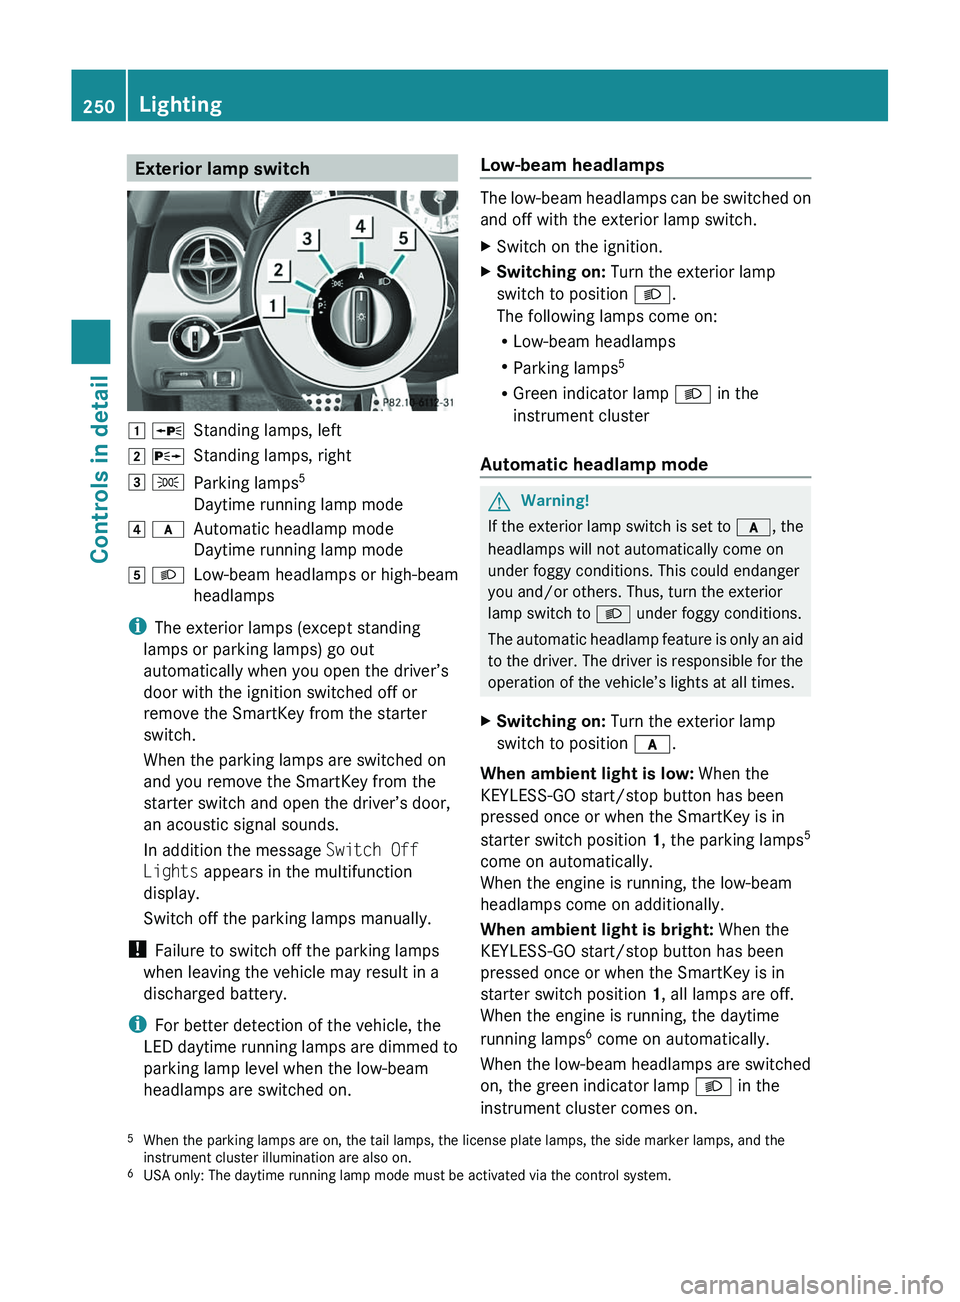
Exterior lamp switch004A 006FStanding lamps, left004B 0070Standing lamps, right004C 006CParking lamps 5
Daytime running lamp mode004D 0066Automatic headlamp mode
Daytime running lamp mode004E 0064Low-beam headlamps or high-beam
headlamps
i The exterior lamps (except standing
lamps or parking lamps) go out
automatically when you open the driver’s
door with the ignition switched off or
remove the SmartKey from the starter
switch.
When the parking lamps are switched on
and you remove the SmartKey from the
starter switch and open the driver’s door,
an acoustic signal sounds.
In addition the message Switch Off
Lights appears in the multifunction
display.
Switch off the parking lamps manually.
! Failure to switch off the parking lamps
when leaving the vehicle may result in a
discharged battery.
i For better detection of the vehicle, the
LED daytime running lamps are dimmed to
parking lamp level when the low-beam
headlamps are switched on.
Low-beam headlamps
The low-beam headlamps can be switched on
and off with the exterior lamp switch.
XSwitch on the ignition.XSwitching on: Turn the exterior lamp
switch to position 0064.
The following lamps come on:
R Low-beam headlamps
R Parking lamps 5
R Green indicator lamp 0064 in the
instrument cluster
Automatic headlamp mode
GWarning!
If the exterior lamp switch is set to 0066, the
headlamps will not automatically come on
under foggy conditions. This could endanger
you and/or others. Thus, turn the exterior
lamp switch to 0064 under foggy conditions.
The automatic headlamp feature is only an aid
to the driver. The driver is responsible for the
operation of the vehicle’s lights at all times.
XSwitching on: Turn the exterior lamp
switch to position 0066.
When ambient light is low: When the
KEYLESS-GO start/stop button has been
pressed once or when the SmartKey is in
starter switch position 1, the parking lamps 5
come on automatically.
When the engine is running, the low-beam
headlamps come on additionally.
When ambient light is bright: When the
KEYLESS-GO start/stop button has been
pressed once or when the SmartKey is in
starter switch position 1, all lamps are off.
When the engine is running, the daytime
running lamps 6
come on automatically.
When the low-beam headlamps are switched
on, the green indicator lamp 0064 in the
instrument cluster comes on.
5 When the parking lamps are on, the tail lamps, the license plate lamps, the side marker lamps, and the
instrument cluster illumination are also on.
6 USA only: The daytime running lamp mode must be activated via the control system.250LightingControls in detail
BA 197 USA, CA Edition A 2011; 1; 27, en-UShereepeVersion: 3.0.3.52010-03-24T15:31:10+01:00 - Seite 250
Page 253 of 436
Once the low-beam headlamps are on, the
high-beam headlamps are also available.
Daytime running lamp mode
In Canada, the daytime running lamp mode is
mandatory and therefore in a constant mode.
In the USA, the daytime running lamp mode
is activated by default.
XMake sure the daytime running lamp mode
is activated in the control system, see
“Switching daytime running lamp mode on
or off (USA only)” ( Y page 284).XTurn the exterior lamp switch to position
0066 .
When the engine is running and the
ambient light is bright, the daytime running
lamps come on.
In low ambient lighting conditions, the
following lamps will come on additionally:
R Low-beam headlamps
R Parking lamps 5
R green indicator lamp 0064 in the
instrument cluster
You can only switch on the high-beam
headlamps when the low-beam headlamps
are on.
The high-beam flasher is available at all times.
Canada only
When the engine is running, and you
R shift from a driving position to park
position P with the vehicle at a standstill,
the daytime running lamps or the low-beam
headlamps will go out with a delay of
3 minutes
R turn the exterior lamp switch to position
006C , the daytime running lamps and the
parking lamps 5
come on in bright ambient
lighting conditions.
R turn the exterior lamp switch to position
0064 , the manual headlamp mode has
priority over the daytime running lamp
mode
The corresponding exterior lamps come on
( Y page 250).
USA only
When the engine is running, and you turn the
exterior lamp switch to position 006C or
0064 , the manual headlamp mode has
priority over the daytime running lamp mode.
The corresponding exterior lamps come on
( Y page 250).
Locator lighting
The locator lighting is described in the
“Control system” section, see “Switching
locator lighting on or off” ( Y page 285).
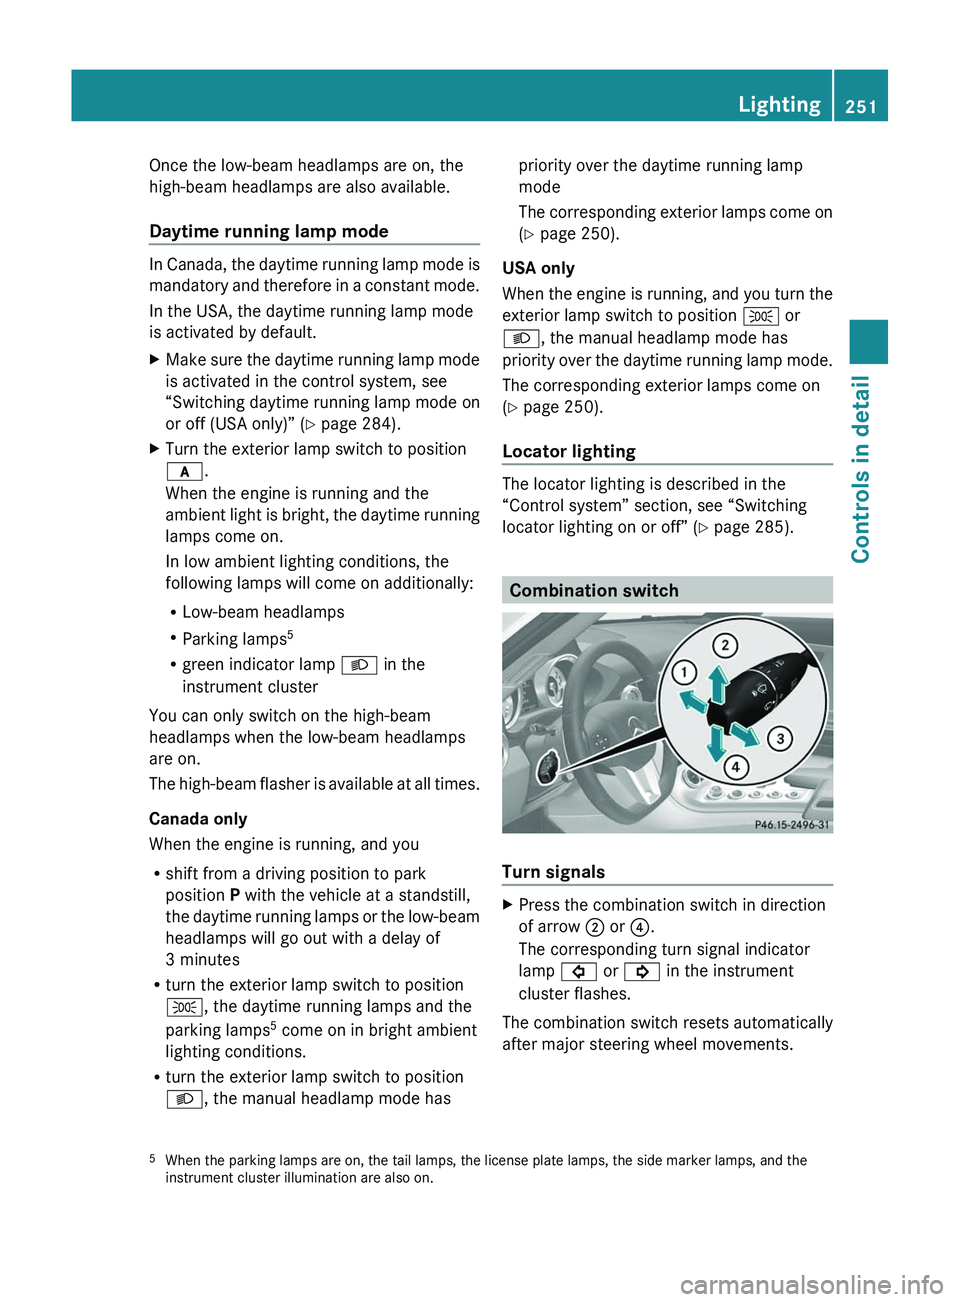
Combination switch
Turn signals
XPress the combination switch in direction
of arrow 0047 or 0088.
The corresponding turn signal indicator
lamp 0026 or 0024 in the instrument
cluster flashes.
The combination switch resets automatically
after major steering wheel movements.
5 When the parking lamps are on, the tail lamps, the license plate lamps, the side marker lamps, and the
instrument cluster illumination are also on.Lighting251Controls in detailBA 197 USA, CA Edition A 2011; 1; 27, en-UShereepeVersion: 3.0.3.52010-03-24T15:31:10+01:00 - Seite 251Z
Page 257 of 436
For information on filling up the washer
reservoir, see “Washer system and headlamp
cleaning system” ( Y page 325).
For information on cleaning the headlamps
with washer fluid, see “Headlamp cleaning
system” ( Y page 252).
Problems with wipers
! If anything blocks the windshield wipers
(leaves, snow, etc.), switch them off
immediately.
For safety reasons, do the following before
attempting to remove any blockage:
R Stop the vehicle in a safe location.
R Turn off the engine by pressing the
KEYLESS-GO start/stop button and
open the driver’s door (with the driver’s
door open, starter switch is in position
0 , same as with SmartKey removed from
starter switch).
or
R Remove the SmartKey from the starter
switch.
R Engage the electronic parking brake.
R Remove blockage.
R Turn the windshield wipers on again.
If the windshield wipers fail to function at
all with the combination switch in position
0062 or 0063 ,
R set the combination switch to the next
higher wiper speed
R have the windshield wipers checked at
the nearest authorized Mercedes-Benz
Center
Power windows
Opening and closing
The door windows are opened and closed
electrically. The switches for all windows are
located on the driver’s door. The switch for
operating the passenger-side windows is
located on the passenger door.GObserve Safety notes, see page 57.GWarning!
When opening or closing the door windows,
make sure there is no danger of anyone being
harmed by the opening/closing procedure.
The door windows are equipped with the
express operation and automatic reversal
function. If in express operation mode a door
window encounters an obstruction that
blocks its path, the automatic reversal
function will stop the door window and open
it slightly.
The door windows operate differently when
the switch is pulled and held. See the “Closing
when a door window is blocked” section in
this chapter for details.
The closing of the door windows can be
immediately halted by releasing the switch or,
if the switch was pulled past the resistance
point and released, by either pressing or
pulling the respective switch.
If a door window encounters an obstruction
that blocks its path in a circumstance where
you are closing the door windows by pressing
and holding button 0037 on the SmartKey the
automatic reversal function will not operate.
i You can also open or close the door
windows using the SmartKey, see
“Summer opening feature” ( Y page 256)
and “Convenience closing feature”
( Y page 257).
i After switching off the ignition or
removing the SmartKey from the starter
switch, you can operate the door windows
until you open a door. If no door was
opened you can operate the door windows
for up to 5 minutes.
Power windows255Controls in detailBA 197 USA, CA Edition A 2011; 1; 27, en-UShereepeVersion: 3.0.3.52010-03-24T15:31:10+01:00 - Seite 255Z
Page 258 of 436
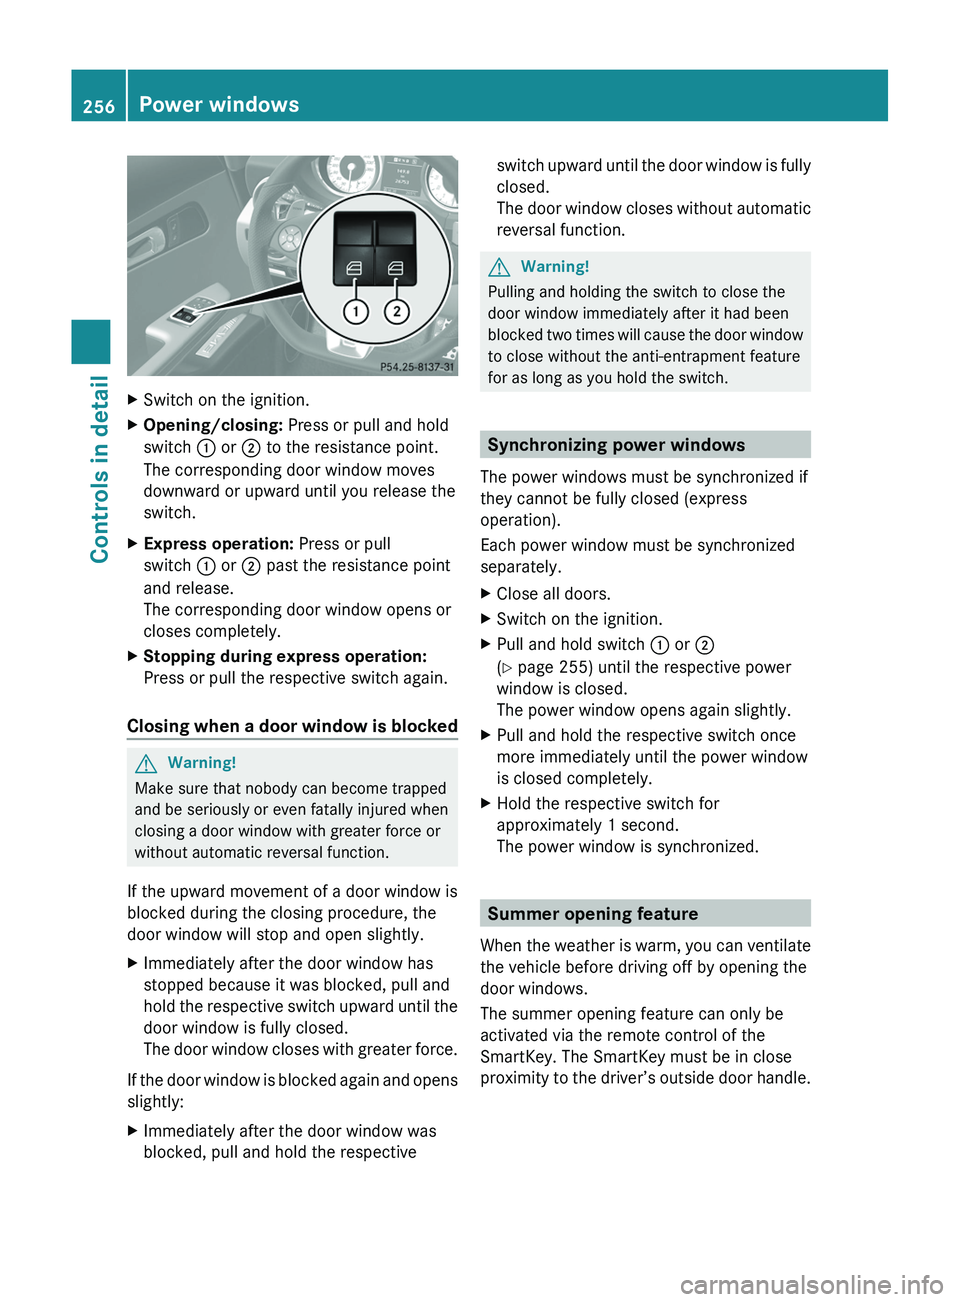
XSwitch on the ignition.XOpening/closing: Press or pull and hold
switch \000F or \000G to the resistance point.
The corresponding door window moves
downward or upward until you release the
switch.
XExpress operation: Press or pull
switch \000F or \000G past the resistance point
and release.
The corresponding door window opens or
closes completely.
XStopping during express operation:
Press or pull the respective switch again.
Closing when a door window is blocked
GWarning!
Make sure that nobody can become trapped
and be seriously or even fatally injured when
closing a door window with greater force or
without automatic reversal function.
If the upward movement of a door window is
blocked during the closing procedure, the
door window will stop and open slightly.
XImmediately after the door window has
stopped because it was blocked, pull and
hold the respective switch upward until the
door window is fully closed.
The door window closes with greater force.
If the door window is blocked again and opens
slightly:
XImmediately after the door window was
blocked, pull and hold the respective
switch upward until the door window is fully
closed.
The door window closes without automatic
reversal function.
GWarning!
Pulling and holding the switch to close the
door window immediately after it had been
blocked two times will cause the door window
to close without the anti-entrapment feature
for as long as you hold the switch.
Synchronizing power windows
The power windows must be synchronized if
they cannot be fully closed (express
operation).
Each power window must be synchronized
separately.
XClose all doors.XSwitch on the ignition.XPull and hold switch \000F or \000G
(Y page 255) until the respective power
window is closed.
The power window opens again slightly.
XPull and hold the respective switch once
more immediately until the power window
is closed completely.
XHold the respective switch for
approximately 1 second.
The power window is synchronized.
Summer opening feature
When the weather is warm, you can ventilate
the vehicle before driving off by opening the
door windows.
The summer opening feature can only be
activated via the remote control of the
SmartKey. The SmartKey must be in close
proximity to the driver’s outside door handle.
256Power windowsControls in detail
BA 197 USA, CA Edition A 2011; 1; 27, en-UShereepeVersion: 3.0.3.52010-03-24T15:31:10+01:00 - Seite 256
Page 261 of 436
The engine does not start. You can hear
the starter.
There could be a malfunction in the engine
electronics or in the fuel supply system.
Carry out the following steps:XIf you are starting the engine with the
SmartKey: Turn the SmartKey in the starter
switch to position 0 and repeat the starting
procedure.XIf you are starting the engine with KEYLESS-
GO: Close any doors that may be open to
allow for better detection of the SmartKey.
or
XStart the engine with the SmartKey as radio
signals from another source may be
interfering with the KEYLESS-GO function.XRepeat the starting procedure.
If the engine does not start after several
starting attempts:
XContact an authorized Mercedes-Benz
Center or call Roadside Assistance.
The engine does not start. You cannot
hear the starter.
The battery may not be charged sufficiently.
XGet a jump start ( Y page 413).
If the engine will not start despite a jump
start:
XContact an authorized Mercedes-Benz
Center or call Roadside Assistance.
The starter has been exposed to excessive
temperatures.
XLet the starter cool for about 2 minutes.XRepeat the starting procedure.
If the engine does not start after several
starting attempts:
XContact an authorized Mercedes-Benz
Center or call Roadside Assistance.Driving offGWarning!
On slippery road surfaces, never downshift in
order to obtain braking action. This could
result in drive wheel slip and reduced vehicle
control. Your vehicle’s ABS will not prevent
this type of loss of control.
! Do not run a cold engine at high engine
speeds. Running a cold engine at high
engine speeds may shorten the service life
of the engine. This is not covered by the
Mercedes-Benz Limited Warranty.
Drive off immediately after starting the
engine to warm up the engine efficiently.
The engine must be at operating
temperature before using full engine
power. The engine has reached operating
temperature once the engine oil
temperature indicator in the AMG menu of
the control system has stopped flashing.
At engine temperatures below 32‡ (0†),
the engine’s maximum speed is restricted
in order to protect it from damage. Avoid
driving your vehicle at full speed when the
engine is cold to prevent premature engine
wear and/or diminished comfort.
! You have forgotten to release the
electronic parking brake when driving off if
R an acoustic warning sounds
R the message Release Parking Brake
appears in the multifunction display
R the red indicator lamp for the electronic
parking brake 0049 (USA only) or 0024
(Canada only) in the instrument cluster
flashes
Release the electronic parking brake.
! Avoid spinning of a drive wheel. This may
cause serious damage to the drivetrain
which is not covered by the Mercedes-Benz
Limited Warranty.
! Simultaneously depressing the
accelerator pedal and applying the brakes
reduces engine performance and causes
Driving and parking259Controls in detailBA 197 USA, CA Edition A 2011; 1; 27, en-UShereepeVersion: 3.0.3.52010-03-24T15:31:10+01:00 - Seite 259Z
Page 270 of 436
iYou cannot shift with the steering wheel
gearshift control when the transmission is
in park position P, neutral position N, or
reverse gear R.
Limiting gear range GWarning!
On slippery road surfaces, never downshift in
order to obtain braking action. This could
result in drive wheel slip and reduced vehicle
control. Your vehicle’s ABS will not prevent
this type of loss of control.
XBriefly pull left gearshift control 0046.
or
XMove the gear selector lever forward briefly
( Y page 263).
The transmission will shift into the next
lower gear as permitted by the shift
program. This action simultaneously limits
the gear range of the transmission.
i To avoid overrevving the engine when
downshifting, the transmission will not shift
into a lower gear if the engine’s maximum
speed would be exceeded.
Extending gear range
XBriefly pull right gearshift control 0047.
or
XMove the gear selector lever back briefly
( Y page 263).
The transmission will shift into the next
higher gear as permitted by the shift
program. This action simultaneously
extends the gear range of the transmission.
i If you press on the accelerator pedal
when the engine has reached the
revolution limit of the current gear range,
the transmission will upshift beyond any
gear range limit selected.
Canceling gear range limitXPull and hold right gearshift control 0047 until
the gear range indicator disappears from
the multifunction display.
or
XMove the gear selector lever back and hold
it there until the numeral for the current
gear disappears from the multifunction
display.
The transmission will shift from the current
gear range directly into drive position D.
Shifting into optimal gear range
XPull and hold left gearshift control 0046.
or
XMove the gear selector lever forward and
hold it there.
The transmission will select the gear range
suited for optimal acceleration and
deceleration automatically. This will involve
shifting down one or more gears.
Manual shift program
Manual program mode M differs with regard
to spontaneity, response time, and shifting
smoothness from automatic program modes
S or S+.
In manual program mode M, system-
controlled automatic gearshifting is switched
off. You need to change the gears by manually
upshifting or downshifting using the gear
selector lever or the steering wheel gearshift
control.
268AMG SPEEDSHIFT DCT 7-SPEED TransmissionControls in detail
BA 197 USA, CA Edition A 2011; 1; 27, en-UShereepeVersion: 3.0.3.52010-03-24T15:31:10+01:00 - Seite 268
Page 273 of 436
Instrument cluster
Introduction
For a full view illustration of the instrument
cluster, see “Instrument cluster”
( Y page 34).
GWarning!
No messages will be displayed if either the
instrument cluster or the multifunction
display is inoperative.
As a result, you will not be able to see
information about your driving conditions,
such as
R speed
R outside temperature
R warning/indicator lamps
R malfunction/warning messages
R failure of any systems
Driving characteristics may be impaired.
If you must continue to drive, do so with added
caution. Contact an authorized Mercedes-
Benz Center as soon as possible.
The language setting for the multifunction
display can be changed via COMAND system
( Y page 99).
Activating the instrument cluster
The instrument cluster is activated when you
R open the driver’s door
R switch on the ignition
R switch on the exterior lamps
Engine oil temperature gauge
The engine oil temperature gauge is located
in the instrument cluster. The engine oil
temperature may rise up to 140† under
normal driving conditions.
! The engine should not be operated with
the engine oil temperature above 140†.
Doing so may cause serious damage which
is not covered by the Mercedes-Benz
Limited Warranty.
The temperature of the transmission fluid and
coolant are displayed in the AMG menu
( Y page 287).
Tachometer
The red marking on the tachometer
( Y page 34) denotes excessive engine speed.
! Avoid driving at excessive engine speeds,
as it may result in serious engine damage
that is not covered by the Mercedes-Benz
Limited Warranty.
To help protect the engine, the fuel supply is
interrupted if the engine is operated within
the red marking.
Outside temperature indicator
The outside temperature indicator is
displayed in the multifunction display
( Y page 273).
GWarning!
The outside temperature indicator is not
designed to serve as an ice-warning device
and is therefore unsuitable for that purpose.
Indicated temperatures just above the
freezing point do not guarantee that the road
surface is free of ice. The road may still be icy,
especially in wooded areas or on bridges.
Fuel gauge
The fuel gauge is on the left-hand side of the
instrument cluster (Y page 34). Once the fuel
level has fallen below the reserve mark, the
yellow fuel tank reserve warning lamp 00B8
for the fuel reserve comes on.
Instrument cluster271Controls in detailBA 197 USA, CA Edition A 2011; 1; 27, en-UShereepeVersion: 3.0.3.52010-03-24T15:31:10+01:00 - Seite 271Z
Page 274 of 436
Control system
Introduction
The control system is activated as soon as the
starter switch is in position 2.
The control system enables you to call up
information about your vehicle and to change
vehicle settings.
For example, you can use the control system
to find out when your vehicle is next due for
maintenance service, to call up statistical
data on your vehicle, and much more.
GWarning!
A driver’s attention to the road and traffic
conditions must always be his/her primary
focus when driving.
For your safety and the safety of others,
selecting features through the multifunction
steering wheel should only be done by the
driver when traffic and road conditions permit
it to be done safely.
Bear in mind that at a speed of just 30 mph
(approximately 50 km/h), your vehicle is
covering a distance of 44 feet (approximately
14 m) every second.
The control system relays information to the
multifunction display.
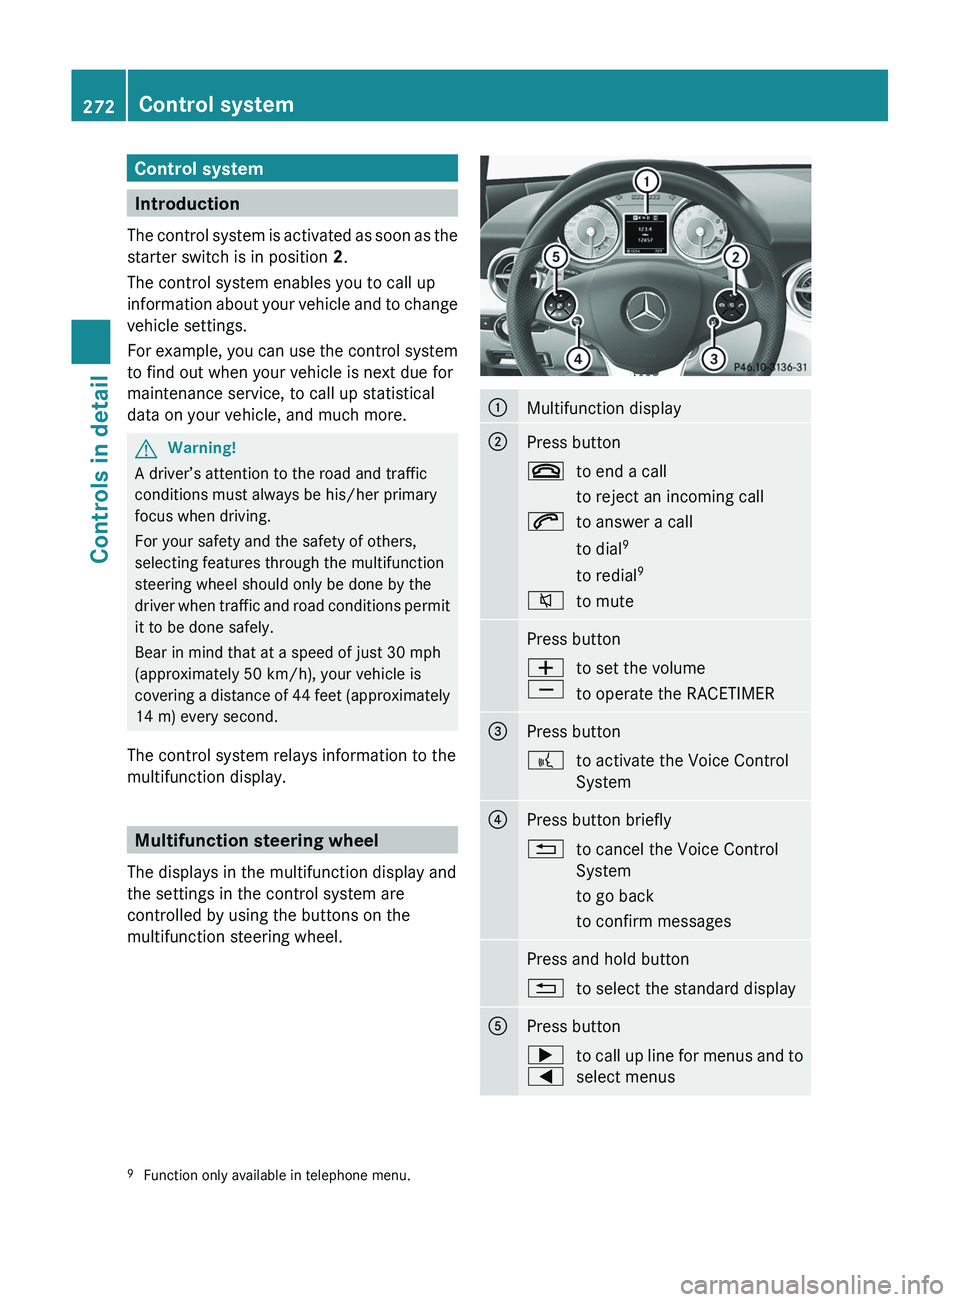
Multifunction steering wheel
The displays in the multifunction display and
the settings in the control system are
controlled by using the buttons on the
multifunction steering wheel.
0046Multifunction display0047Press button007Fto end a call
to reject an incoming call006Ato answer a call
to dial 9
to redial 9006Cto mutePress button005A
005Bto set the volume
to operate the RACETIMER008APress button0062to activate the Voice Control
System0088Press button briefly0041to cancel the Voice Control
System
to go back
to confirm messagesPress and hold button0041to select the standard display0086Press button003E
0040to call up line for menus and to
select menus9 Function only available in telephone menu.272Control systemControls in detail
BA 197 USA, CA Edition A 2011; 1; 27, en-UShereepeVersion: 3.0.3.52010-03-24T15:31:10+01:00 - Seite 272