2011 MERCEDES-BENZ SLS AMG ESP
[x] Cancel search: ESPPage 135 of 436
regulations during your journey. Road and
traffic rules and regulations always have
priority over the navigation commands
generated by the system.
COMAND guides you to the destination by
means of driving recommendations in the
form of navigation announcements or route
guidance displays.
iThe route guidance displays only appear
if the display has been switched to
navigation mode.
If, for some reason, you do not follow the
navigation announcements or if you leave the
calculated route, COMAND automatically
calculates a new route to the destination.
If the map data contains corresponding
information during route guidance, COMAND
tries to avoid roads with limited passability,
e.g. roads that are blocked for through-traffic
and are for residents only.
Driving Maneuver
Driving maneuvers are given in three phases:
RPreparation phase
RAnnouncement phase
RManeuver phase
Preparation Phase
COMAND prepares you for the next driving
maneuver. Based on the example display
shown below, the announcement is made
using Prepare to turn right. The display
is not split and displays the map over the
entire width.
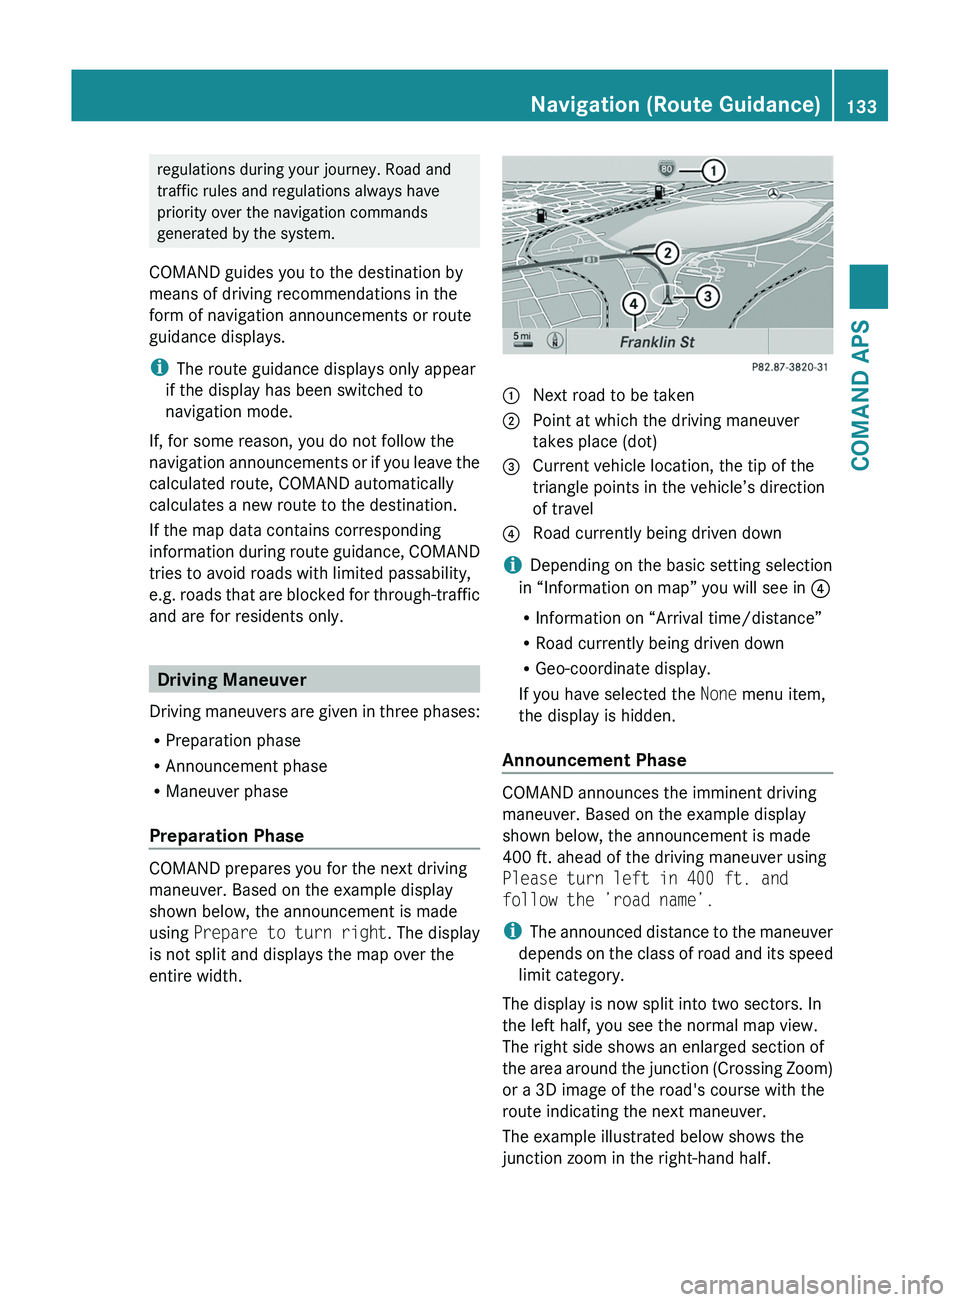
1 Next road to be taken2 Point at which the driving maneuver
takes place (dot)
3 Current vehicle location, the tip of the
triangle points in the vehicle’s direction
of travel
4 Road currently being driven down
iDepending on the basic setting selection
in “Information on map” you will see in 4
RInformation on “Arrival time/distance”
RRoad currently being driven down
RGeo-coordinate display.
If you have selected the None menu item,
the display is hidden.
Announcement Phase
COMAND announces the imminent driving
maneuver. Based on the example display
shown below, the announcement is made
400 ft. ahead of the driving maneuver using
Please turn left in 400 ft. and
follow the ’road name’.
iThe announced distance to the maneuver
depends on the class of road and its speed
limit category.
The display is now split into two sectors. In
the left half, you see the normal map view.
The right side shows an enlarged section of
the area around the junction (Crossing Zoom)
or a 3D image of the road's course with the
route indicating the next maneuver.
The example illustrated below shows the
junction zoom in the right-hand half.
Navigation (Route Guidance)133COMAND APSBA 197 USA, CA Edition A 2011; 1; 27, en-UShereepeVersion: 3.0.3.52010-03-24T15:31:10+01:00 - Seite 133Z
Page 137 of 436
Traffic Lane Recommendations
On multi-lane roads, COMAND may display
traffic lane recommendations. For this there
must be corresponding data available on the
digital map.
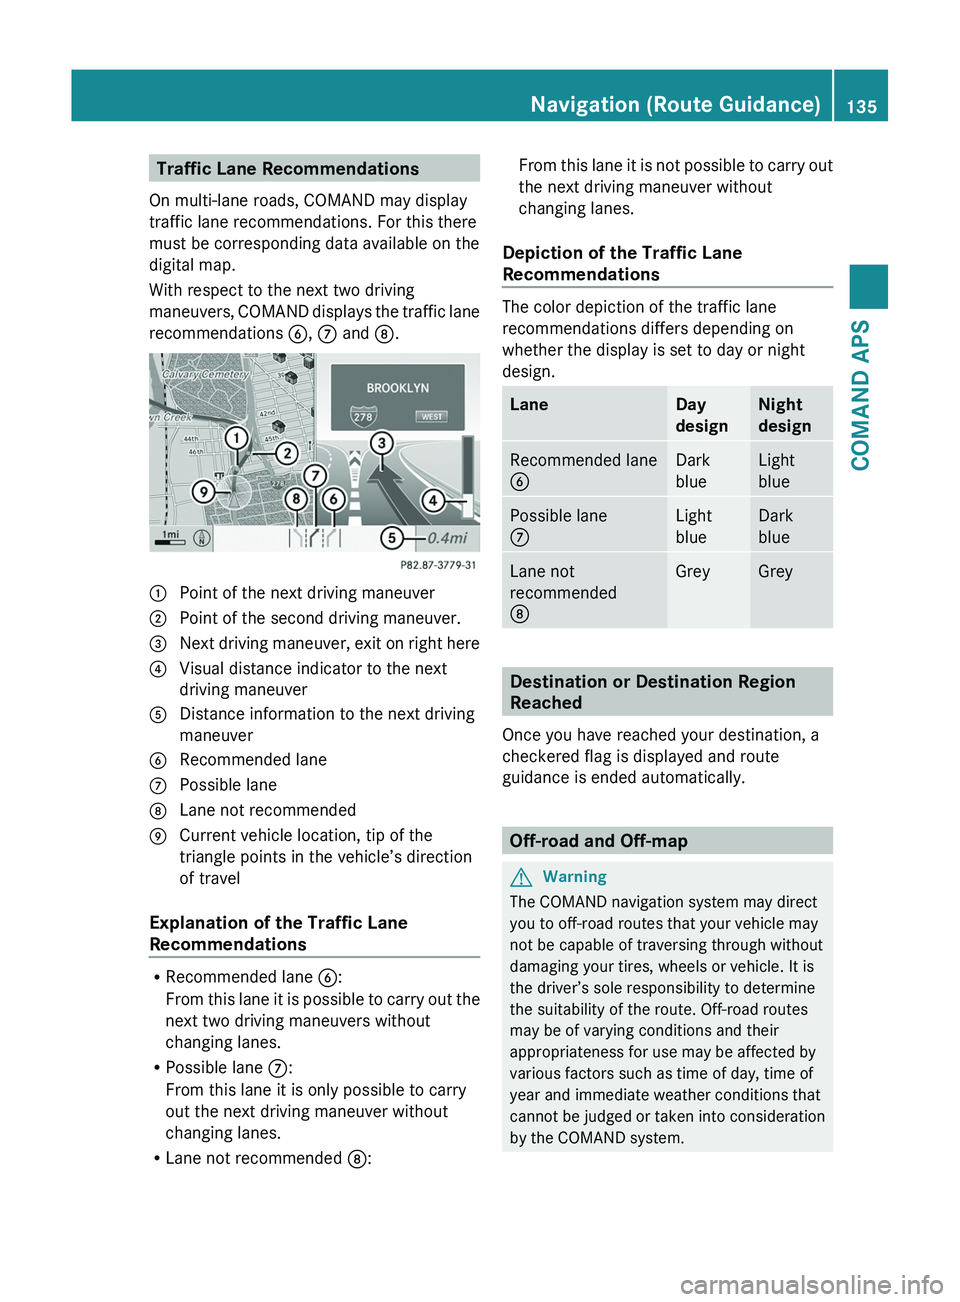
With respect to the next two driving
maneuvers, COMAND displays the traffic lane
recommendations 6, 7 and 8.
1 Point of the next driving maneuver2 Point of the second driving maneuver.3 Next driving maneuver, exit on right here4 Visual distance indicator to the next
driving maneuver
5 Distance information to the next driving
maneuver
6 Recommended lane7 Possible lane8 Lane not recommended9 Current vehicle location, tip of the
triangle points in the vehicle’s direction
of travel
Explanation of the Traffic Lane
Recommendations
RRecommended lane 6:
From this lane it is possible to carry out the
next two driving maneuvers without
changing lanes.
RPossible lane 7:
From this lane it is only possible to carry
out the next driving maneuver without
changing lanes.
RLane not recommended 8:
From this lane it is not possible to carry out
the next driving maneuver without
changing lanes.
Depiction of the Traffic Lane
Recommendations
The color depiction of the traffic lane
recommendations differs depending on
whether the display is set to day or night
design.
LaneDay
design
Night
design
Recommended lane
6
Dark
blue
Light
blue
Possible lane
7
Light
blue
Dark
blue
Lane not
recommended
8
GreyGrey
Destination or Destination Region
Reached
Once you have reached your destination, a
checkered flag is displayed and route
guidance is ended automatically.
Off-road and Off-map
GWarning
The COMAND navigation system may direct
you to off-road routes that your vehicle may
not be capable of traversing through without
damaging your tires, wheels or vehicle. It is
the driver’s sole responsibility to determine
the suitability of the route. Off-road routes
may be of varying conditions and their
appropriateness for use may be affected by
various factors such as time of day, time of
year and immediate weather conditions that
cannot be judged or taken into consideration
by the COMAND system.
Navigation (Route Guidance)135COMAND APSBA 197 USA, CA Edition A 2011; 1; 27, en-UShereepeVersion: 3.0.3.52010-03-24T15:31:10+01:00 - Seite 135Z
Page 149 of 436
Destination from the Destination Memory”
section ( Y page 122).XSelect Options £ Delete .
A prompt appears asking whether you wish
to delete the destination.XSelect Yes or No.
If you select Yes, COMAND deletes the
destination. You see a corresponding
message.
i If the address data, which supports
navigation, for the destination to be deleted
has also been assigned to an address book
entry, COMAND deletes this data there,
too. If the corresponding address book
entry does not contain any other data, e.g.
phone numbers, COMAND deletes the
entire address book entry.
Navigation (Last Destinations)
i COMAND automatically saves the last
destinations used for the last route
calculation. If the memory is full, COMAND
deletes the oldest destination. You can also
save a destination from the last
destinations to the destination memory.
Here it is saved permanently.
Saving a Destination Permanently in
the Destination Memory
XProceed as described in the “Entering
Destination from the Last Destinations”
section ( Y page 123).
Saving the Vehicle Position in the List
of Last Destinations
XIf necessary, switch to navigation mode
and display the menu system
( Y page 105).XSelect Position £ Save Vehicle
Position .
COMAND saves the current vehicle
position as a destination in the list of last
destinations.
Saving the Crosshair Position in the
List of Last Destinations
i A crosshair appears on the map if you
have moved the map manually. You can
store the crosshair position as a
destination in the list of last destinations.
XIf necessary, display the menu system:
Press n.XSelect Position £ Save Crosshair
Position .
COMAND saves the crosshair position as a
destination in the list of last destinations.
Deleting One of the Last Destinations
XIf necessary, switch to navigation mode
and display the menu system
( Y page 105).XSelect Destination £ From Last
Destinations .
The list of last destinations appears.XSelect the desired destination.XSelect Options £ Delete .
A query appears.XSelect Yes or No.
If you select Yes, COMAND deletes the
destination. You see a corresponding
message.
Telephone
Safety Precautions
GWarning
A driver's attention to the road must always
be his/her primary focus when driving. For
Telephone147COMAND APSBA 197 USA, CA Edition A 2011; 1; 27, en-UShereepeVersion: 3.0.3.52010-03-24T15:31:10+01:00 - Seite 147Z
Page 156 of 436
Initiating Call to an EntryXSelect entry (Y page 153).XPress n
or
XPress the \000j button on the COMAND
control unit.
Creating a New Entry
iWhen a new entry is added through the
COMAND phone book, it is saved to the
address book.
XSelect Options £ New Entry in the
COMAND phone book.
XSelect a number category, e.g. Home.XSelect a telephone category, e.g. Mobile
Phone.
XSelect Save.
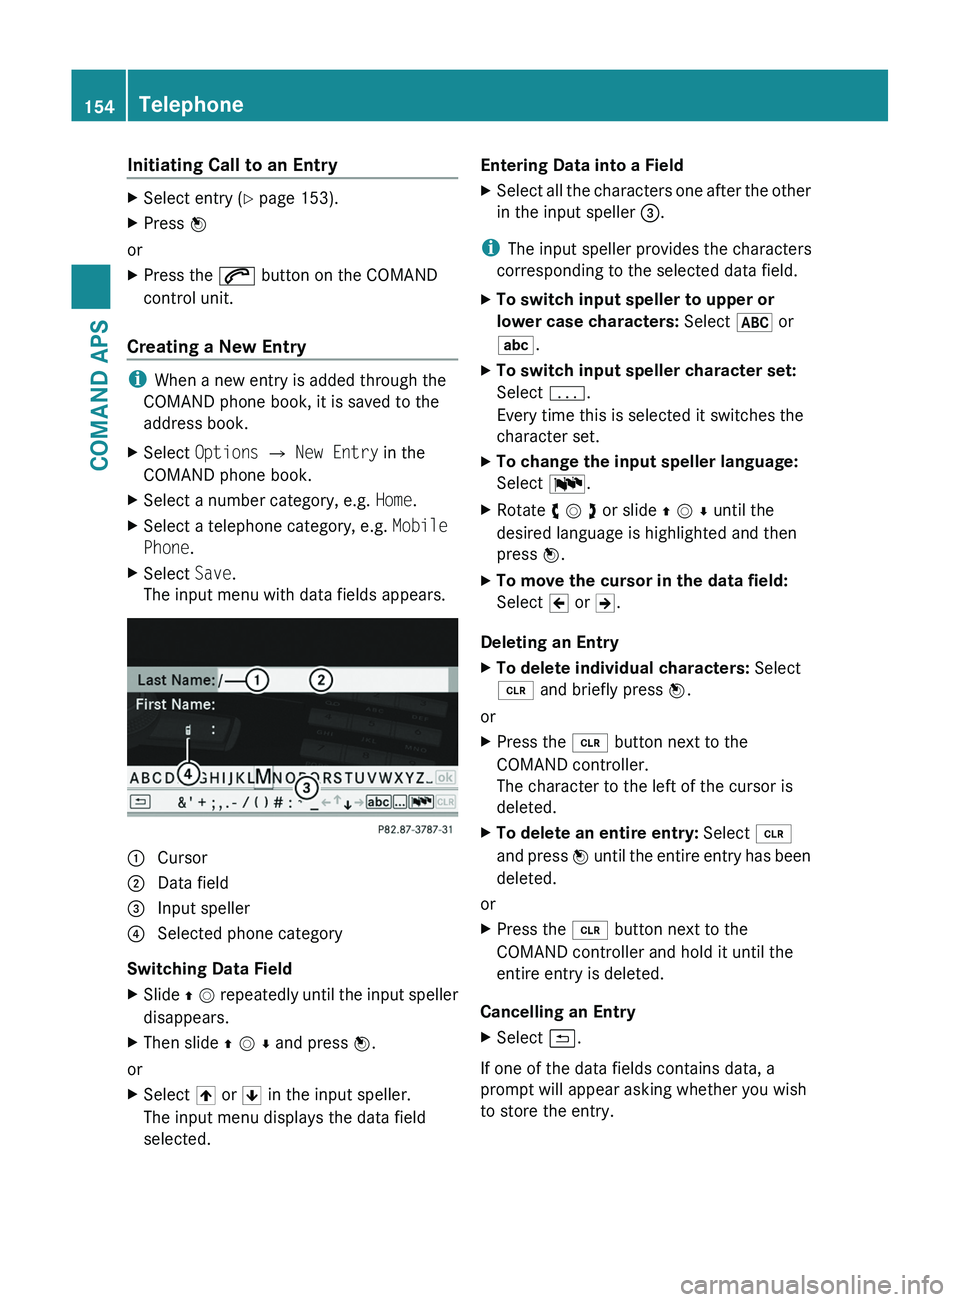
The input menu with data fields appears.1 Cursor2 Data field3 Input speller4 Selected phone category
Switching Data Field
XSlide q m repeatedly until the input speller
disappears.
XThen slide q m r and press n.
or
XSelect [ or ] in the input speller.
The input menu displays the data field
selected.
Entering Data into a FieldXSelect all the characters one after the other
in the input speller 3.
iThe input speller provides the characters
corresponding to the selected data field.
XTo switch input speller to upper or
lower case characters: Select & or
(.
XTo switch input speller character set:
Select k.
Every time this is selected it switches the
character set.
XTo change the input speller language:
Select !.
XRotate y m z or slide q m r until the
desired language is highlighted and then
press n.
XTo move the cursor in the data field:
Select Y or Z.
Deleting an Entry
XTo delete individual characters: Select
õ and briefly press n.
or
XPress the \000
Page 157 of 436
XSelect Yes or No.
The entry will either be stored or not,
depending on your selection.
Saving an Entry
XSelect d.
A corresponding message is displayed.
Deleting an Entry
The deletion rules vary according to the entry
selected:
R Phone book entry selected:
The entry is deleted in the COMAND phone
book and the address book if the address
book entry only contains phone numbers.
R Entire address book entry selected:
The entry is deleted in the COMAND phone
book and additionally also in the address
book if the address book entry only
contains phone numbers.
R Subentry of an address book entry
selected:
The subentry is deleted in the COMAND
phone book and in the address book.
XTo delete: Select entry ( Y page 153).XSelect Options £ Delete .
You will be prompted to confirm that you
really want to delete the entry.XSelect Yes or No.
Yes option: The entry is deleted according
to the above rules.
Adding a Phone Number to a Phone
Book Entry
XSelect the address book entry.XSelect Options £ Add Phone No. .XSelect a number category, e.g. Home.XSelect a phone category, e.g. Mobile
Phone .XSelect Save.
If five numbers are saved for the entry in the
selected number category, a prompt will
appear asking whether you wish to overwrite
one of the existing numbers.XSelect Yes or No.
If you select Yes, a selection list will appear
containing the five existing numbers.XSelect the number to be overwritten.
The input menu with the data field for
entering the new telephone number
appears.XTo enter digits: Select the required digits
in sequence from the input speller or use
the number keypad.XTo move the cursor in the data field:
Select Y or Z.XTo delete individual digits: Select õ
and briefly press the n button.
or
XPress the 0084 button next to the
COMAND controller.
The digit to the left of the cursor is deleted.XTo delete an entire entry: Select õ
and press n until the entire entry has been
deleted.
or
XPress and hold down the 0084 button next
to the COMAND controller until the entire
entry is deleted.XTo save entry: Select d.
Call Lists
i COMAND supports Bluetooth ®
PBAP
(Phone Book Access Profile).
How COMAND handles call lists depends
on the type of mobile phone connected:
R Bluetooth ®
phone with PBAP support:
COMAND downloads the call lists from
the mobile phone when the phone is
connected to COMAND
R Bluetooth ®
phone without PBAP support:
COMAND creates the call lists from calls
received (including missed calls) and
Telephone155COMAND APSBA 197 USA, CA Edition A 2011; 1; 27, en-UShereepeVersion: 3.0.3.52010-03-24T15:31:10+01:00 - Seite 155Z
Page 159 of 436
Saving in the Address Book as a New EntryXSelect the list entry.XSelect Options £ Save £ New Entry.
i Save has no function if the selected list
entry is already stored in the address book.
XSelect a number category, e.g. Home.XSelect a telephone category, e.g. Mobile
Phone.
Number categoryDisplay (phone
and address book)
Not classified°Home@Work\Phone categoryDisplay (phone
and address book)
Not classified°Mobile¢Car^PagerïXSelect Save.
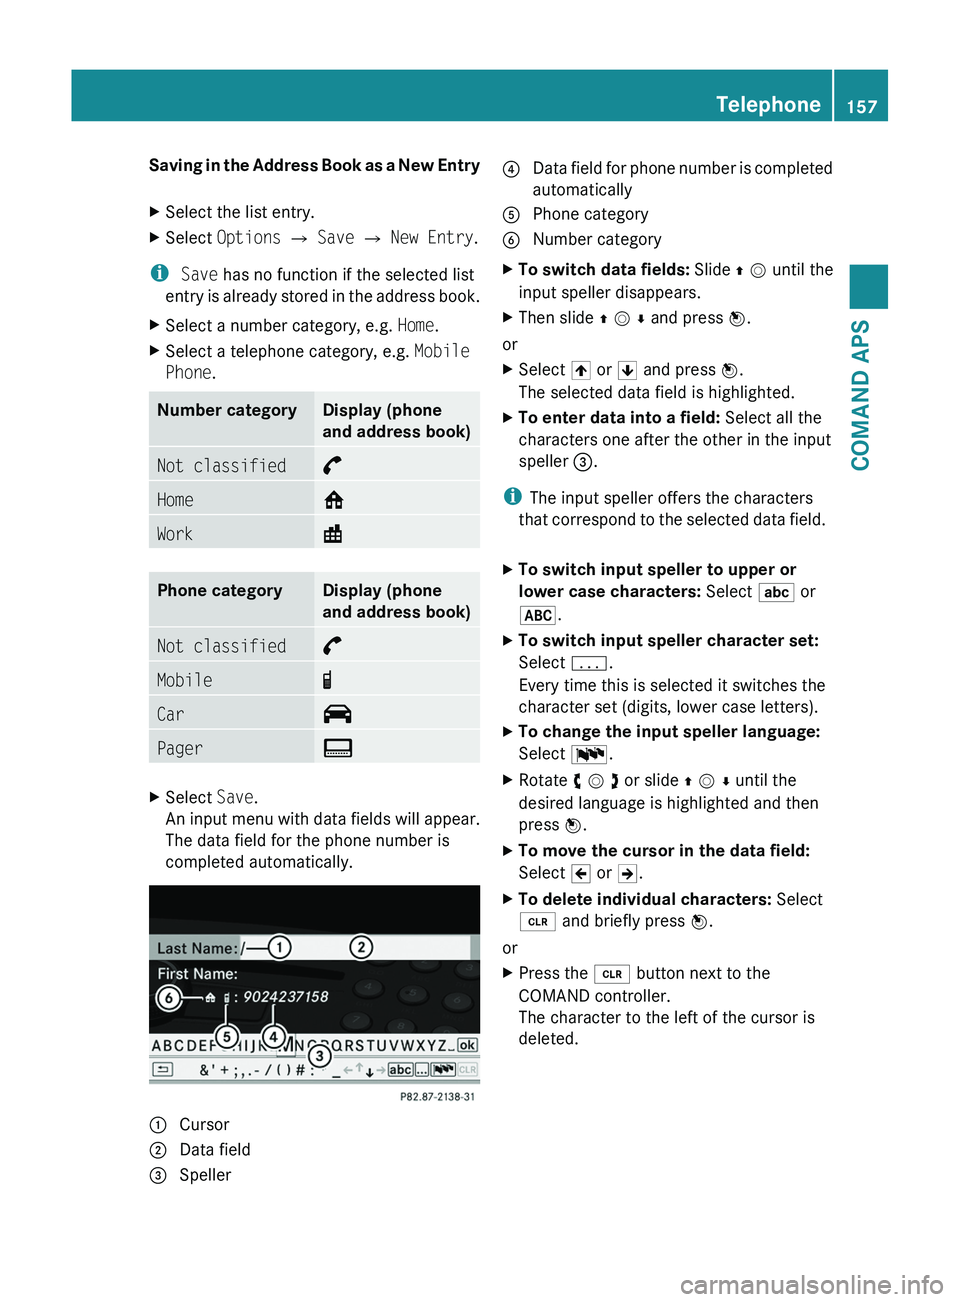
An input menu with data fields will appear.
The data field for the phone number is
completed automatically.
1 Cursor2 Data field3 Speller4 Data field for phone number is completed
automatically
5 Phone category6 Number categoryXTo switch data fields: Slide q m until the
input speller disappears.
XThen slide q m r and press n.
or
XSelect [ or ] and press n.
The selected data field is highlighted.
XTo enter data into a field: Select all the
characters one after the other in the input
speller 3.
iThe input speller offers the characters
that correspond to the selected data field.
XTo switch input speller to upper or
lower case characters: Select ( or
&.
XTo switch input speller character set:
Select k.
Every time this is selected it switches the
character set (digits, lower case letters).
XTo change the input speller language:
Select !.
XRotate y m z or slide q m r until the
desired language is highlighted and then
press n.
XTo move the cursor in the data field:
Select Y or Z.
XTo delete individual characters: Select
õ and briefly press n.
or
XPress the \000
Page 162 of 436
Initiating a Call to a Call List Entry or
COMAND Phone Book Entry
XCall up a call list and select an entry
(Y page 156).
or
XOpen the COMAND phone book and select
an entry (Y page 153).
XTo initiate call: Press n.
Functions During a Single Call
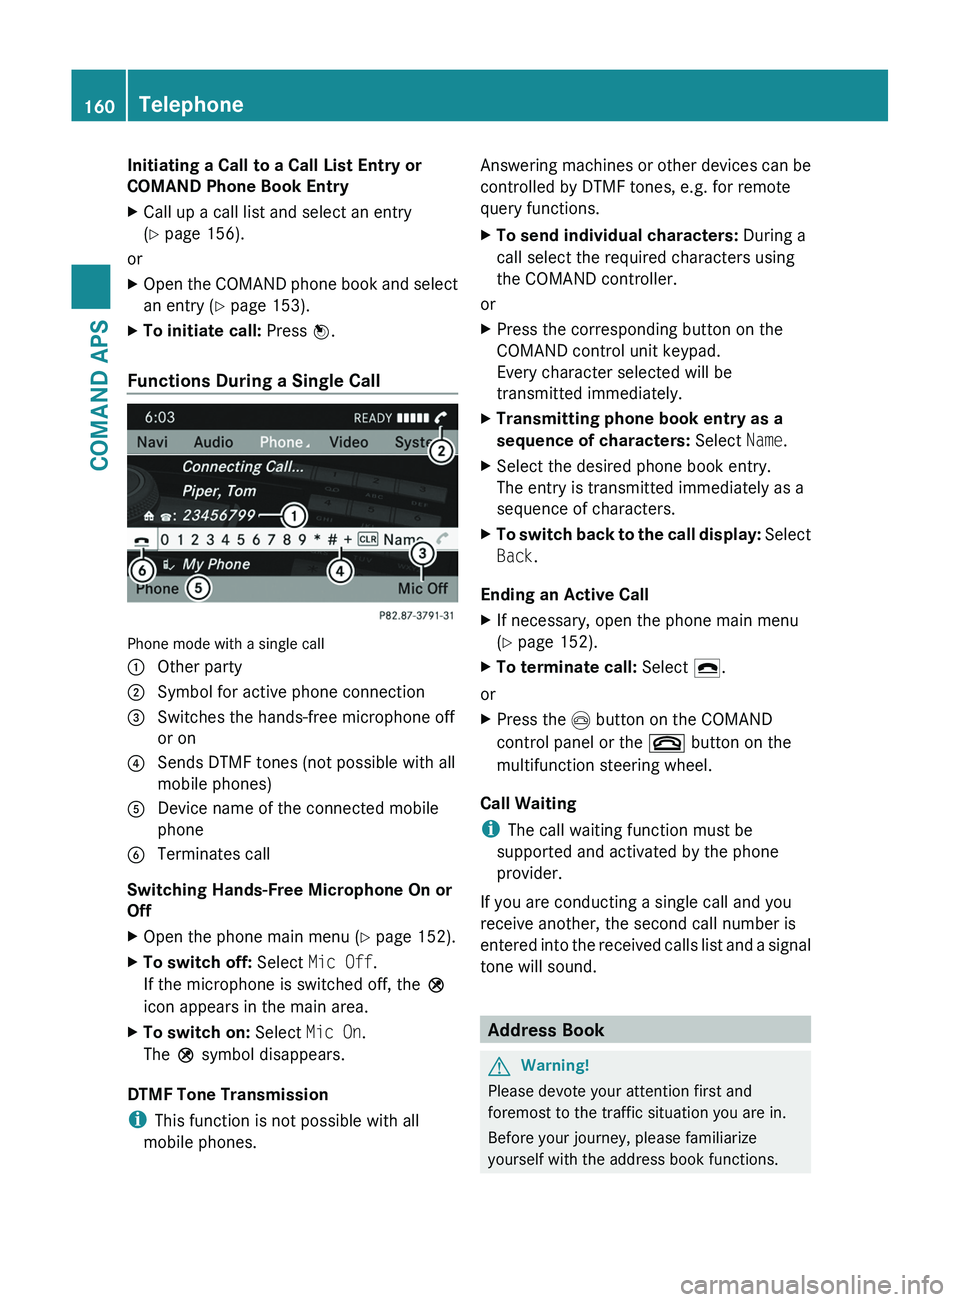
Phone mode with a single call
1 Other party2 Symbol for active phone connection3 Switches the hands-free microphone off
or on
4 Sends DTMF tones (not possible with all
mobile phones)
5 Device name of the connected mobile
phone
6 Terminates call
Switching Hands-Free Microphone On or
Off
XOpen the phone main menu (Y page 152).XTo switch off: Select Mic Off.
If the microphone is switched off, the >
icon appears in the main area.
XTo switch on: Select Mic On.
The > symbol disappears.
DTMF Tone Transmission
iThis function is not possible with all
mobile phones.
Answering machines or other devices can be
controlled by DTMF tones, e.g. for remote
query functions.
XTo send individual characters: During a
call select the required characters using
the COMAND controller.
or
XPress the corresponding button on the
COMAND control unit keypad.
Every character selected will be
transmitted immediately.
XTransmitting phone book entry as a
sequence of characters: Select Name.
XSelect the desired phone book entry.
The entry is transmitted immediately as a
sequence of characters.
XTo switch back to the call display: Select
Back.
Ending an Active Call
XIf necessary, open the phone main menu
(Y page 152).
XTo terminate call: Select 4.
or
XPress the \000m button on the COMAND
control panel or the \000 button on the
multifunction steering wheel.
Call Waiting
iThe call waiting function must be
supported and activated by the phone
provider.
If you are conducting a single call and you
receive another, the second call number is
entered into the received calls list and a signal
tone will sound.
Address Book
GWarning!
Please devote your attention first and
foremost to the traffic situation you are in.
Before your journey, please familiarize
yourself with the address book functions.
160TelephoneCOMAND APS
BA 197 USA, CA Edition A 2011; 1; 27, en-UShereepeVersion: 3.0.3.52010-03-24T15:31:10+01:00 - Seite 160
Page 164 of 436
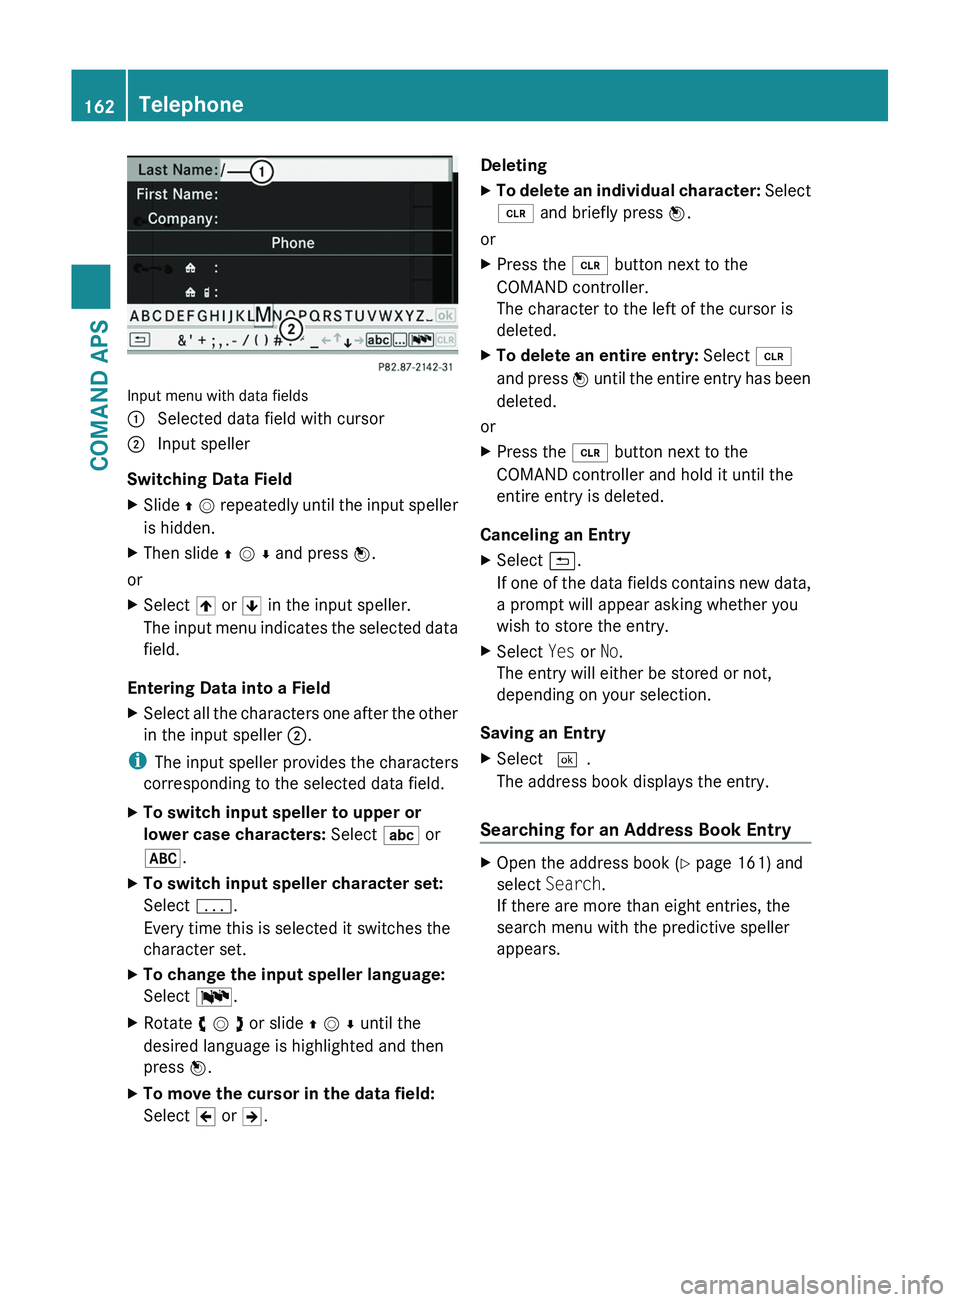
Input menu with data fields
1 Selected data field with cursor2 Input speller
Switching Data Field
XSlide q m repeatedly until the input speller
is hidden.
XThen slide q m r and press n.
or
XSelect [ or ] in the input speller.
The input menu indicates the selected data
field.
Entering Data into a Field
XSelect all the characters one after the other
in the input speller 2.
iThe input speller provides the characters
corresponding to the selected data field.
XTo switch input speller to upper or
lower case characters: Select ( or
&.
XTo switch input speller character set:
Select k.
Every time this is selected it switches the
character set.
XTo change the input speller language:
Select !.
XRotate y m z or slide q m r until the
desired language is highlighted and then
press n.
XTo move the cursor in the data field:
Select Y or Z.
DeletingXTo delete an individual character: Select
õ and briefly press n.
or
XPress the \000