2011 MERCEDES-BENZ SLS AMG steering wheel adjustment
[x] Cancel search: steering wheel adjustmentPage 247 of 436
Seat heating
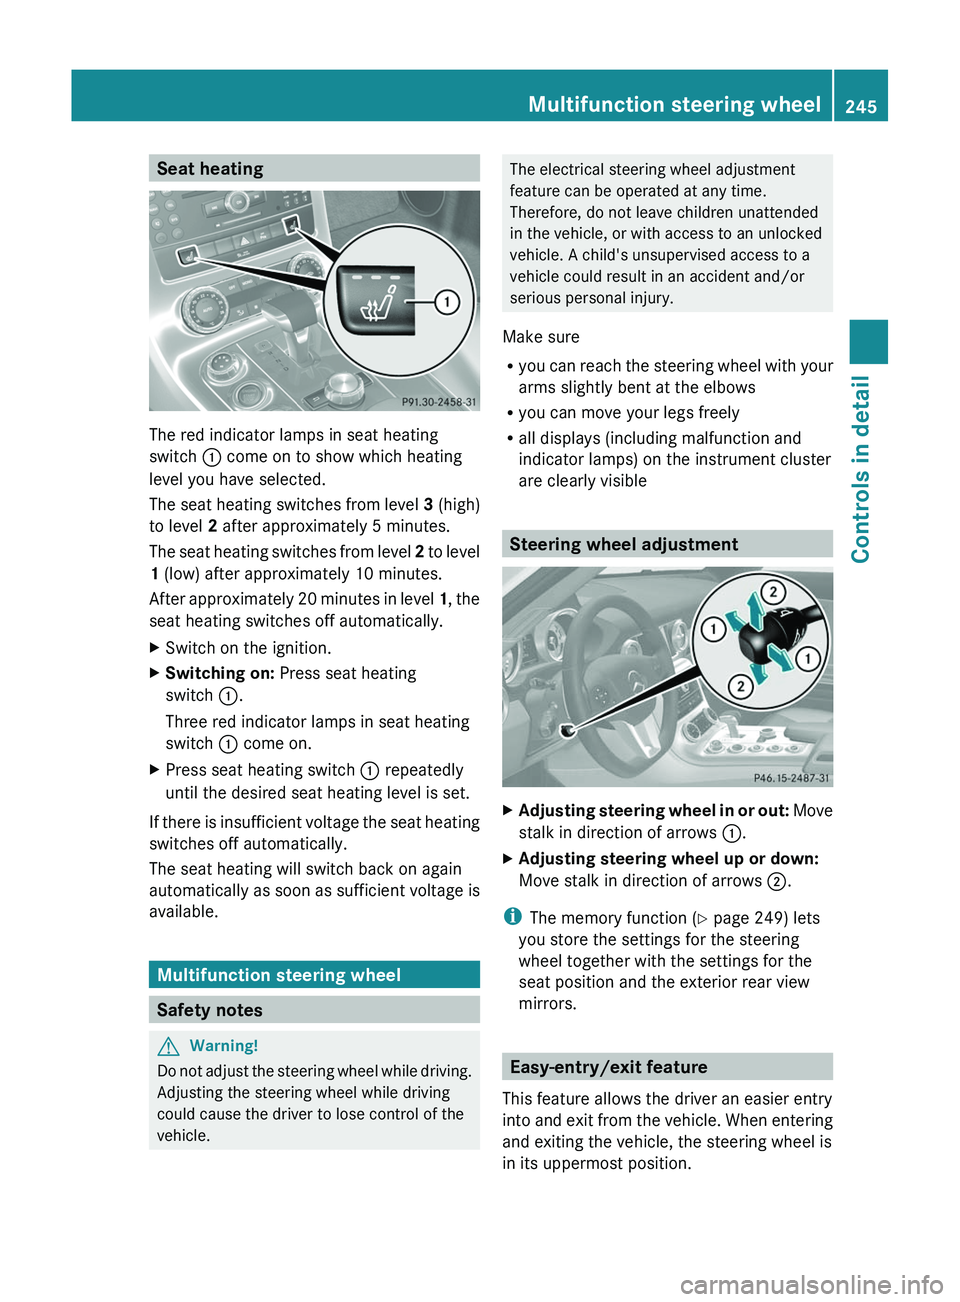
The red indicator lamps in seat heating
switch \000F come on to show which heating
level you have selected.
The seat heating switches from level 3 (high)
to level 2 after approximately 5 minutes.
The seat heating switches from level 2 to level
1 (low) after approximately 10 minutes.
After approximately 20 minutes in level 1, the
seat heating switches off automatically.
XSwitch on the ignition.XSwitching on: Press seat heating
switch \000F.
Three red indicator lamps in seat heating
switch \000F come on.
XPress seat heating switch \000F repeatedly
until the desired seat heating level is set.
If there is insufficient voltage the seat heating
switches off automatically.
The seat heating will switch back on again
automatically as soon as sufficient voltage is
available.
Multifunction steering wheel
Safety notes
GWarning!
Do not adjust the steering wheel while driving.
Adjusting the steering wheel while driving
could cause the driver to lose control of the
vehicle.
The electrical steering wheel adjustment
feature can be operated at any time.
Therefore, do not leave children unattended
in the vehicle, or with access to an unlocked
vehicle. A child's unsupervised access to a
vehicle could result in an accident and/or
serious personal injury.
Make sure
Ryou can reach the steering wheel with your
arms slightly bent at the elbows
Ryou can move your legs freely
Rall displays (including malfunction and
indicator lamps) on the instrument cluster
are clearly visible
Steering wheel adjustment
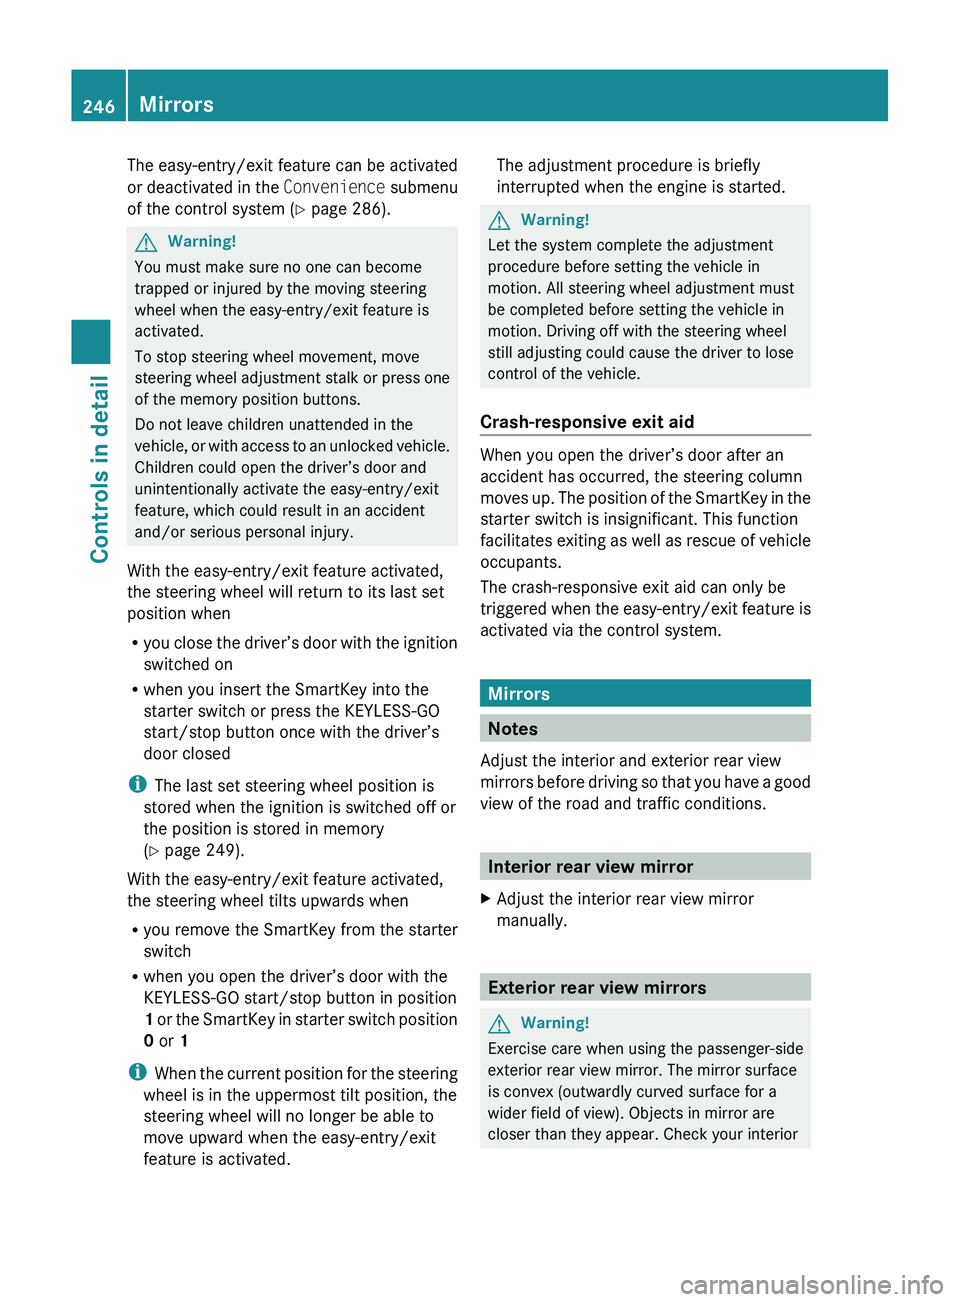
XAdjusting steering wheel in or out: Move
stalk in direction of arrows \000F.
XAdjusting steering wheel up or down:
Move stalk in direction of arrows \000G.
iThe memory function (Y page 249) lets
you store the settings for the steering
wheel together with the settings for the
seat position and the exterior rear view
mirrors.
Easy-entry/exit feature
This feature allows the driver an easier entry
into and exit from the vehicle. When entering
and exiting the vehicle, the steering wheel is
in its uppermost position.
Multifunction steering wheel245Controls in detailBA 197 USA, CA Edition A 2011; 1; 27, en-UShereepeVersion: 3.0.3.52010-03-24T15:31:10+01:00 - Seite 245Z
Page 248 of 436
The easy-entry/exit feature can be activated
or deactivated in the Convenience submenu
of the control system ( Y page 286).GWarning!
You must make sure no one can become
trapped or injured by the moving steering
wheel when the easy-entry/exit feature is
activated.
To stop steering wheel movement, move
steering wheel adjustment stalk or press one
of the memory position buttons.
Do not leave children unattended in the
vehicle, or with access to an unlocked vehicle.
Children could open the driver’s door and
unintentionally activate the easy-entry/exit
feature, which could result in an accident
and/or serious personal injury.
With the easy-entry/exit feature activated,
the steering wheel will return to its last set
position when
R you close the driver’s door with the ignition
switched on
R when you insert the SmartKey into the
starter switch or press the KEYLESS-GO
start/stop button once with the driver’s
door closed
i The last set steering wheel position is
stored when the ignition is switched off or
the position is stored in memory
( Y page 249).
With the easy-entry/exit feature activated,
the steering wheel tilts upwards when
R you remove the SmartKey from the starter
switch
R when you open the driver’s door with the
KEYLESS-GO start/stop button in position
1 or the SmartKey in starter switch position
0 or 1
i When the current position for the steering
wheel is in the uppermost tilt position, the
steering wheel will no longer be able to
move upward when the easy-entry/exit
feature is activated.
The adjustment procedure is briefly
interrupted when the engine is started.GWarning!
Let the system complete the adjustment
procedure before setting the vehicle in
motion. All steering wheel adjustment must
be completed before setting the vehicle in
motion. Driving off with the steering wheel
still adjusting could cause the driver to lose
control of the vehicle.
Crash-responsive exit aid
When you open the driver’s door after an
accident has occurred, the steering column
moves up. The position of the SmartKey in the
starter switch is insignificant. This function
facilitates exiting as well as rescue of vehicle
occupants.
The crash-responsive exit aid can only be
triggered when the easy-entry/exit feature is
activated via the control system.
Mirrors
Notes
Adjust the interior and exterior rear view
mirrors before driving so that you have a good
view of the road and traffic conditions.
Interior rear view mirror
XAdjust the interior rear view mirror
manually.
Exterior rear view mirrors
GWarning!
Exercise care when using the passenger-side
exterior rear view mirror. The mirror surface
is convex (outwardly curved surface for a
wider field of view). Objects in mirror are
closer than they appear. Check your interior
246MirrorsControls in detail
BA 197 USA, CA Edition A 2011; 1; 27, en-UShereepeVersion: 3.0.3.52010-03-24T15:31:10+01:00 - Seite 246
Page 289 of 436
wheel when the easy-entry/exit feature is
activated.
To stop steering wheel movement, move
steering wheel adjustment stalk or press one
of the memory position buttons.
Do not leave children unattended in the
vehicle, or with access to an unlocked vehicle.
Children could open the driver’s door and
unintentionally activate the easy-entry/exit
feature, which could result in an accident
and/or serious personal injury.XPress button 0040 or 003E to select the
Settings menu.XPress button 003D or 003C to select the
Convenience submenu.XPress button 0064.XPress button 003D or 003C to select the
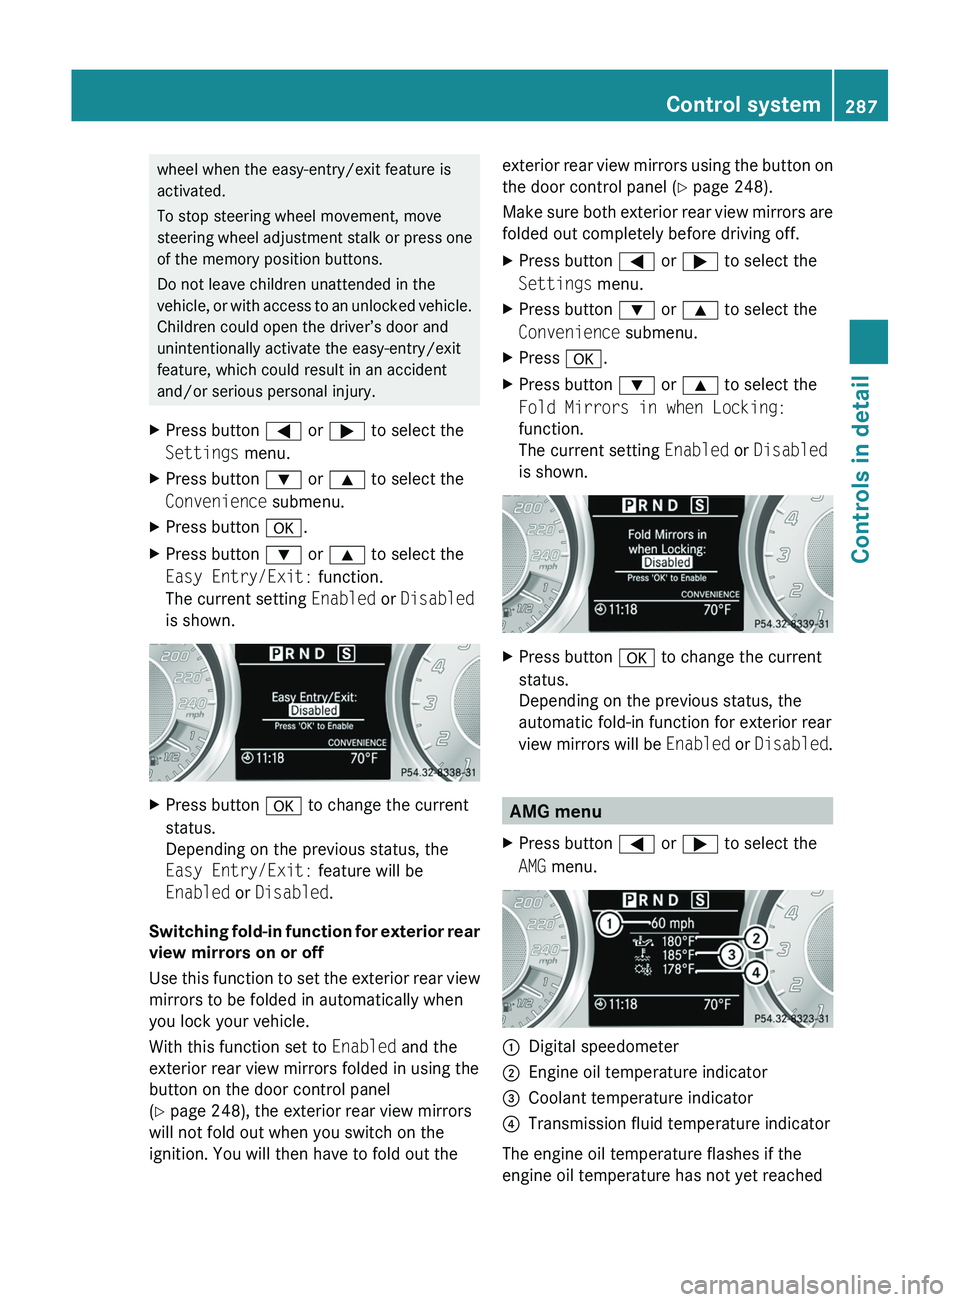
Easy Entry/Exit: function.
The current setting Enabled or Disabled
is shown.XPress button 0064 to change the current
status.
Depending on the previous status, the
Easy Entry/Exit: feature will be
Enabled or Disabled .
Switching fold-in function for exterior rear
view mirrors on or off
Use this function to set the exterior rear view
mirrors to be folded in automatically when
you lock your vehicle.
With this function set to Enabled and the
exterior rear view mirrors folded in using the
button on the door control panel
( Y page 248), the exterior rear view mirrors
will not fold out when you switch on the
ignition. You will then have to fold out the
exterior rear view mirrors using the button on
the door control panel ( Y page 248).
Make sure both exterior rear view mirrors are
folded out completely before driving off.XPress button 0040 or 003E to select the
Settings menu.XPress button 003D or 003C to select the
Convenience submenu.XPress 0064.XPress button 003D or 003C to select the
Fold Mirrors in when Locking:
function.
The current setting Enabled or Disabled
is shown.XPress button 0064 to change the current
status.
Depending on the previous status, the
automatic fold-in function for exterior rear
view mirrors will be Enabled or Disabled .
AMG menu
XPress button 0040 or 003E to select the
AMG menu.0046Digital speedometer0047Engine oil temperature indicator008ACoolant temperature indicator0088Transmission fluid temperature indicator
The engine oil temperature flashes if the
engine oil temperature has not yet reached
Control system287Controls in detailBA 197 USA, CA Edition A 2011; 1; 27, en-UShereepeVersion: 3.0.3.52010-03-24T15:31:10+01:00 - Seite 287Z
Page 294 of 436
increments each time you lift or press the
cruise control lever up or down to the
resistance point.XIncreasing: Briefly lift the cruise control
lever up to the resistance point in direction
of arrow 0046.XDecreasing: Briefly press the cruise
control lever down to the resistance point
in direction of arrow 0047.XRelease the cruise control lever.
The new speed is set and the vehicle will
accelerate or decelerate.
Adjustment in 5 mph (Canada: 10 km/h)
increments
i The set speed value is increased or
decreased in 5 mph (Canada: 10 km/h)
increments each time you lift or press the
cruise control lever up or down past the
resistance point.
XIncreasing: Briefly lift the cruise control
lever up past the resistance point in
direction of arrow 0046.XDecreasing: Briefly press the cruise
control lever down past the resistance
point in direction of arrow 0047.XRelease the cruise control lever.
The new speed is set and the vehicle will
accelerate or decelerate. Keep in mind that
it may take a brief moment until the vehicle
has reached the set speed.
Setting stored speed (Resume function)
GWarning!
The set speed stored in memory should only
be set again if prevailing road conditions and
legal speed limits permit. Possible
acceleration or deceleration differences
arising from returning to the preset speed
could cause an accident and/or serious injury
to you and others.
XBriefly pull the cruise control lever in
direction of arrow 0088.
If no speed is stored, the current speed is
set and stored.XRemove your foot from the accelerator
pedal.
The last stored speed is deleted from memory
when the engine is turned off.
RACE START
RACE START enables optimum acceleration
from a standing start with suitable high-grip
road surface conditions.
GWarning!
RACE START is only available when ESC
SPORT is activated. ESC SPORT only
stabilizes the vehicle to a certain extent if it is
swerving or the wheels are spinning.
RACE START may only be used on closed
roads. Always adapt your speed and driving
style to suit the current road and weather
conditions.
Conditions for activation
RACE START can be activated when
R the doors are closed
R the trunk is closed
R the hood is closed
R the engine is running and the transmission
and the engine have reached their
operating temperature. The engine has
reached its operating temperature when
the engine oil temperature indicator in the
multifunction display stops flashing.
R ESC SPORT is switched on ( Y page 62)
R the multifunction steering wheel is in the
straight-ahead position
R the vehicle is standing still and the brake
pedal is depressed (left foot)
R the transmission is in drive position D
292Driving systemsControls in detail
BA 197 USA, CA Edition A 2011; 1; 27, en-UShereepeVersion: 3.0.3.52010-03-24T15:31:10+01:00 - Seite 292
Page 311 of 436
steps may result in a system that is not
activated.
If you have any questions regarding
activation, please call the Response Center
at 866-990-9007 (USA only) or
1-888-923-8367 (Canada only).
Shortly after the completion of your mbrace
acquaintance call, you will receive an account
number via email. You will also receive a two-
part welcome kit via mail that will provide
your account and Personal Identification
Number (PIN). You will only need the PIN once
to access the mbrace account section in
“Owners Online” at
http://www.MBUSA.com (USA only).
The mbrace system is available if
R it has been activated and is operational.
Activation requires a subscription for
monitoring services, connection and
cellular air time
R vehicle battery power is available
R the relevant cellular phone network and
GPS signals are available
i Location of the vehicle on a map is only
possible if the vehicle is able to receive
signals from the GPS satellite network and
pass the information on to the Response
Center.
The mbrace system
The mbrace system consists of three types of
response:
R Automatic and manual emergency
R Roadside Assistance
R Information
To adjust the speaker volume during a
mbrace call do the following:
XPress button 005A or 005B on the
multifunction steering wheel.
or
XUse the volume adjustment button on your
COMAND system.Be sure to check “Owners Online” at
http://www.MBUSA.com (USA only) for
more information and a description of all
available features.
System self-test
The system performs a self-test after you
have switched on the ignition.
GWarning!
A malfunction in the system has been
detected if any or all of the following
conditions occur:
R The indicator lamp in the SOS button does
not come on during the system self-test.
R The indicator lamp in the wrench button
005E does not come on during the system
self-test.
R The indicator lamp in the Information
button 00E5 does not come on during the
system self-test.
R The indicator lamp in the SOS button,
wrench button 005E, or Information button
00E5 remains illuminated constantly in red
after the system self-test.
R The message Tele Aid Inoperative or
Tele Aid Not Activated appears in the
multifunction display after the system self-
test.
If a malfunction is indicated as outlined above,
the system may not operate as expected. In
case of an emergency, help will have to be
summoned by other means.
Have the system checked at the nearest
Mercedes-Benz Center or contact the
Response Center at 866-990-9007 (USA
only) or 1-888-923-8367 (Canada only) as
soon as possible.
Emergency calls
! In order to activate the mbrace system, a
subscriber agreement must be completed.
To ensure your system is activated and
operational, please press Information
button 00E5 to perform the acquaintance
Useful features309Controls in detailBA 197 USA, CA Edition A 2011; 1; 27, en-UShereepeVersion: 3.0.3.52010-03-24T15:31:10+01:00 - Seite 309Z
Page 334 of 436
Restarting Advanced TPMSGWarning!
It is the driver’s responsibility to set the tire
inflation pressure to the recommended cold
tire inflation pressure. Underinflated tires
affect the ability to steer or brake the vehicle.
You might lose control over the vehicle.
When you restart the TPMS, the system sets
new reference values for each tire.
The TPMS must be restarted when you have
adjusted the tire inflation pressure to a new
level (e.g. because of different load or driving
conditions). The TPMS is then recalibrated to
the current tire inflation pressures.
i Canada only:
The TPMS usually recognizes tire pressure
adjustments and sets new reference values
automatically. You can, however, restart
the TPMS manually as described.
Restart the TPMS after adjusting the tire
inflation pressure to the inflation pressure
recommended for the vehicle operating
condition. Tire inflation pressure should only
be adjusted on cold tires. Observe the
recommended tire inflation pressure on the
Tire and Loading Information placard on the
driver’s door B-pillar. Some vehicles may have
supplemental tire inflation pressure
information for driving at high speeds or for
vehicle loads less than the maximum loaded
vehicle condition. If such information is
provided, it can be found on the inside of the
fuel filler flap.
XUsing the Tire and Loading Information
placard on the driver’s door B-pillar
( Y page 334) or the supplemental tire
inflation pressure information on the inside
of the fuel filler flap, make sure the tire
inflation pressure of all four tires is correct.XSwitch on the ignition.XPress button 0040 or 003E on the
multifunction steering wheel to select the
Service menu.XPress button 003C or 003D on the
multifunction steering wheel to select
Tire Pressure .XPress button 0064.
The current inflation pressure for each tire
appears in the multifunction display or the
following message appears in the
multifunction display:
Tire pressures
will be displayed
after driving
a few minutesXPress button 003D.
The following message appears in the
multifunction display:
Use Current
Pressures as New
Reference Values
Press 'OK' to ConfirmXPress button 0064.
The following message appears in the
multifunction display:
Tire Press. Monitor
Restarted
After driving a few minutes the system
verifies that the current tire inflation
pressures are within the system’s specified
range. Afterwards the current tire inflation
pressures are accepted as reference values
and then monitored.XIf you wish to cancel: Press button 0041.
or
XPress button 003C to exit the menu screen.
i
When the wheel positions have been
changed, the inflation pressure of a tire
may be displayed for the wrong position
temporarily. After driving for a few minutes,
the inflation pressure will be shown for the
correct position.
332Tires and wheelsOperation
BA 197 USA, CA Edition A 2011; 1; 27, en-UShereepeVersion: 3.0.3.52010-03-24T15:31:10+01:00 - Seite 332