2011 MERCEDES-BENZ SLS AMG start stop button
[x] Cancel search: start stop buttonPage 23 of 436
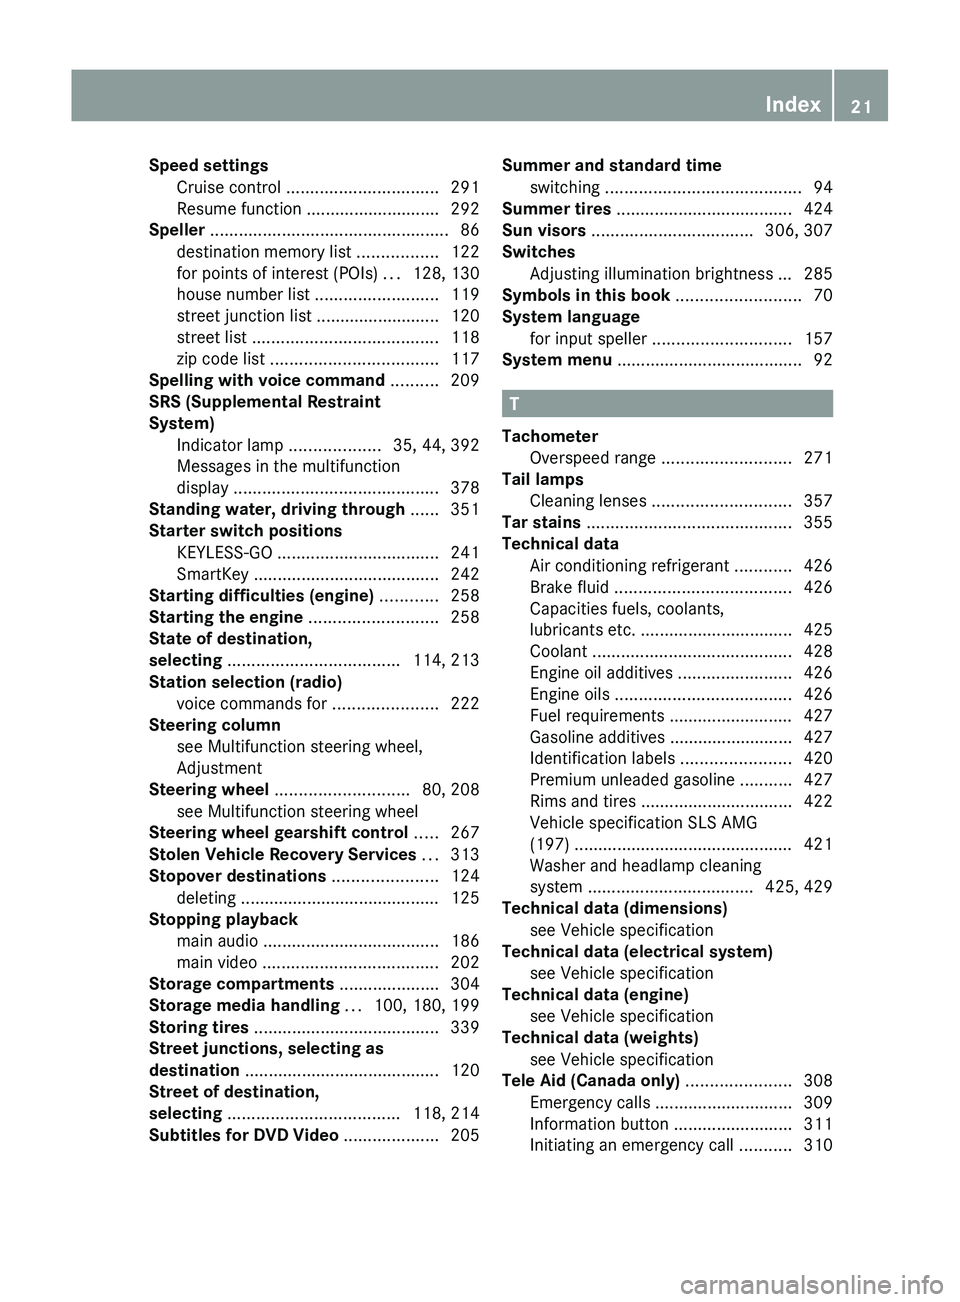
Speed settingsCruise control ................................ 291
Resume function ............................ 292
Speller .................................................. 86
destination memory list .................122
for points of interest (POIs) ...128, 130
house number list ..........................119
street junction list .......................... 120
street list ....................................... 118
zip code list ................................... 117
Spelling with voice command .......... 209
SRS (Supplemental Restraint
System) Indicator lamp ...................35, 44, 392
Messages in the multifunction
display ........................................... 378
Standing water, driving through ...... 351
Starter switch positions KEYLESS-GO .................................. 241
SmartKey ....................................... 242
Starting difficulties (engine) ............ 258
Starting the engine ........................... 258
State of destination,
selecting .................................... 114, 213
Station selection (radio) voice commands for ......................222
Steering column
see Multifunction steering wheel,
Adjustment
Steering wheel ............................ 80, 208
see Multifunction steering wheel
Steering wheel gearshift control ..... 267
Stolen Vehicle Recovery Services ... 313
Stopover destinations ...................... 124
deleting .......................................... 125
Stopping playback
main audio ..................................... 186
main video ..................................... 202
Storage compartments ..................... 304
Storage media handling ... 100, 180, 199
Storing tires ....................................... 339
Street junctions, selecting as
destination ......................................... 120
Street of destination,
selecting .................................... 118, 214
Subtitles for DVD Video .................... 205Summer and standard time
switching ......................................... 94
Summer tires ..................................... 424
Sun visors .................................. 306, 307
Switches Adjusting illumination brightness ... 285
Symbols in this book .......................... 70
System language for input speller ............................. 157
System menu ....................................... 92
T
Tachometer Overspeed range ........................... 271
Tail lamps
Cleaning lenses ............................. 357
Tar stains ........................................... 355
Technical data Air conditioning refrigerant ............426
Brake fluid ..................................... 426
Capacities fuels, coolants,
lubricants etc. ................................ 425
Coolant .......................................... 428
Engine oil additives ........................426
Engine oils ..................................... 426
Fuel requirements .......................... 427
Gasoline additives .......................... 427
Identification labels .......................420
Premium unleaded gasoline ...........427
Rims and tires ................................ 422
Vehicle specification SLS AMG
(197) .............................................. 421
Washer and headlamp cleaning
system ................................... 425, 429
Technical data (dimensions)
see Vehicle specification
Technical data (electrical system)
see Vehicle specification
Technical data (engine)
see Vehicle specification
Technical data (weights)
see Vehicle specification
Tele Aid (Canada only) ...................... 308
Emergency calls ............................. 309
Information button .........................311
Initiating an emergency call ...........310
Index21BA 197 USA, CA Edition A 2011; 1; 27, en-UShereepeVersion: 3.0.3.52010-03-24T15:31:10+01:00 - Seite 21
Page 41 of 436
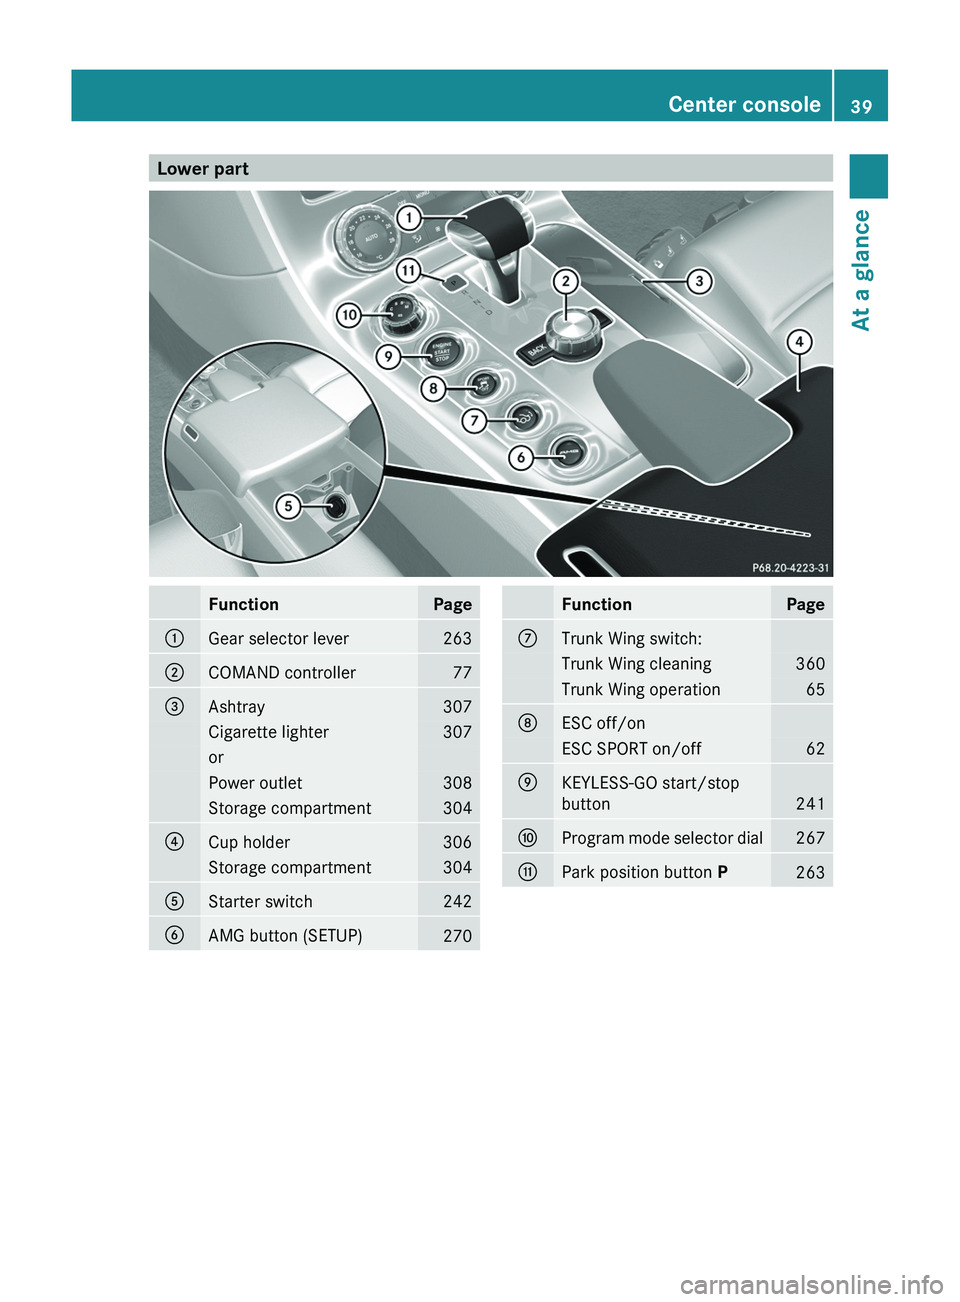
Lower partFunctionPage0046Gear selector lever2630047COMAND controller77008AAshtray307Cigarette lighter307orPower outlet308Storage compartment3040088Cup holder306Storage compartment3040086Starter switch2420087AMG button (SETUP)270FunctionPage006ETrunk Wing switch:Trunk Wing cleaning360Trunk Wing operation65006FESC off/onESC SPORT on/off620070KEYLESS-GO start/stop
button
241
0071Program mode selector dial2670072Park position button P263Center console39At a glanceBA 197 USA, CA Edition A 2011; 1; 27, en-UShereepeVersion: 3.0.3.52010-03-24T15:31:10+01:00 - Seite 39
Page 54 of 436
technicians as soon as possible. Contact an
authorized Mercedes-Benz Center.
Only have the seat repaired or replaced at an
authorized Mercedes-Benz Center.
In order to ensure proper operation of the air
bag system and OCS:
R Sit with the seat belt properly fastened in a
position that is as upright as possible with
your back against the seat backrest.
R While seated, an occupant should not
position him/herself in such a way as to
cause the occupant’s weight to be lifted
from the seat bottom as this may result in
the OCS being unable to correctly
approximate the occupant’s weight
category.
R Read and observe all warnings in this
chapter.
OCS Self-test
After turning the SmartKey in the starter
switch to position 1 or 2 or pressing the
KEYLESS-GO start/stop button once or
twice, the 007F 0080 indicator lamp
illuminates. If an adult occupant is properly
sitting on the passenger seat and the system
classifies the occupant as an adult, the 007F
0080 indicator lamp will illuminate and go out
after approximately 6 seconds.
If the seat is not occupied and the system
classifies the passenger seat as being empty,
the 007F 0080 indicator lamp will illuminate
and not go out.
GWarning!
If the 007F 0080 indicator lamp does not
illuminate, the system is not functioning. You
must contact an authorized Mercedes-Benz
Center before seating any child on the
passenger seat.
For more information, see the “Practical
hints” section ( Y page 49).
GWarning!
Never place anything between seat cushion
and child seat (e.g. pillow), since it reduces
the effectiveness of the OCS. The bottom and
back of the child seat must make full contact
with the passenger seat cushion and
backrest.
If necessary, adjust the tilt of the passenger
seat backrest.
An incorrectly mounted child seat could cause
injuries to the child in case of an accident,
instead of increasing protection for the child.
Follow the manufacturer’s instructions for
installation of child seats.
Seat belts
Safety notes
The use of seat belts and infant and child
restraint systems is required by law in all 50
states, the District of Columbia, the U.S.
territories and all Canadian provinces.
Even where this is not the case, all vehicle
occupants should have their seat belts
fastened whenever the vehicle is in motion.
i See “Children in the vehicle”
( Y page 57) for information on
R infants and children traveling with you in
the vehicle
R restraint systems for infants and children
GWarning!
Always fasten your seat belt before driving off.
Always make sure your passenger is properly
restrained. You and your passenger should
always wear seat belts.
Failure to wear and properly fasten and
position your seat belt greatly increases your
risk of injuries and their likely severity in an
accident.
If you are ever in an accident, your injuries can
be considerably more severe without your
seat belt properly buckled. Without your seat
belt buckled, you are much more likely to hit
52Occupant safetySafety and security
BA 197 USA, CA Edition A 2011; 1; 27, en-UShereepeVersion: 3.0.3.52010-03-24T15:31:10+01:00 - Seite 52
Page 57 of 436
special seat belt retractors, see “Infant and
child restraint systems” ( Y page 58).
To release the seat belt with seat belt release
button 0088, see ( Y page 55).
Releasing the seat beltsXPress seat belt release button 0088
( Y page 54).
Allow the retractor to completely rewind
the seat belt by guiding latch plate 0047
( Y page 54).
!
Make sure the seat belt retracts
completely. Otherwise the seat belt and/or
latch plate could get caught or pinched in
the door or in the seat mechanism. This can
damage the seat belt and impair its
effectiveness, and/or cause damage to the
door and/or door trim panel. Such damage
is not covered by the Mercedes-Benz
Limited Warranty.
Damaged seat belts must be replaced.
Contact an authorized Mercedes-Benz
Center.
Enhanced seat belt reminder system
When the engine is started, the seat belt
telltale 0082 will always illuminate for
6 seconds to remind you and your passenger
to fasten your seat belts.
If the driver’s seat belt is not fastened when
the engine is started, an additional warning
chime will sound. The warning chime goes out
after approximately 6 seconds or once the
driver’s seat belt is fastened.
If after these 6 seconds the driver’s or the
passenger’s seat belt (with the passenger
seat occupied) is not fastened with both
doors closed,
R the seat belt telltale 0082 remains
illuminated for as long as either the driver’s
or passenger’s seat belt is not fastened.
R and if the vehicle speed once exceeds
15 mph (25 km/h), the seat belt telltale
0082 starts flashing and a warning chime
sounds with increasing intensity for a
maximum of 60 seconds or until the
driver’s and passenger’s seat belt are
fastened.
If you and/or your passenger release the
seat belt during driving, the seat belt
telltale 0082 starts flashing and the
warning chime sounds as described before.
If the driver’s or the passenger’s seat belt
remains unfastened after 60 seconds, the
warning chime stops sounding, the seat
belt telltale 0082 stops flashing but
continues to be illuminated.
After a vehicle standstill, the warning chime
is reactivated and the seat belt telltale
0082 is flashing again if the vehicle speed
once exceeds 15 mph (25 km/h).
The seat belt telltale 0082 will only go out if
both the driver’s and the passenger’s seat
belt (with the passenger seat occupied) are
fastened, or the vehicle is standing still and a
door is opened.
For more information, see “Practical hints”
( Y page 35).
Emergency Tensioning Device (ETD),
seat belt force limiter
The seat belts are equipped with ETDs and
seat belt force limiters.
The ETDs are designed to activate in the
following cases:
R in frontal or rear-end impacts exceeding
the system’s preset deployment threshold
R in side impacts exceeding the system’s
preset deployment threshold on the far
side of the impact
R in certain vehicle rollovers
R if the restraint systems are operational and
functioning correctly, see “SRS indicator
lamp” ( Y page 44)
The ETDs will only activate if the seat belts are
fastened (latch plate properly inserted into
buckle).
In an impact, the ETDs remove slack from the
seat belts in such a way that the seat belts fit
Occupant safety55Safety and securityBA 197 USA, CA Edition A 2011; 1; 27, en-UShereepeVersion: 3.0.3.52010-03-24T15:31:10+01:00 - Seite 55Z
Page 62 of 436
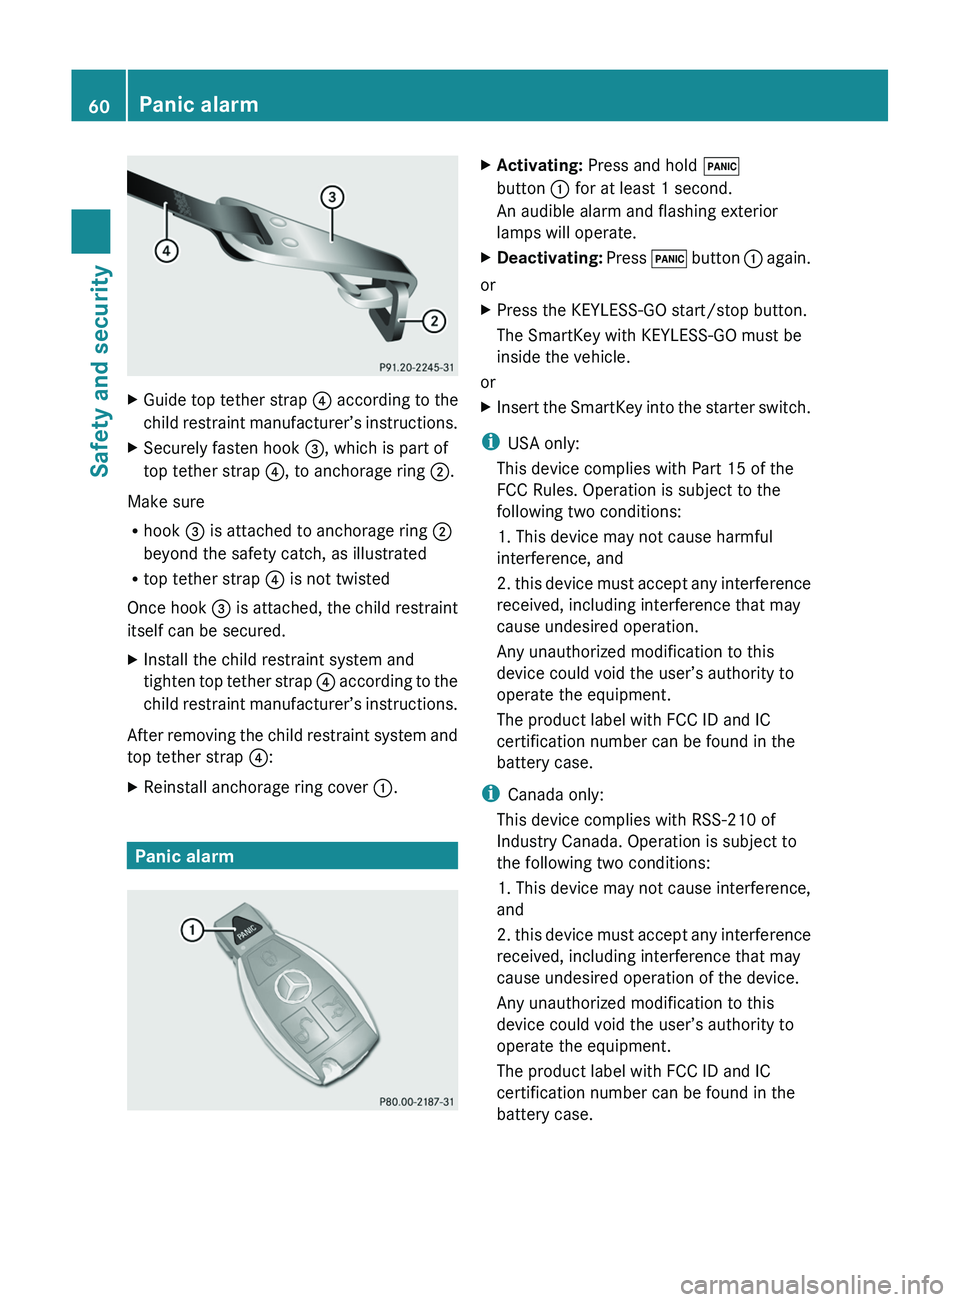
XGuide top tether strap 0088 according to the
child restraint manufacturer’s instructions.XSecurely fasten hook 008A, which is part of
top tether strap 0088, to anchorage ring 0047.
Make sure
R hook 008A is attached to anchorage ring 0047
beyond the safety catch, as illustrated
R top tether strap 0088 is not twisted
Once hook 008A is attached, the child restraint
itself can be secured.
XInstall the child restraint system and
tighten top tether strap 0088 according to the
child restraint manufacturer’s instructions.
After removing the child restraint system and
top tether strap 0088:
XReinstall anchorage ring cover 0046.
Panic alarm
XActivating: Press and hold 0033
button 0046 for at least 1 second.
An audible alarm and flashing exterior
lamps will operate.XDeactivating: Press 0033 button 0046 again.
or
XPress the KEYLESS-GO start/stop button.
The SmartKey with KEYLESS-GO must be
inside the vehicle.
or
XInsert the SmartKey into the starter switch.
i USA only:
This device complies with Part 15 of the
FCC Rules. Operation is subject to the
following two conditions:
1. This device may not cause harmful
interference, and
2. this device must accept any interference
received, including interference that may
cause undesired operation.
Any unauthorized modification to this
device could void the user’s authority to
operate the equipment.
The product label with FCC ID and IC
certification number can be found in the
battery case.
i Canada only:
This device complies with RSS-210 of
Industry Canada. Operation is subject to
the following two conditions:
1. This device may not cause interference,
and
2. this device must accept any interference
received, including interference that may
cause undesired operation of the device.
Any unauthorized modification to this
device could void the user’s authority to
operate the equipment.
The product label with FCC ID and IC
certification number can be found in the
battery case.
60Panic alarmSafety and security
BA 197 USA, CA Edition A 2011; 1; 27, en-UShereepeVersion: 3.0.3.52010-03-24T15:31:10+01:00 - Seite 60
Page 64 of 436
functions as a reminder to take extra care
while driving.
Emergency brake maneuverXKeep continuous full pressure on the brake
pedal.GWarning!
If the ABS malfunctions, other driving safety
systems such as the BAS or the ESC are also
switched off. Observe indicator and warning
lamps that may come on as well as messages
in the multifunction display that may appear.
If the ABS malfunctions, the wheels may lock
during hard braking, reducing steering
capability and extending the braking distance.
BAS
GObserve Safety notes, see page 61.
The Brake Assist System (BAS) operates in
emergency situations. If you apply the brakes
very quickly, the BAS provides full brake
boost automatically, thereby potentially
reducing the braking distance.
XApply continuous full braking pressure until
the emergency braking situation is over.
The ABS will prevent the wheels from
locking.
When you release the brake pedal, the brakes
function again as normal. The BAS is then
deactivated.
GWarning!
If the BAS malfunctions, the brake system still
functions, but without the additional brake
boost available that the BAS would normally
provide in an emergency braking maneuver.
Therefore, the braking distance may increase.
ESC
GObserve Safety notes, see page 61.
The Electronic Stability Control (ESC) is
operational as soon as the engine is running.
It monitors the vehicle’s traction (force of
adhesive friction between the tires and the
road surface) and handling.
The ESC recognizes that the vehicle deviates
from the direction of travel as intended by the
driver. By applying brakes to individual
wheels and by limiting the engine output, the
ESC works to stabilize the vehicle. The ESC is
especially useful while driving off and on wet
or slippery road surfaces. The ESC also
stabilizes the vehicle during braking and
steering maneuvers.
The ESC warning lamp 00F2 in the instrument
cluster comes on when you switch on the
ignition. It goes out when the engine is
running.GWarning!
Never switch off the ESC when you see the
ESC warning lamp 00F2 flashing in the
instrument cluster. In this case proceed as
follows:
R When driving off, apply as little throttle as
possible.
R While driving, ease up on the accelerator
pedal.
R Adapt your speed and driving style to the
prevailing road conditions.
Failure to observe these guidelines could
cause the vehicle to skid. The ESC cannot
prevent accidents resulting from excessive
speed.
! Because the ESC operates automatically,
the engine and ignition must be shut off
(KEYLESS-GO start/stop button in position
0 or 1, or SmartKey in starter switch
position 0 or 1) when the electronic parking
brake is being tested on a brake test
dynamometer or when the vehicle is being
towed with the rear axle raised.
Active braking action through the ESC may
otherwise seriously damage the brake
system which is not covered by the
Mercedes-Benz Limited Warranty.
62Driving safety systemsSafety and security
BA 197 USA, CA Edition A 2011; 1; 27, en-UShereepeVersion: 3.0.3.52010-03-24T15:31:10+01:00 - Seite 62
Page 69 of 436
XArming: Lock the vehicle with the
SmartKey.
The turn signal lamps flash three times and
an acoustic warning sounds three times to
indicate that the vehicle is locked. Indicator
lamp 0046 flashes to indicate that the alarm
system is armed.
i If the turn signal lamps do not flash three
times and the acoustic warning does not
sound three times, a door or the trunk may
not be properly closed.
Close the respective element.
XDisarming: Unlock the vehicle with the
SmartKey.
The turn signal lamps flash once and an
acoustic warning sounds once to indicate
that the alarm system is disarmed.
i Unless you open a door or the trunk within
approximately 40 seconds after unlocking
the vehicle:
R The vehicle will be locked again.
R The anti-theft alarm system will be
rearmed.
Canceling the alarm
To cancel the alarm, do one of the following:
XPress the KEYLESS-GO start/stop button.
The SmartKey must be inside the vehicle.
or
XPress button 0036 or 0037 on the
SmartKey.
or
XInsert the SmartKey into the starter switch.Anti-theft systems67Safety and securityBA 197 USA, CA Edition A 2011; 1; 27, en-UShereepeVersion: 3.0.3.52010-03-24T15:31:10+01:00 - Seite 67Z
Page 87 of 436
XIf only one telephone number is stored
for a name: Press \000j or \000d to start
dialing.
The message Connecting Call... and
the selected number appear in the
multifunction display. The name also
appears, provided it is stored in the phone
book. The selected number is stored in the
CALLS DIALED list in COMAND
(Y page 156).
If a call is connected, the phone book entry
appears in the multifunction display.
or
XIf there is more than one number for a
particular name: Press \000j or \000d to
display the numbers.
XPress \000= or \000< to select the number
you want to dial.
XPress \000j or \000d to start dialing.
The message Connecting Call... and
the selected number appear in the
multifunction display. The name also
appears, provided it is stored in the phone
book. The selected number is stored in the
CALLS DIALED list in COMAND.
If a call is connected, the phone book entry
appears in the multifunction display.
iTo exit the phone book without making a
call, press the \000 button. Phone READY
appears in the multifunction display.
iIf you press and hold the \000= or \000<
button for more than one second, a rapid
scroll begins. After four seconds, the rapid
scroll speeds up. The rapid scroll stops
when you release the button or reach the
end of the list.
Redialing
COMAND saves the most recently dialed
names and numbers from the mobile phone.
This means that you do not have to search
through the entire phone book.
XSelect the Tel menu.
The multifunction display shows
Phone READY .
XPress \000j to go to the most recently
dialed number or name in the
CALLS DIALED menu.
XPress \000= or \000< to select the number
or name you are looking for.
XPress \000j or \000d to start dialing.
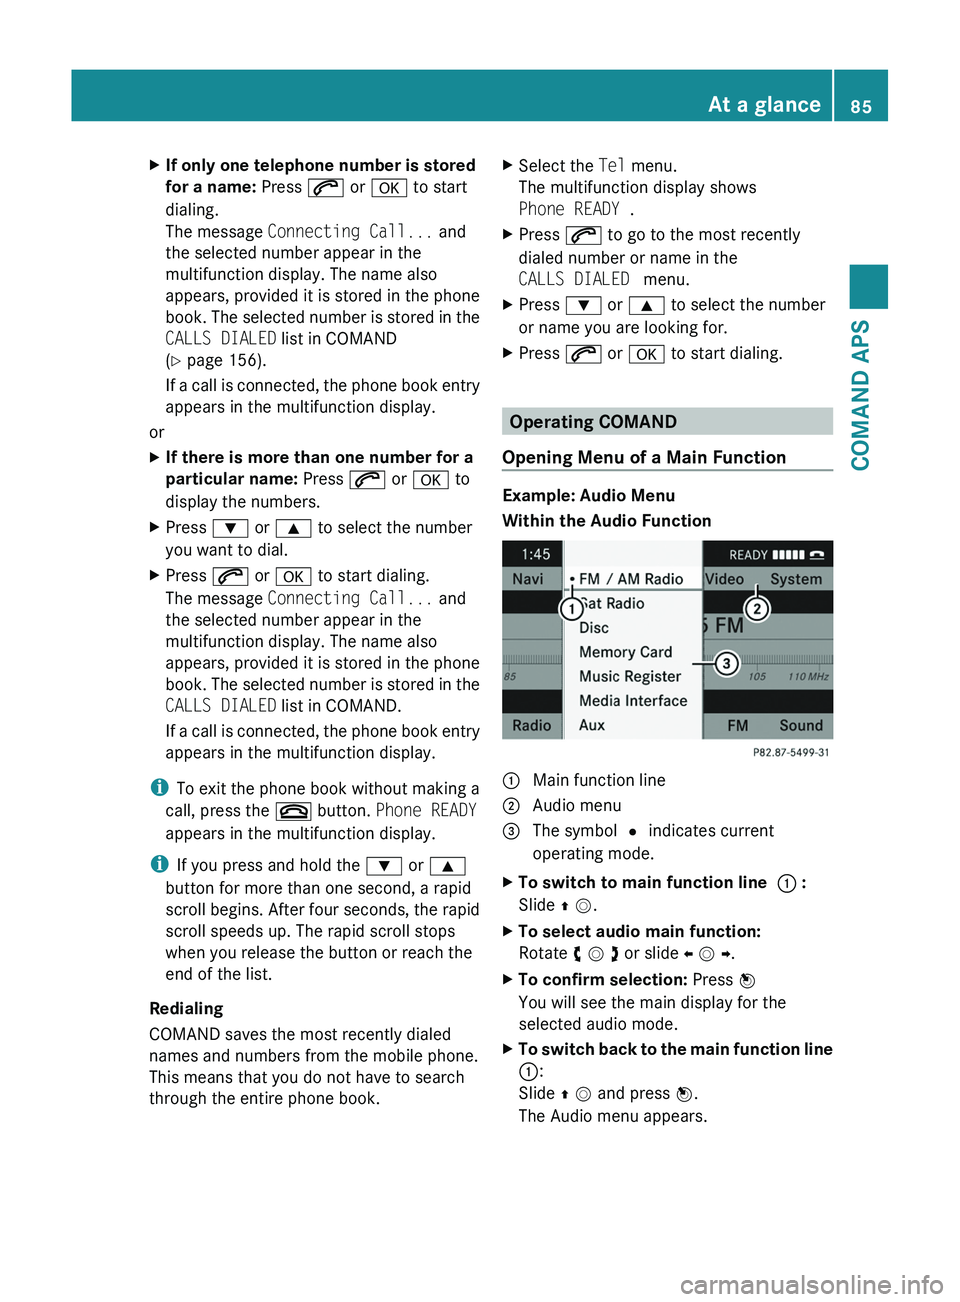
Operating COMAND
Opening Menu of a Main Function
Example: Audio Menu
Within the Audio Function
1 Main function line2 Audio menu3 The symbol R indicates current
operating mode.
XTo switch to main function line 1 :
Slide q m.
XTo select audio main function:
Rotate y m z or slide o m p.
XTo confirm selection: Press n
You will see the main display for the
selected audio mode.
XTo switch back to the main function line
1:
Slide q m and press n.
The Audio menu appears.
At a glance85COMAND APSBA 197 USA, CA Edition A 2011; 1; 27, en-UShereepeVersion: 3.0.3.52010-03-24T15:31:10+01:00 - Seite 85Z