2011 MERCEDES-BENZ SLS AMG start stop button
[x] Cancel search: start stop buttonPage 248 of 436
The easy-entry/exit feature can be activated
or deactivated in the Convenience submenu
of the control system ( Y page 286).GWarning!
You must make sure no one can become
trapped or injured by the moving steering
wheel when the easy-entry/exit feature is
activated.
To stop steering wheel movement, move
steering wheel adjustment stalk or press one
of the memory position buttons.
Do not leave children unattended in the
vehicle, or with access to an unlocked vehicle.
Children could open the driver’s door and
unintentionally activate the easy-entry/exit
feature, which could result in an accident
and/or serious personal injury.
With the easy-entry/exit feature activated,
the steering wheel will return to its last set
position when
R you close the driver’s door with the ignition
switched on
R when you insert the SmartKey into the
starter switch or press the KEYLESS-GO
start/stop button once with the driver’s
door closed
i The last set steering wheel position is
stored when the ignition is switched off or
the position is stored in memory
( Y page 249).
With the easy-entry/exit feature activated,
the steering wheel tilts upwards when
R you remove the SmartKey from the starter
switch
R when you open the driver’s door with the
KEYLESS-GO start/stop button in position
1 or the SmartKey in starter switch position
0 or 1
i When the current position for the steering
wheel is in the uppermost tilt position, the
steering wheel will no longer be able to
move upward when the easy-entry/exit
feature is activated.
The adjustment procedure is briefly
interrupted when the engine is started.GWarning!
Let the system complete the adjustment
procedure before setting the vehicle in
motion. All steering wheel adjustment must
be completed before setting the vehicle in
motion. Driving off with the steering wheel
still adjusting could cause the driver to lose
control of the vehicle.
Crash-responsive exit aid
When you open the driver’s door after an
accident has occurred, the steering column
moves up. The position of the SmartKey in the
starter switch is insignificant. This function
facilitates exiting as well as rescue of vehicle
occupants.
The crash-responsive exit aid can only be
triggered when the easy-entry/exit feature is
activated via the control system.
Mirrors
Notes
Adjust the interior and exterior rear view
mirrors before driving so that you have a good
view of the road and traffic conditions.
Interior rear view mirror
XAdjust the interior rear view mirror
manually.
Exterior rear view mirrors
GWarning!
Exercise care when using the passenger-side
exterior rear view mirror. The mirror surface
is convex (outwardly curved surface for a
wider field of view). Objects in mirror are
closer than they appear. Check your interior
246MirrorsControls in detail
BA 197 USA, CA Edition A 2011; 1; 27, en-UShereepeVersion: 3.0.3.52010-03-24T15:31:10+01:00 - Seite 246
Page 252 of 436
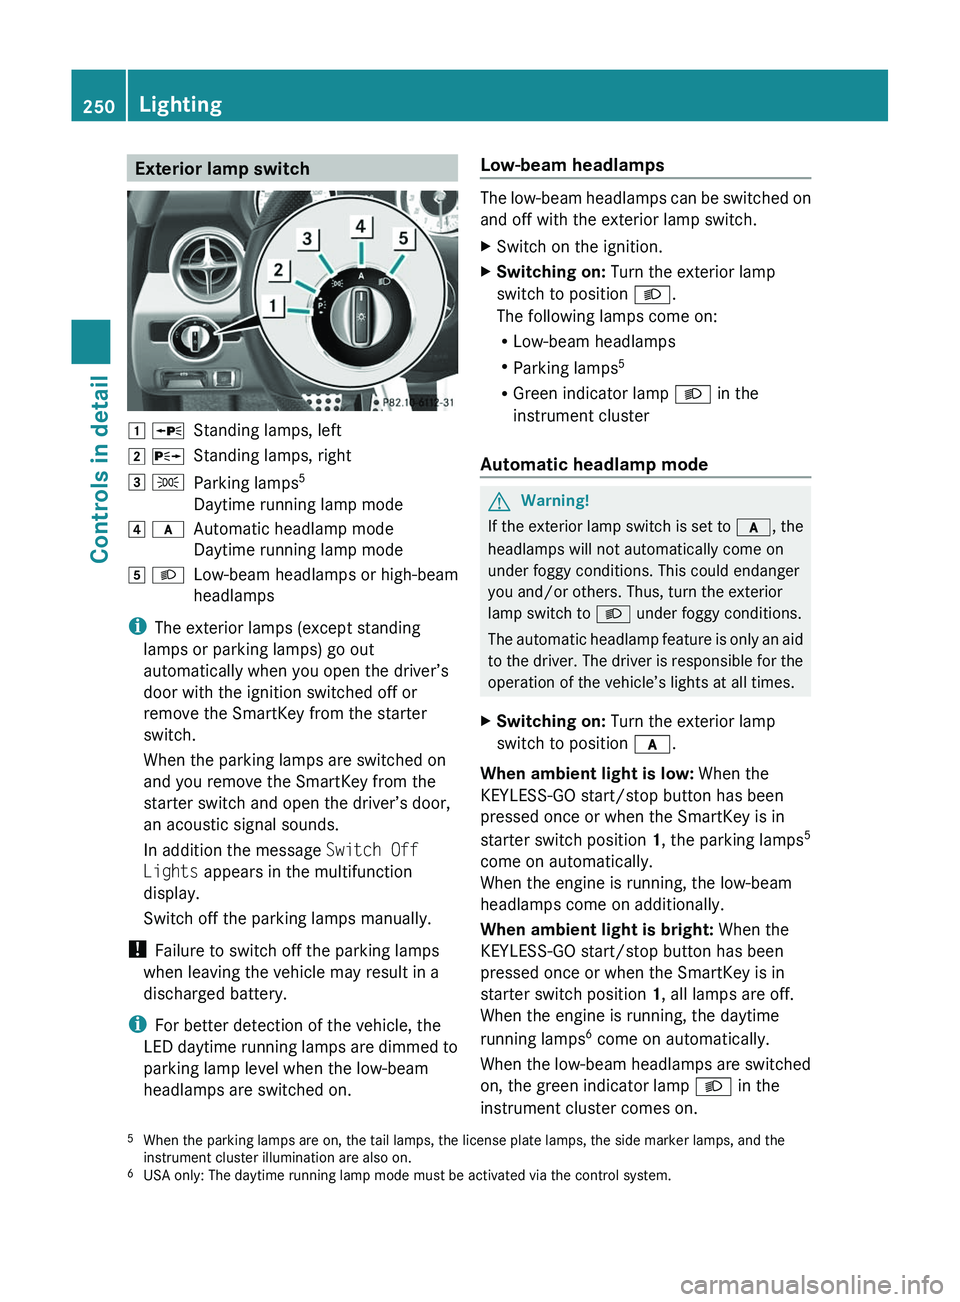
Exterior lamp switch004A 006FStanding lamps, left004B 0070Standing lamps, right004C 006CParking lamps 5
Daytime running lamp mode004D 0066Automatic headlamp mode
Daytime running lamp mode004E 0064Low-beam headlamps or high-beam
headlamps
i The exterior lamps (except standing
lamps or parking lamps) go out
automatically when you open the driver’s
door with the ignition switched off or
remove the SmartKey from the starter
switch.
When the parking lamps are switched on
and you remove the SmartKey from the
starter switch and open the driver’s door,
an acoustic signal sounds.
In addition the message Switch Off
Lights appears in the multifunction
display.
Switch off the parking lamps manually.
! Failure to switch off the parking lamps
when leaving the vehicle may result in a
discharged battery.
i For better detection of the vehicle, the
LED daytime running lamps are dimmed to
parking lamp level when the low-beam
headlamps are switched on.
Low-beam headlamps
The low-beam headlamps can be switched on
and off with the exterior lamp switch.
XSwitch on the ignition.XSwitching on: Turn the exterior lamp
switch to position 0064.
The following lamps come on:
R Low-beam headlamps
R Parking lamps 5
R Green indicator lamp 0064 in the
instrument cluster
Automatic headlamp mode
GWarning!
If the exterior lamp switch is set to 0066, the
headlamps will not automatically come on
under foggy conditions. This could endanger
you and/or others. Thus, turn the exterior
lamp switch to 0064 under foggy conditions.
The automatic headlamp feature is only an aid
to the driver. The driver is responsible for the
operation of the vehicle’s lights at all times.
XSwitching on: Turn the exterior lamp
switch to position 0066.
When ambient light is low: When the
KEYLESS-GO start/stop button has been
pressed once or when the SmartKey is in
starter switch position 1, the parking lamps 5
come on automatically.
When the engine is running, the low-beam
headlamps come on additionally.
When ambient light is bright: When the
KEYLESS-GO start/stop button has been
pressed once or when the SmartKey is in
starter switch position 1, all lamps are off.
When the engine is running, the daytime
running lamps 6
come on automatically.
When the low-beam headlamps are switched
on, the green indicator lamp 0064 in the
instrument cluster comes on.
5 When the parking lamps are on, the tail lamps, the license plate lamps, the side marker lamps, and the
instrument cluster illumination are also on.
6 USA only: The daytime running lamp mode must be activated via the control system.250LightingControls in detail
BA 197 USA, CA Edition A 2011; 1; 27, en-UShereepeVersion: 3.0.3.52010-03-24T15:31:10+01:00 - Seite 250
Page 257 of 436
For information on filling up the washer
reservoir, see “Washer system and headlamp
cleaning system” ( Y page 325).
For information on cleaning the headlamps
with washer fluid, see “Headlamp cleaning
system” ( Y page 252).
Problems with wipers
! If anything blocks the windshield wipers
(leaves, snow, etc.), switch them off
immediately.
For safety reasons, do the following before
attempting to remove any blockage:
R Stop the vehicle in a safe location.
R Turn off the engine by pressing the
KEYLESS-GO start/stop button and
open the driver’s door (with the driver’s
door open, starter switch is in position
0 , same as with SmartKey removed from
starter switch).
or
R Remove the SmartKey from the starter
switch.
R Engage the electronic parking brake.
R Remove blockage.
R Turn the windshield wipers on again.
If the windshield wipers fail to function at
all with the combination switch in position
0062 or 0063 ,
R set the combination switch to the next
higher wiper speed
R have the windshield wipers checked at
the nearest authorized Mercedes-Benz
Center
Power windows
Opening and closing
The door windows are opened and closed
electrically. The switches for all windows are
located on the driver’s door. The switch for
operating the passenger-side windows is
located on the passenger door.GObserve Safety notes, see page 57.GWarning!
When opening or closing the door windows,
make sure there is no danger of anyone being
harmed by the opening/closing procedure.
The door windows are equipped with the
express operation and automatic reversal
function. If in express operation mode a door
window encounters an obstruction that
blocks its path, the automatic reversal
function will stop the door window and open
it slightly.
The door windows operate differently when
the switch is pulled and held. See the “Closing
when a door window is blocked” section in
this chapter for details.
The closing of the door windows can be
immediately halted by releasing the switch or,
if the switch was pulled past the resistance
point and released, by either pressing or
pulling the respective switch.
If a door window encounters an obstruction
that blocks its path in a circumstance where
you are closing the door windows by pressing
and holding button 0037 on the SmartKey the
automatic reversal function will not operate.
i You can also open or close the door
windows using the SmartKey, see
“Summer opening feature” ( Y page 256)
and “Convenience closing feature”
( Y page 257).
i After switching off the ignition or
removing the SmartKey from the starter
switch, you can operate the door windows
until you open a door. If no door was
opened you can operate the door windows
for up to 5 minutes.
Power windows255Controls in detailBA 197 USA, CA Edition A 2011; 1; 27, en-UShereepeVersion: 3.0.3.52010-03-24T15:31:10+01:00 - Seite 255Z
Page 260 of 436
Starting the engineGWarning!
Inhalation of exhaust gas is hazardous to your
health. All exhaust gas contains carbon
monoxide (CO), and inhaling it can cause
unconsciousness and possible death.
Do not run the engine in confined areas (such
as a garage) which are not properly ventilated.
If you think that exhaust gas fumes are
entering the vehicle while driving, have the
cause determined and corrected
immediately. If you must drive under these
conditions, drive only with at least one
window fully open at all times.
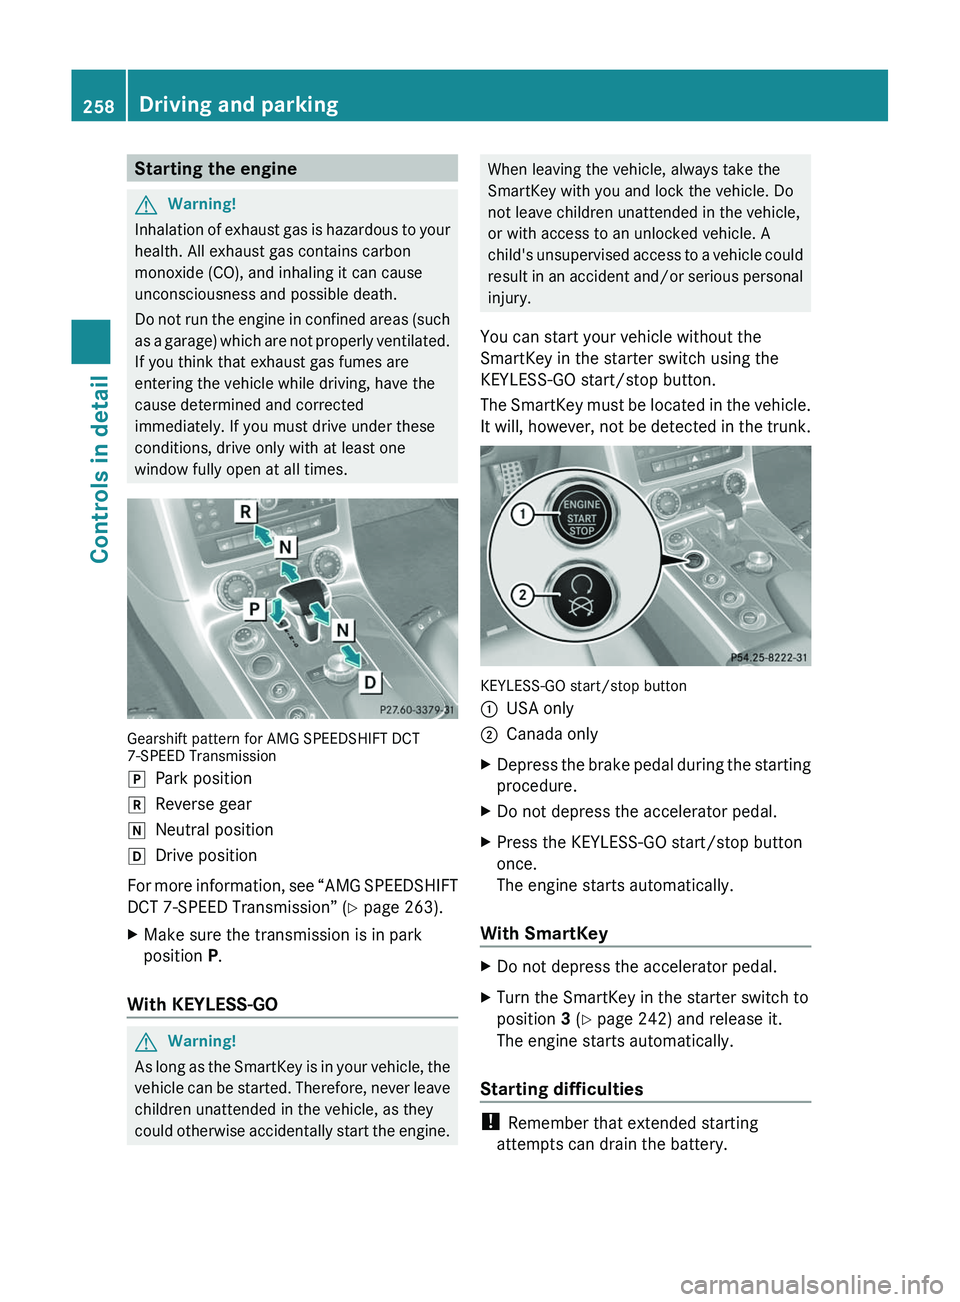
Gearshift pattern for AMG SPEEDSHIFT DCT7-SPEED Transmission
\000`Park position\000aReverse gear\000_Neutral position\000^Drive position
For more information, see “AMG SPEEDSHIFT
DCT 7-SPEED Transmission” (Y page 263).
XMake sure the transmission is in park
position P.
With KEYLESS-GO
GWarning!
As long as the SmartKey is in your vehicle, the
vehicle can be started. Therefore, never leave
children unattended in the vehicle, as they
could otherwise accidentally start the engine.
When leaving the vehicle, always take the
SmartKey with you and lock the vehicle. Do
not leave children unattended in the vehicle,
or with access to an unlocked vehicle. A
child's unsupervised access to a vehicle could
result in an accident and/or serious personal
injury.
You can start your vehicle without the
SmartKey in the starter switch using the
KEYLESS-GO start/stop button.
The SmartKey must be located in the vehicle.
It will, however, not be detected in the trunk.
KEYLESS-GO start/stop button
\000FUSA only\000GCanada onlyXDepress the brake pedal during the starting
procedure.
XDo not depress the accelerator pedal.XPress the KEYLESS-GO start/stop button
once.
The engine starts automatically.
With SmartKey
XDo not depress the accelerator pedal.XTurn the SmartKey in the starter switch to
position 3 (Y page 242) and release it.
The engine starts automatically.
Starting difficulties
! Remember that extended starting
attempts can drain the battery.
258Driving and parkingControls in detail
BA 197 USA, CA Edition A 2011; 1; 27, en-UShereepeVersion: 3.0.3.52010-03-24T15:31:10+01:00 - Seite 258
Page 263 of 436
If the extent of the damage cannot be
determined:
XContact an authorized Mercedes-Benz
Center or call Roadside Assistance.
If no damage on major assemblies, fuel
system, and engine mount can be
determined:
XStart the engine in the usual manner.
Parking
GWarning!
Do not park in areas where the hot exhaust
system could come into contact with
combustible materials. Combustible
materials such as grass, hay or leaves could
be ignited and cause a vehicle fire.
Unintended vehicle movement could cause
serious personal injury or damage to the
vehicle or the vehicle drivetrain. To reduce
such risks, always do the following before
turning off the engine and leaving the vehicle:
RKeep right foot on the brake pedal.
REngage the electronic parking brake.
RShift the transmission into park position P.
RSlowly release the brake pedal.
RWhen parked on an incline, always turn the
front wheels towards the road curb.
RPress the KEYLESS-GO start/stop button,
or turn the SmartKey in the starter switch
to position 0 and remove the SmartKey
from the starter switch.
RTake the SmartKey with you and lock the
vehicle when leaving.
Electronic parking brake
GWarning!
When leaving the vehicle, always remove the
SmartKey from the starter switch, take it with
you, and lock the vehicle. Do not leave
children unattended in the vehicle, or with
access to an unlocked vehicle. Children could
release the electronic parking brake and/or
shift the transmission out of park position P,
either of which could result in an accident
and/or serious personal injury.
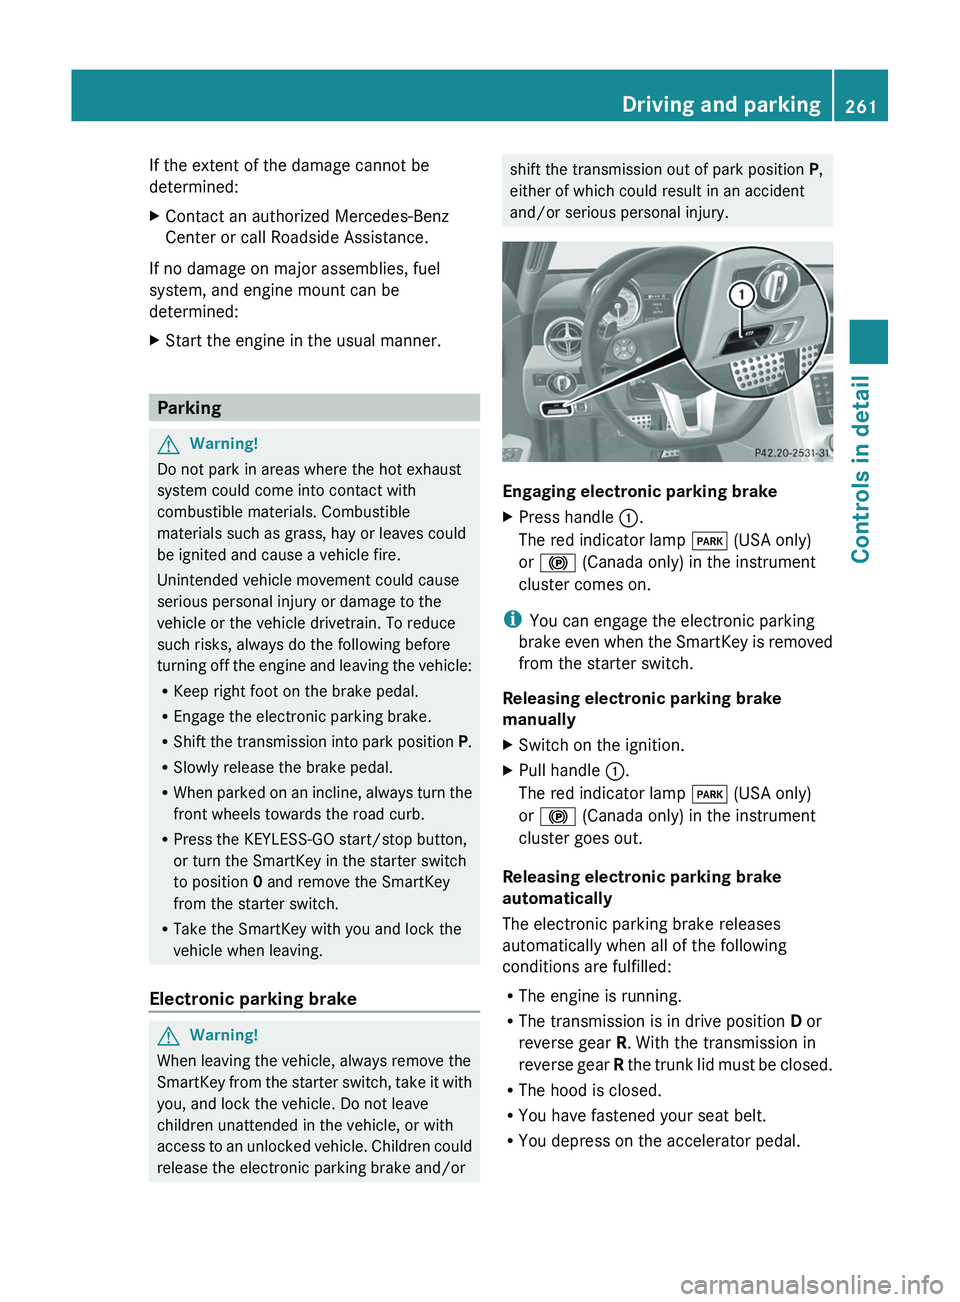
Engaging electronic parking brake
XPress handle \000F.
The red indicator lamp \000I (USA only)
or \000$ (Canada only) in the instrument
cluster comes on.
iYou can engage the electronic parking
brake even when the SmartKey is removed
from the starter switch.
Releasing electronic parking brake
manually
XSwitch on the ignition.XPull handle \000F.
The red indicator lamp \000I (USA only)
or \000$ (Canada only) in the instrument
cluster goes out.
Releasing electronic parking brake
automatically
The electronic parking brake releases
automatically when all of the following
conditions are fulfilled:
RThe engine is running.
RThe transmission is in drive position D or
reverse gear R. With the transmission in
reverse gear R the trunk lid must be closed.
RThe hood is closed.
RYou have fastened your seat belt.
RYou depress on the accelerator pedal.
Driving and parking261Controls in detailBA 197 USA, CA Edition A 2011; 1; 27, en-UShereepeVersion: 3.0.3.52010-03-24T15:31:10+01:00 - Seite 261Z
Page 264 of 436
iIf you have not fastened your seat belt,
the following conditions must be met in
order for the electronic parking brake to
release automatically:
R The driver’s door is closed and you shift
the transmission out of park position P.
or
R The driver’s door is closed and you drive
faster than 2 mph (3 km/h).
Emergency braking with electronic
parking brake
In an emergency situation, you can also brake
your vehicle by using the electronic parking
brake.XWhile driving, press handle 0046.
All four wheels of the vehicle will be braked
for as long as you press and hold the handle
for the electronic parking brake. The longer
you keep the handle pressed, the stronger
your vehicle will be braked.
During the braking procedure
R an acoustic warning sounds
R the message Release Parking Brake
appears in the multifunction display
R the red indicator lamp for the electronic
parking brake 0049 (USA only) or 0024
(Canada only) in the instrument cluster
flashes
Once the vehicle comes to a complete stop,
the electronic parking brake will engage
automatically.
Turning off the engine
GWarning!
Do not turn off the engine before the vehicle
has come to a complete stop. With the engine
not running, there is no power assistance for
the brake and steering systems. In this case,
it is important to keep in mind that a
considerably higher degree of effort is
necessary to brake and steer the vehicle.
XShift the transmission into park position P .With KEYLESS-GOXPress the KEYLESS-GO start/stop button.
With the driver’s door closed, the starter
switch is now in position 1. With the driver’s
door opened, the starter switch is set to
position 0, same as the SmartKey removed
from the starter switch ( Y page 242).
Read and observe messages that may appear
in the multifunction display ( Y page 367).
i The transmission will shift into neutral
position N automatically when you turn off
the engine with the transmission in reverse
gear R or drive position D.
The transmission will remain in neutral
position N for approximately 30 minutes
when you have shifted the transmission to
neutral position N before turning off the
engine.
The transmission will shift into park
position P automatically when you open a
door during this period.
i In an emergency you can turn off the
engine while driving by pressing and
holding the KEYLESS-GO start/stop button
for approximately 3 seconds.
With SmartKey
! Do not remove the SmartKey from the
starter switch while driving. When driving
at low speed, the transmission will
otherwise shift into park position P
automatically. The transmission could be
damaged as a result.
XTurn the SmartKey in the starter switch to
position 0.XRemove the SmartKey from the starter
switch.
Read and observe messages that may appear
in the multifunction display ( Y page 367).
i The transmission will shift into neutral
position N automatically when you turn off
the engine with the transmission in reverse
gear R or drive position D.
262Driving and parkingControls in detail
BA 197 USA, CA Edition A 2011; 1; 27, en-UShereepeVersion: 3.0.3.52010-03-24T15:31:10+01:00 - Seite 262
Page 266 of 436
Without the brake pedal depressed, the
gear selector lever can be moved up or
down, but the parking pawl remains
engaged, not allowing shifting to occur.
i The gear selector lever always returns to
its original position.
The current transmission position P, R , N ,
or D appears in the multifunction display
( Y page 265).
There are additional indicators on the cover
of the shifting gate showing the current gear
selector lever position.
The indicators come on when you insert the
SmartKey into the starter switch, and go out
when you remove the SmartKey from the
starter switch.
Shifting into park position PXWith the vehicle at a standstill, press
button 0046 on the gearshift pattern
( Y page 263).
KEYLESS-GO: When you turn off the engine
using the KEYLESS-GO start/stop button and
open a door, the transmission will shift into
park position P automatically.
SmartKey: When you turn off the engine using
the SmartKey, and remove the SmartKey
from the starter switch or open a door, the
transmission will shift into park position P
automatically.
i You cancel park position P when you
depress the brake pedal and move the gear
selector lever forward or back past the first
point of resistance. The transmission shifts
into neutral position N.
Shifting into neutral position N
XWith the vehicle at a standstill, depress the
brake pedal.XMove the gear selector lever forward or
back to the first point of resistance.
i The transmission will remain in neutral
position N for approximately 30 minutes
when you have shifted the transmission to
neutral position N before turning off the
engine. The transmission will shift into park
position P automatically when you open a
door or remove the SmartKey from the
starter switch during this period. The
transmission remains in neutral position
N when the SmartKey is in the starter
switch or when you open a door.
Shifting into reverse gear RXWith the vehicle at a standstill, depress the
brake pedal.XMove the gear selector lever forward past
the first point of resistance.
Shifting into drive position D
XWith the vehicle at a standstill, depress the
brake pedal.XMove the gear selector lever back past the
first point of resistance.
Shifting procedure
The transmission selects individual gears
automatically, depending on
R the selected gear range ( Y page 266)
R the selected program mode:
C /S/ S+ /M and RS (Y page 267)
R the position of the accelerator pedal
R the vehicle speed
With drive position D selected, you can
influence transmission shifting by
R limiting the gear range
R extending the gear range
R changing the gears manually
Double-clutching is active when downshifting
in all program modes. Double-clutching
reduces load-alteration effects and supports
sporty driving. The degree to which you
perceive double-clutching acoustically varies
depending on the selected program mode.
264AMG SPEEDSHIFT DCT 7-SPEED TransmissionControls in detail
BA 197 USA, CA Edition A 2011; 1; 27, en-UShereepeVersion: 3.0.3.52010-03-24T15:31:10+01:00 - Seite 264
Page 284 of 436
RVehicle status message memory
( Y page 282)
R Checking tire inflation pressure
electronically with the Advanced TPMS
( Y page 329)
R Calling up the maintenance service
indicator display ( Y page 353)
Vehicle status message memory
Use the vehicle status message memory
function to scan malfunction and warning
messages that may be stored in the system.
Such messages appear in the multifunction
display and are based on conditions or
system status the vehicle’s system has
recorded.
GWarning!
Malfunction and warning messages are only
indicated for certain systems and are
intentionally not very detailed. The
malfunction and warning messages are
simply a reminder with respect to the
operation of certain systems. They do not
replace the owner’s and/or driver’s
responsibility to maintain the vehicle’s
operating safety. Have all required
maintenance and safety checks performed on
the vehicle. Bring the vehicle to an authorized
Mercedes-Benz Center to address the
malfunction and warning messages.
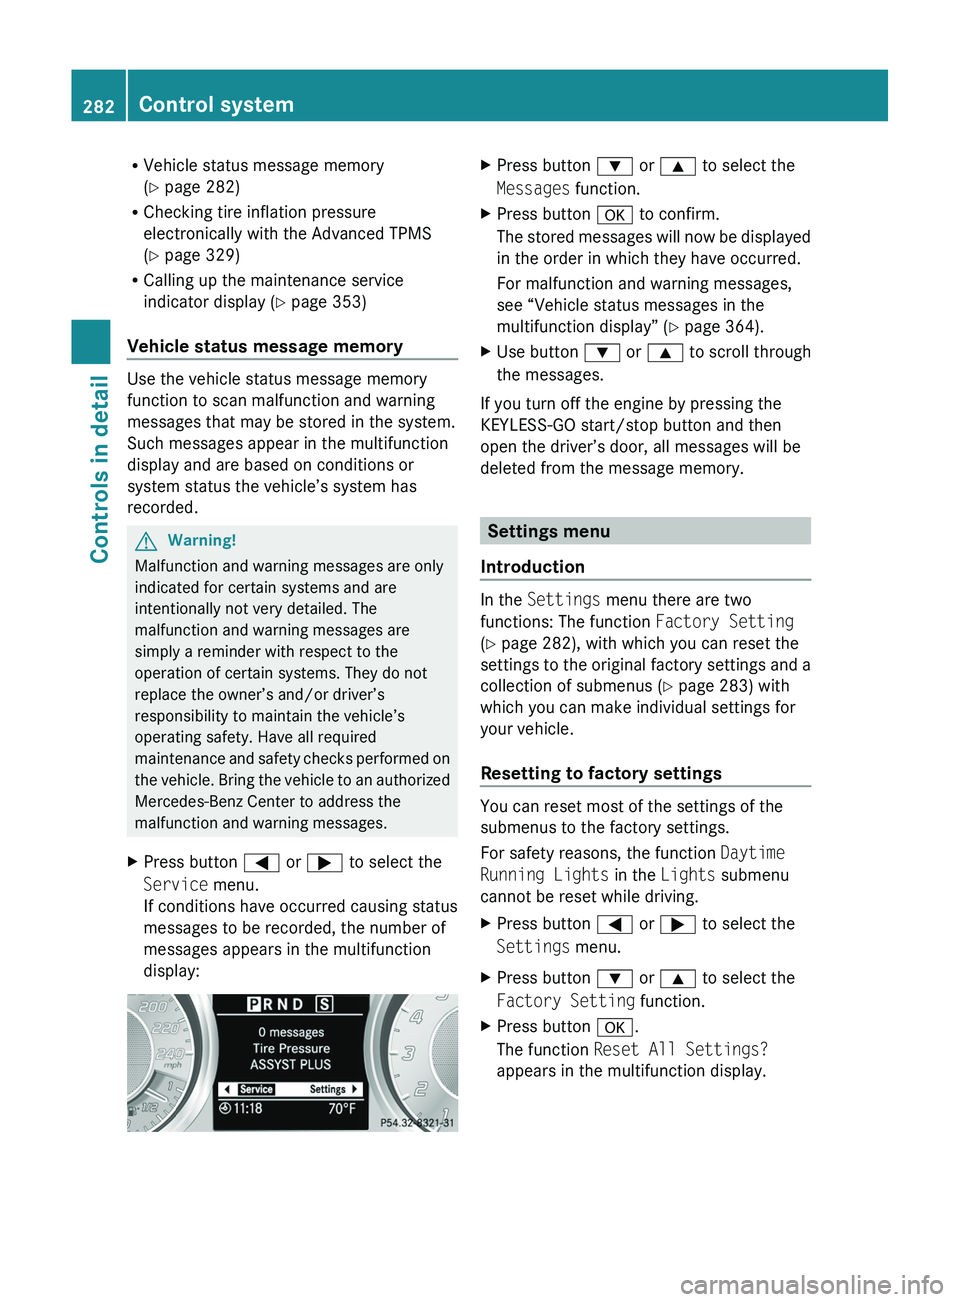
XPress button 0040 or 003E to select the
Service menu.
If conditions have occurred causing status
messages to be recorded, the number of
messages appears in the multifunction
display:XPress button 003D or 003C to select the
Messages function.XPress button 0064 to confirm.
The stored messages will now be displayed
in the order in which they have occurred.
For malfunction and warning messages,
see “Vehicle status messages in the
multifunction display” ( Y page 364).XUse button 003D or 003C to scroll through
the messages.
If you turn off the engine by pressing the
KEYLESS-GO start/stop button and then
open the driver’s door, all messages will be
deleted from the message memory.
Settings menu
Introduction
In the Settings menu there are two
functions: The function Factory Setting
( Y page 282), with which you can reset the
settings to the original factory settings and a
collection of submenus ( Y page 283) with
which you can make individual settings for
your vehicle.
Resetting to factory settings
You can reset most of the settings of the
submenus to the factory settings.
For safety reasons, the function Daytime
Running Lights in the Lights submenu
cannot be reset while driving.
XPress button 0040 or 003E to select the
Settings menu.XPress button 003D or 003C to select the
Factory Setting function.XPress button 0064.
The function Reset All Settings?
appears in the multifunction display.282Control systemControls in detail
BA 197 USA, CA Edition A 2011; 1; 27, en-UShereepeVersion: 3.0.3.52010-03-24T15:31:10+01:00 - Seite 282