2011 MERCEDES-BENZ S-Class tow eye
[x] Cancel search: tow eyePage 23 of 524

Increased vehicle weight due to
optional equipment (definition) ......500
Kilopascal (kPa) (definition) ...........501
Labeling (overview) ........................495
Load bearing index (definition) ......502
Load index ..................................... 498
Load index (definition) ...................501
Maximum loaded vehicle weight
(definition) ..................................... 501
Maximum load on a tire
(definition) ..................................... 501
Maximum permissible tire
pressure (definition) ....................... 501
Maximum tire load .........................494
Maximum tire load (definition) .......501
Optional equipment weight
(definition) ..................................... 502
PSI (pounds per square inch)
(definition) ..................................... 501
Replacing ....................................... 502
Service life ..................................... 482
Sidewall (definition) .......................502
Speed index (definition) .................500
Storing ........................................... 503
Structure and characteristics
(definition) ..................................... 500
Temperature .................................. 495
TIN (Tire Identification Number)
(definition) ..................................... 502
Tire bead (definition) ......................502
Tire pressure (definition) ................501
Tire pressures (recommended) ......500
Tire size (data) ............................... 503
Tire size designation, load-bearing
capacity, speed index ....................496
Tire tread ....................................... 481
Tire tread (definition) .....................501
Total load limit (definition) .............502
Traction ......................................... 495
Traction (definition) .......................502
Tread wear ..................................... 495
Uniform Tire Quality Grading
Standards ...................................... 494
Uniform Tire Quality Grading
Standards (definition) ....................500
Unladen weight (definition) ............501
Wear indicator (definition) .............502
Wheel rim (definition) ....................500Tires and wheels (important safety
information) ....................................... 480
Toggling .............................................. 198
Tone settings Balance and fader ..........................133
Treble and bass ............................. 133
Top Tether ............................................ 64
Towing Important safety guidelines ...........473
Installing the towing eye ................474
Removing the towing eye ...............474
Track
Selecting ........................................ 248
Track information .............................. 250
Traffic jam function ........................... 168
Traffic Program Switching off .................................. 132
Traffic report
Real-time traffic report ..................174
Traffic report read-aloud function ... 172
Traffic reports .................................... 172
Transfer case ..................................... 313
Transmission position display ......... 308
Transmission positions .................... 309
Treble and bass Adjusting ....................................... 133
Trip computer (on-board
computer) .......................................... 368
Trip odometer Calling up ....................................... 368
Resetting (on-board computer) ......369
True Image™ ...................................... 135
Trunk Automatic opening ..................... 86, 87
Emergency release ..........................88
Important safety guidelines .............85
Limiting the opening angle ............. 261
Locking separately ...........................87
Trunk lid
Display message ............................ 410
Trunk lid opening height
restriction .......................................... 261
trunk load (maximum) ...................... 516
Turn signal (display message) ......... 394
Turn signals ....................................... 274
Type plate see Vehicle identification plate Index21
Page 425 of 524

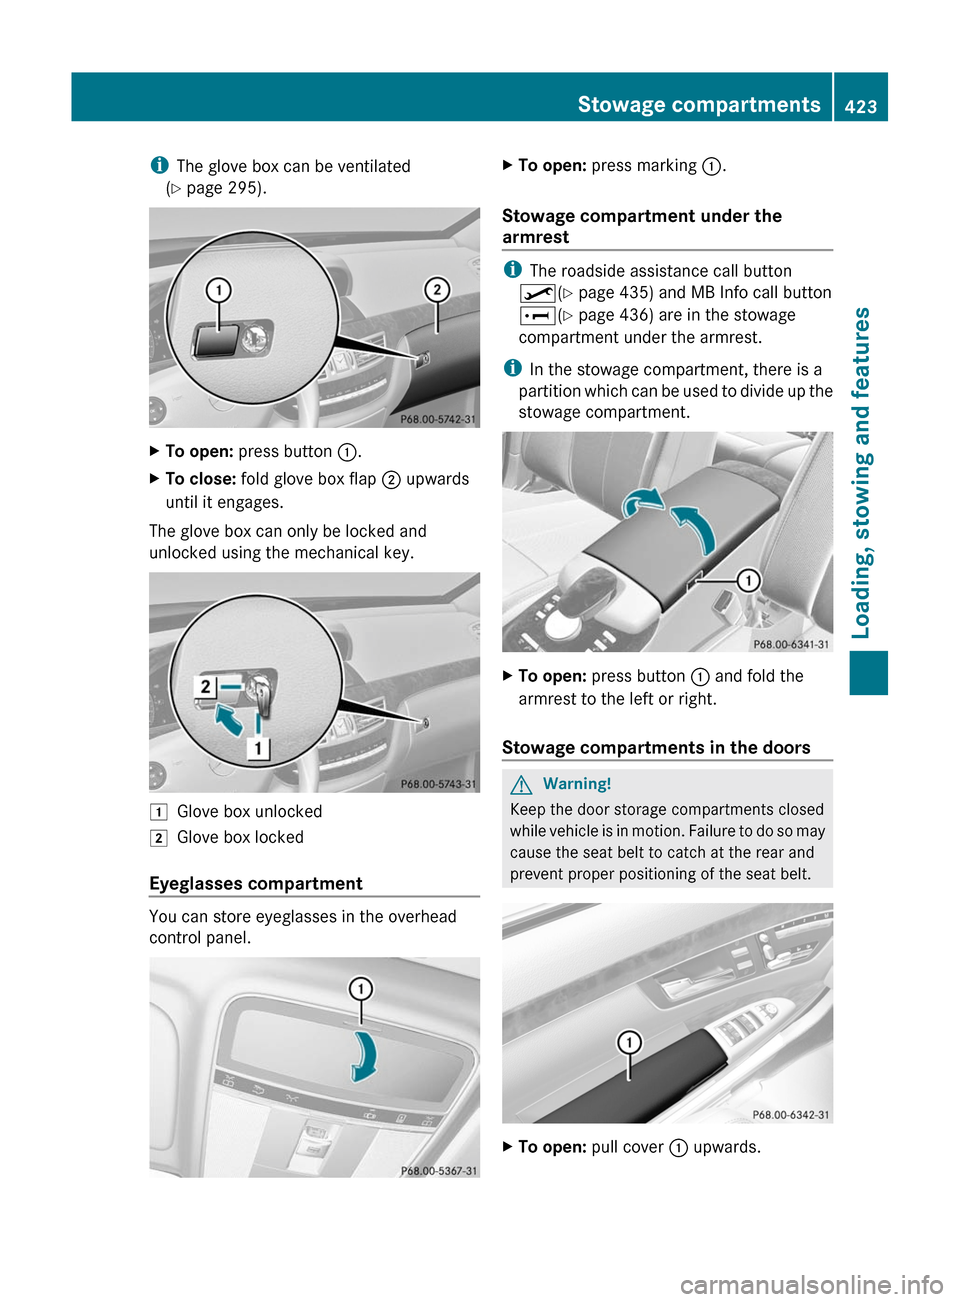
iThe glove box can be ventilated
(Y page 295).
XTo open: press button :.XTo close: fold glove box flap ; upwards
until it engages.
The glove box can only be locked and
unlocked using the mechanical key.
1Glove box unlocked2Glove box locked
Eyeglasses compartment
You can store eyeglasses in the overhead
control panel.
XTo open: press marking :.
Stowage compartment under the
armrest
iThe roadside assistance call button
º(Y page 435) and MB Info call button
E(Y page 436) are in the stowage
compartment under the armrest.
iIn the stowage compartment, there is a
partition which can be used to divide up the
stowage compartment.
XTo open: press button : and fold the
armrest to the left or right.
Stowage compartments in the doors
GWarning!
Keep the door storage compartments closed
while vehicle is in motion. Failure to do so may
cause the seat belt to catch at the rear and
prevent proper positioning of the seat belt.
XTo open: pull cover : upwards.Stowage compartments423Loading, stowing and featuresZ
Page 444 of 524

Garage door system with rolling code:
indicator lamp : flashes briefly and then
lights up for approximately two seconds.
This is repeated for up to 20 seconds.
iThe transmitter will transmit a signal for
as long as the transmitter button is being
pressed. The transmission will be halted
after a maximum of 20 seconds and
indicator lamp : will flash. Press the
transmitter button again, if necessary.
Clearing the remote control memory
XTurn the SmartKey to position 2 in the
ignition lock.
XPress and hold transmitter buttons ;
and ? for approximately 20 seconds until
indicator lamp : flashes rapidly.
The memory is cleared.
iYou should clear the remote control
memory before selling the vehicle.
Floormat on the driver's side
GWarning!
Whenever you are using a floormat, make sure
there is enough clearance and that the
floormat is securely fastened.
The floormat should always be securely
fastened using the fastening equipment.
Before driving off, check that the floormat is
securely in place and adjust it if necessary. A
loose floormat could slip and hinder proper
functioning of the pedals.
Do not place several floormats on top of each
other as this may impair pedal movement.
XSlide seat backwards.XTo install: place the floormat in position.XPress floormat eyelets : onto retainer
pins ;.
XTo remove: pull the floormats off
retainers ;.
XRemove the floormat.
Infrared reflective windshield
The infrared reflecting glass prevents the
vehicle interior from becoming too hot. It also
blocks radio waves up into the gigahertz
range.
Vehicles without Night View Assist Plus
:Areas permeable to radio waves (to the
left and right of the rain sensor cover)
;Rain sensor cover=Areas permeable to radio waves442FeaturesLoading, stowing and features
Page 475 of 524

Towing and tow-starting
Important safety notes
GWarning
Hybrid vehicles: ensure that you read the
"HYBRID" supplement. You may otherwise fail
to recognize dangers.
GWarning
If you tow the vehicle, you must use a rigid
towing bar if:
R the engine will not run.
R there is a malfunction in the brake system.
R there is a malfunction in the power supply
or the vehicle's electrical system.
With the engine not running, there is no power
assistance for the brake and steering
systems. You will then need considerably
more force to steer and to brake and the
brake pedal travel will be longer. If necessary,
depress the brake pedal with maximum force.
Before towing away, make sure that the
steering can be moved and is not locked.
If you tow or tow-start another vehicle, its
weight must not exceed the maximum
permissible gross vehicle weight of your
vehicle.
GWarning
The vehicle is braked when the HOLD function
or DISTRONIC PLUS is activated. Therefore,
deactivate HOLD and DISTRONIC PLUS if the
vehicle is to be towed.
It is better to have the vehicle transported
than to have it towed.
! You may only tow the vehicle a maximum
distance of 30 miles (50 km). A towing
speed of 30 mph (50 km/h) must not be
exceeded.
For towing distances over 30 miles
(50 km), the vehicle must loaded onto a
transporter.
! Make sure that the electric parking brake
is released. If the electric parking brake is
faulty, visit a qualified specialist workshop.
Mercedes-Benz recommends that you use
an authorized Mercedes-Benz Center for
this purpose.
! Only secure the tow rope or tow bar at the
towing eyes. Otherwise, the vehicle could
be damaged.
! Do not use the towing eye for recovery,
as this could damage the vehicle. If in
doubt, recover the vehicle with a crane.
! Drive slowly and smoothly when towing.
Excessive tractive power could otherwise
damage the vehicles.
! Do not tow with sling-type equipment.
This could damage the vehicle.
! When towing vehicles with KEYLESS-GO,
use the key instead of the Start/Stop
button. Otherwise, the automatic
transmission may shift to position P when
the driver's or front-passenger door are
opened, which could lead to damage to the
transmission.
! Vehicles with automatic transmission
must not be started by tow-starting. This
could otherwise damage the transmission.
! Vehicles with 4MATIC must not be towed
with the front or rear axle raised. This could
otherwise damage the transmission.
The automatic transmission must be in
position N when the vehicle is being towed.
Make sure that the battery is connected and
charged. You will otherwise not be able to:
R turn the SmartKey to position 2 in the
ignition lock.
R shift the automatic transmission to
position N.
i Switch off the automatic locking feature
before the vehicle is towed ( Y page 261).
Otherwise, you could lock yourself out of
the vehicle when pushing or towing the
vehicle.Towing and tow-starting473Roadside assistanceZ
Page 476 of 524

Installing/removing the towing eye
Installing the towing eye
XRemove the towing eye from the vehicle
tool kit (Y page 462).
GWarning
The exhaust tail pipe may be hot. You could
burn yourself if you touch the tail pipe. Be
particularly careful when removing the rear
cover.
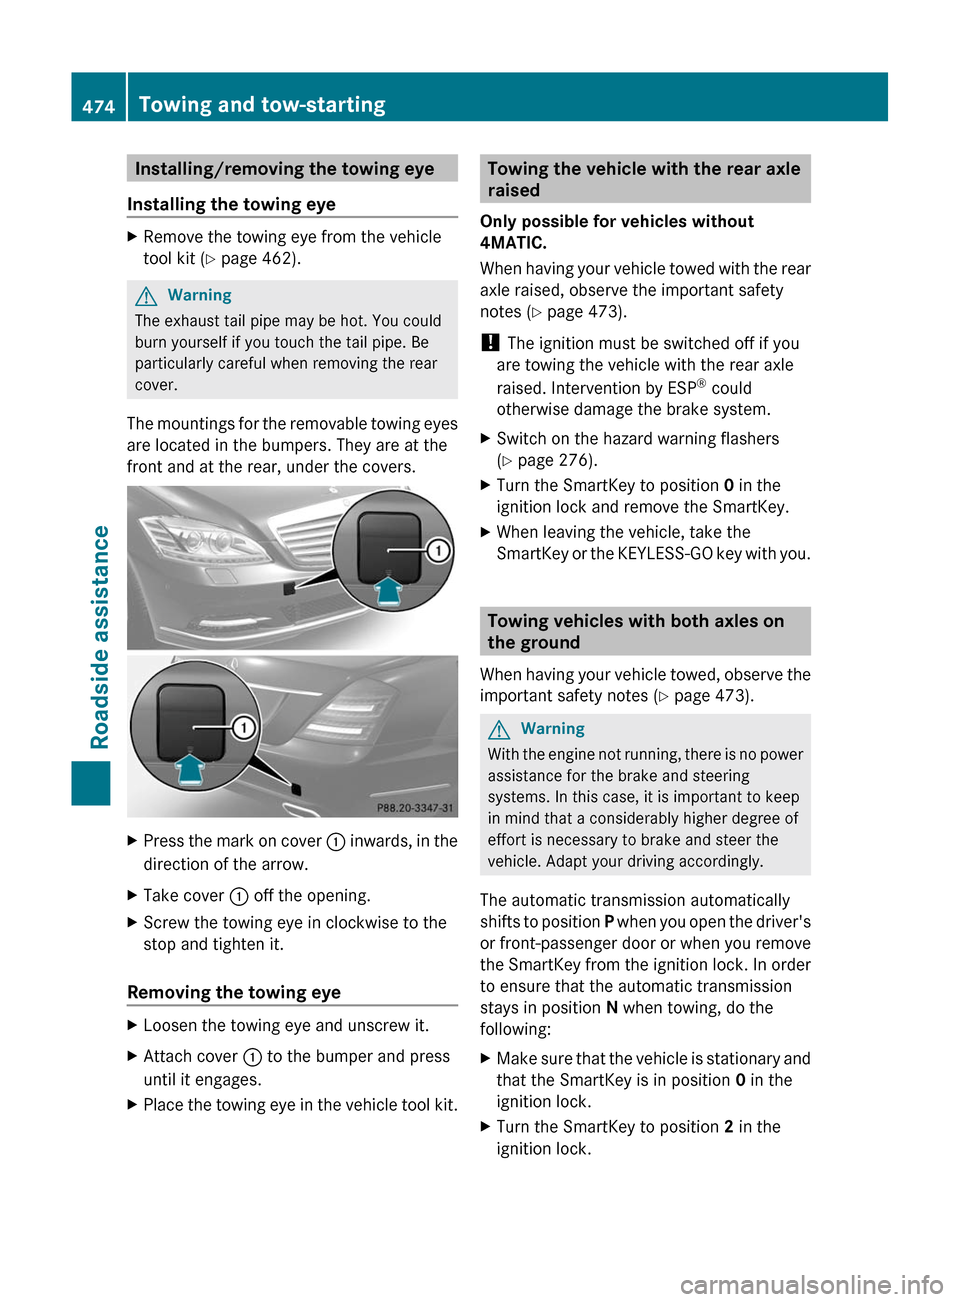
The mountings for the removable towing eyes
are located in the bumpers. They are at the
front and at the rear, under the covers.
XPress the mark on cover : inwards, in the
direction of the arrow.
XTake cover : off the opening.XScrew the towing eye in clockwise to the
stop and tighten it.
Removing the towing eye
XLoosen the towing eye and unscrew it.XAttach cover : to the bumper and press
until it engages.
XPlace the towing eye in the vehicle tool kit.Towing the vehicle with the rear axle
raised
Only possible for vehicles without
4MATIC.
When having your vehicle towed with the rear
axle raised, observe the important safety
notes (Y page 473).
! The ignition must be switched off if you
are towing the vehicle with the rear axle
raised. Intervention by ESP® could
otherwise damage the brake system.
XSwitch on the hazard warning flashers
(Y page 276).
XTurn the SmartKey to position 0 in the
ignition lock and remove the SmartKey.
XWhen leaving the vehicle, take the
SmartKey or the KEYLESS-GO key with you.
Towing vehicles with both axles on
the ground
When having your vehicle towed, observe the
important safety notes (Y page 473).
GWarning
With the engine not running, there is no power
assistance for the brake and steering
systems. In this case, it is important to keep
in mind that a considerably higher degree of
effort is necessary to brake and steer the
vehicle. Adapt your driving accordingly.
The automatic transmission automatically
shifts to position P when you open the driver's
or front-passenger door or when you remove
the SmartKey from the ignition lock. In order
to ensure that the automatic transmission
stays in position N when towing, do the
following:
XMake sure that the vehicle is stationary and
that the SmartKey is in position 0 in the
ignition lock.
XTurn the SmartKey to position 2 in the
ignition lock.
474Towing and tow-startingRoadside assistance
Page 477 of 524

On vehicles with KEYLESS-GO, use the
SmartKey instead of the Start/Stop button
( Y page 299).XDepress and hold the brake pedal.XShift the automatic transmission to
position N.XRelease the brake pedal.XRelease the electric parking brake.XSwitch on the hazard warning flashers
( Y page 276).XLeave the SmartKey inserted in the ignition
lock in position 2.
i
When towing with the hazard warning
flashers switched on, use the combination
switch as usual to signal in which direction
you are changing. In this case, only the
indicator lamps for the direction of travel
flash. When you reset the combination
switch, the hazard warning flashers start
flashing again.
Transporting the vehicle
The towing eye can be used to pull the vehicle
onto a trailer or transporter for transporting
purposes.
XTurn the SmartKey to position 2 in the
ignition lock.XShift the automatic transmission to
position N.
As soon as the vehicle has been loaded:
XPrevent the vehicle from rolling away by
applying the electric parking brake.XShift the automatic transmission to
position P.XTurn the SmartKey to position 0 in the
ignition lock and remove the SmartKey.XSecure the vehicle.
! Only lash the vehicle down by the wheels
or wheel rims, not by parts of the vehicle
such as axle or steering components.
Otherwise, the vehicle could be damaged.
Fuses
Important safety notes
The fuses in your vehicle serve to close down
faulty circuits. If a fuse blows, all the
components on the circuit and their functions
will fail.
GWarning
Only use fuses approved by Mercedes-Benz
with the specified amperage for the system in
question and do not attempt to repair or
bridge a blown fuse. Using other than
approved fuses or using repaired or bridged
fuses may cause an overload leading to a fire,
and/or cause damage to electrical
components and/or systems. Have the cause
determined and remedied by an authorized
Mercedes-Benz Center.
Blown fuses must be replaced with fuses of
the same rating, which you can recognize by
the color and value. The fuse ratings are listed
in the fuse allocation chart. An authorized
Mercedes-Benz Center will be happy to
advise you.
i If a fuse has blown, visit a breakdown
service or an authorized Mercedes-Benz
Center.
If the newly inserted fuse also blows, have the
cause traced and rectified at a qualified
specialist workshop, e.g. an authorized
Mercedes-Benz Center.
! Only use fuses that have been approved
for Mercedes-Benz vehicles and which
have the correct fuse rating for the system
concerned. Otherwise, components or
systems could be damaged.
Before changing a fuse
XPark the vehicle and apply the electric
parking brake.XSwitch off all electrical consumers.XRemove the key from the ignition lock.Fuses475Roadside assistanceZ