2011 MERCEDES-BENZ S-Class Light
[x] Cancel search: LightPage 109 of 524

iIf the battery voltage is too low, the seat
heating may switch off.
The system automatically switches down
from level 3 to level 2 after approximately
eight minutes.
The system automatically switches down
from level 2 to level 1 after approximately ten
minutes.
The system automatically switches off
approximately 20 minutes after it is set to
level 1.
XMake sure that the SmartKey is in position
2 in the ignition lock.
XTo switch on: press button : repeatedly
until the desired heating level is set.
XTo switch off: press button : repeatedly
until all the indicator lamps go out.
Problems with the seat heating
The seat heating has switched itself off
prematurely. The vehicle's electrical system
voltage is too low because too many electrical
consumers are switched on.
XSwitch off electrical consumers which you
do not need, such as the rear window
heating or interior lighting.
Switching the seat ventilation on/off
Switching on/off
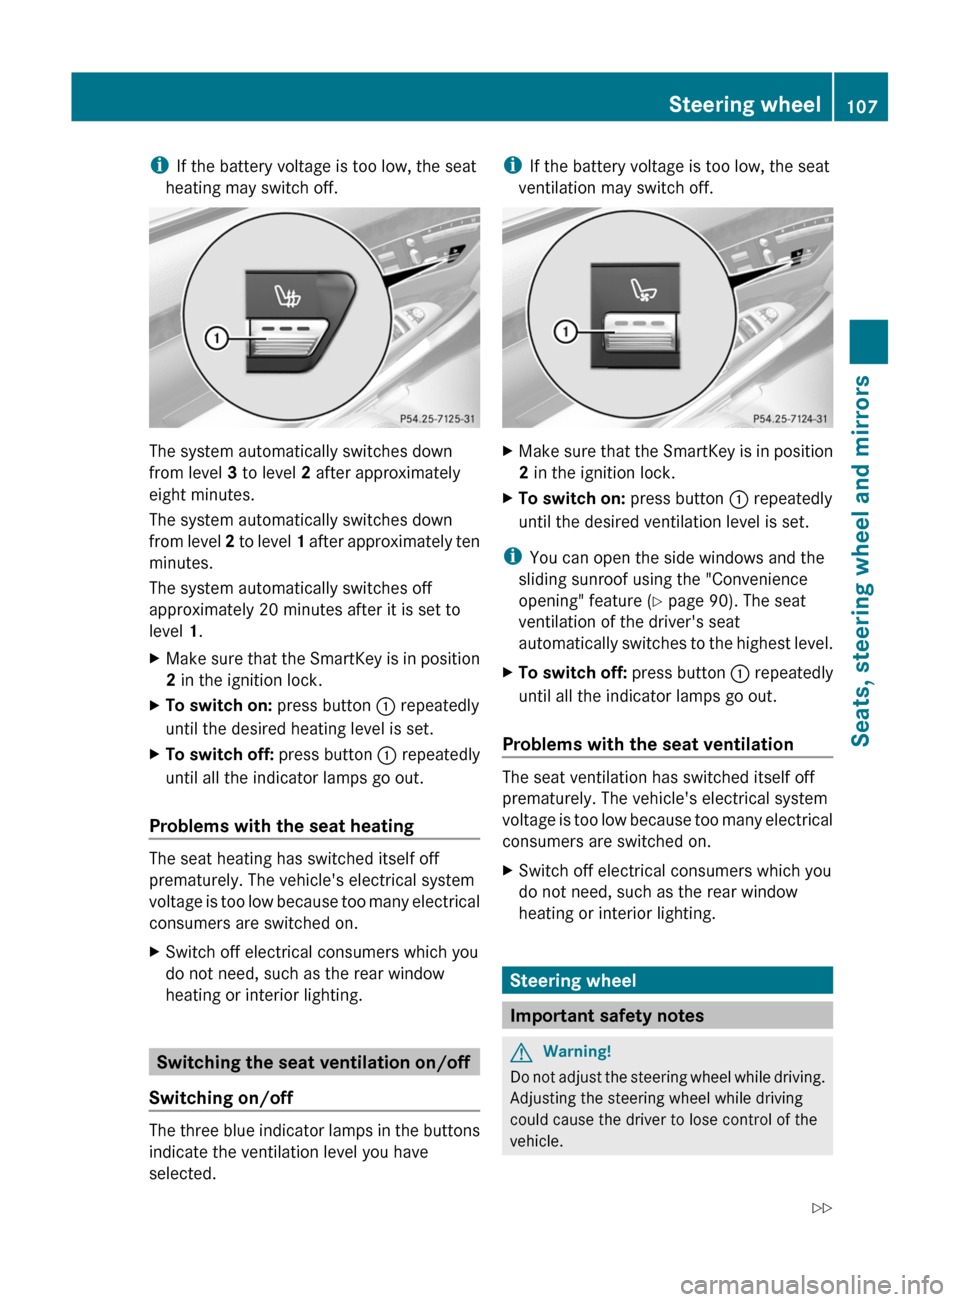
The three blue indicator lamps in the buttons
indicate the ventilation level you have
selected.
iIf the battery voltage is too low, the seat
ventilation may switch off.
XMake sure that the SmartKey is in position
2 in the ignition lock.
XTo switch on: press button : repeatedly
until the desired ventilation level is set.
iYou can open the side windows and the
sliding sunroof using the "Convenience
opening" feature (Y page 90). The seat
ventilation of the driver's seat
automatically switches to the highest level.
XTo switch off: press button : repeatedly
until all the indicator lamps go out.
Problems with the seat ventilation
The seat ventilation has switched itself off
prematurely. The vehicle's electrical system
voltage is too low because too many electrical
consumers are switched on.
XSwitch off electrical consumers which you
do not need, such as the rear window
heating or interior lighting.
Steering wheel
Important safety notes
GWarning!
Do not adjust the steering wheel while driving.
Adjusting the steering wheel while driving
could cause the driver to lose control of the
vehicle.
Steering wheel107Seats, steering wheel and mirrorsZ
Page 112 of 524

XMake sure that the SmartKey is in position
1 or 2 in the ignition lock.XPress button ; for the right-hand exterior
mirror or button = for the left-hand
exterior mirror.
The indicator lamp lights up in the button
that has been pressed.XPress adjustment button : up, down, to
the right or to the left until the exterior
mirror is set in a way which provides you
with a good overview of traffic conditions.
Folding the exterior mirrors in or out
electrically
XMake sure that the SmartKey is in position
1 or 2 in the ignition lock.XBriefly press button :.
Both exterior mirrors fold in or out.
i Make sure that the exterior mirrors are
always folded out fully while the vehicle is
in motion, as they may otherwise vibrate.
Folding the exterior mirrors in or out
automatically
When the "Automatic mirror folding" function
is activated in COMAND ( Y page 258):
R the exterior mirrors fold in automatically as
soon as you lock the vehicle from the
outside.
R the exterior mirrors fold out again
automatically as soon as you unlock the
vehicle and then open the driver's or front-
passenger door.
i The mirrors do not fold out if they have
been folded in manually.
Exterior mirror out of position
If an exterior mirror has been pushed out of
position, proceed as follows:
XPress the mirror-folding button
( Y page 110) repeatedly until you hear the
mirrors engage in position.
The mirror housing is engaged again and
you can adjust the exterior mirrors as usual
( Y page 109).
Automatic anti-glare mirrors
GWarning!
The auto dimming function does not react if
incoming light is not aimed directly at sensors
in the interior rear view mirror.
The interior rear view mirror and the exterior
rear view mirror on the driver's side do not
react, for example, if the rear window
sunshade is in raised position.
Light hitting the mirror(s) at certain angles
(incident light) could blind you. As a result,
you may not be able to observe traffic
conditions and could cause an accident.
The rear-view mirror and the exterior mirror
on the driver's side automatically go into anti-
glare mode if the ignition is switched on and
incident light from headlamps strikes the
sensor in the rear-view mirror.
110MirrorsSeats, steering wheel and mirrors
Page 113 of 524

The mirrors do not go into anti-glare mode if
reverse gear is engaged or the interior lighting
is switched on.
Parking position for the exterior
mirror on the front-passenger side
Setting and storing the parking position
You can position the front-passenger side
exterior mirror in such a way that you can see
the rear wheel on that side as soon as you
engage reverse gear. You can store this
position.
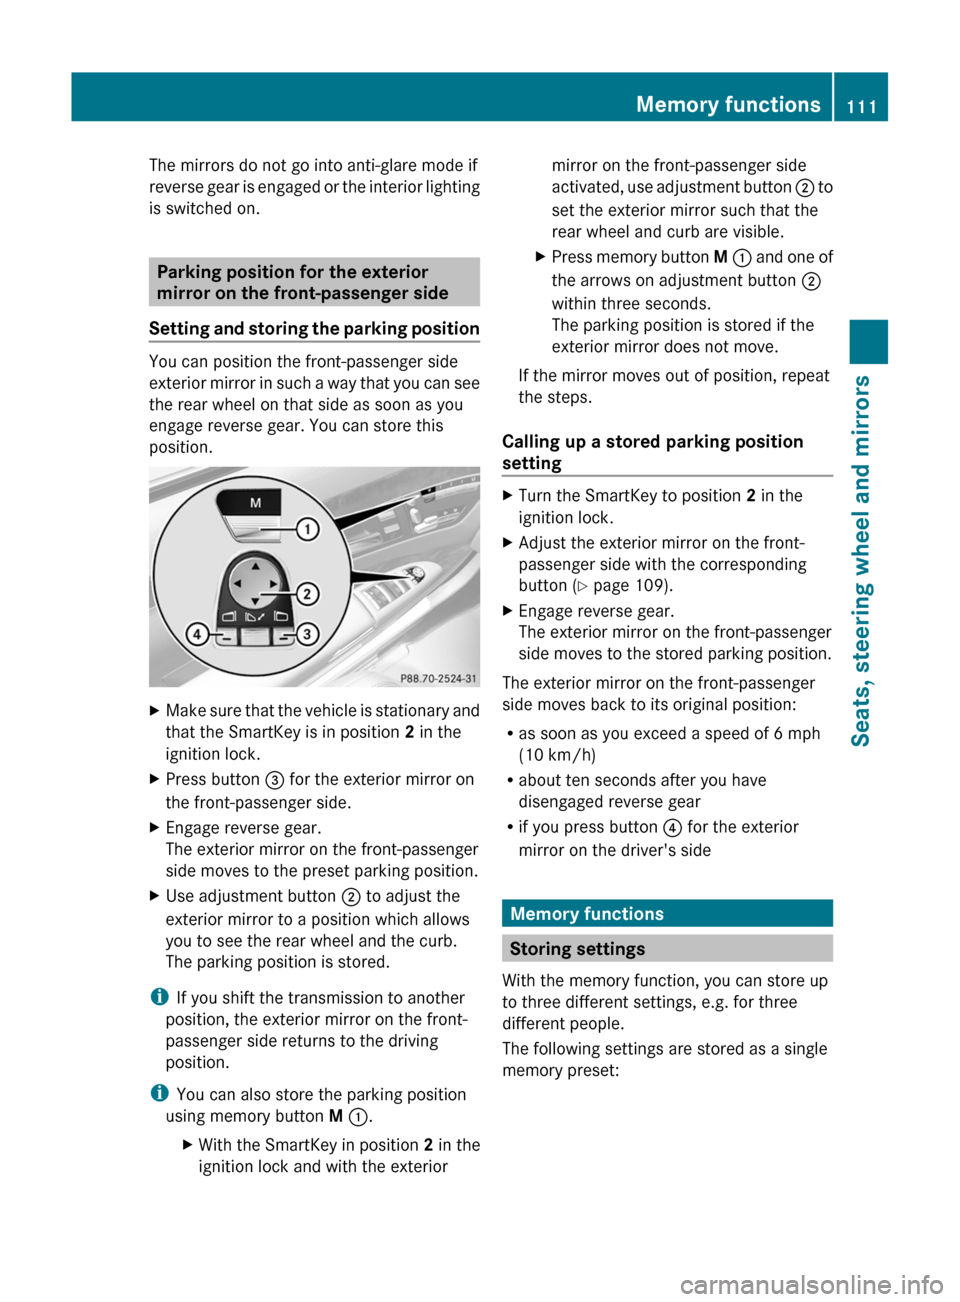
XMake sure that the vehicle is stationary and
that the SmartKey is in position 2 in the
ignition lock.
XPress button = for the exterior mirror on
the front-passenger side.
XEngage reverse gear.
The exterior mirror on the front-passenger
side moves to the preset parking position.
XUse adjustment button ; to adjust the
exterior mirror to a position which allows
you to see the rear wheel and the curb.
The parking position is stored.
iIf you shift the transmission to another
position, the exterior mirror on the front-
passenger side returns to the driving
position.
iYou can also store the parking position
using memory button M :.
XWith the SmartKey in position 2 in the
ignition lock and with the exterior
mirror on the front-passenger side
activated, use adjustment button ; to
set the exterior mirror such that the
rear wheel and curb are visible.
XPress memory button M : and one of
the arrows on adjustment button ;
within three seconds.
The parking position is stored if the
exterior mirror does not move.
If the mirror moves out of position, repeat
the steps.
Calling up a stored parking position
setting
XTurn the SmartKey to position 2 in the
ignition lock.
XAdjust the exterior mirror on the front-
passenger side with the corresponding
button (Y page 109).
XEngage reverse gear.
The exterior mirror on the front-passenger
side moves to the stored parking position.
The exterior mirror on the front-passenger
side moves back to its original position:
Ras soon as you exceed a speed of 6 mph
(10 km/h)
Rabout ten seconds after you have
disengaged reverse gear
Rif you press button ? for the exterior
mirror on the driver's side
Memory functions
Storing settings
With the memory function, you can store up
to three different settings, e.g. for three
different people.
The following settings are stored as a single
memory preset:
Memory functions111Seats, steering wheel and mirrorsZ
Page 122 of 524

NaviAudioTelephoneVideoVehicleModeFM/AM radioVideo DVDECOMap orientationSatRadioAUXMulticontour
seat/lumbar
settingsPoint of interest
symbols on the mapDiscVideo offRear window
blindRoad signs on the
mapMemory cardEASY-ENTRY/
EXIT systemText information on
mapMUSIC
REGISTERExterior
lighting
delayed
switch-off timeO Speed Limit AssistMedia
InterfaceInterior
lighting
delayed
switch-offO Topographical
mapUSBAmbient
lightingO City viewRearO Automatic
mirror fold-in
functionO Freeway
informationAUXO Locator
lightingO Audio fadeoutAudio offO Automatic
lockingSIRIUS serviceO Interior
motion sensorMap versionO Tow-away
protectionO Trunk lid
opening height
restrictionSPLITVIEW
SPLITVIEW allows the driver and front
passenger to use separate COMAND
functions at the same time. Depending on the
viewing angle of the display (from the driver's
seat or from the front passenger seat), you
will see two different displays.
For example, the "Navi" function can be
viewed from the driver's side while the video120At a glanceCOMAND
Page 124 of 524

removed, the settings on the front-passenger
side are saved for approximately 30 minutes
longer. After this period, reactivation on the
front-passenger side means that the settings
from the driver's side will be used.
Cordless headphones for the front
passenger
There are different cordless headphones for
the front passenger and the rear
compartment.
The cordless headphones for the front
passenger can be identified by SPLITVIEW
symbol : on the headband.
The cordless headphones for the front
passenger cannot be used in the rear
compartment. Equally, the headphones for
the rear compartment cannot be used by the
front passenger.
Swiveling the COMAND display and
setting the brightness
! Do not place any objects in front of or
behind the COMAND display and/or do not
secure any objects to the COMAND
display. Movement could otherwise be
prevented when folding the display in/out.
You can swivel the COMAND display7. The
buttons are located beside the COMAND
display.
Swiveling:To swivel the display to the left;To swivel the display to the right
Setting the brightness
:Brightness of the instrument cluster
lighting
;Brightness of the COMAND display
Brighter or dimmer:
XTurn control : or ; clockwise or counter-
clockwise.
iIf Night View Assist Plus is activated, only
the brightness of the multifunction display
is adjusted with control :.
Display design
When the default settings are selected, the
display automatically switches between day
design and night design.
You can change these settings using
COMAND (Y page 141).
7Not with SPLITVIEW.122At a glanceCOMAND
Page 125 of 524

Cleaning instructions
! Do not touch the COMAND display. The
display has a very sensitive high-gloss
surface; there is a risk of scratching. If you
have to clean the screen, however, use a
mild cleaning agent and a soft, lint-free
cloth.
When cleaning, the display must be switched
off and cooled down. Clean the display
screen, when necessary, with a commercially
available microfiber cloth and cleaning agent
for TFT/LCD displays. Then, dry the surface
with a dry microfiber cloth.
Avoid using alcoholic thinners, gasoline or
abrasive cleaning agents. These products can
damage the display surface. Do not apply
pressure to the display surface when cleaning
it as this could cause irreversible damage.
Remote control
Overview
You can use the remote control to operate the
COMAND display, SPLITVIEW and either one
of the rear-compartment screens.
:To switch the screen on/off (Rear Seat
Entertainment System only)
;To switch button lighting on/off=To select the screen for remote control
operation (COMAND, SPLITVIEW, L
REAR and REAR R can be selected)
?To select a menu or menu itemATo confirm a selection or settingBTo switch the sound on/off (Rear Seat
Entertainment System in conjunction with
corded headphones)
CTo adjust the volume (Rear Seat
Entertainment System in conjunction with
corded headphones)
DCOMAND: e.g. to set the station, skip
track, fast forward/rewind. Rear Seat
Entertainment System: skip track, fast
forward/rewind
At a glance123COMANDZ
Page 126 of 524

ECOMAND: e.g. to select a station from
presets, select a track, enter directly,
enter a phone number. Rear Seat
Entertainment System: to select a
track, enter directlyFTo leave the menu (back)XPoint the remote control at the
corresponding screen and execute the
functions by pressing the corresponding
button.
i The remote control's function may be
restricted depending on the angle at which
it is pointed at the respective screen.
Selecting the screen for the remote
control
XTurn thumbwheel = until the desired
display is highlighted in the window.
Switching the screen on/off (Rear Seat
Entertainment System only)
If the key is in position 0 or 1 in the ignition
lock (see vehicle Operator's Manual), or the
key is not inserted, the screens in the rear will
switch off after 30 minutes. Before the
screens switch off, they show a message to
this effect.
You can switch the screens back on,
However, this will discharge the starter
battery.
XPoint the remote control at the rear-
compartment screen which has been
selected for remote operation.XPress button : on the remote control.
The respective rear screen switches on or
off.
i You can only switch the screens on using
the remote control if the ignition is
switched on.
Switching button lighting on/offXPress button ; on the remote control.
Depending on the previous status, the
button lighting is switched on or off.
i If you do not use the remote control for
about 15 seconds, the button lighting
switches off automatically.
Mute
XPress button B on the remote control.
The sound is switched on/off.
Adjusting the volume
This function is available for COMAND and for
the Rear Seat Entertainment System in
conjunction with corded headphones.
XPress one of buttons C on the remote
control.
The volume of the currently selected audio
or video source changes.
For COMAND, you can also adjust the
volume for phone calls and navigation
announcements.
Selecting a menu/menu item and
confirming your selection
XSelect a menu/menu item using the
=;9: buttons and press
the 9 button to confirm.124At a glanceCOMAND
Page 129 of 524

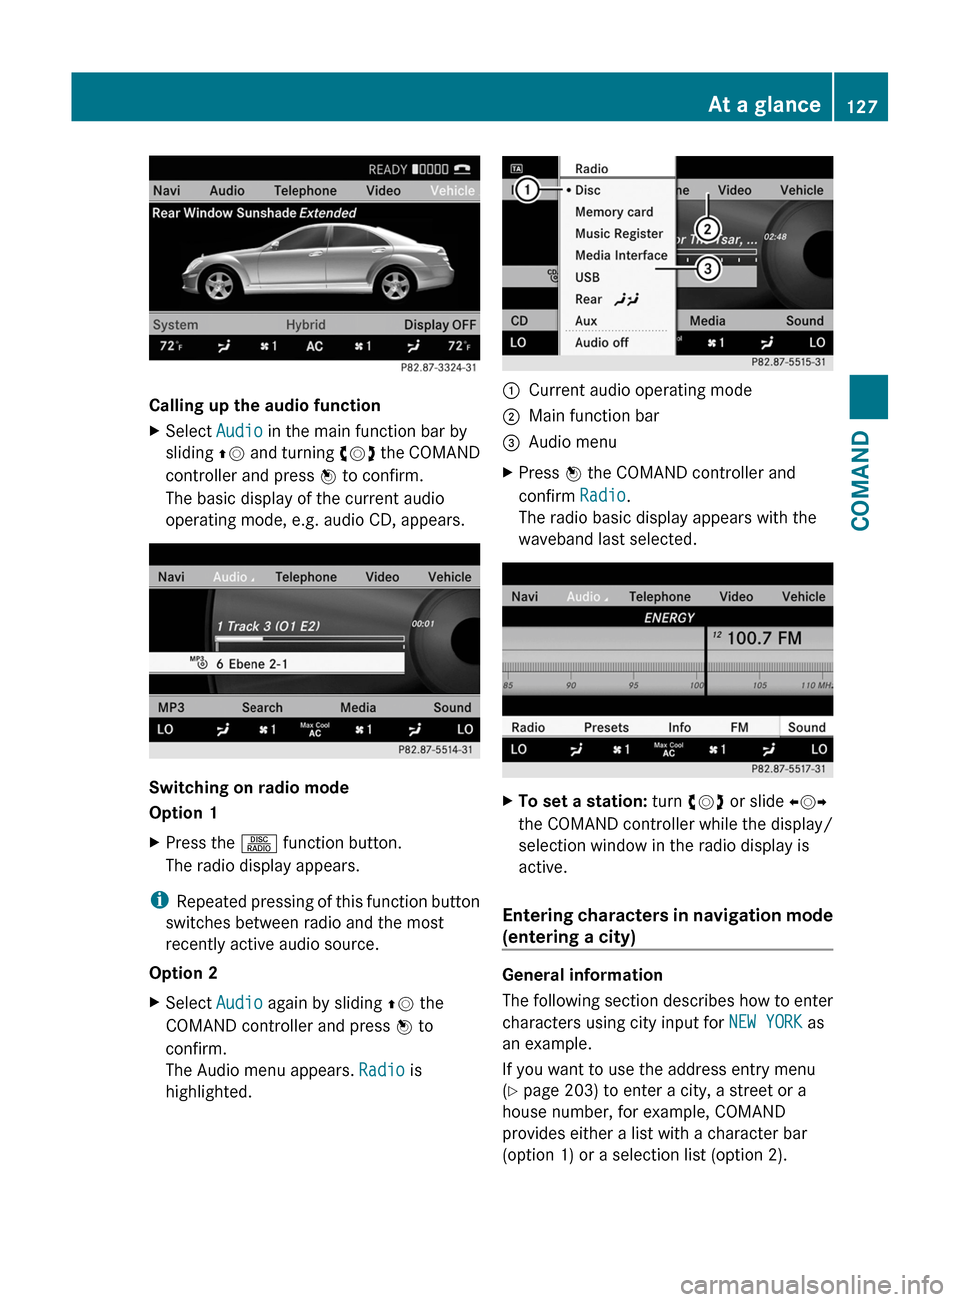
Calling up the audio function
XSelect Audio in the main function bar by
sliding ZV and turning cVd the COMAND
controller and press W to confirm.
The basic display of the current audio
operating mode, e.g. audio CD, appears.
Switching on radio mode
Option 1
XPress the R function button.
The radio display appears.
iRepeated pressing of this function button
switches between radio and the most
recently active audio source.
Option 2
XSelect Audio again by sliding ZV the
COMAND controller and press W to
confirm.
The Audio menu appears. Radio is
highlighted.
:Current audio operating mode;Main function bar=Audio menuXPress W the COMAND controller and
confirm Radio.
The radio basic display appears with the
waveband last selected.
XTo set a station: turn cVd or slide XVY
the COMAND controller while the display/
selection window in the radio display is
active.
Entering characters in navigation mode
(entering a city)
General information
The following section describes how to enter
characters using city input for NEW YORK as
an example.
If you want to use the address entry menu
(Y page 203) to enter a city, a street or a
house number, for example, COMAND
provides either a list with a character bar
(option 1) or a selection list (option 2).
At a glance127COMANDZ