2011 MERCEDES-BENZ S-Class Light
[x] Cancel search: LightPage 188 of 524

You can view the current direction of travel,
the current height and the coordinates of the
current vehicle position in the compass view.XTo switch on navigation mode: press the
S function button once or twice.XTo show the menu: press the COMAND
controller W.XSelect Position in the navigation menu by
sliding VÆ and turning cVd the COMAND
controller and press W to confirm.XSelect Compass and press W to confirm.XTo exit the display: confirm Back by
pressing W or press the % button.
Installing new map software
The digital data generated by the map
software becomes outdated in the same way
as conventional road maps. Optimal route
guidance can only be provided by the
navigation system in conjunction with the
most up-to-date map software. Information
about new map software versions can be
obtained from an authorized Mercedes-Benz
Center.
You can install new map software yourself
using one or more DVDs, depending on the
size.
The installation process can take between 10
and 120 minutes depending on the size of the
map software. If radio mode is selected
before you start the installation process, you
can still adjust the volume. It is also still
possible to operate the automatic climate
control and cancel the process on COMAND.
Other functions are not operational. If
possible, carry out the installation process
when the vehicle is stationary. This takes less
time, since the DVD read speed is higher
when the vehicle is stationary than when it is
in motion. If the starter battery is not
sufficiently charged, COMAND may end the
process automatically in order to preserve
the battery. Therefore, keep the engine
running during the installation process.
GWarning
Never leave the engine running in enclosed
spaces. The exhaust gases contain toxic
carbon monoxide. Breathing in exhaust fumes
is a health hazard and can lead to
unconsciousness or death.
Displaying information about the
currently used map version
XTo switch on navigation mode: press the
S function button once or twice.XTo show the menu: press the COMAND
controller W.XSelect Navi in the main function bar by
sliding VÆ and turning cVd the COMAND
controller and press W to confirm.XSelect Map Version and press W to
confirm.
Notes on handling DVDs
R Only touch the edges of DVDs.
R Handle DVDs carefully to avoid read errors.
R Avoid scratching DVDs or getting
fingerprints or dust on them.
R Use a conventional cleaning cloth to clean
DVDs. Never wipe in a circle, but instead in
straight lines from the inside to the outside.
R Place DVDs back in their cases after use.
R Do not expose DVDs to heat or direct
sunlight.
Map software copy protection
Map software for COMAND is subject to a fee.
Map software can only be used on one vehicle
with an activation code and is not
transferable. The six-digit activation code is
available at your authorized Mercedes-Benz
Center. Contact your authorized Mercedes-
Benz Center if you lose the activation code or
if COMAND does not accept the code that you
received.
Your vehicle is delivered from the factory with
map software. Depending on the country,
map software for your region is either pre-
installed (Europe/USA) or the map software
186NavigationCOMAND
Page 196 of 524

The passcode is any one to sixteen-digit
number combination which you can
determine yourself. You must enter the same
number combination in COMAND and in the
Bluetooth®-capable mobile phone (see the
operating instructions of the mobile phone).
iSome mobile phones require a four-digit
(or longer) passcode.
If you want to re-authorize a mobile phone
following de-authorization, you can select a
different passcode.
XTo enter a passcode in COMAND: press
the number keys in sequence.
¬ is highlighted after the first number
has been entered.
or
XSelect the digits one by one by turning
cVd the COMAND controller and press
W to confirm. Then, select ¬.
XTo confirm an entry in COMAND: press
W the COMAND controller.
XNow enter the same passcode in the mobile
phone.
To make entries on the mobile phone: if
the Bluetooth® connection is successful, you
will be requested to enter the passcode
(access code, passkey) (see mobile phone
operating instructions).
XEnter the same passcode in the mobile
phone as already entered in COMAND.
iAfter entering the passcode, you may also
need to enter a confirmation in your mobile
phone to connect calls. Please check your
mobile phone display.
If the Error during authorization
process message appears on the
COMAND display, you may have exceeded
the allowed time. Repeat the procedure.
The mobile phone is connected to COMAND
(authorized). You can now make calls using
the COMAND hands-free system.
External authorization
If COMAND does not detect your mobile
phone, this may be due to particular security
settings on your mobile phone. In this case,
you can test if your mobile phone can find
COMAND. The Bluetooth® device name of
COMAND is MB Bluetooth.
Observe the following: some mobile phones
require that you reconnect to COMAND after
you have entered the passcode (see the
mobile phone operating instructions). The
mobile phone cannot otherwise be
authorized.
XPress the S function button on the
COMAND controller once or twice.
XSelect Data/connections in the
telephone basic menu by sliding VÆ and
turning cVd the COMAND controller and
press W to confirm.
XSelect Bluetooth telephones and press
W to confirm.
XSelect Update and press W to confirm.XSelect Options by sliding VY and press
W to confirm.
XSelect External authorization and
press W to confirm.
194TelephoneCOMAND
Page 207 of 524

stores the destination in the address book
with the complete navigable address data.
In this case, navigation can be started
without any further data input.
If the contact entry contains a postal
address, e.g. as a result of importing a
vCard, the system can also navigate to this
address. If the data is incomplete or
unclear, COMAND asks the user to enter
the relevant address data. After the entry
has been completed and navigation has
been started, COMAND replaces the
existing address with the navigable
address if necessary.XSearch for an address book entry using the
¤ symbol.XDisplay the details about an entry and
highlight the address data field.XSelect Options by sliding VÆ and turning
cVd the COMAND controller and press
W to confirm.XSelect Navigate and press W to confirm.XSelect Start and press W to confirm.
i
You may only select Navigate if the
address data field contains complete,
navigable data. This is indicated by the ¤
symbol.
Voice tags*
i Voice tags are entered via Voice Control
System*; see the separate operating
instructions for Voice Control System*.
Adding or changing a voice tag
i You can add one voice tag per address
book entry.
XSearch for an address book entry with or
without a voice tag ( ¦ symbol).XSelect Options by sliding VÆ and turning
cVd the COMAND controller and press
W to confirm.XSelect Voice tag and press W to confirm.XSelect Add or Edit and press W to confirm.
Subsequent operation is controlled
by voice. Voice Control System* guides you
through the menus.
Deleting a voice tag
XSearch for an address book entry with a
voice tag.XSelect Options by sliding VÆ and turning
cVd the COMAND controller and press
W to confirm.XSelect Voice tag and press W to confirm.XSelect Delete and press W to confirm.
A deletion prompt appears.
Listening to a voice tag
XSearch for an address book entry with a
voice tag.XSelect Options by sliding VÆ and turning
cVd the COMAND controller and press
W to confirm.XSelect Voice tag and press W to confirm.XSelect Listen and press W to confirm.
You will hear the voice tag.
Using call lists
Introduction
COMAND displays calls received (including
missed calls) and made during phone
operation in lists.
i The respective menu item can only be
selected if calls have already been made or
received in COMAND or if the call lists have
been imported from the telephone.
Opening the call list and selecting an
entry
XTo call up the telephone menu: press the
S function button.XSelect Call lists in the telephone basic
menu by sliding VÆ and turning cVd theTelephone205COMAND* optionalZ
Page 222 of 524

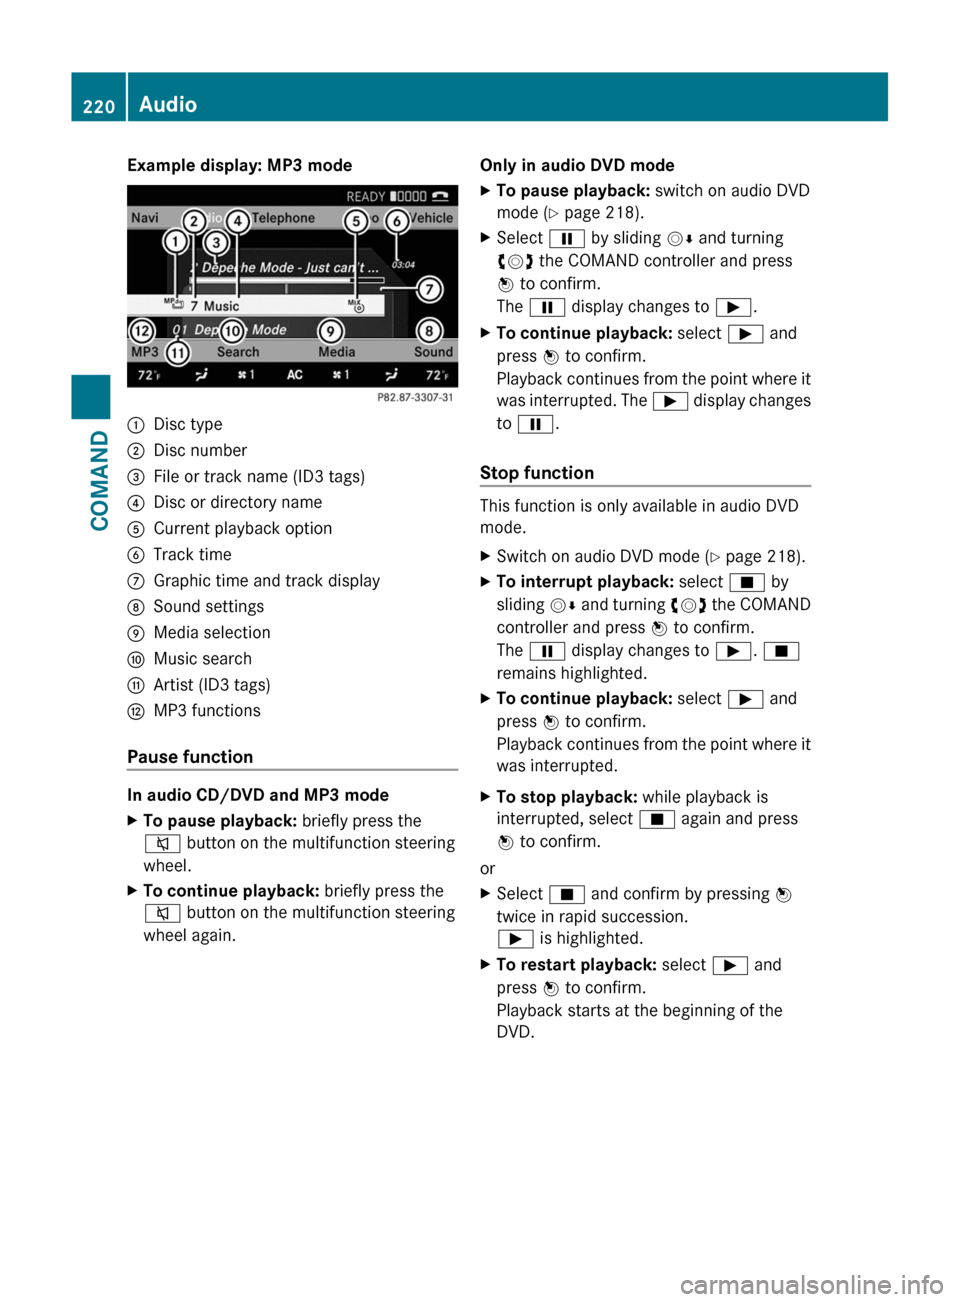
Example display: MP3 mode:Disc type;Disc number=File or track name (ID3 tags)?Disc or directory nameACurrent playback optionBTrack timeCGraphic time and track displayDSound settingsEMedia selectionFMusic searchGArtist (ID3 tags)HMP3 functions
Pause function
In audio CD/DVD and MP3 mode
XTo pause playback: briefly press the
8 button on the multifunction steering
wheel.XTo continue playback: briefly press the
8 button on the multifunction steering
wheel again.Only in audio DVD modeXTo pause playback: switch on audio DVD
mode ( Y page 218).XSelect Ë by sliding VÆ and turning
cVd the COMAND controller and press
W to confirm.
The Ë display changes to Ì.XTo continue playback: select Ì and
press W to confirm.
Playback continues from the point where it
was interrupted. The Ì display changes
to Ë .
Stop function
This function is only available in audio DVD
mode.
XSwitch on audio DVD mode ( Y page 218).XTo interrupt playback: select É by
sliding VÆ and turning cVd the COMAND
controller and press W to confirm.
The Ë display changes to Ì. É
remains highlighted.XTo continue playback: select Ì and
press W to confirm.
Playback continues from the point where it
was interrupted.XTo stop playback: while playback is
interrupted, select É again and press
W to confirm.
or
XSelect É and confirm by pressing W
twice in rapid succession.
Ì is highlighted.XTo restart playback: select Ì and
press W to confirm.
Playback starts at the beginning of the
DVD.220AudioCOMAND
Page 230 of 524

XSelect Music Register by sliding VÆ and
turning cVd the COMAND controller and
press W to confirm.
XSelect Delete all music files and
press W to confirm.
A query appears. No is highlighted.
If you select Yes, all music files are deleted.
You see the Please wait... message.
Then, you see the Deletion successful
message.
If you select No, the process will be aborted.
Calling up memory space info
XSelect Music Register by sliding VÆ and
turning cVd the COMAND controller and
press W to confirm.
XSelect Memory information and press
W to confirm.
The following is displayed:
Rstorage capacity
Ravailable memory
Roccupied memory
Rcontent (folders, tracks)
Folder functions
Introduction
You can view the content of the MUSIC
REGISTER, change folder or track names and
delete individual folders or tracks.
Calling up a folder
XSelect Search by sliding VÆ and turning
cVd the COMAND controller and press
W to confirm.
XSelect Folder and press W to confirm.
You see the contents of the current folder.
XTo switch to the superordinate folder:
select the U icon and press W to
confirm.
The display changes to the next folder up.
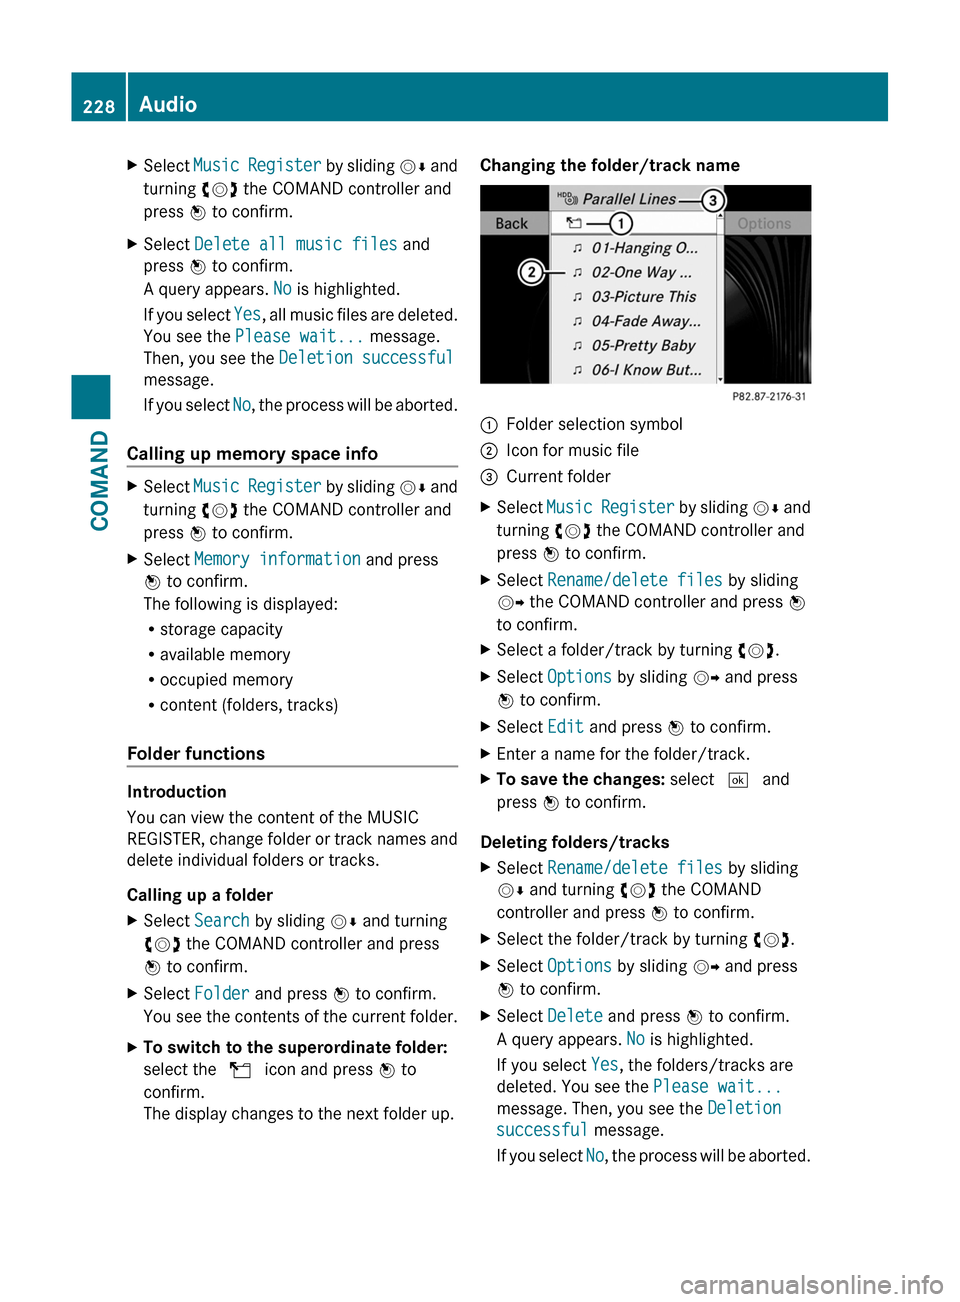
Changing the folder/track name:Folder selection symbol;Icon for music file=Current folderXSelect Music Register by sliding VÆ and
turning cVd the COMAND controller and
press W to confirm.
XSelect Rename/delete files by sliding
VY the COMAND controller and press W
to confirm.
XSelect a folder/track by turning cVd.XSelect Options by sliding VY and press
W to confirm.
XSelect Edit and press W to confirm.XEnter a name for the folder/track.XTo save the changes: select ¬ and
press W to confirm.
Deleting folders/tracks
XSelect Rename/delete files by sliding
VÆ and turning cVd the COMAND
controller and press W to confirm.
XSelect the folder/track by turning cVd.XSelect Options by sliding VY and press
W to confirm.
XSelect Delete and press W to confirm.
A query appears. No is highlighted.
If you select Yes, the folders/tracks are
deleted. You see the Please wait...
message. Then, you see the Deletion
successful message.
If you select No, the process will be aborted.
228AudioCOMAND
Page 235 of 524

displayed. The display's status bar shows
the selected category or the folder name.
i The Music menu item is not available until
the device has been activated.
XSelect the category/folder by turning
cVd the COMAND controller and press
W to confirm.
The contents of the selected category or
folder are displayed.
i If the data needs to be read from the
connected device, the Please wait...
message appears.
XIf necessary, repeat this step until the
tracks in the desired folder/album appear.XSelect the track by turning cVd the
COMAND controller and press W to
confirm.
The track is played back.XTo select one folder higher: select the
U icon and confirm with W.
i
The U icon is always shown at the top
of the respective folder.
Playing back the contents of a category
or folder
XSelect the category or folder by turning
cVd the COMAND controller.XPress W the COMAND controller for longer
than two seconds.
The content of the category or folder
selected is played in accordance with the
playback option ( Y page 224) selected.
Alphabetical track selection
iPod ®
and MP3 players
This function is available for alphabetically
sorted categories and folders. This function
is not available within albums or playlists, for
example.
XSelect a category, e.g. Artists, by turning
cVd the COMAND controller and press
W to confirm.
The available artists are displayed.XPress the corresponding number key once
or several times to select the first letter of
the artist's name (e.g. for an artist
beginning with the letter "C", press number
key l three times).
The available letters are listed at the lower
edge of the display.
After a message, the first entry in the list
which matches the letter entered is
highlighted.
i If no corresponding entry exists, the last
entry corresponding to a previous letter is
highlighted instead.
i For iPods ®
and MP3 players, the quality
of the search results is highly dependent on
the version and language variant of the
software (e.g. iTunes ®
version) used to
populate the device.
USB mass storage device
This function is available for alphabetically
sorted directories. This function is not
available within albums or playlists, for
example.
XIn a directory, press the corresponding
number key once or several times to select
the first letter of the artist's name (e.g. for
an artist beginning with the letter "C", press
number key l three times).
The available letters are listed at the lower
edge of the display.
If the directory only contains folders,
COMAND searches for folders. After a
message, the first entry which matches the
letter entered is shown at the top of the list.
If no entry matches the entered letter, the
first item in the list is the last entry to
correspond to a selection.Audio233COMANDZ
Page 243 of 524

XSelect the Back (to the movie) menu
item in the menu and press W to confirm.
Setting the language and audio format
This function is not available on all DVDs. If it
is available, you can set the DVD menu
language, the audio language or the audio
format. The number of settings is determined
by the DVD content. It is possible that the
settings may also be accessed in the DVD
menu ( Y page 240).
XPress W the COMAND controller to show
the menu.XSelect DVD-V in the menu by turning cVd
the COMAND controller and press W to
confirm.XSelect DVD functions and press W to
confirm.XSelect Audio language and press W to
confirm.
In both cases, a menu appears after a few
seconds. The # dot in front of an entry
indicates the currently selected language.XSelect a setting by turning cVd the
COMAND controller and press W to
confirm.XTo exit the menu: slide XVY the COMAND
controller.
Subtitles and camera angle
These functions are not available on all DVDs.
The number of subtitle languages and camera
angles available depends on the content of
the DVD. It is possible that the settings may
also be accessed in the DVD menu
( Y page 240).
XPress W the COMAND controller to show
the menu.XSelect DVD-V in the menu by turning cVd
the COMAND controller and press W to
confirm.XSelect DVD functions and press W to
confirm.XSelect Subtitles or Camera angle and
press W to confirm.
In both cases, a menu appears. The # dot
in front of an entry indicates the current
setting.XSelect a setting by turning cVd the
COMAND controller and press W to
confirm.XTo exit the menu: slide XVY the COMAND
controller.
Interactive content
DVDs can contain interactive content (e.g. a
video game). In a video game, for example,
you may be able to influence events by
selecting and triggering actions. The type and
number of actions depend on the DVD.
XSelect an action by sliding ZVÆ or XVY the
COMAND controller and press W to
execute it.
A menu appears and the first entry,
Select , is highlighted.XPress the W COMAND controller.
Video AUX operation
AUX jacks
You can connect an external video source
(video AUX) to COMAND via the Media
Interface (Y page 229) using the AUX jacks in
the glove compartment.
i In vehicles equipped with a rear view
camera, the video AUX jack cannot be used
to connect external video sources.
Video241COMANDZ
Page 246 of 524

XInsert new batteries. Observe the polarity
marking on the batteries and in the battery
compartment when doing so.
Left-hand battery: the positive pole (+)
must face upwards.
Right-hand battery: the positive pole (+)
must face downwards.
XTo close the battery compartment: first
place battery compartment cover = into
the battery compartment with retaining
lugs ? and allow lug ; to clip into place.
In the wireless headphones
The battery compartment cover is located on
the left headphone.
:Battery compartment cover
The wireless headphones contain 2 type AAA
1.5 V batteries.
XTo open the battery compartment: fold
the battery compartment cover :
upwards. When doing so, hold the left
headphone as shown to prevent the
inserted batteries from falling out.
XRemove the discharged batteries from the
compartment.
XInsert new batteries. Observe the polarity
marking on the batteries and in the battery
compartment when doing so.
Left-hand battery: the positive pole (+)
must face upwards.
Right-hand battery: the positive pole (+)
must face downwards.
XTo close the battery compartment:
press the battery compartment lid
downwards until it clips into place.
If the batteries have been inserted
correctly, the indicator lamp will light up
green when the headphones are switched
on.
Basic functions
Operating with headphones
iVehicles intended for sale in the USA are
equipped with cordless headphones.
Corded headphones are available for the
Canadian market and other markets.
You can use the cordless headphones
supplied and/or up to two sets of corded
headphones connected to the corresponding
jack of the rear-compartment screens
(Y page 137).
Information on:
Rswitching the cordless headphones on/off
Radjusting the volume of the headphones
Rselecting a screen for the headphones
can be found in the "cordless headphones"
section (Y page 140).
Using the main loudspeakers
This function is available in conjunction with
COMAND.
You can use the vehicle loudspeakers to
listen to a disc inserted in the rear-
compartment drive. To do so, at least one of
the rear-compartment screens must be set to
disc mode.
244Rear Seat Entertainment SystemCOMAND