2011 MERCEDES-BENZ S-Class change
[x] Cancel search: changePage 166 of 524
Route guidance
General information
GWarning
COMAND calculates the route to the
destination without taking into account the
following, for example:
RTraffic lights
RStop and right-of-way signs
RLane merging
RParking or stopping prohibited areas
ROther road and traffic rules and regulations
RNarrow bridges
COMAND may give incorrect navigation
commands if the data in the digital map does
not correspond with the actual road/ traffic
situation. For example, if the traffic routing
has been changed or the direction of a one-
way road has been reversed.
For this reason, you must always observe
applicable road and traffic rules and
regulations during your journey. Road and
traffic rules and regulations always have
priority over the navigation commands
generated by the system.
Route guidance begins once a route has been
calculated (Y page 154).
COMAND guides you to your destination by
means of navigation commands in the form
of audible navigation announcements and
route guidance displays.
The route guidance displays can only be seen
if the display is switched to navigation mode.
If you do not follow the navigation
announcements or if you leave the calculated
route, COMAND automatically calculates a
new route to the destination.
If the digital map contains the corresponding
information, the following applies:
Rwhen selecting a route, COMAND tries to
avoid roads that only have limited access,
e.g. roads closed to through traffic and non-
residents.
Rroads that have time restrictions (e.g.
closed on Sundays and public holidays) are
avoided for route guidance.
Changing direction
Introduction
Changes of direction have three phases:
RPreparation phase
RAnnouncement phase
RChange-of-direction phase
Preparation phase
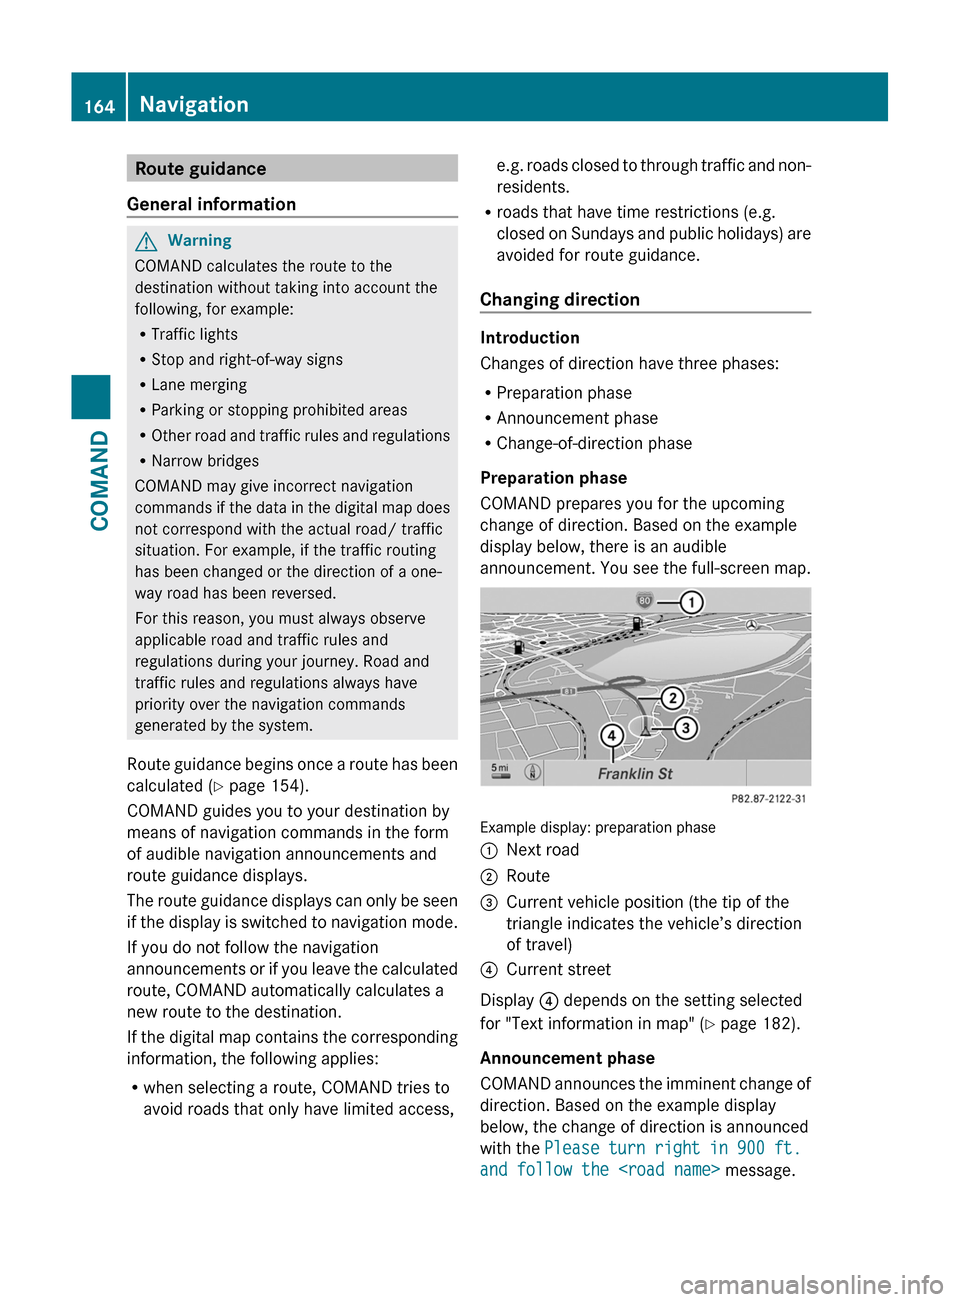
COMAND prepares you for the upcoming
change of direction. Based on the example
display below, there is an audible
announcement. You see the full-screen map.
Example display: preparation phase
:Next road;Route=Current vehicle position (the tip of the
triangle indicates the vehicle’s direction
of travel)
?Current street
Display ? depends on the setting selected
for "Text information in map" (Y page 182).
Announcement phase
COMAND announces the imminent change of
direction. Based on the example display
below, the change of direction is announced
with the Please turn right in 900 ft.
and follow the
164NavigationCOMAND
Page 167 of 524
The announced distance to the next change
of direction depends on the type of road and
its permissible speed limit.
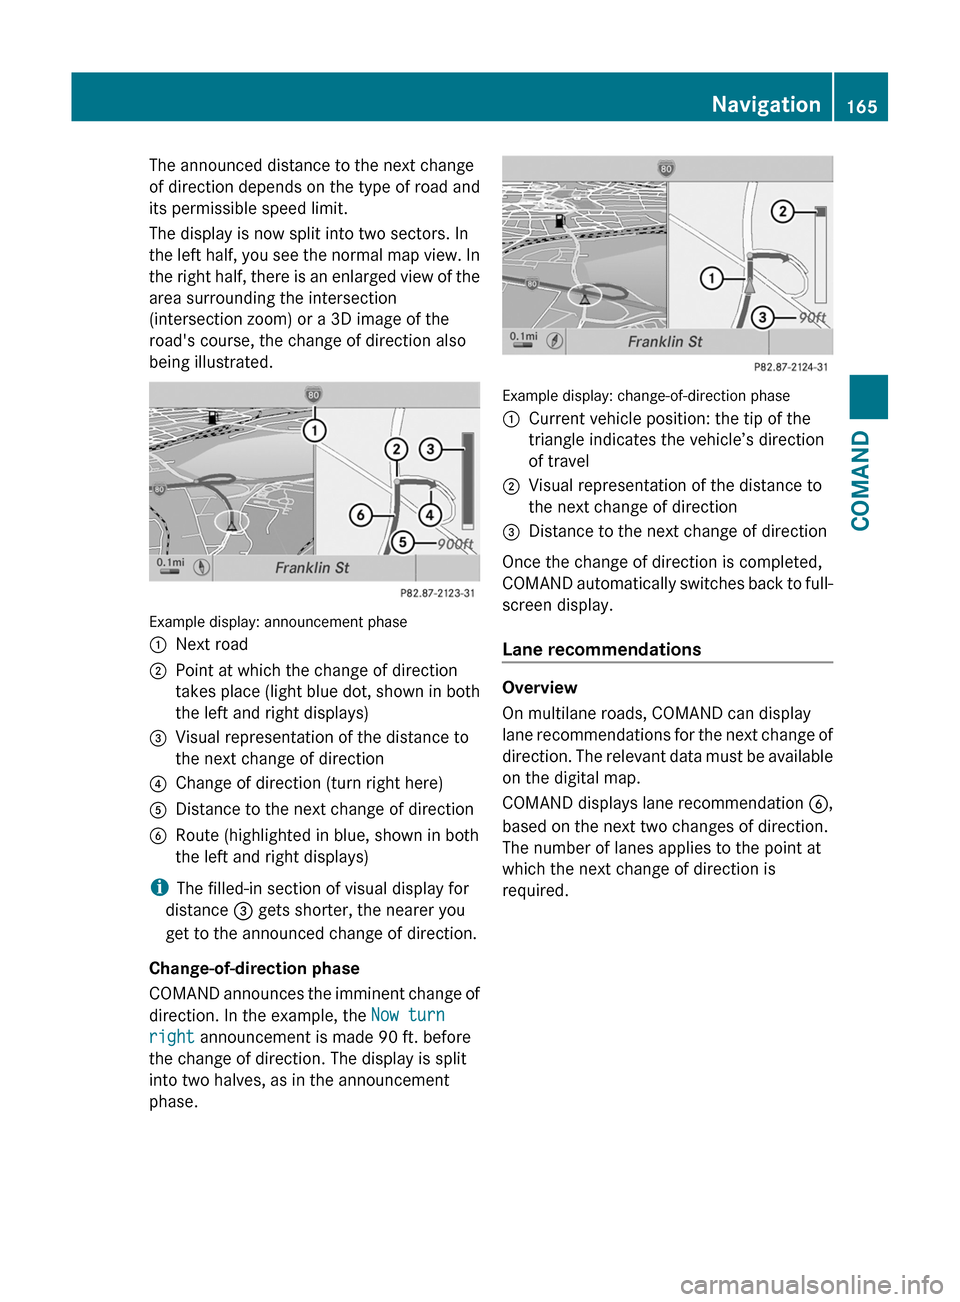
The display is now split into two sectors. In
the left half, you see the normal map view. In
the right half, there is an enlarged view of the
area surrounding the intersection
(intersection zoom) or a 3D image of the
road's course, the change of direction also
being illustrated.
Example display: announcement phase
:Next road;Point at which the change of direction
takes place (light blue dot, shown in both
the left and right displays)
=Visual representation of the distance to
the next change of direction
?Change of direction (turn right here)ADistance to the next change of directionBRoute (highlighted in blue, shown in both
the left and right displays)
iThe filled-in section of visual display for
distance = gets shorter, the nearer you
get to the announced change of direction.
Change-of-direction phase
COMAND announces the imminent change of
direction. In the example, the Now turn
right announcement is made 90 ft. before
the change of direction. The display is split
into two halves, as in the announcement
phase.
Example display: change-of-direction phase
:Current vehicle position: the tip of the
triangle indicates the vehicle’s direction
of travel
;Visual representation of the distance to
the next change of direction
=Distance to the next change of direction
Once the change of direction is completed,
COMAND automatically switches back to full-
screen display.
Lane recommendations
Overview
On multilane roads, COMAND can display
lane recommendations for the next change of
direction. The relevant data must be available
on the digital map.
COMAND displays lane recommendation B,
based on the next two changes of direction.
The number of lanes applies to the point at
which the next change of direction is
required.
Navigation165COMANDZ
Page 168 of 524
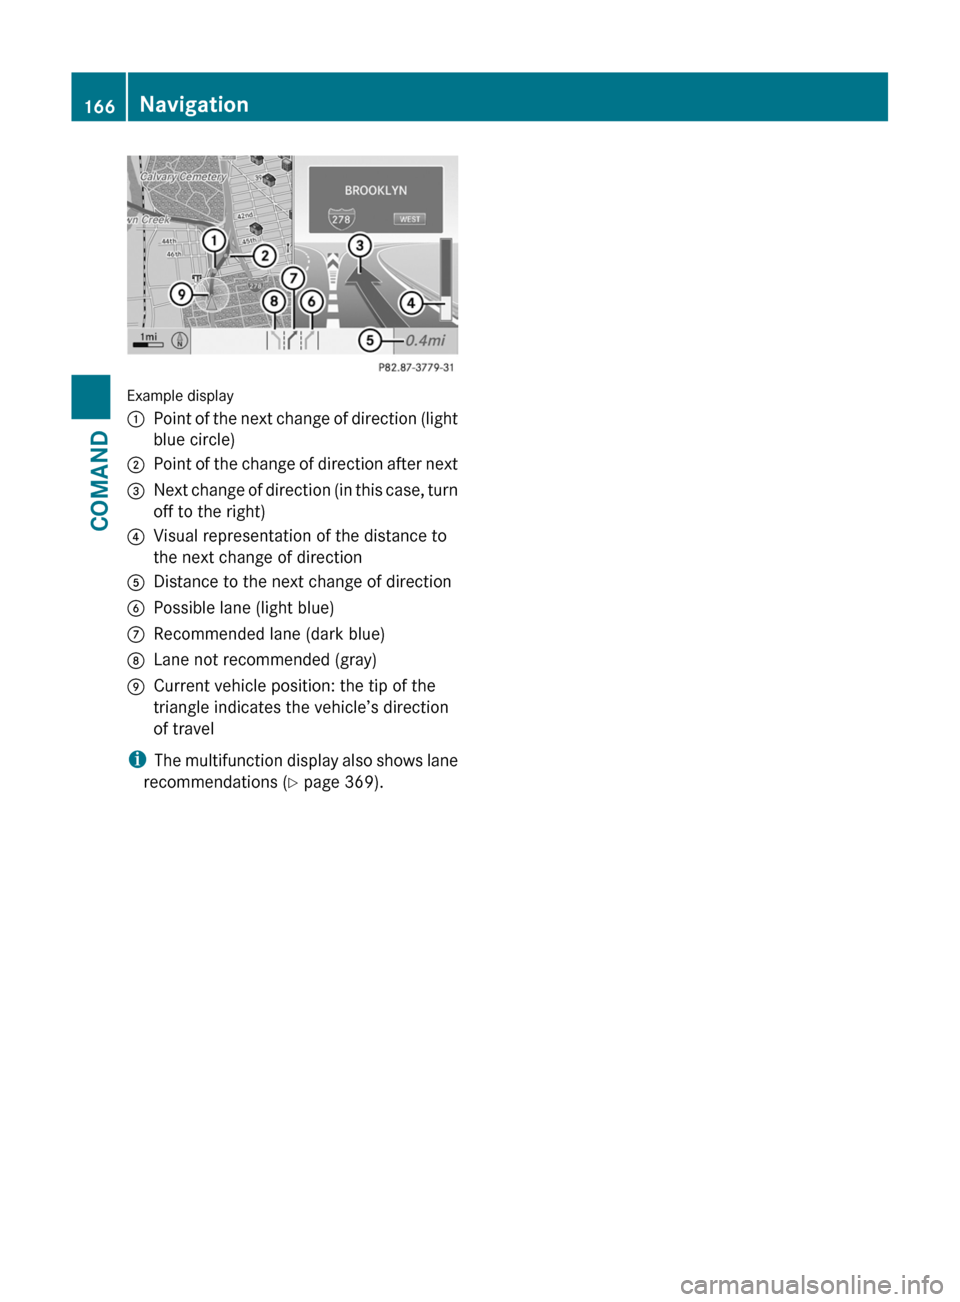
Example display
:Point of the next change of direction (light
blue circle)
;Point of the change of direction after next=Next change of direction (in this case, turn
off to the right)
?Visual representation of the distance to
the next change of direction
ADistance to the next change of directionBPossible lane (light blue)CRecommended lane (dark blue)DLane not recommended (gray)ECurrent vehicle position: the tip of the
triangle indicates the vehicle’s direction
of travel
iThe multifunction display also shows lane
recommendations (Y page 369).
166NavigationCOMAND
Page 169 of 524
Display and description of lane recommendations
The colors used in the lane recommendation display vary depending on whether day or night
design is switched on.
LaneDay designNight designRecommended lane C
In this lane, you will be able to complete the
next two changes of direction without
changing lanes.
Dark blueLight bluePossible lane B
In this lane, you will only be able to complete
the next change of direction without
changing lanes.
Light blueDark blueLane not recommended D
In this lane, you will not be able to complete
the next change of direction without
changing lanes.
GrayGrayCar pool lanes
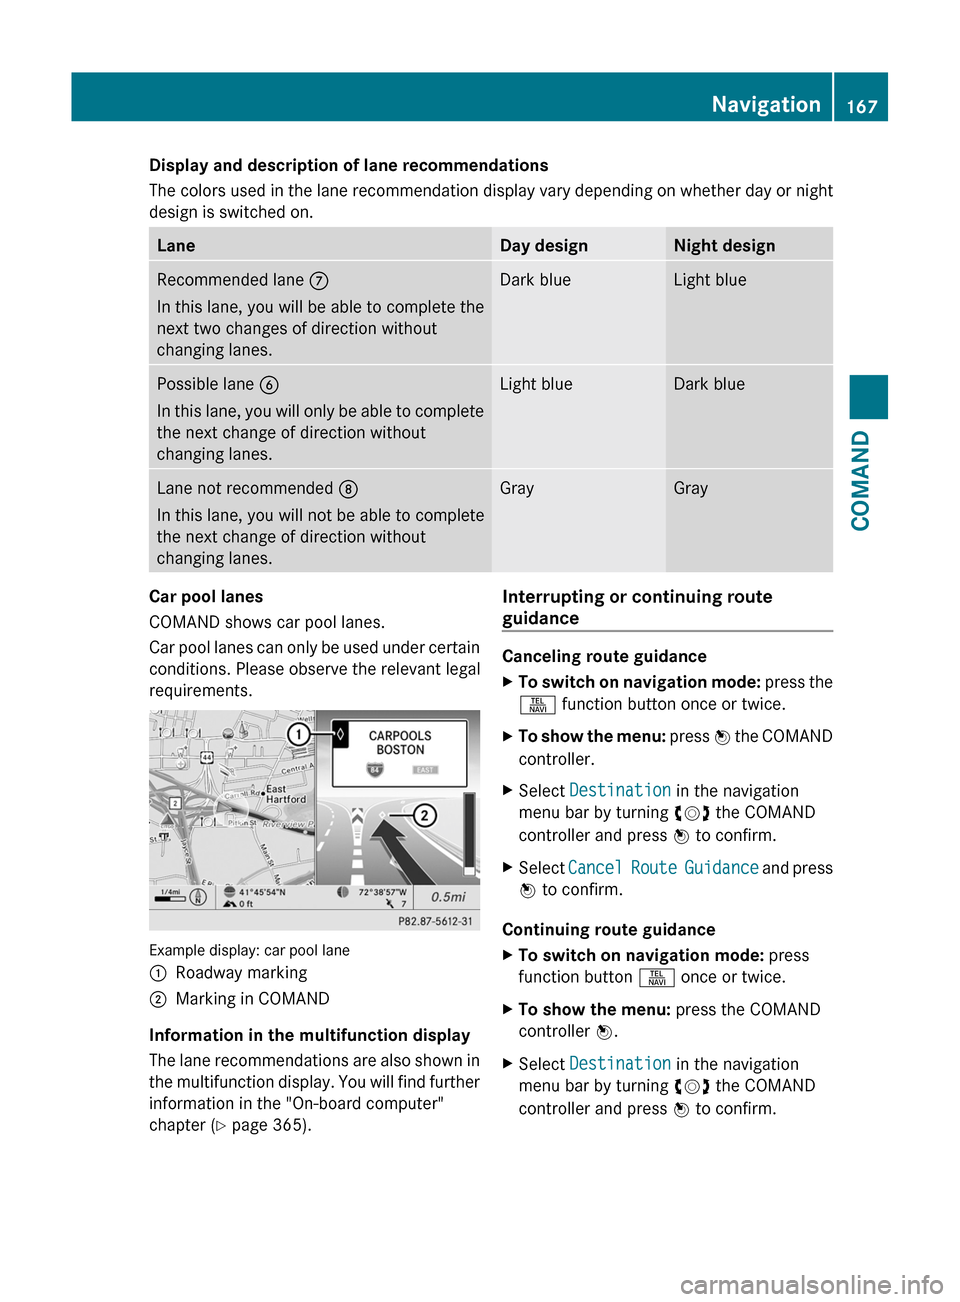
COMAND shows car pool lanes.
Car pool lanes can only be used under certain
conditions. Please observe the relevant legal
requirements.
Example display: car pool lane
:Roadway marking;Marking in COMAND
Information in the multifunction display
The lane recommendations are also shown in
the multifunction display. You will find further
information in the "On-board computer"
chapter (Y page 365).
Interrupting or continuing route
guidance
Canceling route guidance
XTo switch on navigation mode: press the
S function button once or twice.
XTo show the menu: press W the COMAND
controller.
XSelect Destination in the navigation
menu bar by turning cVd the COMAND
controller and press W to confirm.
XSelect Cancel Route Guidance and press
W to confirm.
Continuing route guidance
XTo switch on navigation mode: press
function button S once or twice.
XTo show the menu: press the COMAND
controller W.
XSelect Destination in the navigation
menu bar by turning cVd the COMAND
controller and press W to confirm.
Navigation167COMANDZ
Page 178 of 524
If no home address has been stored yet, you
can now assign an address book entry. If a
home address already exists, it is displayed
and you can alter it.
i If you select New Entry, you are also
offered the option of entering the home
address for the first time. You can then
save the home address without starting
route guidance.XTo enter the home address for the first
time: select Assign Address Book
Entry and press W to confirm.XSelect Home or Work and press W to
confirm.XTo change the home address: select
Change and press W to confirm.XSelect Assign Address Book Entry and
press W to confirm.
i
If you select New Entry, you are also
offered the option of changing the home
address by entering an address. You can
then save the home address without having
to start route guidance.
XSelect Home or Work and press W to
confirm.
In both cases, you will see the address book
either with the character bar or as a
selection list.XTo select an address book entry:
proceed as described in the "Searching for
an address book entry" section
( Y page 201).XTo confirm the selection: press W the
COMAND controller.
If no home address has been stored,
COMAND saves the entry. You will see a
message and then the address menu with
the selected address. Start is highlighted
automatically.
If a home address has already been stored,
you will see a prompt asking you whether
the My Address entry should be
overwritten.XSelect Yes or No and press W to confirm.
If you select Yes, COMAND overwrites the
destination. You will see a message and
then the address menu with the selected
address. Start is highlighted
automatically.
If you select No, the list will reappear.
Selecting the home address for route
guidance
XProceed as described in the "Selecting a
destination from the destination memory"
section ( Y page 156).
Saving a destination in the destination
memory
Note
This function also stores the destination in
the address book.
After destination entry
XThe destination has been entered and is
shown in the address entry menu
( Y page 154).XSelect Save by sliding VÆ and turning
cVd the COMAND controller and press
W to confirm.
You can now select storage options
( Y page 177).
During route guidance
XTo show the menu: press W the COMAND
controller.XSelect Destination in the navigation
menu bar by turning cVd the COMAND
controller and press W to confirm.XSelect Save Destination and press W to
confirm.
You can now select storage options
( Y page 177).
From the list of previous destinations
XTo show the menu: press W the COMAND
controller.176NavigationCOMAND
Page 183 of 524
Centering on the destination
This function requires a calculated route to a
destination.
XTo show the menu: press the COMAND
controller W.
XSelect Position in the navigation menu by
sliding VÆ and turning cVd the COMAND
controller and press W to confirm.
XSelect Destination Map and press W to
confirm.
The crosshair is centered on the
destination.
Map display
Setting the map orientation
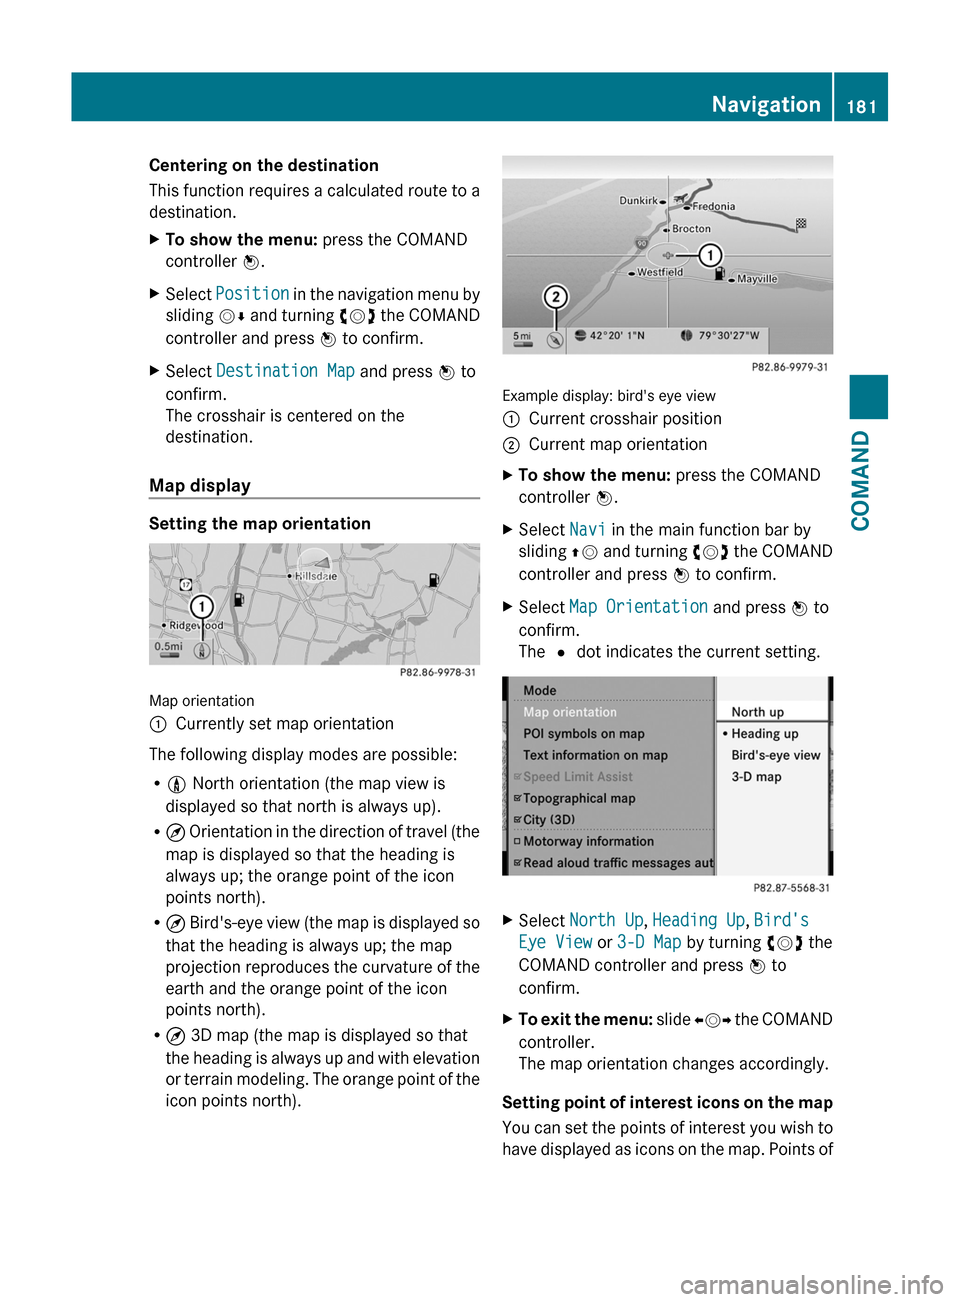
Map orientation
:Currently set map orientation
The following display modes are possible:
R0 North orientation (the map view is
displayed so that north is always up).
R¤ Orientation in the direction of travel (the
map is displayed so that the heading is
always up; the orange point of the icon
points north).
R¤ Bird's-eye view (the map is displayed so
that the heading is always up; the map
projection reproduces the curvature of the
earth and the orange point of the icon
points north).
R¤ 3D map (the map is displayed so that
the heading is always up and with elevation
or terrain modeling. The orange point of the
icon points north).
Example display: bird's eye view
:Current crosshair position;Current map orientationXTo show the menu: press the COMAND
controller W.
XSelect Navi in the main function bar by
sliding ZV and turning cVd the COMAND
controller and press W to confirm.
XSelect Map Orientation and press W to
confirm.
The # dot indicates the current setting.
XSelect North Up, Heading Up, Bird's
Eye View or 3-D Map by turning cVd the
COMAND controller and press W to
confirm.
XTo exit the menu: slide XVY the COMAND
controller.
The map orientation changes accordingly.
Setting point of interest icons on the map
You can set the points of interest you wish to
have displayed as icons on the map. Points of
Navigation181COMANDZ
Page 194 of 524

automatically attempts to log into a
network. If no network is available, you will
not be able to make a " 911" emergency
call. If you attempt to make an outgoing
call, the No Service message will appear
for a short while.
911 emergency callGWarning
The 911 emergency call system is a public
service. Using it without due cause is a
criminal offense.
The following conditions must be fulfilled in
order to make a 911 emergency call:
R the mobile phone must be switched on.
R a network must be available.
R a valid and operational SIM card must be
inserted in the mobile phone.
R the mobile phone must be connected to
COMAND via the Bluetooth ®
interface
If you cannot make an emergency call, you
must arrange rescue measures yourself.
XEnter the number using COMAND.XPress the 6 button.
The telephone makes the connection.XWait until the emergency call center
answers and describe the emergency
situation.
Telephony via the Bluetooth ®
interface
Conditions
On the mobile phone
For telephony via COMAND's Bluetooth ®
interface, a Bluetooth ®
-capable mobile
phone is required.
i Not all mobile phones available on the
market are equally suitable. For more
information on suitable mobile phones and
on connecting Bluetooth ®
-capable mobile
phones to COMAND, visit
http://www.mbusa-mobile.com or call
the Mercedes-Benz Customer Assistance
Center at 1-800-FOR-MERCedes
(1-800-367-6372) (US) or Customer
Relations at 1-800-387-0100 (Canada).
The battery of the mobile phone should
always be kept sufficiently charged in order
to prevent malfunctions.
In preparation for telephoning via the
Bluetooth ®
interface, you should check the
following items on your mobile phone (see the
mobile phone operating instructions):XHands-free profile
The mobile phone must support Hands-free
Profile 1.0 or above.
i Some displays (e.g. the signal strength)
depend on the supported version of the
Hands-free Profile.
XBluetooth ®
visibility
On certain mobile phones, the device itself
must be made "visible" for other devices,
as well as activating the Bluetooth ®
function (see the mobile phone operating
instructions).XBluetooth ®
device name
Every Bluetooth ®
device has its own
Bluetooth ®
device name. This name can be
freely chosen, but the default name may be
identical for all devices from a given
manufacturer. It is therefore
recommended that you change this name
so that you can easily recognize your
mobile phone (see the mobile phone
operating instructions).XSwitch on the mobile phone and enter the
PIN when prompted to do so (see the
mobile phone operating instructions).XActivate Bluetooth ®
functions and, where
necessary, Bluetooth ®
visibility on the
mobile phone (see the mobile phone
operating instructions).192TelephoneCOMAND
Page 201 of 524

You can simultaneously switch back and forth
between two parties or conduct a conference
call with up to five others.
Toggling12
If you are on the telephone and you receive
another call, the call waiting display will
appear. You also hear an acoustic signal.
XTo reject: select Reject and press W to
confirm.
or
XPress the ~ button on the telephone
keypad or on the multifunction steering
wheel.
XTo accept: select Accept and press W to
confirm.
or
XPress the 6 button on the telephone
keypad or on the multifunction steering
wheel.
If you accept the waiting call, the active call
is ended.
iThe active call will also be ended if you
accept the waiting call using Voice Control
System (see the separate operating
instructions).
If you accept the waiting call using the mobile
phone, the active call will be put on hold.
Then, you have two calls, with the accepted
call being the active call.
The COMAND display changes. If you
continue to operate functions on the mobile
phone, the COMAND display may differ from
that of the mobile phone.
Calling additional parties
You can call a second person while on the
phone with someone else. This action puts
the previous call on hold.
XSelect NEW from the telephone basic menu
and press W to confirm.
or
XSelect SEND on the telephone keypad.XEnter the phone number manually
(Y page 197) or using the phone book
(Y page 204).
Switching between two parties (toggling)
If you have added another party to your
previously active call, the telephone menu
then looks like this:
:Active party;Party on holdXTo switch to the other party: select ;
by turning cVd the COMAND controller
and press W to confirm.
or
XSelect SEND on the telephone keypad.
or
XPress the 6 button on the multifunction
steering wheel.
Interconnecting to create a conference
You can interconnect calls which are active
and those which are on hold. This permits
several parties to hear one another and speak
with one another.
12This function is only available if toggling has been activated on the mobile phone.Telephone199COMANDZ