2011 MERCEDES-BENZ S-Class change
[x] Cancel search: changePage 254 of 524

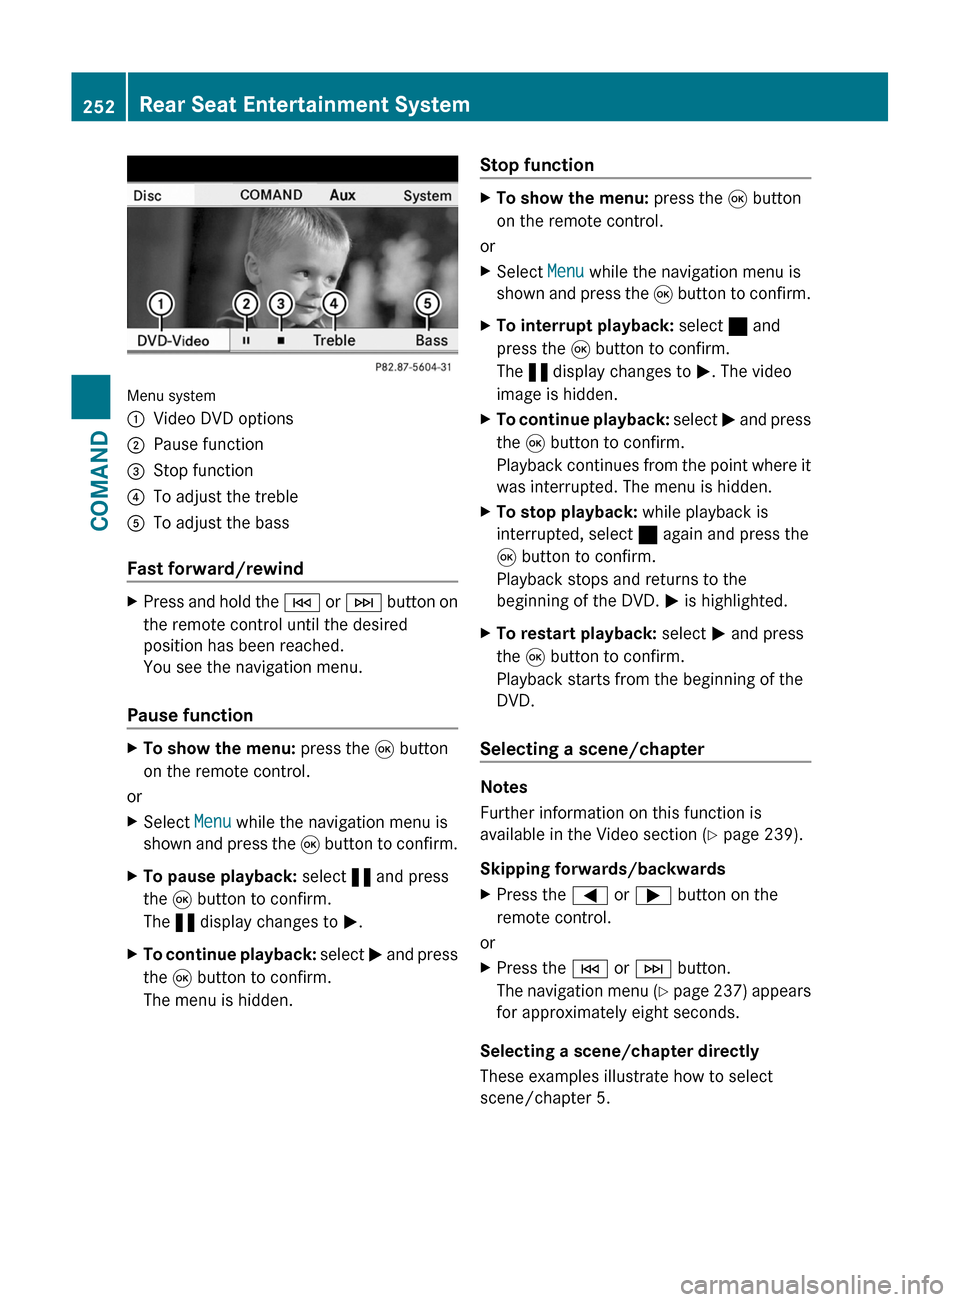
Menu system
:Video DVD options;Pause function=Stop function?To adjust the trebleATo adjust the bass
Fast forward/rewind
XPress and hold the E or F button on
the remote control until the desired
position has been reached.
You see the navigation menu.
Pause function
XTo show the menu: press the 9 button
on the remote control.
or
XSelect Menu while the navigation menu is
shown and press the 9 button to confirm.
XTo pause playback: select « and press
the 9 button to confirm.
The « display changes to M.
XTo continue playback: select M and press
the 9 button to confirm.
The menu is hidden.
Stop functionXTo show the menu: press the 9 button
on the remote control.
or
XSelect Menu while the navigation menu is
shown and press the 9 button to confirm.
XTo interrupt playback: select ± and
press the 9 button to confirm.
The « display changes to M. The video
image is hidden.
XTo continue playback: select M and press
the 9 button to confirm.
Playback continues from the point where it
was interrupted. The menu is hidden.
XTo stop playback: while playback is
interrupted, select ± again and press the
9 button to confirm.
Playback stops and returns to the
beginning of the DVD. M is highlighted.
XTo restart playback: select M and press
the 9 button to confirm.
Playback starts from the beginning of the
DVD.
Selecting a scene/chapter
Notes
Further information on this function is
available in the Video section (Y page 239).
Skipping forwards/backwards
XPress the = or ; button on the
remote control.
or
XPress the E or F button.
The navigation menu (Y page 237) appears
for approximately eight seconds.
Selecting a scene/chapter directly
These examples illustrate how to select
scene/chapter 5.
252Rear Seat Entertainment SystemCOMAND
Page 266 of 524

cVd the COMAND controller and press
W to confirm.
The climate control menu opens.
XTo switch on: select Æ and press W.XTo switch off: select Æ and press W.
A tick appears.
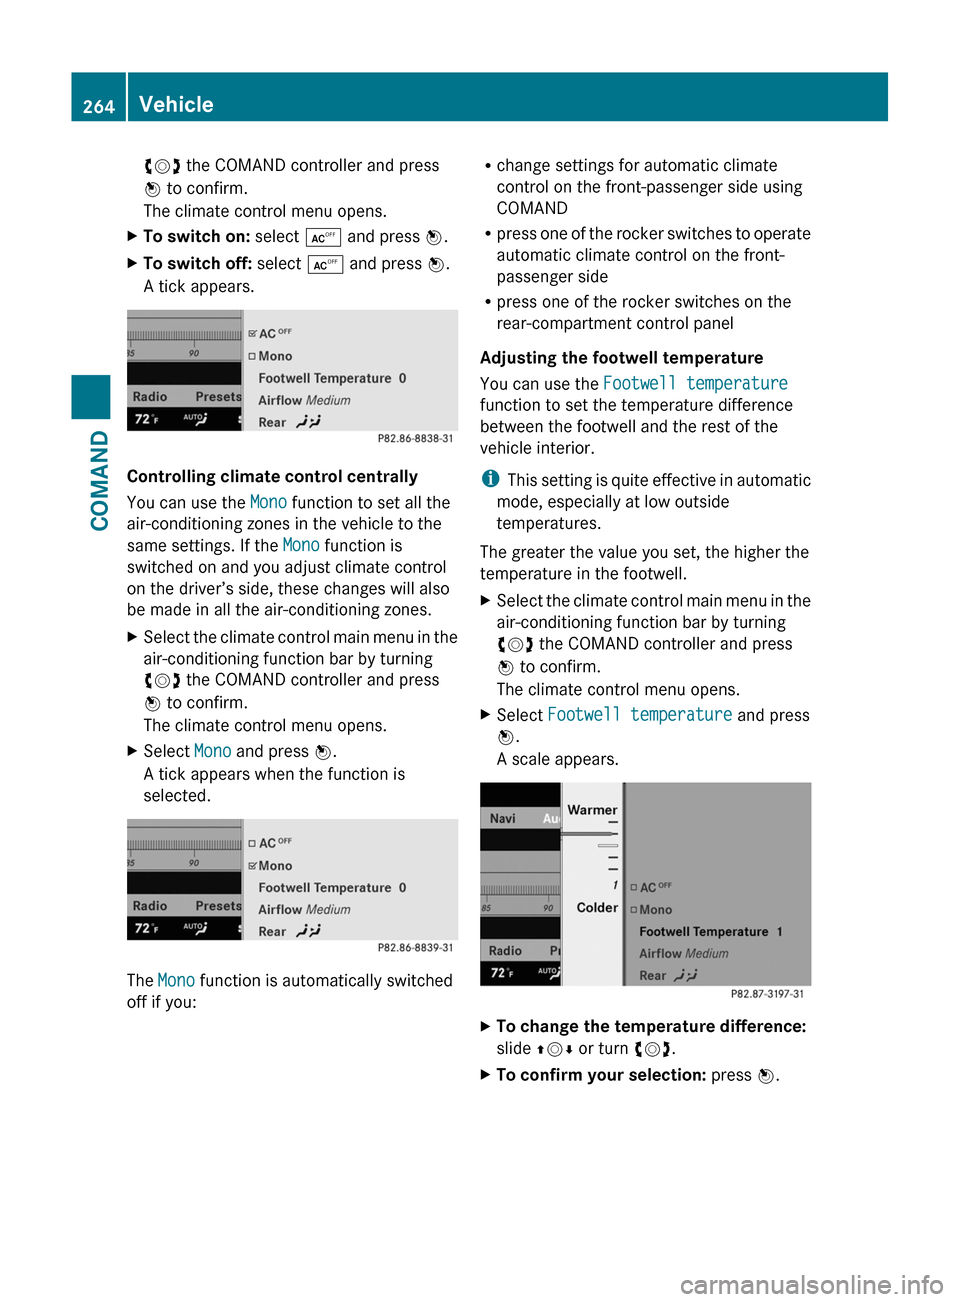
Controlling climate control centrally
You can use the Mono function to set all the
air-conditioning zones in the vehicle to the
same settings. If the Mono function is
switched on and you adjust climate control
on the driver’s side, these changes will also
be made in all the air-conditioning zones.
XSelect the climate control main menu in the
air-conditioning function bar by turning
cVd the COMAND controller and press
W to confirm.
The climate control menu opens.
XSelect Mono and press W.
A tick appears when the function is
selected.
The Mono function is automatically switched
off if you:
Rchange settings for automatic climate
control on the front-passenger side using
COMAND
Rpress one of the rocker switches to operate
automatic climate control on the front-
passenger side
Rpress one of the rocker switches on the
rear-compartment control panel
Adjusting the footwell temperature
You can use the Footwell temperature
function to set the temperature difference
between the footwell and the rest of the
vehicle interior.
iThis setting is quite effective in automatic
mode, especially at low outside
temperatures.
The greater the value you set, the higher the
temperature in the footwell.
XSelect the climate control main menu in the
air-conditioning function bar by turning
cVd the COMAND controller and press
W to confirm.
The climate control menu opens.
XSelect Footwell temperature and press
W.
A scale appears.
XTo change the temperature difference:
slide ZVÆ or turn cVd.
XTo confirm your selection: press W.264VehicleCOMAND
Page 267 of 524

Adjusting the blower settings for the air
vents
This function allows you to determine the way
the air is blown through the air vents in
automatic mode.
You can select:
RFocused (high blower setting)
RMedium (standard setting)
RDiffuse (low blower setting)
iThis setting is quite effective in automatic
mode, especially at high outside
temperatures.
If the vehicle has become very warm and the
automatic climate control is cooling the
interior, the blower settings are briefly
canceled.
XSelect the climate control main menu in the
air-conditioning function bar by turning
cVd the COMAND controller and press
W to confirm.
The climate control menu opens.
XSelect Airflow and press W.
A menu appears.
The current setting is indicated by a # dot.
XTo change the airflow: slide ZVÆ or turn
cVd.
XTo confirm your selection: press W.
Operating the rear-compartment air-
conditioning system from the front
The rear-compartment air-conditioning
system is operated in the same way as
climate control for the driver and front
passenger.
Switching on operation of the rear-
compartment air conditioning from the
front
XSelect the climate control main menu in the
air-conditioning function bar by turning
cVd the COMAND controller and press
W to confirm.
The climate control menu opens.
XSelect Rear Y and press W.
Rear appears in the main menu on the air-
conditioning function bar. The rear-
compartment air-conditioning system can
be controlled from the front.
Main menu for the rear-compartment air-
conditioning system
In the main menu for the rear-compartment
air-conditioning system, you can:
Rswitch back to front-compartment climate
control operation
Rswitch off the rear-compartment air
conditioning
Rswitch automatic mode for the rear-
compartment air conditioning on/off
XTo open the main menu: select the
climate control main menu in the air
conditioning function bar and press W.
The current setting is indicated by a # dot.
Vehicle265COMANDZ
Page 277 of 524

High-beam headlampsXTo switch on the high-beam headlamps:
turn the key in the ignition lock to position
2 or start the engine.
XTurn the light switch to L.XPress the combination switch beyond the
pressure point in the direction of
arrow :.
The K indicator lamp in the instrument
cluster lights up.
XTo switch off the high-beam
headlamps: move the combination switch
back to its normal position.
The K indicator lamp in the instrument
cluster goes out.
Adaptive Highbeam Assist
GWarning!
The Adaptive Highbeam Assist is only an aid
intended to support you while driving. The
driver is and remains responsible for proper
vehicle lighting in accordance with the
prevailing light, sight and traffic conditions.
The system may be impaired or unavailable
when
Rvisibility is poor, e.g. due to snow, rain, fog,
or heavy spray
Rthe optical sensor area of the windshield is
dirty, fogged up, or covered by a sticker for
example
The system cannot recognize the following
road users:
RRoad users without a lighting system of
their own, e.g. pedestrians
RRoad users with dim lighting of their own,
e.g. cyclists
RRoad users whose lighting is obstructed,
e.g. road users behind a guardrail
RIn some seldom cases, even road users with
a lighting system of their own may be
recognized too late or not at all.
The automatic high-beam headlamps will then
not be deactivated or it will be activated in
spite of preceding or oncoming road users.
This could endanger you and/or others and
cause an accident. Always pay close attention
to the traffic situation and switch off the high
beam manually if necessary.
You can use this function to set the
headlamps to change between low beam and
high beam automatically. The system
recognizes vehicles with their lights on, either
approaching from the opposite direction or
traveling in front of your vehicle, and
consequently switches the headlamps from
high beam to low beam.
The system automatically adapts the low-
beam headlamp range depending on the
distance to the other vehicle. Once the
system no longer detects any other vehicles,
it reactivates the high-beam headlamps.
The system's optical sensor is located behind
the windshield near the overhead control
panel.
XTo activate: activate the Adaptive
Highbeam Assist function using the on-
board computer (Y page 377).
XTurn the light switch to c.Exterior lighting275Lights and windshield wipersZ
Page 280 of 524

Switch the reading lamp off=Interior lighting
Interior lighting control
Important notes
In order to prevent the vehicle's battery from
discharging, the interior lighting functions are
automatically deactivated after some time
except for when the key is in position 2 in the
ignition lock.
Automatic interior lighting control
XTo switch on/off: press the | button.
The OFF indicator lamp shows whether the
automatic interior lighting control is
deactivated (indicator lamp on) or
activated (indicator lamp off).
The interior lighting automatically switches
on if you:
R unlock the vehicle
R open a door
R remove the key from the ignition lock
The interior light is activated for a short while
when the key is removed from the ignition
lock. You can activate this delayed switch-off
using COMAND ( Y page 259).
Manual interior lighting control
XTo switch the front interior lighting on/
off: press the c button.XTo switch the rear interior lighting on/
off: press the u button.XTo switch the reading lamps on/off:
press the p button.Changing bulbs
Important safety notes
Xenon bulbs
If your vehicle is equipped with Xenon bulbs,
you can recognize this by the following: the
cone of light from the Xenon bulbs moves
from the top to the bottom and back again
when you start the engine. For this to be
observed, the lights must be switched on
before starting the engine.
GWarning
Xenon bulbs carry a high voltage. You could
get an electric shock and be seriously or even
fatally injured if you touch the electric
contacts on Xenon bulbs. Therefore, never
remove the cover from Xenon bulbs.
Do not change Xenon bulbs yourself, but have
them replaced at a qualified specialist
workshop which has the necessary specialist
knowledge and tools to carry out the work
required.
Mercedes-Benz recommends that you use an
authorized Mercedes-Benz Center for this
purpose. In particular, work relevant to safety
or on safety-related systems must be carried
out at a qualified specialist workshop.
Bulbs and lamps are an important aspect of
vehicle safety. You must therefore make sure
that these function correctly at all times.
Have the headlamp setting checked regularly.
Other bulbs
GWarning!
Bulbs and lamps can be very hot. You should
therefore allow them to cool down before you
change them. Otherwise, you could be burned
if you touch them.
Keep bulbs out of the reach of children.
Otherwise, they could damage the bulbs, for
example, and injure themselves.
278Changing bulbsLights and windshield wipers
Page 281 of 524

Never use a bulb which has been dropped.
Such a bulb may break or even explode and
injure you.
Halogen bulbs are pressurized and can
explode when you change them, particularly
if they are very hot. You should therefore wear
eye protection and gloves when you are
changing them.
There are bulbs other than the Xenon bulbs
that you cannot replace. Replace only the
bulbs listed (Y page 279). Have the bulbs that
you cannot replace yourself changed at a
qualified specialist workshop.
Mercedes-Benz recommends that you use an
authorized Mercedes-Benz Center for this
purpose. In particular, work relevant to safety
or on safety-related systems must be carried
out at a qualified specialist workshop.
If you require assistance changing bulbs,
consult a qualified specialist workshop.
Do not touch the glass tube of new bulbs with
your bare hands. Even minor contamination
can burn into the glass surface and reduce
the service life of the bulbs. Always use a lint-
free cloth or only touch the base of the bulb
when installing.
Only use bulbs of the correct type.
If the new bulb still does not light up, consult
a qualified specialist workshop.
Bulbs and lamps are an important aspect of
vehicle safety. You must therefore make sure
that these function correctly at all times.
Have the headlamp setting checked regularly.
Overview: changing bulbs/bulb types
You can change the following bulbs. The bulb
type can be found in the legend.
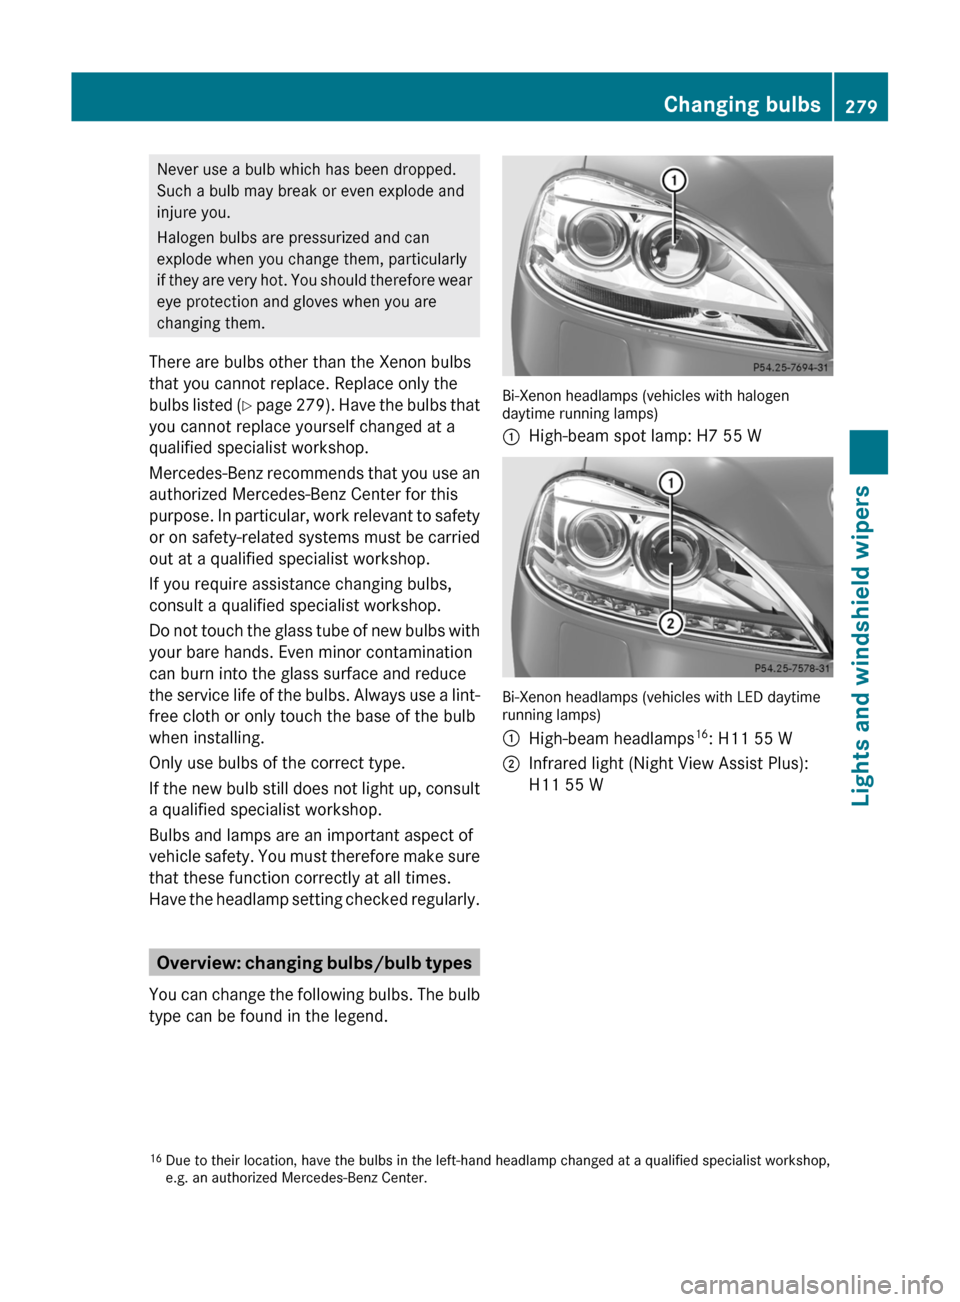
Bi-Xenon headlamps (vehicles with halogendaytime running lamps)
:High-beam spot lamp: H7 55 W
Bi-Xenon headlamps (vehicles with LED daytimerunning lamps)
:High-beam headlamps16: H11 55 W;Infrared light (Night View Assist Plus):
H11 55 W16Due to their location, have the bulbs in the left-hand headlamp changed at a qualified specialist workshop,e.g. an authorized Mercedes-Benz Center.
Changing bulbs279Lights and windshield wipersZ
Page 282 of 524

Changing the front bulbs
High-beam spot lamp (vehicles with
halogen daytime running lamps)
XSwitch off the lights.XOpen the hood.XTurn housing cover : counter-clockwise
and pull it out.
XTurn bulb holder ; counter-clockwise and
pull it out.
XTake the bulb out of bulb holder ;.XInsert the new bulb into bulb holder ;.XInsert bulb holder ;.
Left-hand headlamp: cable outlet = must
be pointing up and to the right.
Right-hand headlamp: cable outlet = must
be pointing down and to the left.
XTurn bulb holder ; clockwise.
Handle ? of bulb holder ; is horizontal.
XAlign housing cover : and turn it
clockwise until it engages.
High-beam spot lamp (vehicles with
LED daytime running lamps)/infrared
light (Night View Assist Plus)
Due to their location, have the bulbs in the
left-hand headlamp changed at a qualified
specialist workshop, e.g. an authorized
Mercedes-Benz Center.
XSwitch off the lights.XOpen the hood.XTurn housing cover : counter-clockwise
and pull it out.
XTurn bulb holder ; counter-clockwise and
pull it out.
XPush the two detents on the right and left
of bulb holder ; and pull the bulb from
bulb holder ;.
XInsert the new bulb into bulb holder ; until
it engages.
XInsert bulb holder ; into the guide in the
headlamp.
Cable outlet = must be pointing down and
to the right.
XTurn bulb holder ; clockwise.
Cable outlet = must be pointing down and
to the left.
XAlign housing cover : and turn it
clockwise until it engages.
280Changing bulbsLights and windshield wipers
Page 284 of 524

Never fold a windshield wiper arm without
a wiper blade back onto the windshield.
Hold the windshield wiper arm firmly when
you change the wiper blade. If you release
the windshield wiper arm without a wiper
blade and it falls onto the windshield, the
windshield can be damaged by the force of
the impact.
Mercedes-Benz recommends that you have
the wiper blades replaced by a qualified
specialist workshop, e.g. at an authorized
Mercedes-Benz Center.
! Always position the windshield wiper
arms vertically before folding them away
from the windshield. By doing so, you will
avoid damage to the hood.
Replacing the windshield wiper blades
Moving the wiper arms to a vertical
position
Vehicles without KEYLESS-GO
XTurn the key to position 1 or 2 in the ignition
lock.
XSet the windshield wipers to
position ° on the combination switch.
XWhen the wiper arms have reached a
vertical position, turn the key to position
0 and remove it from the ignition lock.
Vehicles with KEYLESS-GO
XSwitch off the engine.XTake your foot off the brake pedal.XSet the windshield wipers to
position ° on the combination switch.
XPress the Start/Stop button repeatedly
until the windshield wipers start.
XWhen the wiper arms have reached a
vertical position, press the Start/Stop
button.
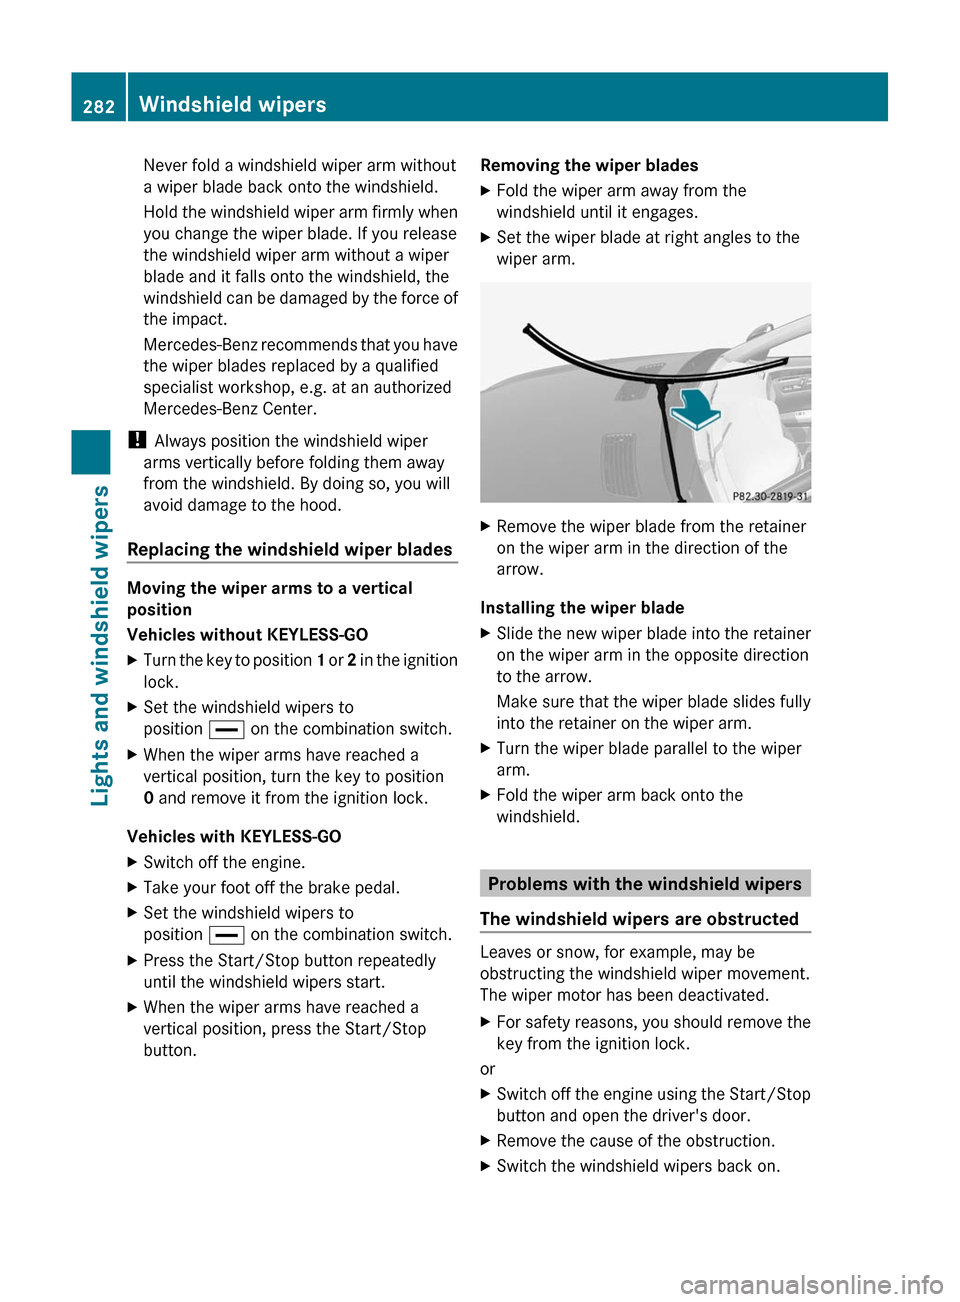
Removing the wiper bladesXFold the wiper arm away from the
windshield until it engages.
XSet the wiper blade at right angles to the
wiper arm.
XRemove the wiper blade from the retainer
on the wiper arm in the direction of the
arrow.
Installing the wiper blade
XSlide the new wiper blade into the retainer
on the wiper arm in the opposite direction
to the arrow.
Make sure that the wiper blade slides fully
into the retainer on the wiper arm.
XTurn the wiper blade parallel to the wiper
arm.
XFold the wiper arm back onto the
windshield.
Problems with the windshield wipers
The windshield wipers are obstructed
Leaves or snow, for example, may be
obstructing the windshield wiper movement.
The wiper motor has been deactivated.
XFor safety reasons, you should remove the
key from the ignition lock.
or
XSwitch off the engine using the Start/Stop
button and open the driver's door.
XRemove the cause of the obstruction.XSwitch the windshield wipers back on.282Windshield wipersLights and windshield wipers