2011 MERCEDES-BENZ S-Class change
[x] Cancel search: changePage 204 of 524

Phone book/address book basic display
:ListÇ Entry with navigable data\ Entry with voice tag; see the
separate operating instructions for Voice
Control System*
Æ Address book entryà Mobile phone entry0 SIM card entry® Entry imported via Bluetooth®¯ Entry imported via memory cardG Entry with multiple phone numbers;Two-line character barB To change the language of the
characters
p To select the character setF To delete your selection¬ To confirm your selection% Back
Calling up contacts from a list
XPhone book: select Name in the telephone
basic menu by sliding VÆ and turning
cVd the COMAND controller and press
W to confirm.
XAddress book: select Data/connections
in the telephone basic menu by sliding
VÆ and turning cVd the COMAND
controller and press W to confirm.
XSelect Address book and press W to
confirm.
XTo switch from the character bar to the
list: slide ZV the COMAND controller until
the character bar is hidden.
or
XSelect ¬.XTo call a contact: select by sliding ZVÆ
or turning cVd the COMAND controller
and press W to confirm.
iThe phone book is also available via the
on-board computer (Y page 374).
Calling up contacts using the character
bar
XPhone book: select Name in the telephone
basic menu by sliding VÆ and turning
cVd the COMAND controller and press
W to confirm.
XAddress book: select Data/connections
in the telephone basic menu by sliding
VÆ and turning cVd the COMAND
controller and press W to confirm.
XSelect Address book and press W to
confirm.
XTo switch from the list to the character
bar: select Back from the list.
or
XPress the % back button on the center
console.
XTo select a character: select by sliding
ZVÆ or XVY the COMAND controller and
press W to confirm. Repeat this procedure
until COMAND automatically switches over
to the list.
The first character entered defines the first
letter of the entry you are searching for. If
there are similar entries, the next character
which is different will be displayed and
offered for selection.
iYou can also use the telephone number
keypad to enter characters.
202TelephoneCOMAND* optional
Page 205 of 524

Displaying contact detailsXSelect Options by sliding VÆ and turning
cVd the COMAND controller and press
W to confirm.
XSelect Details and press W to confirm.
The detailed view appears.
XTo return to the list: select List by sliding
XVY the COMAND controller and press
W to confirm.
Creating new contacts/changing
contacts
Automatically imported contacts cannot be
edited. These have to be copied to the
COMAND address book first by saving.
iIn certain countries, these functions are
not available from speeds above
approximately 3 mph (5 km/h). As soon as
the speed falls below approximately 2 mph
(3 km/h), the function is available again.
iYou can enter address data directly into
the address book. If you store telephone
numbers in the phone book, these are
saved in the address book. If you store a
navigation destination, COMAND creates
an address book entry which includes the
complete navigable address data.
iAutomatically imported contacts cannot
be edited. They have to be saved first, to be
copied to the COMAND address book.
XCall up the contact (Y page 201)13.XSelect Options by sliding VÆ and turning
cVd the COMAND controller and press
W to confirm.
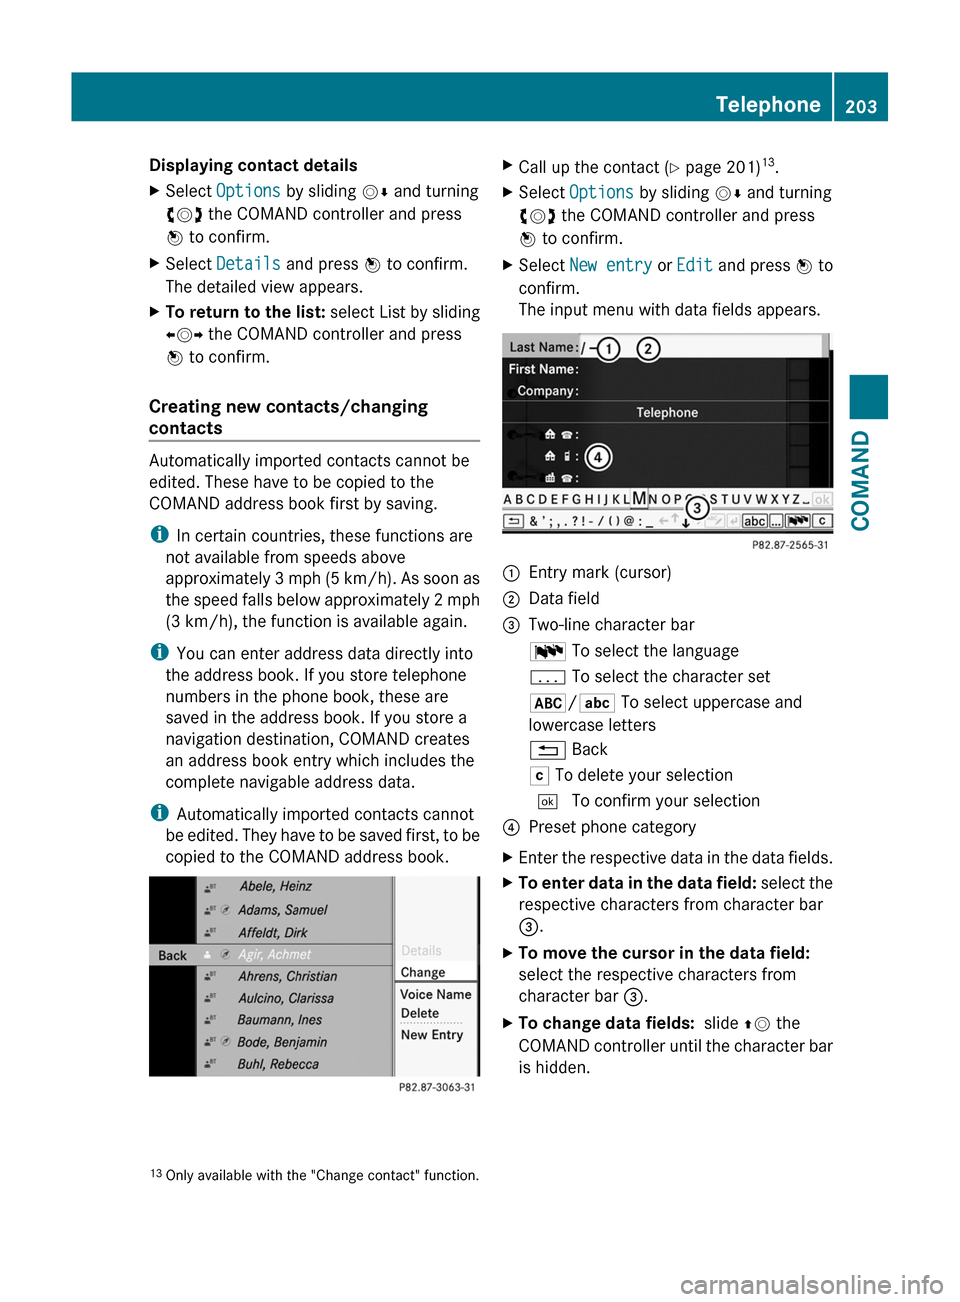
XSelect New entry or Edit and press W to
confirm.
The input menu with data fields appears.
:Entry mark (cursor);Data field=Two-line character barB To select the languagep To select the character set*/E To select uppercase and
lowercase letters
% BackF To delete your selection¬ To confirm your selection?Preset phone categoryXEnter the respective data in the data fields.XTo enter data in the data field: select the
respective characters from character bar
=.
XTo move the cursor in the data field:
select the respective characters from
character bar =.
XTo change data fields: slide ZV the
COMAND controller until the character bar
is hidden.
13Only available with the "Change contact" function.Telephone203COMANDZ
Page 219 of 524

Using the multifunction steering wheelXUse = or ; to select the Audio
menu.
XPress 9 or : briefly.
Displaying information
XSelect Info in the submenu bar by turning
cVd the COMAND controller and press
W to confirm.
Information on the currently received
program is displayed.
XTo return to the SatRadio main display:
slide XVY the COMAND controller.
Displaying service information
If you have any questions or require version
information, you can call the provider's
customer service center at any time.
XSelect Sat. Radio in the submenu bar by
turning cVd the COMAND controller and
press W to confirm.
XSelect Service and press W to confirm.
The provider's details appear.
XTo return to the SatRadio main display:
slide XVY the COMAND controller.
Updating the channel list
When receiving a new channel list, the display
shows the Updating channel... message.
The station last selected is muted until the
update has been completed. Satellite radio
mode is not available during the update
process.
When the update has been completed, the
satellite radio main menu appears. The
station last selected is played.
Sound settings
You will find details on the sound settings in
the "At a glance" section (Y page 133).
Audio CD/DVD and MP3 mode
Important safety notes
GWarning!
COMAND is classified as a Class 1 laser
product. You must not open the casing. If you
open the casing, or if the casing is faulty or
damaged, there is a risk of exposure to
invisible laser radiation. This may damage
your eyes, or those of others.
COMAND does not contain any parts that can
be serviced by the user. For safety reasons,
all maintenance work must be carried out by
qualified aftersales technicians.
GWarning!
Only when the vehicle is stationary should
you:
Rload a disc
Reject a disc
There is a risk of being distracted from the
road and traffic conditions if this is done while
the vehicle is in motion.
Inserting/ejecting CDs/DVDs
DVD changer
The DVD changer has a fixed magazine with
six trays.
Magazine tray status =:
RIndicator lamp off: magazine tray is empty.
RIndicator lamp constantly lit: magazine tray
is loaded.
Audio217COMANDZ
Page 220 of 524

XTo load a single magazine tray: press
respective button =.
XRemove any CD/DVD which may be in
slot :.
XWait until the indicator lamp for button =
which has been pressed flashes quickly.
XInsert the CD/DVD to be loaded into
slot :.
If the CD/DVD has been inserted properly
and if it is a permissible type, the last CD/
DVD loaded will be played.
XTo load all six magazine trays: press
button ;.
The DVD changer checks the load status of
all magazine trays and switches to the first
empty tray.
XWait until the indicator lamp for the
respective button flashes quickly.
XInsert a disc into slot :.
The DVD changer switches to the next
empty magazine tray.
XRepeat the last two steps until all trays are
loaded.
If the CD/DVD has been inserted properly
and if it is a permissible type, the last CD/
DVD loaded will be played.
iIf you remove one disc while playing
another disc, the DVD changer interrupts
playback. Playback continues once the disc
has been removed.
XTo remove a disc: press respective button
=.
XRemove the CD/DVD from slot :.
If the CD/DVD is not removed from
slot :, it will be automatically drawn in
again after a short while.
XTo remove all discs: press button ?.
The DVD changer ejects the CD/DVD from
the tray currently in use.
XRemove the CD/DVD from slot :.
The DVD changer switches to the next
loaded magazine tray and ejects the CD/
DVD.
XRepeat the last step until the magazine is
empty.
Loading and removing SD cards
iNot all SD memory cards are designed for
the temperatures which may be reached in
the vehicle.
Due to the wide range of SD cards available
on the market, Mercedes-Benz cannot
guarantee playback for all brands of SD
memory card.
XTo load an SD card: press the SD card into
slot :. The tapered side must point
towards the right.
If the SD card contains MP3 tracks,
COMAND will play them back.
XTo remove the SD card: press the SD card
into slot : as far as it will go and then
release it again.
XPull out the card.
Activating audio CD/DVD or MP3 mode
Option 1
XInsert a CD/DVD (Y page 217) or an SD
card (Y page 218).
COMAND loads the medium inserted and
starts to play it.
218AudioCOMAND
Page 222 of 524

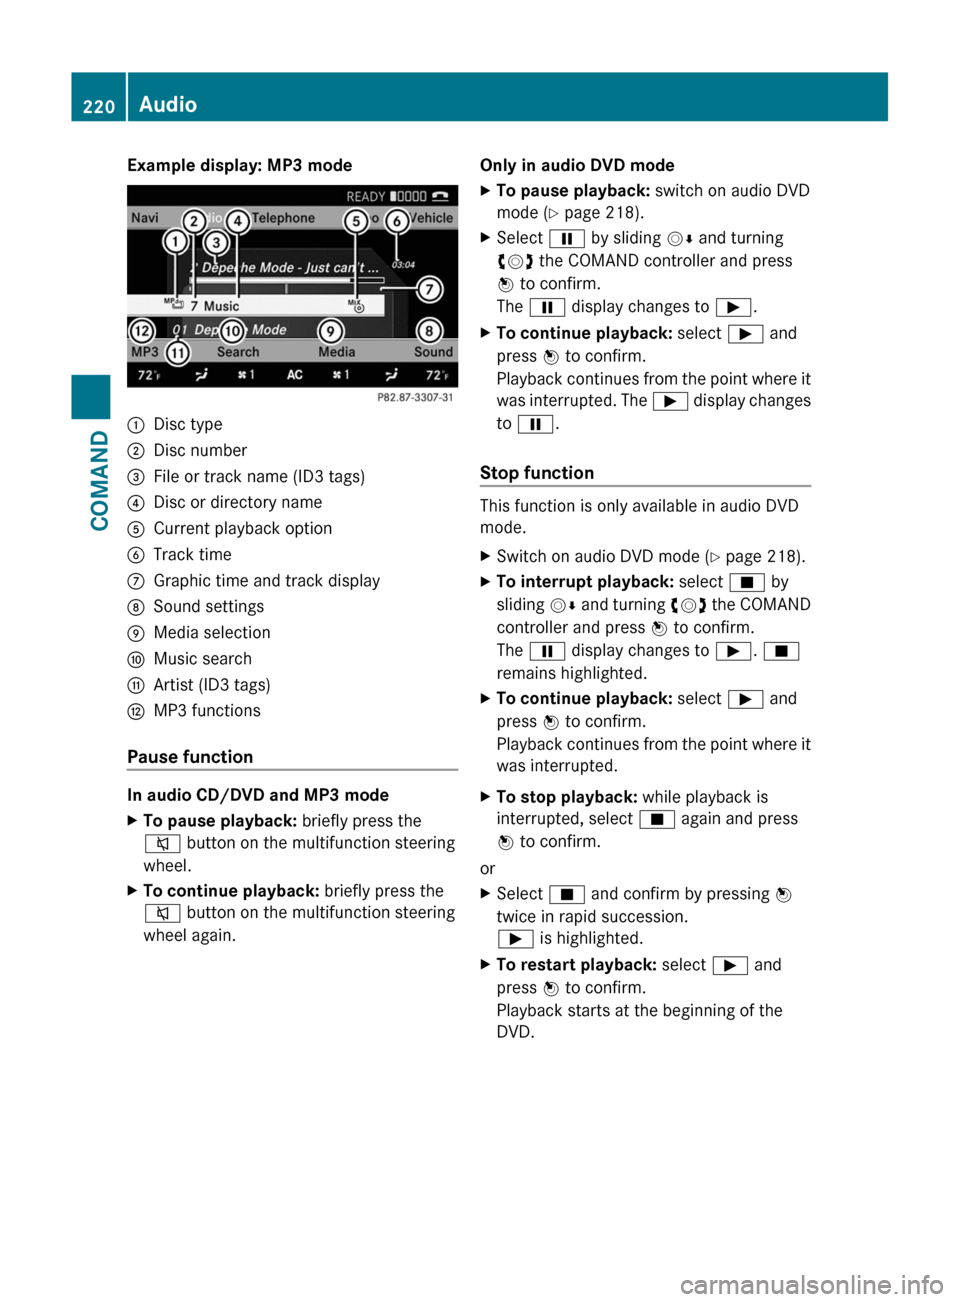
Example display: MP3 mode:Disc type;Disc number=File or track name (ID3 tags)?Disc or directory nameACurrent playback optionBTrack timeCGraphic time and track displayDSound settingsEMedia selectionFMusic searchGArtist (ID3 tags)HMP3 functions
Pause function
In audio CD/DVD and MP3 mode
XTo pause playback: briefly press the
8 button on the multifunction steering
wheel.XTo continue playback: briefly press the
8 button on the multifunction steering
wheel again.Only in audio DVD modeXTo pause playback: switch on audio DVD
mode ( Y page 218).XSelect Ë by sliding VÆ and turning
cVd the COMAND controller and press
W to confirm.
The Ë display changes to Ì.XTo continue playback: select Ì and
press W to confirm.
Playback continues from the point where it
was interrupted. The Ì display changes
to Ë .
Stop function
This function is only available in audio DVD
mode.
XSwitch on audio DVD mode ( Y page 218).XTo interrupt playback: select É by
sliding VÆ and turning cVd the COMAND
controller and press W to confirm.
The Ë display changes to Ì. É
remains highlighted.XTo continue playback: select Ì and
press W to confirm.
Playback continues from the point where it
was interrupted.XTo stop playback: while playback is
interrupted, select É again and press
W to confirm.
or
XSelect É and confirm by pressing W
twice in rapid succession.
Ì is highlighted.XTo restart playback: select Ì and
press W to confirm.
Playback starts at the beginning of the
DVD.220AudioCOMAND
Page 223 of 524

Selecting CD/audio DVD/MP3 discs
Selecting via the media list
XIn CD/audio DVD and MP3 mode: select
Media by sliding VÆ or turning cVd the
COMAND controller and press W to
confirm.
The media list appears. The # dot
indicates the currently selected medium.
Media list
The media list shows the discs currently
available.
Media list (when equipped with a DVD
changer)
Magazine trays, positions 1 to 6: readable
data media are audio CDs, MP3 CDs or MP3
DVDs, audio DVDs and video DVDs.
Memory card, position 7MUSIC REGISTER, position 8Media Interface, position 9USB, position 10
iIf a disc cannot be read, an entry appears
after the display in the magazine tray.
Equipped with a single DVD driveDVD drive, position 1: readable data media
are audio CDs, MP3 CDs or MP3 DVDs,
audio DVDs and video DVDs.
Memory card, position 2MUSIC REGISTER, position 3Media Interface, position 4USB, position 5XSelect the data medium by turning cVd
the COMAND controller and press W to
confirm.
iIf you select a video DVD, the system
switches to video DVD mode
(Y page 236).
Selecting a track using the number
keypad
XPress a number button, e.g. n, when the
display/selection window is active.
The medium at the corresponding position
in the media list is loaded and then played.
Selecting a track
Selecting by skipping to a track
XTo skip forwards or back to a track: slide
XVY or turn cVd the COMAND controller
when the display/selection window is
active.
The skip forward function skips to the next
track.
Skipping backwards restarts the current
track (if it has been playing for more than
eight seconds) or starts the previous track
(if the current track has only been playing
for a shorter time).
If you activate the Medium mix or Random
tracks playback option (MP3 mode only),
the track order is random.
XOn the multifunction steering wheel:
switch COMAND to audio CD, audio DVD or
MP3 mode (Y page 218).
XUse = or ; to select the Audio
menu.
XPress the 9 or : button on the
multifunction steering wheel.
Audio221COMANDZ
Page 226 of 524

XSelect Group by turning cVd and press
W to confirm.
The list of available audio formats appears.
The # dot indicates the format currently
selected.XSelect the audio format by turning cVd
and press W to confirm.XTo exit the menu: slide XVY the COMAND
controller or press the % button.
Playback options
The following options are available to you:
R Normal track sequence
The tracks are played in the normal order
(e.g. track 1, 2, 3, etc.).
In MP3 mode, the track order is determined
by the order in which the tracks are written
to the MP3 data carrier when it is created.
Alphabetical order is the most common.
Once all the tracks in a folder have been
played, the tracks in the next folder are
played.
R Medium mix
All the tracks on the medium are played in
random order (e.g. track 3, 8, 5 etc.).
R Random tracks (MP3 mode only)
You hear the tracks in the current active
folder and any subfolders in random order.
XTo select options: switch on audio CD/
DVD or MP3 mode ( Y page 218).XSelect CD, DVD-A or MP3 by sliding VÆ and
turning cVd the COMAND controller and
press W to confirm.
The options list appears. The # dot
indicates the option selected.XSelect an option by turning cVd and press
W to confirm.
The option is switched on. For all options
except "Normal track sequence", you will
see a corresponding display in the display/
selection window. See the example of the
display in audio CD mode ( Y page 219).i
The "Normal track sequence" option is
automatically selected when you change
the medium you are currently listening to
or when you select a different medium. If
an option is selected, it remains selected
after COMAND is switched on or off.
Notes on MP3 mode
Permissible discs
R CD-R and CD-RW
R DVD-R and DVD-RW
R DVD+R and DVD+RW
R SD memory card:
Permissible file systems
R ISO 9660/Joliet standard for CDs
R UDF for audio and video DVDs
R FAT16 or FAT32 for PCMCIA memory cards
with storage medium
Multisession CDs
For multisession CDs, the content of the first
session determines how COMAND will
process the CD. COMAND plays only one
session and gives priority to the audio CD
session.
If possible, use COMAND to play only CDs
which have been written in one session.
File structure of a data carrier
When you create a disc with compressed
music files, the tracks can be organized in
folders. A folder can also contain subfolders.
A disc can contain a maximum of 255 folders.
Each folder can contain a maximum of
255 tracks and 255 subfolders.
The disc may contain no more than eight
directory levels. Files beyond the eighth level
will not be recognized by the system.
Track and file names
When you create a disc with compressed
music files, you can assign names to the
tracks and folders.
COMAND uses these names accordingly for
the display. Folders which contain data other
224AudioCOMAND
Page 228 of 524

If you insert thicker discs, e.g. those that
contain data on both sides (DVD on one
side and audio data on the other), they
cannot be ejected and can damage the
drive.
Do not use discs with a diameter of 8 cm,
even with an adapter. Only use round discs
with a diameter of 12 cm.
iCOMAND is able to play back audio CDs
in multichannel audio format.
MUSIC REGISTER
General notes
You can store music files in MP3 or WMA
format in the MUSIC REGISTER. The memory
has a capacity of approximately 7 GB.
! Retain the original music files in a secure
location. An error in COMAND might result
in the loss of the music files stored in the
MUSIC REGISTER. Mercedes-Benz is not
liable for any loss of data.
Switching on the MUSIC REGISTER
XSelect Audio in the main function bar by
sliding ZV and turning cVd the COMAND
controller and press W to confirm.
If MUSIC REGISTER was the last mode
selected, it is now switched on.
If another audio source is switched on, you
can now switch on the MUSIC REGISTER in
the audio menu.
XSelect Music Register and press W to
confirm.
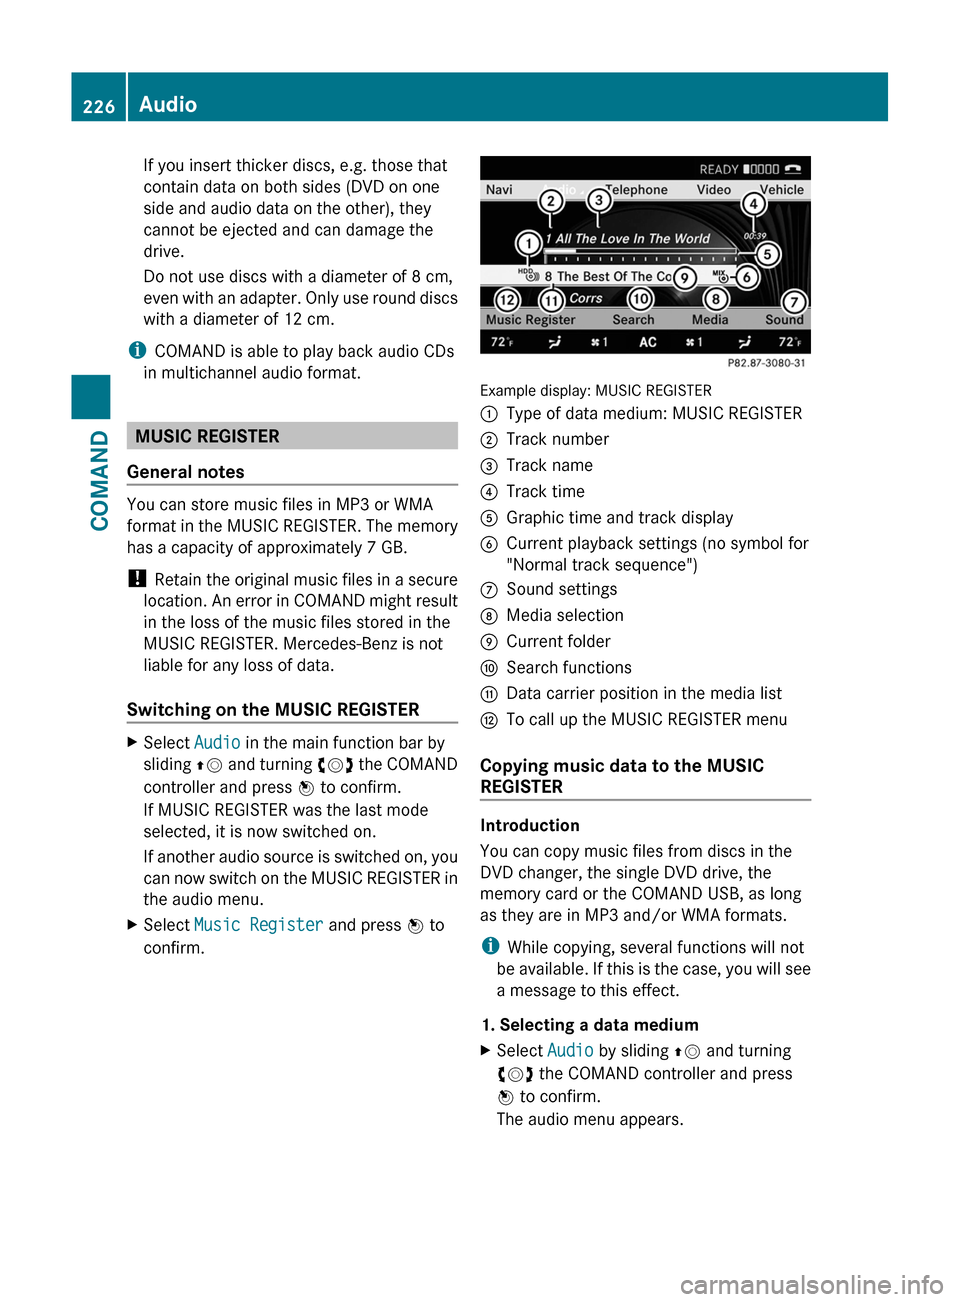
Example display: MUSIC REGISTER
:Type of data medium: MUSIC REGISTER;Track number=Track name?Track timeAGraphic time and track displayBCurrent playback settings (no symbol for
"Normal track sequence")
CSound settingsDMedia selectionECurrent folderFSearch functionsGData carrier position in the media listHTo call up the MUSIC REGISTER menu
Copying music data to the MUSIC
REGISTER
Introduction
You can copy music files from discs in the
DVD changer, the single DVD drive, the
memory card or the COMAND USB, as long
as they are in MP3 and/or WMA formats.
iWhile copying, several functions will not
be available. If this is the case, you will see
a message to this effect.
1. Selecting a data medium
XSelect Audio by sliding ZV and turning
cVd the COMAND controller and press
W to confirm.
The audio menu appears.
226AudioCOMAND