2011 MERCEDES-BENZ S-Class phone
[x] Cancel search: phonePage 140 of 524

Remote control
Overview
:To switch the screen on/off;To switch button lighting on/off=To select the screen for remote control
operation (COMAND, SPLITVIEW, L
REAR and REAR R can be selected)
?To select a menu or menu itemATo confirm a selection or settingBTo switch sound on/off (for corded
headphones)
CTo adjust the volume (for corded
headphones)
DTo skip, fast-forward/fast-rewindETo select a track, to enter directlyFTo leave the menu (back)Selecting the screen for the remote
control
You can use the remote control to operate
one of the two rear screens at a time. To do
so, you must switch the remote control to the
desired screen.
XTo select the left-hand screen: turn
thumbwheel = until "L REAR" is
highlighted in the window.
XTo select the right-hand screen: turn
thumbwheel = until "REAR R" is
highlighted in the window.
Switching the screen on/off
If the key in the ignition lock is in position 0
or 1 or if the key is not in the ignition lock, the
rear screens will switch off after 30 minutes.
Before the screens switch off, they show a
message to this effect.
You can switch the screens back on,
However, this will discharge the starter
battery.
XPoint the remote control at the rear-
compartment screen which has been
selected for remote operation.
XPress button : on the remote control.
The respective rear screen switches on or
off.
iYou can only switch the screens on using
the remote control if the ignition is
switched on.
Switching button lighting on/off
XPress button ; on the remote control.
Depending on the previous status, the
button lighting is switched on or off.
iIf you do not use the remote control for
about 15 seconds, the button lighting
switches off automatically.
Switching the sound on/off (corded
headphones only)
XPress button B on the remote control.
The sound is switched on/off.
138At a glanceCOMAND
Page 142 of 524

Cordless headphones
Overview
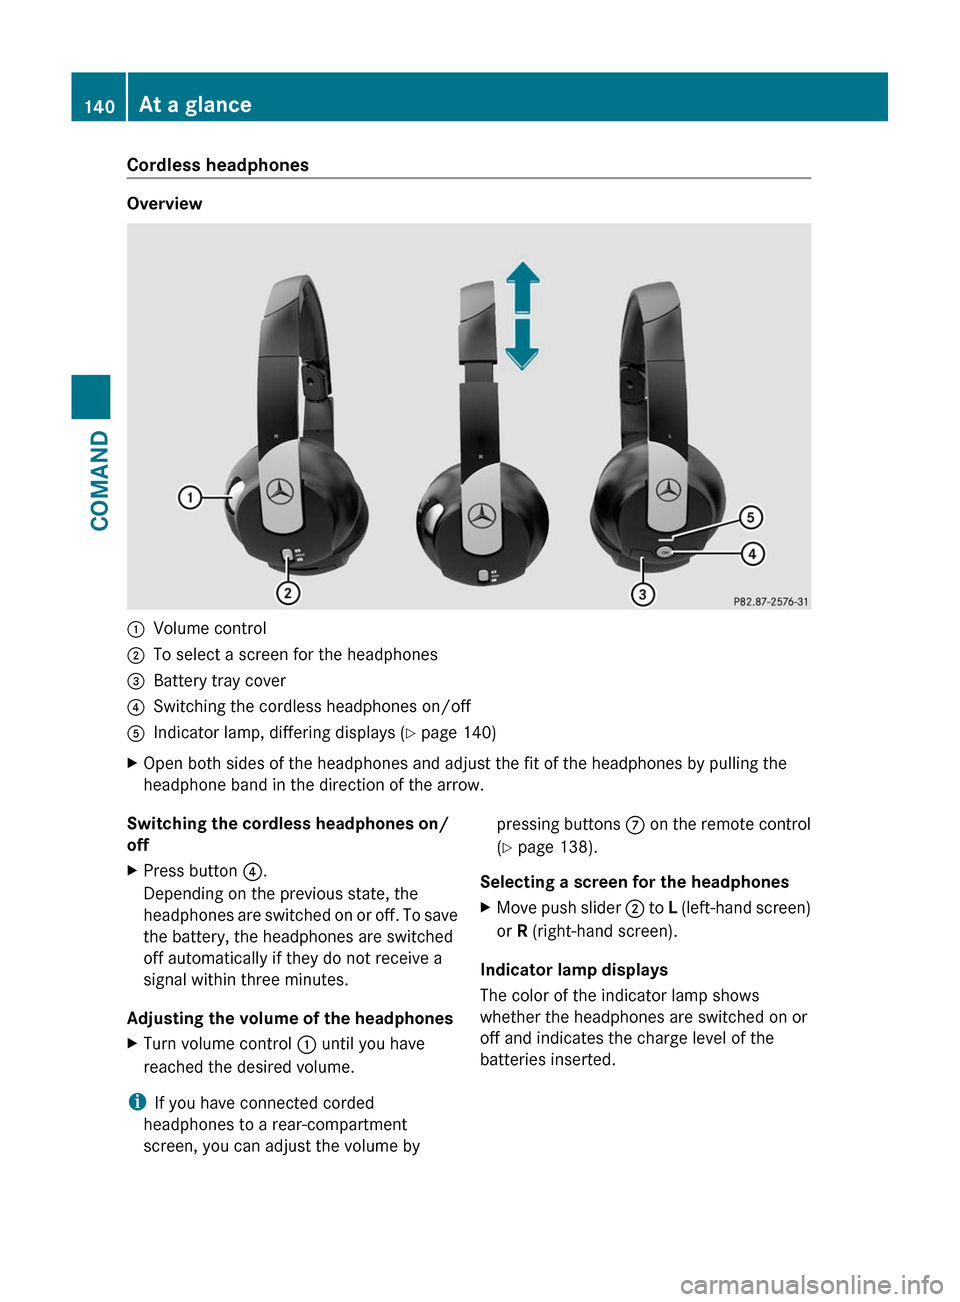
:Volume control;To select a screen for the headphones=Battery tray cover?Switching the cordless headphones on/offAIndicator lamp, differing displays (Y page 140)XOpen both sides of the headphones and adjust the fit of the headphones by pulling the
headphone band in the direction of the arrow.Switching the cordless headphones on/
offXPress button ?.
Depending on the previous state, the
headphones are switched on or off. To save
the battery, the headphones are switched
off automatically if they do not receive a
signal within three minutes.
Adjusting the volume of the headphones
XTurn volume control : until you have
reached the desired volume.
i If you have connected corded
headphones to a rear-compartment
screen, you can adjust the volume by
pressing buttons C on the remote control
( Y page 138).
Selecting a screen for the headphonesXMove push slider ; to L (left-hand screen)
or R (right-hand screen).
Indicator lamp displays
The color of the indicator lamp shows
whether the headphones are switched on or
off and indicates the charge level of the
batteries inserted.
140At a glanceCOMAND
Page 143 of 524

DisplayStatusGreenThe headphones are switched
on and the batteries are fully
charged.RedThe headphones are switched
on and the batteries are
almost discharged.No display
(dark)The headphones are switched
off, or the batteries are
empty, incorrectly inserted or
not inserted.
Connecting additional headphones
You can connect an additional set of corded
headphones to each rear-compartment
screen ( Y page 137).
Changing batteries
Batteries are required for the remote control
and for the two sets of cordless headphones.
For changing batteries: ( Y page 243)
System settings
Vehicle equipment
i These Operating Instructions describe all
standard and optional equipment available
for your vehicle at the time of purchase.
Please note that your vehicle may not be
equipped with all features described.
Display settings
Switching the display on/off
XSelect Vehicle by turning cVd the
COMAND controller and press W to
confirm.XSelect Display off by turning cVd the
COMAND controller and press W to
confirm.XTo switch on the display: press W or
cVd turn the COMAND controller.
Display design
Your COMAND display features optimized
designs for operation during daytime and
night-time hours. You can customize the
design to suit your personal preferences by
manually selecting day or night design or opt
for an automatic setting.
XSelect Vehicle by turning cVd the
COMAND controller and press W to
confirm.XSelect System by turning cVd the
COMAND controller and press W to
confirm.XSelect Display and press W to confirm.XSelect Day design , Night design or
Automatic by turning cVd the COMAND
controller and press W to confirm.
The # icon indicates the current setting.DesignExplanationDay designThe display is set
permanently to day
design.Night designThe display is set
permanently to night
design.AutomaticThe display design
changes depending on
the brightness around
the vehicle.
i In the Automatic setting, COMAND
evaluates the readings from the automatic
vehicle light sensor and switches between
the display designs automatically.
System settings141COMANDZ
Page 147 of 524

XSelect Yes or No and press W to confirm.
If you select No, the process will be aborted.
If you select Yes, the individualization is
deleted. You will see a message to this
effect.
Bluetooth® settings
General information about Bluetooth®
Bluetooth® technology is the standard for
short-range wireless data transmission of up
to approximately 10 meters. Bluetooth®
allows, for example, the exchange of vCards.
Bluetooth® is a registered trademark of
Bluetooth Special Interest Group (SIG) Inc.
Requirements for a Bluetooth®
connection
You can connect mobile phones and
notebooks with COMAND.
To do so, the following conditions need to be
met:
RBluetooth®-capable devices, e.g. mobile
phones, must comply with a certain profile
in order to be connected to COMAND.
Every Bluetooth® device has its own
specific Bluetooth® name.
RBluetooth® must be activated in COMAND
and on the respective Bluetooth® device;
see the separate operating instructions.
Rthe Bluetooth® device must be "visible" to
COMAND in order for COMAND to find and
display it. For the setting procedures,
please see the operating instructions for
the Bluetooth® device.
iOnce a mobile phone has been
connected, reception and transmission
volume may change.
Activating/deactivating Bluetooth®
XSelect Vehicle in the main function bar by
turning cVd the COMAND controller and
press W to confirm.
XSelect System by turning cVd the
COMAND controller and press W to
confirm.
XSelect Bluetooth by turning cVd the
COMAND controller and press W to
confirm.
XSelect Bluetooth activated and press
W to confirm.
This switches Bluetooth® on O or off ª.
Connecting Bluetooth® devices
General information
Before using your Bluetooth® device with
COMAND for the first time, you will need to
connect it.
Connecting is comprised of:
Rsearching for a Bluetooth® device and
Rsubsequently authorizing it
iYou can connect up to ten devices to
COMAND.
For more information on suitable mobile
phones and on connecting a Bluetooth®-
capable mobile phone to COMAND, visit
http://www.mbusa-mobile.com or call
the Mercedes-Benz Customer Assistance
Center at
1-800-FOR-MERCedes(1-800-367-6372)
(US) or Customer Service at
1-800-387-0100 (Canada).
System settings145COMANDZ
Page 148 of 524

Searching for Bluetooth® devicesXActivate Bluetooth® (Y page 145).XSelect Vehicle in the main function bar by
turning cVd the COMAND controller and
press W to confirm.
XSelect System by turning cVd the
COMAND controller and press W to
confirm.
XSelect Bluetooth by turning cVd the
COMAND controller and press W to
confirm.
XSelect Search for Bluetooth devices
and press W to confirm.
COMAND searches for Bluetooth® devices
within range. After a short while, the
Bluetooth® device list appears.
Example of display: Bluetooth® device list
:Currently connected # and authorized
device (Y icon)
;Device not within range but previously
authorized (L appears in gray)
=Newly detected device within range but
not yet authorized (no Y icon)
The Bluetooth® device list shows all devices
within range and all previously authorized
devices, whether or not they are in range.
If the Bluetooth® device list is already full, you
will be requested to de-authorize a device
(Y page 147). If COMAND does not detect
your Bluetooth® device, external
authorization may be necessary
(Y page 147).
iWhen subsequently called up again, the
list may no longer show all devices, for
example because a device has been
removed from the vehicle in the meantime.
In this case, start a new search to update
the device list.
Authorizing a Bluetooth® device
(registering)
XIn the Bluetooth® device list, select not yet
authorized device = by turning cVd the
COMAND controller.
XSelect Options by sliding VY the
COMAND controller and press W to
confirm.
XSelect Authorize and press W to confirm.
The passcode is any one to sixteen-digit
number combination which you can
determine yourself. You must enter the same
number combination in COMAND and in the
Bluetooth® device to be authorized (see
mobile phone operating instructions).
iSome mobile phones require a four-digit
(or longer) passcode.
iIf you want to re-authorize a device
following de-authorization (Y page 147),
you can select a different passcode.
146System settingsCOMAND
Page 149 of 524

XTo enter a passcode in COMAND: press
the number keys in sequence.
¬ is highlighted after the first number
has been entered.
or
XSelect the digits one by one by turning
cVd the COMAND controller and press
W to confirm.XTo confirm an entry in COMAND: select
¬ using the COMAND controller and
press W to confirm.XEnter the same passcode into the
Bluetooth ®
device (see the operating
instructions for the respective device).
The device is authorized.
External authorization
If COMAND does not detect your
Bluetooth ®
device, this may be due to
particular security settings on your
Bluetooth ®
device. In this case, check
whether your Bluetooth ®
device can locate
the COMAND system. The Bluetooth ®
device
name of COMAND is "MB Bluetooth".
XIn the Bluetooth ®
device list, select the
desired device by turning cVd the
COMAND controller.XSelect Options by sliding VY the
COMAND controller and press W to
confirm.XSelect External authorization and
press W to confirm.XStart the Bluetooth ®
scan process on the
Bluetooth ®
device (see separate operating
instructions of the respective device).XSelect COMAND ("MB Bluetooth").XWhen prompted, enter the passcode on the
Bluetooth ®
device and then on COMAND.Displaying the details of a Bluetooth ®
deviceXIn the Bluetooth ®
device list, select the
desired device by turning cVd the
COMAND controller.XSelect Options by sliding VY the
COMAND controller and press W to
confirm.XSelect Details and press W to confirm.
The detailed view for this device appears.XTo close the detailed view: turn cVd or
slide XVY the COMAND controller.
De-authorizing (de-registering) a
Bluetooth ®
device
Mercedes-Benz USA, LLC recommends that
you de-authorize devices, e.g. mobile phones,
both in COMAND and on the respective
Bluetooth ®
device itself. Subsequent
authorization may otherwise fail.
XIn the Bluetooth ®
device list, select the
authorized device by turning cVd the
COMAND controller.XSelect Options by sliding VY the
COMAND controller and press W to
confirm.XSelect De-authorize and press W to
confirm.
A prompt appears asking whether you
really wish to revoke authorization for this
device.XSelect Yes or No and press W to confirm.
If you select Yes, the authorization for the
device will be revoked.
If you select No, the process will be aborted.
i
If a Bluetooth ®
device has been de-
authorized and is no longer in range, it will
no longer be shown in the Bluetooth ®
device list after the next search.
System settings147COMANDZ
Page 163 of 524

XSelect By Name from the menu and press
W to confirm.
A list of all of the points of interest on the
digital map appears.XProceed as described in the "Point of
interest list with character bar" section
( Y page 162).
Entering a point of interest using the
phone number search
This function gives you access to all points of
interest that have a phone number.
XSelect By Telephone Number and press
W to confirm.
You will see a list of phone numbers.XProceed as described in the "Point of
interest list with character bar" section
( Y page 162).
Assigning a point of interest category
Introduction
The categories and points of interest
available depend on the distance from the
vehicle position you have set for the point of
interest.
R Point of interest in the vicinity of the
destination:
Alphabetically sorted categories are
available, as well as points of interest in the
vicinity of the destination position arranged
by distance.
R Point of interest in the vicinity of the current
position:
Alphabetically sorted categories are
available, as well as points of interest in the
vicinity of the vehicle position arranged by
distance.
R Point of interest within a given city:
If you have only entered the state/province
and the city, alphabetically sorted
categories and alphabetically sorted points
of interest within the city are available.
If you have entered more information than
the state/province and the city,
alphabetically sorted categories and points
of interest sorted by distance within the
vicinity of the address entered are
available.
R point of interest using name search:
An alphabetically sorted list of all points of
interest is available.
Points of interest with the same name and
the same category are sorted into a sub-list
in order of ascending distance.
Selecting a categoryXSelect the main category by turning cVd
the COMAND controller.XConfirm the selection by pressing W.
If the selected main category does not
contain any sub-categories, the point of
interest list appears.
If the main category selected contains sub-
categories, a list of all the sub-categories
appears as a selection list.XSelect the category by turning cVd the
COMAND controller.XConfirm the selection by pressing W.
The point of interest list appears. It
contains the points of interest that are
available in the sub-category and which are
within the search radius.
i Search radius means: COMAND searches
within a radius of up to 100 km.
If COMAND does not find any points of
interest within this radius, it extends its
search range to approximately 200 km. If
COMAND finds one point of interest within
this radius, it finishes the search.
i If you select the ALL list item, the points
of interest list contains all points of interest
for all sub-categories in the RESTAURANT
main category which lie within the search
radius.
If you select the OTHER RESTAURANTS
Restaurant list item: the points of interest
Navigation161COMANDZ
Page 164 of 524

list contains all the points of interest which
cannot be assigned to any sub-category of
the Restaurant main category and that lie
within the search radius.
Point of interest list
Introduction
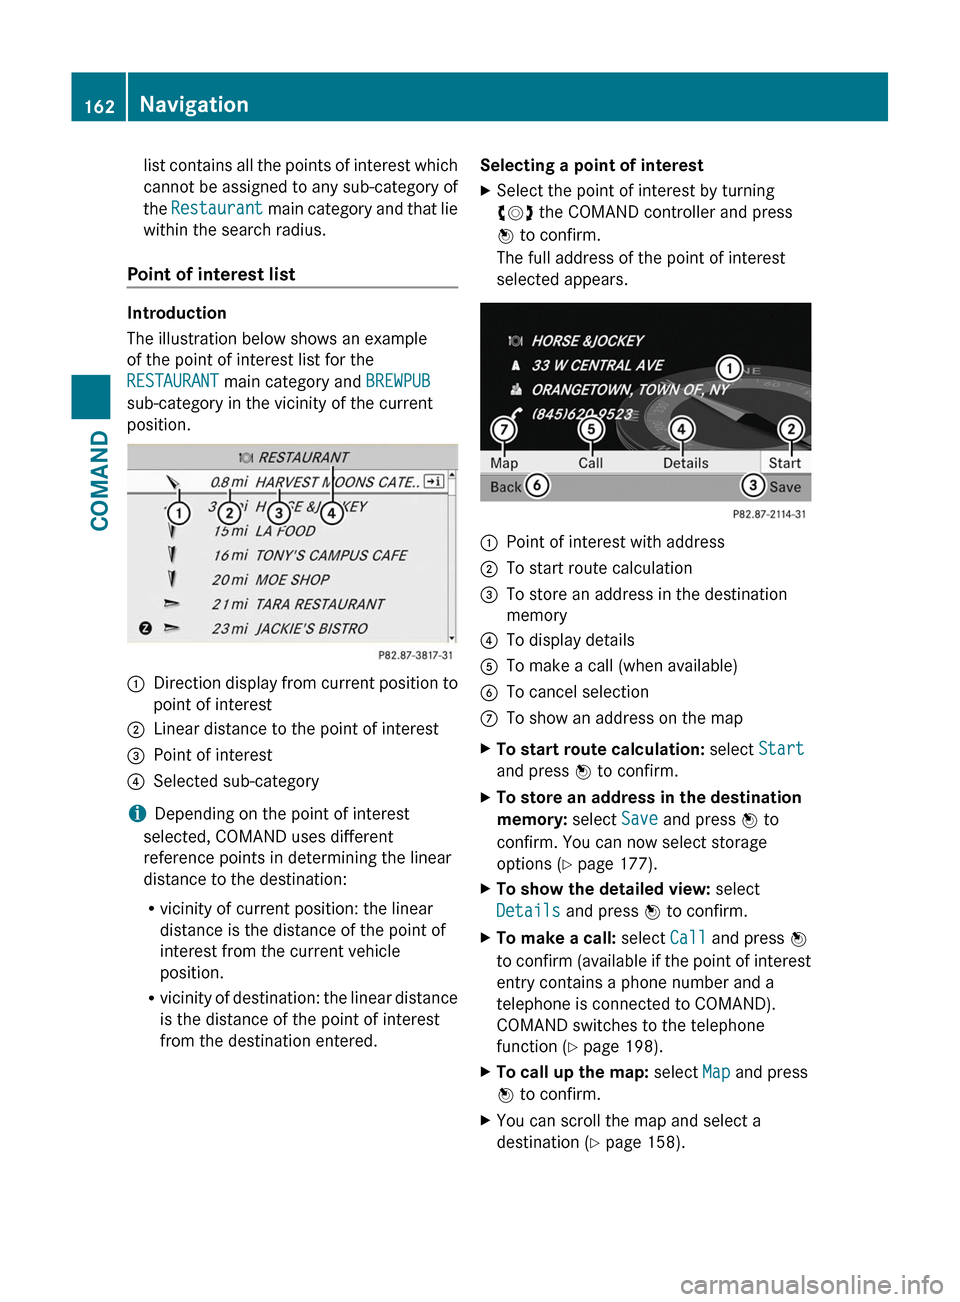
The illustration below shows an example
of the point of interest list for the
RESTAURANT main category and BREWPUB
sub-category in the vicinity of the current
position.
:Direction display from current position to
point of interest
;Linear distance to the point of interest=Point of interest?Selected sub-category
iDepending on the point of interest
selected, COMAND uses different
reference points in determining the linear
distance to the destination:
Rvicinity of current position: the linear
distance is the distance of the point of
interest from the current vehicle
position.
Rvicinity of destination: the linear distance
is the distance of the point of interest
from the destination entered.
Selecting a point of interestXSelect the point of interest by turning
cVd the COMAND controller and press
W to confirm.
The full address of the point of interest
selected appears.
:Point of interest with address;To start route calculation=To store an address in the destination
memory
?To display detailsATo make a call (when available)BTo cancel selectionCTo show an address on the mapXTo start route calculation: select Start
and press W to confirm.
XTo store an address in the destination
memory: select Save and press W to
confirm. You can now select storage
options (Y page 177).
XTo show the detailed view: select
Details and press W to confirm.
XTo make a call: select Call and press W
to confirm (available if the point of interest
entry contains a phone number and a
telephone is connected to COMAND).
COMAND switches to the telephone
function (Y page 198).
XTo call up the map: select Map and press
W to confirm.
XYou can scroll the map and select a
destination (Y page 158).
162NavigationCOMAND