2011 MERCEDES-BENZ S-Class phone
[x] Cancel search: phonePage 205 of 524
Displaying contact detailsXSelect Options by sliding VÆ and turning
cVd the COMAND controller and press
W to confirm.
XSelect Details and press W to confirm.
The detailed view appears.
XTo return to the list: select List by sliding
XVY the COMAND controller and press
W to confirm.
Creating new contacts/changing
contacts
Automatically imported contacts cannot be
edited. These have to be copied to the
COMAND address book first by saving.
iIn certain countries, these functions are
not available from speeds above
approximately 3 mph (5 km/h). As soon as
the speed falls below approximately 2 mph
(3 km/h), the function is available again.
iYou can enter address data directly into
the address book. If you store telephone
numbers in the phone book, these are
saved in the address book. If you store a
navigation destination, COMAND creates
an address book entry which includes the
complete navigable address data.
iAutomatically imported contacts cannot
be edited. They have to be saved first, to be
copied to the COMAND address book.
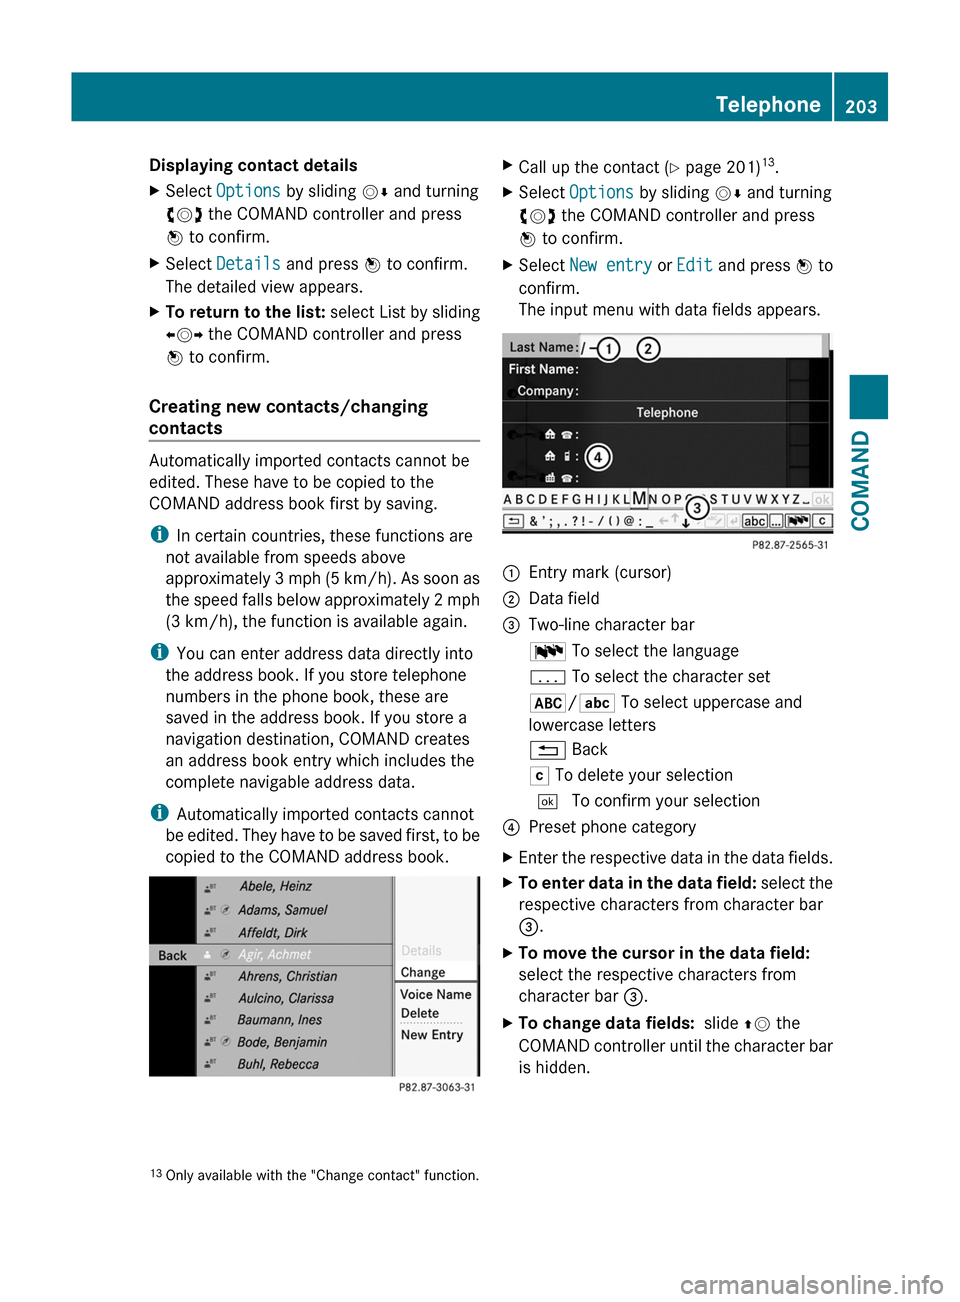
XCall up the contact (Y page 201)13.XSelect Options by sliding VÆ and turning
cVd the COMAND controller and press
W to confirm.
XSelect New entry or Edit and press W to
confirm.
The input menu with data fields appears.
:Entry mark (cursor);Data field=Two-line character barB To select the languagep To select the character set*/E To select uppercase and
lowercase letters
% BackF To delete your selection¬ To confirm your selection?Preset phone categoryXEnter the respective data in the data fields.XTo enter data in the data field: select the
respective characters from character bar
=.
XTo move the cursor in the data field:
select the respective characters from
character bar =.
XTo change data fields: slide ZV the
COMAND controller until the character bar
is hidden.
13Only available with the "Change contact" function.Telephone203COMANDZ
Page 206 of 524

XSlide ZVÆ the COMAND controller and
press W to confirm.
or
XPress Æ in the character bar.XTo cancel data entry: select the %
symbol in the character bar and press W
to confirm.
If one of the data fields contains data, a
prompt will appear asking whether you
wish to store the entry.
XTo save data entry: select the ¬
symbol in the character bar and press W
to confirm.
The entry is created in the phone book and
in the address book.
Deleting contacts
XTo select a contact: select Data/
connections in the telephone basic menu
by sliding VÆ and turning cVd the
COMAND controller and press W to
confirm.
XSelect Delete and press W to confirm.
You can select and delete the following types
of contact here:
RInternal contacts
RImported from the memory card
RImported via Bluetooth
RDelete all
XConfirm the selection by pressing W.
A prompt appears asking whether the data
should be deleted.
XSelect Yes and press W to confirm.iAutomatically imported contacts cannot
be deleted (Y page 200).
Calling a number stored in an entry
Using the phone book
XSelect Name in the telephone basic menu
by sliding VÆ and turning cVd the
COMAND controller and press W to
confirm.
XCall up the contact (Y page 201).XContact with multiple telephone
numbers (with G symbol): select by
turning cVd the COMAND controller and
press W to confirm.
or
XPress SEND on the telephone keypad.XContact with one telephone number
(without G symbol): press W to confirm.
or
XPress SEND on the telephone keypad.
iYou can also use the phone book in the
on-board computer to make a call
(Y page 374).
Using the address book
XSelect Data/connections in the
telephone basic menu by sliding VÆ and
turning cVd the COMAND controller and
press W to confirm.
XSelect Address book and press W to
confirm.
XCall contact (Y page 201) and press W to
confirm.
XSelect by turning cVd the COMAND
controller and press W to confirm.
or
XPress SEND on the telephone keypad.
Starting route guidance to an entry*
iYou can use this function once you have
stored a destination in the destination
memory (Y page 176). COMAND also
204TelephoneCOMAND* optional
Page 207 of 524
stores the destination in the address book
with the complete navigable address data.
In this case, navigation can be started
without any further data input.
If the contact entry contains a postal
address, e.g. as a result of importing a
vCard, the system can also navigate to this
address. If the data is incomplete or
unclear, COMAND asks the user to enter
the relevant address data. After the entry
has been completed and navigation has
been started, COMAND replaces the
existing address with the navigable
address if necessary.XSearch for an address book entry using the
¤ symbol.XDisplay the details about an entry and
highlight the address data field.XSelect Options by sliding VÆ and turning
cVd the COMAND controller and press
W to confirm.XSelect Navigate and press W to confirm.XSelect Start and press W to confirm.
i
You may only select Navigate if the
address data field contains complete,
navigable data. This is indicated by the ¤
symbol.
Voice tags*
i Voice tags are entered via Voice Control
System*; see the separate operating
instructions for Voice Control System*.
Adding or changing a voice tag
i You can add one voice tag per address
book entry.
XSearch for an address book entry with or
without a voice tag ( ¦ symbol).XSelect Options by sliding VÆ and turning
cVd the COMAND controller and press
W to confirm.XSelect Voice tag and press W to confirm.XSelect Add or Edit and press W to confirm.
Subsequent operation is controlled
by voice. Voice Control System* guides you
through the menus.
Deleting a voice tag
XSearch for an address book entry with a
voice tag.XSelect Options by sliding VÆ and turning
cVd the COMAND controller and press
W to confirm.XSelect Voice tag and press W to confirm.XSelect Delete and press W to confirm.
A deletion prompt appears.
Listening to a voice tag
XSearch for an address book entry with a
voice tag.XSelect Options by sliding VÆ and turning
cVd the COMAND controller and press
W to confirm.XSelect Voice tag and press W to confirm.XSelect Listen and press W to confirm.
You will hear the voice tag.
Using call lists
Introduction
COMAND displays calls received (including
missed calls) and made during phone
operation in lists.
i The respective menu item can only be
selected if calls have already been made or
received in COMAND or if the call lists have
been imported from the telephone.
Opening the call list and selecting an
entry
XTo call up the telephone menu: press the
S function button.XSelect Call lists in the telephone basic
menu by sliding VÆ and turning cVd theTelephone205COMAND* optionalZ
Page 208 of 524
COMAND controller and press W to
confirm.
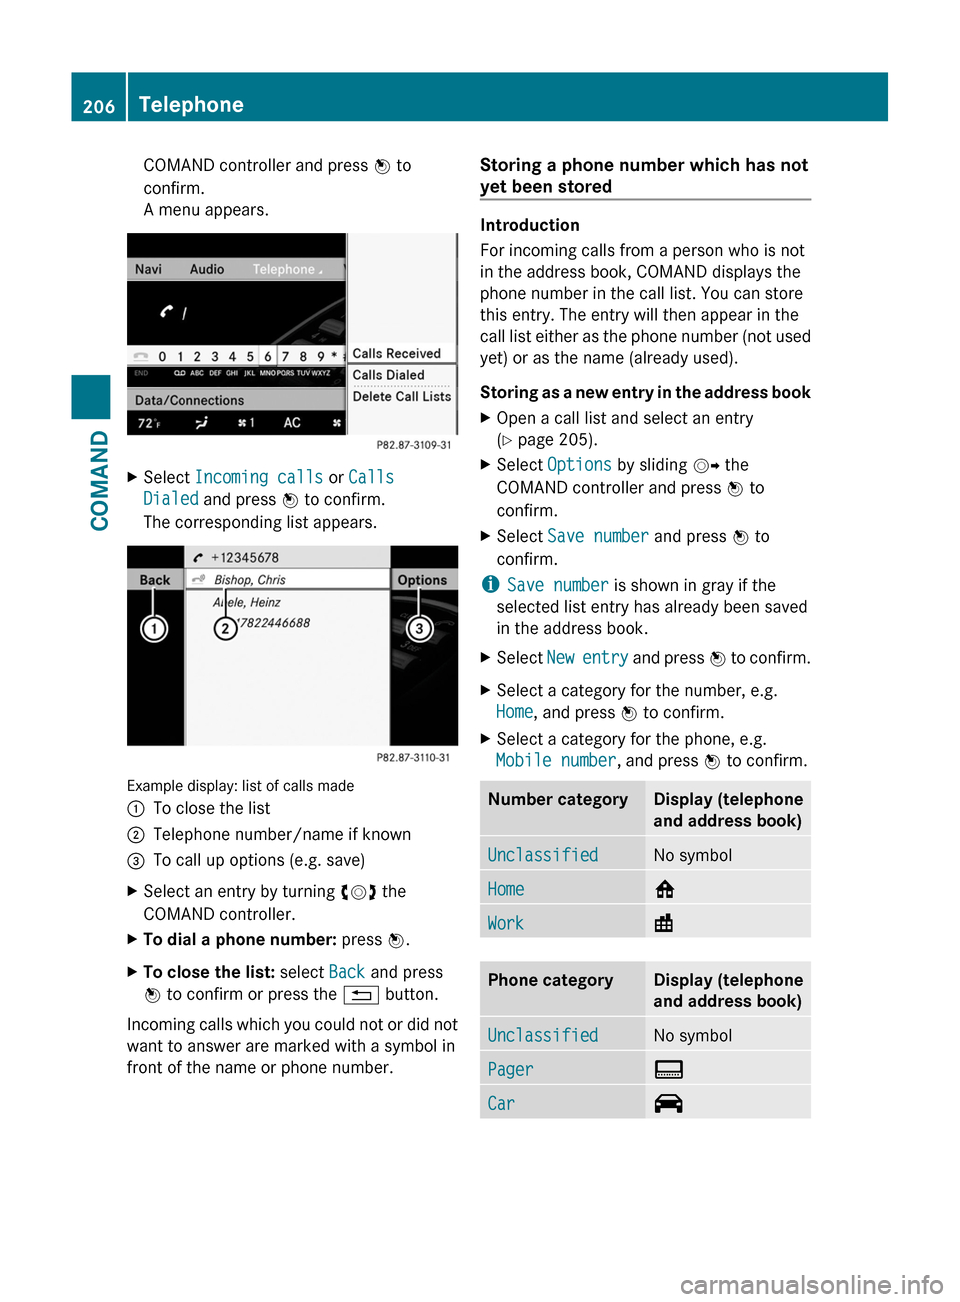
A menu appears.
XSelect Incoming calls or Calls
Dialed and press W to confirm.
The corresponding list appears.
Example display: list of calls made
:To close the list;Telephone number/name if known=To call up options (e.g. save)XSelect an entry by turning cVd the
COMAND controller.
XTo dial a phone number: press W.XTo close the list: select Back and press
W to confirm or press the % button.
Incoming calls which you could not or did not
want to answer are marked with a symbol in
front of the name or phone number.
Storing a phone number which has not
yet been stored
Introduction
For incoming calls from a person who is not
in the address book, COMAND displays the
phone number in the call list. You can store
this entry. The entry will then appear in the
call list either as the phone number (not used
yet) or as the name (already used).
Storing as a new entry in the address book
XOpen a call list and select an entry
(Y page 205).
XSelect Options by sliding VY the
COMAND controller and press W to
confirm.
XSelect Save number and press W to
confirm.
iSave number is shown in gray if the
selected list entry has already been saved
in the address book.
XSelect New entry and press W to confirm.XSelect a category for the number, e.g.
Home, and press W to confirm.
XSelect a category for the phone, e.g.
Mobile number, and press W to confirm.
Number categoryDisplay (telephone
and address book)
UnclassifiedNo symbolHome6Work\Phone categoryDisplay (telephone
and address book)
UnclassifiedNo symbolPager¨Car^206TelephoneCOMAND
Page 209 of 524
Phone categoryDisplay (telephone
and address book)
Landline
telephone number
¬PreferredO
iIf you have not entered the phone number
in a number and telephone category,
the ; icon will appear in the display.
XSelect Next (save) and press W to
confirm.
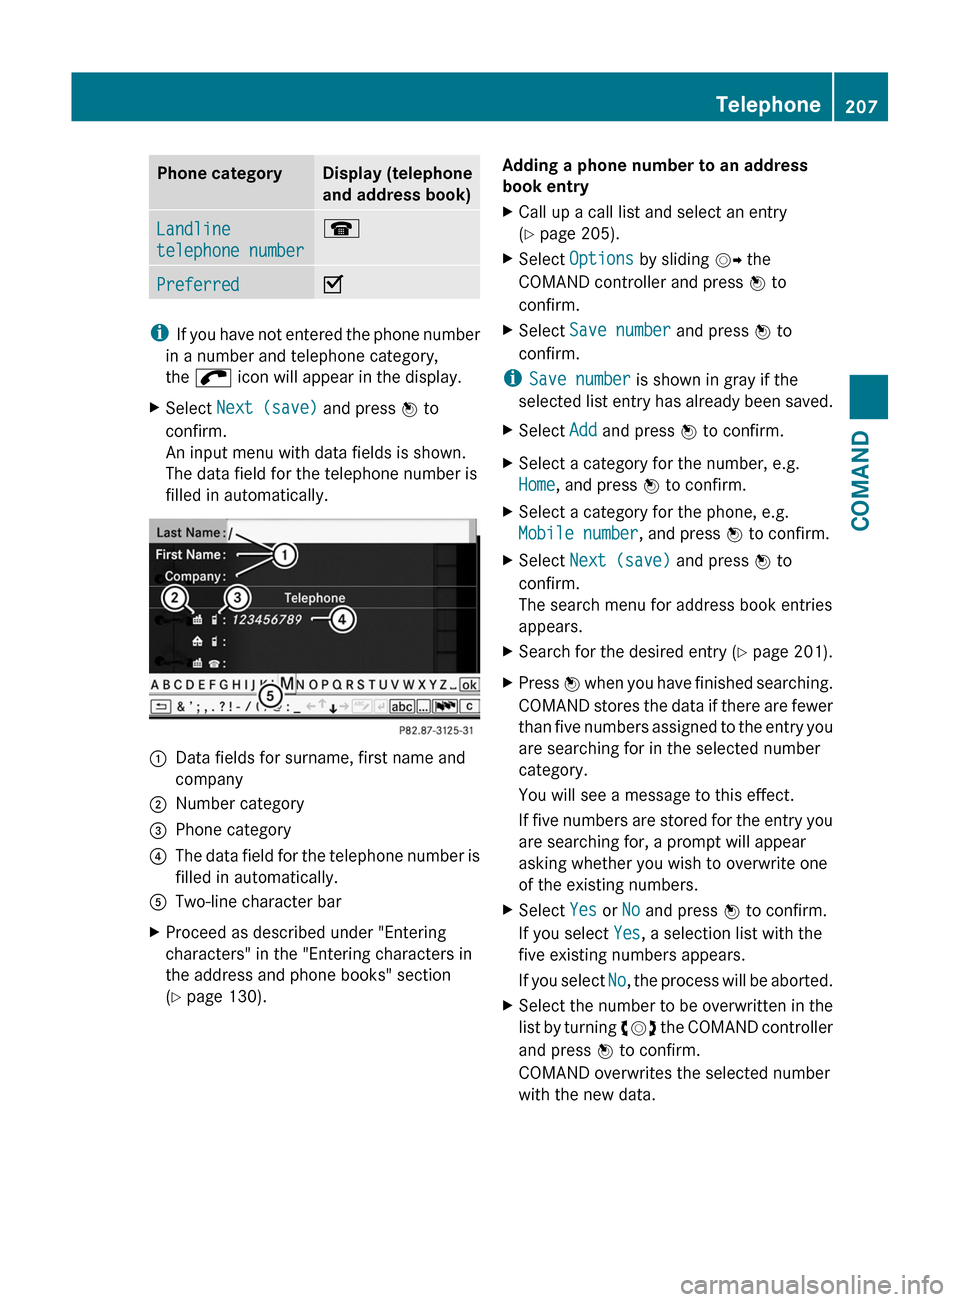
An input menu with data fields is shown.
The data field for the telephone number is
filled in automatically.
:Data fields for surname, first name and
company
;Number category=Phone category?The data field for the telephone number is
filled in automatically.
ATwo-line character barXProceed as described under "Entering
characters" in the "Entering characters in
the address and phone books" section
(Y page 130).
Adding a phone number to an address
book entry
XCall up a call list and select an entry
(Y page 205).
XSelect Options by sliding VY the
COMAND controller and press W to
confirm.
XSelect Save number and press W to
confirm.
iSave number is shown in gray if the
selected list entry has already been saved.
XSelect Add and press W to confirm.XSelect a category for the number, e.g.
Home, and press W to confirm.
XSelect a category for the phone, e.g.
Mobile number, and press W to confirm.
XSelect Next (save) and press W to
confirm.
The search menu for address book entries
appears.
XSearch for the desired entry (Y page 201).XPress W when you have finished searching.
COMAND stores the data if there are fewer
than five numbers assigned to the entry you
are searching for in the selected number
category.
You will see a message to this effect.
If five numbers are stored for the entry you
are searching for, a prompt will appear
asking whether you wish to overwrite one
of the existing numbers.
XSelect Yes or No and press W to confirm.
If you select Yes, a selection list with the
five existing numbers appears.
If you select No, the process will be aborted.
XSelect the number to be overwritten in the
list by turning cVd the COMAND controller
and press W to confirm.
COMAND overwrites the selected number
with the new data.
Telephone207COMANDZ
Page 213 of 524
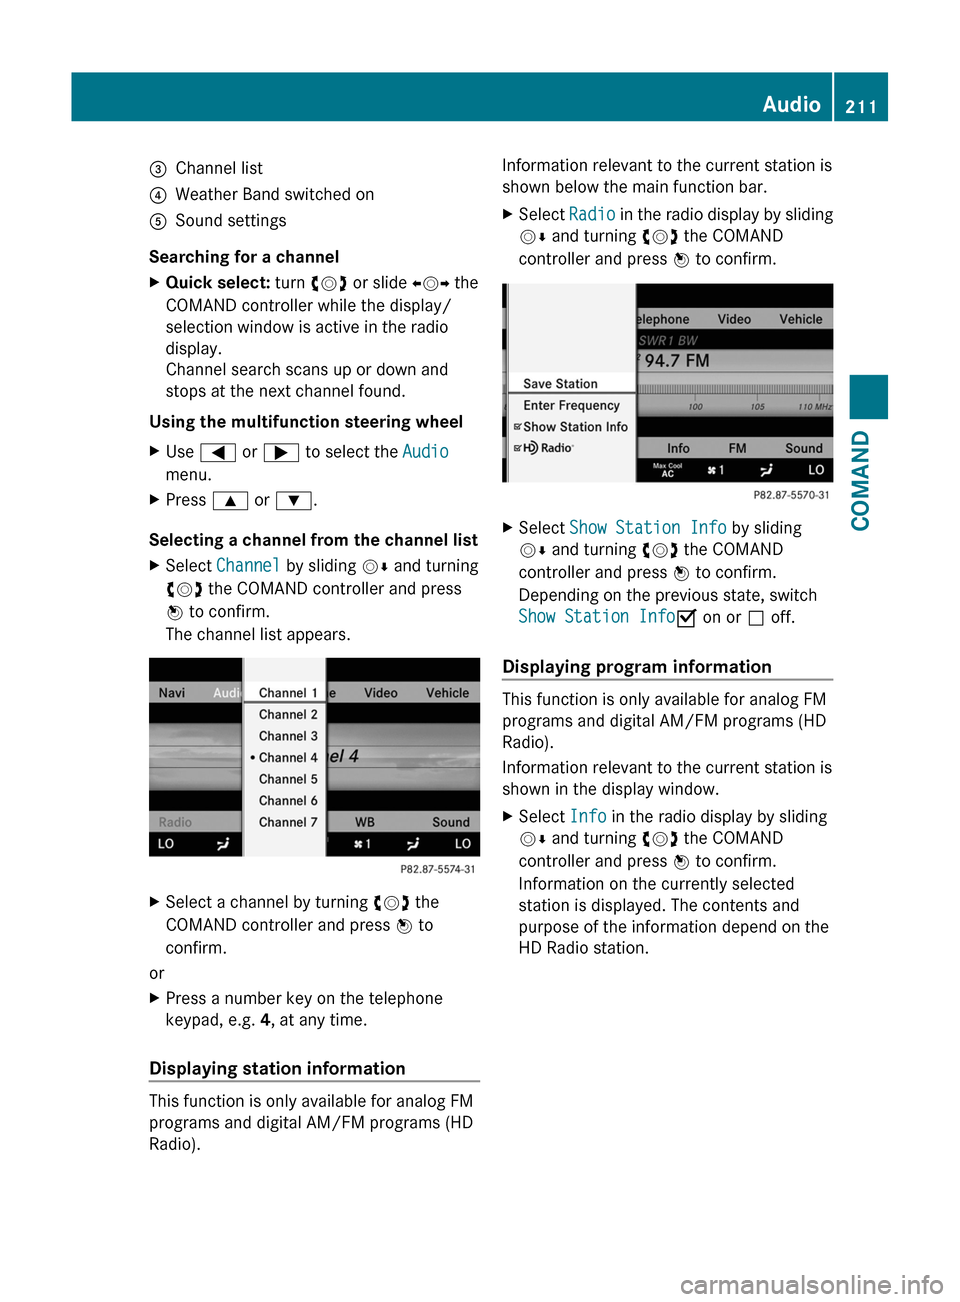
=Channel list?Weather Band switched onASound settings
Searching for a channel
XQuick select: turn cVd or slide XVY the
COMAND controller while the display/
selection window is active in the radio
display.
Channel search scans up or down and
stops at the next channel found.
Using the multifunction steering wheel
XUse = or ; to select the Audio
menu.
XPress 9 or :.
Selecting a channel from the channel list
XSelect Channel by sliding VÆ and turning
cVd the COMAND controller and press
W to confirm.
The channel list appears.
XSelect a channel by turning cVd the
COMAND controller and press W to
confirm.
or
XPress a number key on the telephone
keypad, e.g. 4, at any time.
Displaying station information
This function is only available for analog FM
programs and digital AM/FM programs (HD
Radio).
Information relevant to the current station is
shown below the main function bar.
XSelect Radio in the radio display by sliding
VÆ and turning cVd the COMAND
controller and press W to confirm.
XSelect Show Station Info by sliding
VÆ and turning cVd the COMAND
controller and press W to confirm.
Depending on the previous state, switch
Show Station InfoO on or ª off.
Displaying program information
This function is only available for analog FM
programs and digital AM/FM programs (HD
Radio).
Information relevant to the current station is
shown in the display window.
XSelect Info in the radio display by sliding
VÆ and turning cVd the COMAND
controller and press W to confirm.
Information on the currently selected
station is displayed. The contents and
purpose of the information depend on the
HD Radio station.
Audio211COMANDZ
Page 216 of 524

of Mercedes-Benz USA, LLC. Operation
may also be impaired in certain locations
(e.g. tunnels, parking garages or inside or
next to buildings) or near certain
constructions.
iSIRIUS XM Radio offers more than 130
digital-quality radio channels providing
100% commercial-free music, sport, news
and entertainment.
SIRIUS XM Radio employs a fleet of high-
performance satellites to broadcast around
the clock in the contiguous USA and
Canada.
Satellite radio is available for a monthly fee.
Details are available from the SIRIUS XM
Service Center and at
http://www.sirius.com (USA) or
http://www.siriuscanada.com
(Canada).
Registering satellite radio
XSelect Audio in the main function bar by
sliding ZV and turning cVd the COMAND
controller and press W to confirm.
XSelect Satellite radio and press W to
confirm.
Service information screen
1Provider's phone number (SIRIUS XM)2SIRIUS XM ID of your satellite receiverXCall the phone number of your satellite
radio provider shown on the screen.
iYou can also have the satellite service
activated online. To do so, visit the SIRIUS
XM Radio website at
http://www.sirius.com (USA) or
http://www.siriuscanada.com
(Canada).
Once the connection has been established:
XFollow the instructions of the service staff.
The activation process may take up to ten
minutes. If the activation is completed
successfully, the No Service message
appears in the display, followed by the
satellite radio main menu.
iIf registration is not included when
purchasing the system, your credit card
details will be required to activate your
account.
If the satellite receiver is not installed or is
not installed correctly, the Device not
available. message will appear.
Switching to satellite radio mode
Notes
Important notes on registration, see
"Registering satellite radio" (Y page 214).
Switching to satellite radio mode
XSelect Audio in the main function bar by
sliding ZV and turning cVd the COMAND
controller and press W to confirm.
If satellite radio mode was the last mode
selected, it will now be active.
If another audio mode is switched on, you
can now switch to satellite radio mode in
the audio menu.
XSelect Audio by sliding ZV the COMAND
controller and press W to confirm.
The audio menu appears.
XSelect Sat. Radio and press W to
confirm.
The No Service message appears when
starting up or if no signal is being received.
If the satellite receiver is not installed or is
not installed correctly, the Device not
available. message will appear.
214AudioCOMAND
Page 245 of 524

accident. Objects moving within the
passenger compartment could cause serious
personal injury to vehicle occupants.
GWarning
Due to a potential choking hazard, wired
headset usage by children should only occur
with adult supervision.
Changing the batteries
Both the remote control and the two sets of
wireless headphones require batteries.
GWarning!
Keep the batteries out of the reach of
children. Consult a doctor immediately if a
child should swallow a battery.
Do not dismantle, short-circuit or burn a
battery.
HEnvironmental note
Dispose of discharged batteries in an
environmentally responsible manner.
In the remote control:Battery tray;Lug=Battery compartment cover?Retaining lugsABatteries
The remote control contains 2 type AAA
1.5 V batteries.
XTo open the battery compartment:
remove battery compartment cover = on
the back of the remote control.
XTo do so, press lug ; downwards and take
off battery compartment cover =.
XRemove discharged batteries A from the
compartment.
Rear Seat Entertainment System243COMANDZ