2011 MERCEDES-BENZ S-Class Light
[x] Cancel search: LightPage 426 of 524
Coat hooks
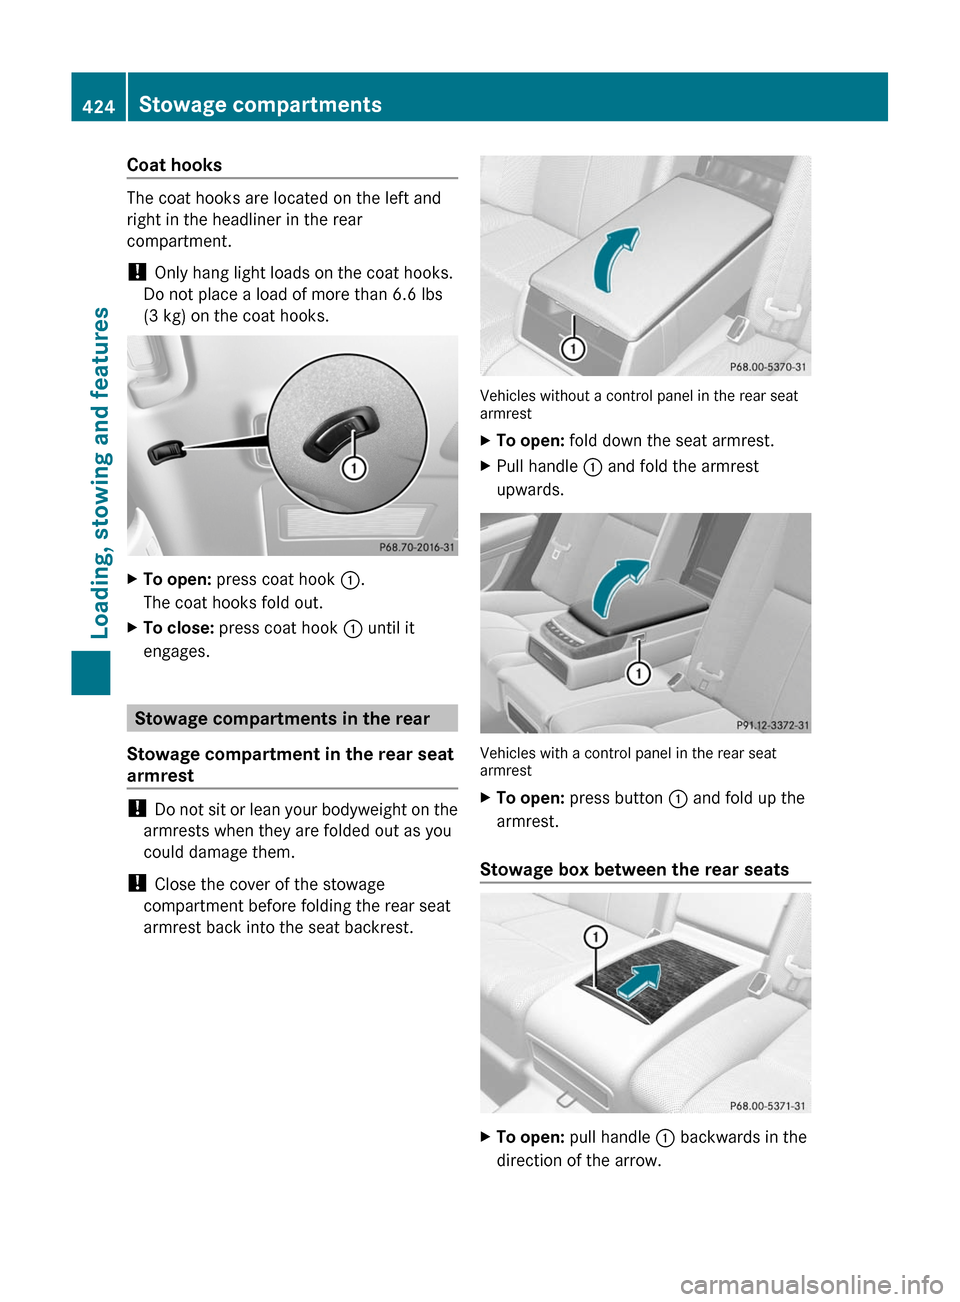
The coat hooks are located on the left and
right in the headliner in the rear
compartment.
! Only hang light loads on the coat hooks.
Do not place a load of more than 6.6 lbs
(3 kg) on the coat hooks.
XTo open: press coat hook :.
The coat hooks fold out.
XTo close: press coat hook : until it
engages.
Stowage compartments in the rear
Stowage compartment in the rear seat
armrest
! Do not sit or lean your bodyweight on the
armrests when they are folded out as you
could damage them.
! Close the cover of the stowage
compartment before folding the rear seat
armrest back into the seat backrest.
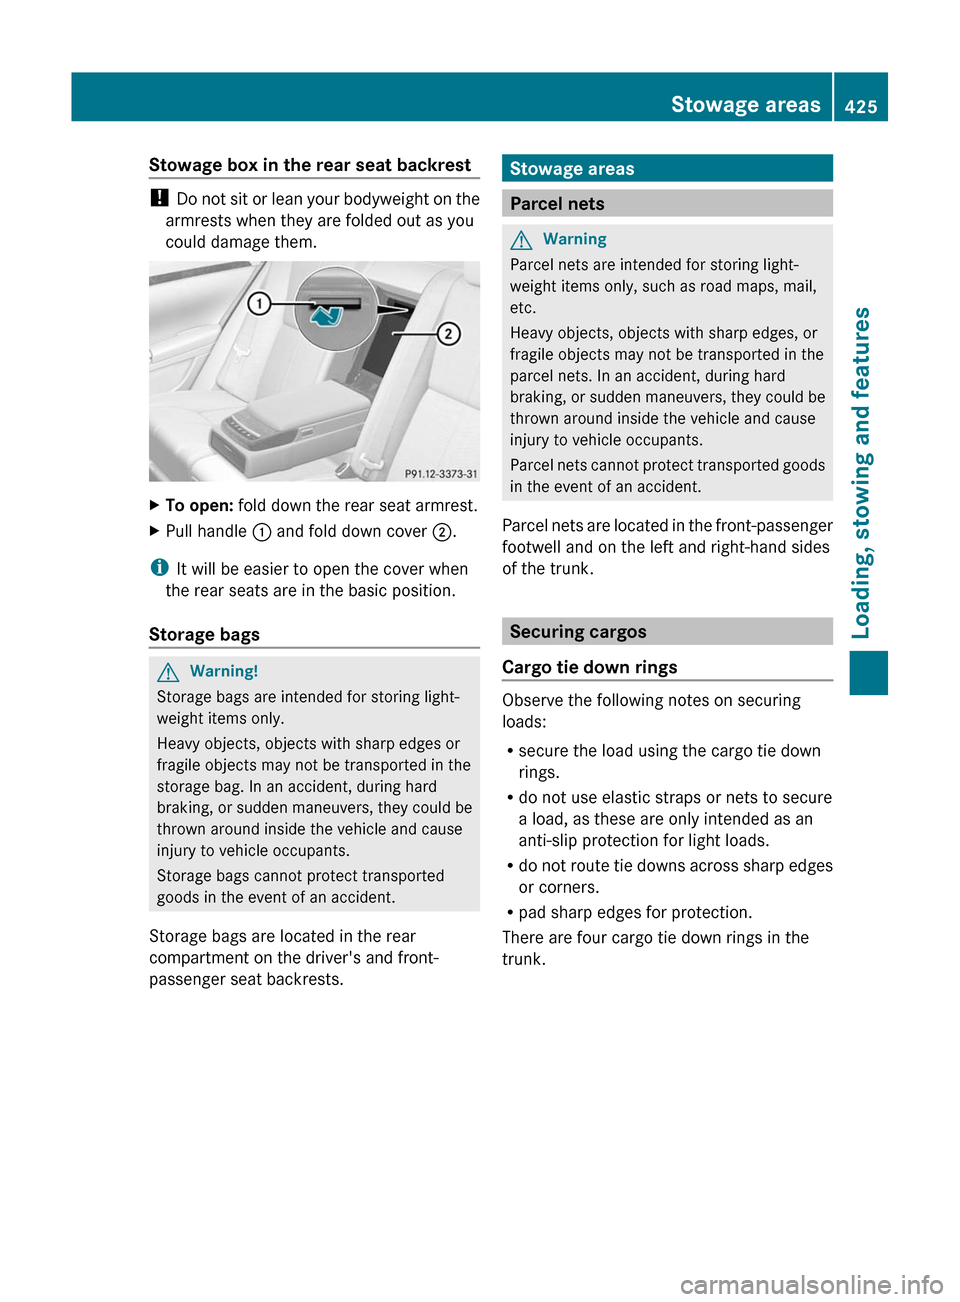
Vehicles without a control panel in the rear seatarmrest
XTo open: fold down the seat armrest.XPull handle : and fold the armrest
upwards.
Vehicles with a control panel in the rear seatarmrest
XTo open: press button : and fold up the
armrest.
Stowage box between the rear seats
XTo open: pull handle : backwards in the
direction of the arrow.
424Stowage compartmentsLoading, stowing and features
Page 427 of 524
Stowage box in the rear seat backrest
! Do not sit or lean your bodyweight on the
armrests when they are folded out as you
could damage them.
XTo open: fold down the rear seat armrest.XPull handle : and fold down cover ;.
iIt will be easier to open the cover when
the rear seats are in the basic position.
Storage bags
GWarning!
Storage bags are intended for storing light-
weight items only.
Heavy objects, objects with sharp edges or
fragile objects may not be transported in the
storage bag. In an accident, during hard
braking, or sudden maneuvers, they could be
thrown around inside the vehicle and cause
injury to vehicle occupants.
Storage bags cannot protect transported
goods in the event of an accident.
Storage bags are located in the rear
compartment on the driver's and front-
passenger seat backrests.
Stowage areas
Parcel nets
GWarning
Parcel nets are intended for storing light-
weight items only, such as road maps, mail,
etc.
Heavy objects, objects with sharp edges, or
fragile objects may not be transported in the
parcel nets. In an accident, during hard
braking, or sudden maneuvers, they could be
thrown around inside the vehicle and cause
injury to vehicle occupants.
Parcel nets cannot protect transported goods
in the event of an accident.
Parcel nets are located in the front-passenger
footwell and on the left and right-hand sides
of the trunk.
Securing cargos
Cargo tie down rings
Observe the following notes on securing
loads:
Rsecure the load using the cargo tie down
rings.
Rdo not use elastic straps or nets to secure
a load, as these are only intended as an
anti-slip protection for light loads.
Rdo not route tie downs across sharp edges
or corners.
Rpad sharp edges for protection.
There are four cargo tie down rings in the
trunk.
Stowage areas425Loading, stowing and featuresZ
Page 430 of 524
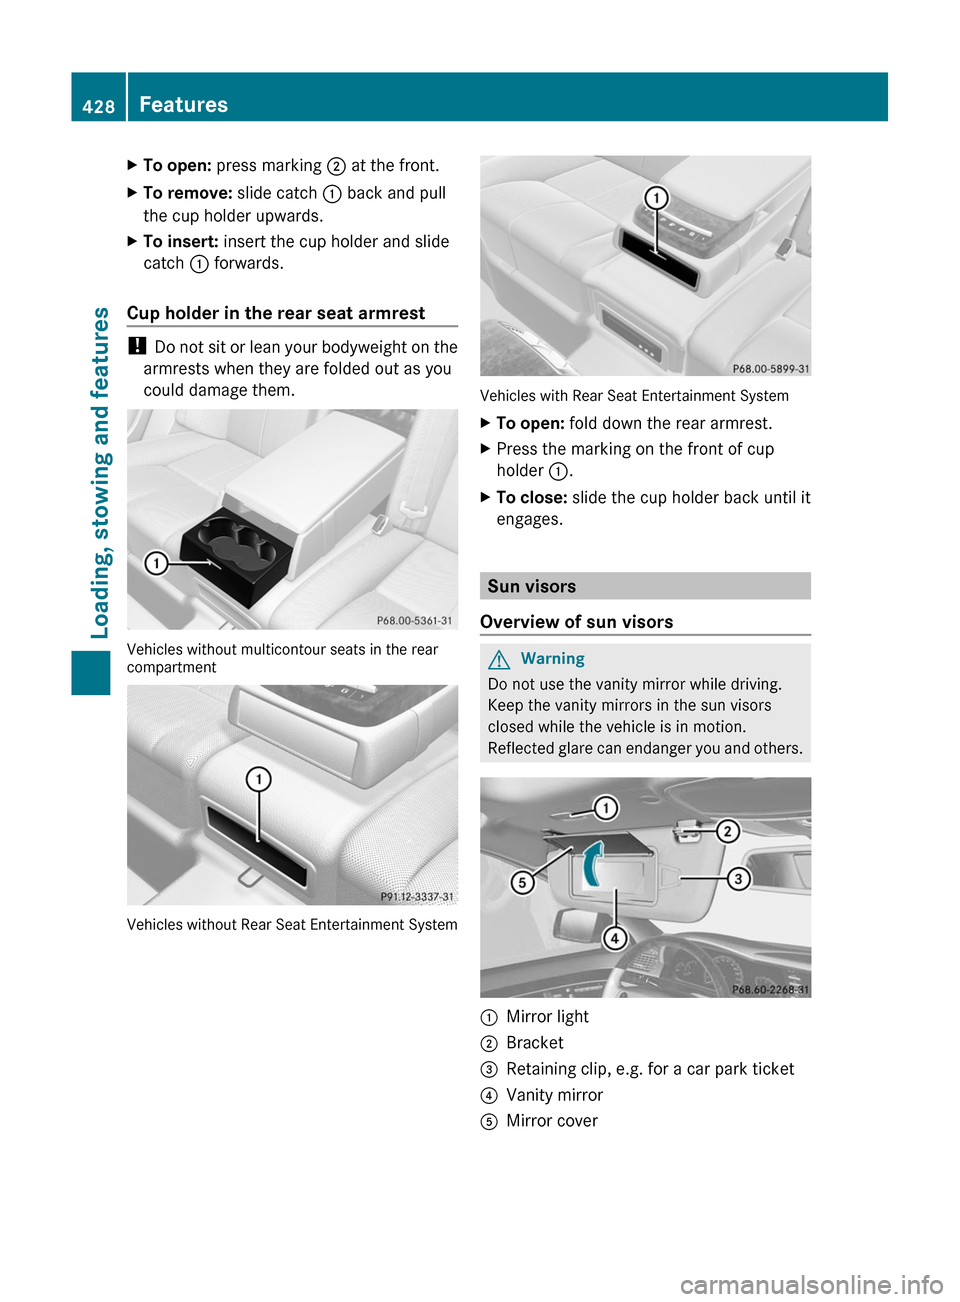
XTo open: press marking ; at the front.XTo remove: slide catch : back and pull
the cup holder upwards.
XTo insert: insert the cup holder and slide
catch : forwards.
Cup holder in the rear seat armrest
! Do not sit or lean your bodyweight on the
armrests when they are folded out as you
could damage them.
Vehicles without multicontour seats in the rearcompartment
Vehicles without Rear Seat Entertainment System
Vehicles with Rear Seat Entertainment System
XTo open: fold down the rear armrest.XPress the marking on the front of cup
holder :.
XTo close: slide the cup holder back until it
engages.
Sun visors
Overview of sun visors
GWarning
Do not use the vanity mirror while driving.
Keep the vanity mirrors in the sun visors
closed while the vehicle is in motion.
Reflected glare can endanger you and others.
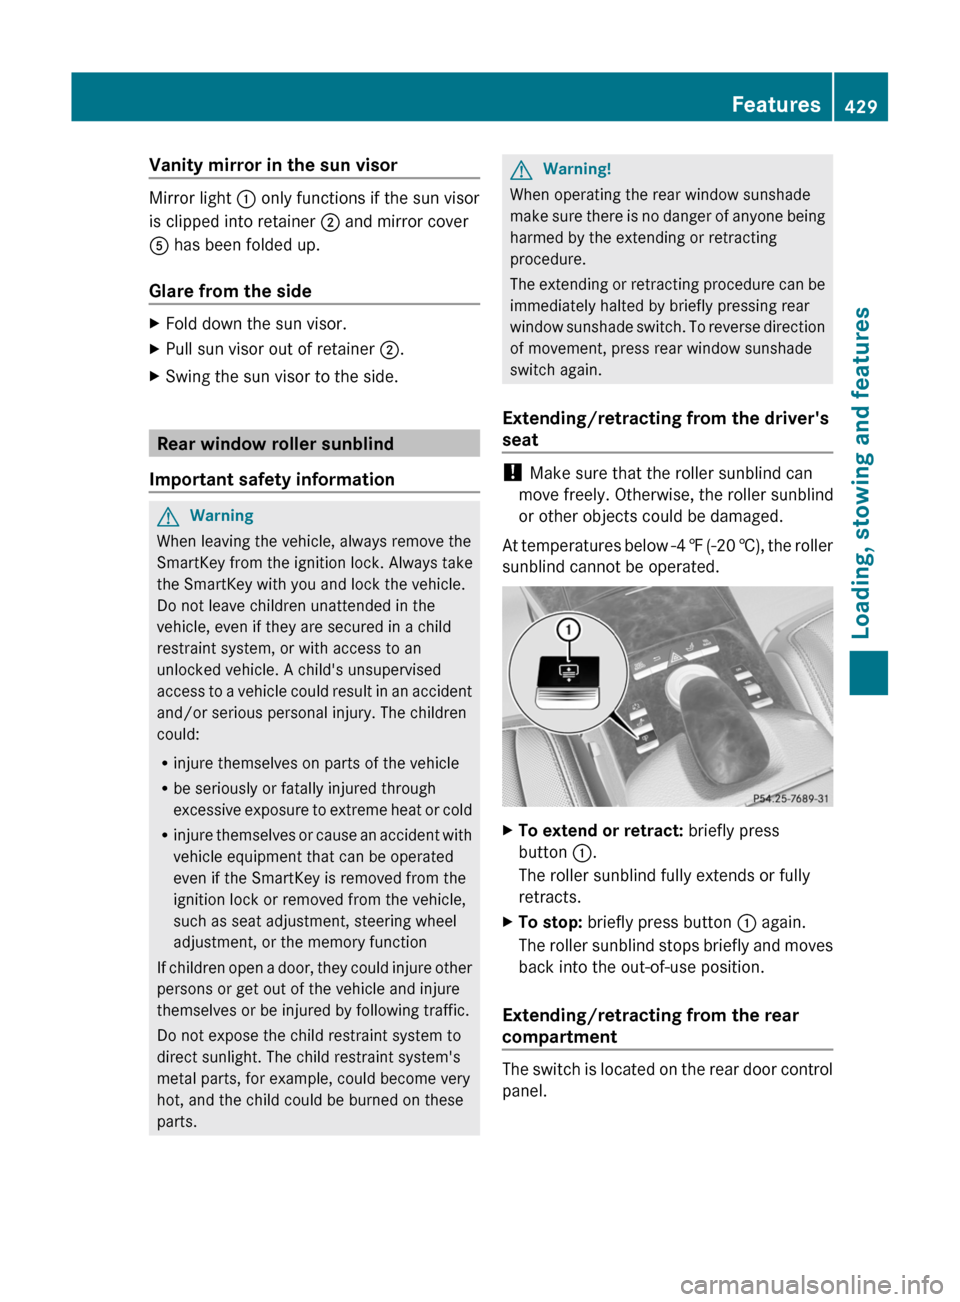
:Mirror light;Bracket=Retaining clip, e.g. for a car park ticket?Vanity mirrorAMirror cover428FeaturesLoading, stowing and features
Page 431 of 524
Vanity mirror in the sun visor
Mirror light : only functions if the sun visor
is clipped into retainer ; and mirror cover
A has been folded up.
Glare from the side
XFold down the sun visor.XPull sun visor out of retainer ;.XSwing the sun visor to the side.
Rear window roller sunblind
Important safety information
GWarning
When leaving the vehicle, always remove the
SmartKey from the ignition lock. Always take
the SmartKey with you and lock the vehicle.
Do not leave children unattended in the
vehicle, even if they are secured in a child
restraint system, or with access to an
unlocked vehicle. A child's unsupervised
access to a vehicle could result in an accident
and/or serious personal injury. The children
could:
Rinjure themselves on parts of the vehicle
Rbe seriously or fatally injured through
excessive exposure to extreme heat or cold
Rinjure themselves or cause an accident with
vehicle equipment that can be operated
even if the SmartKey is removed from the
ignition lock or removed from the vehicle,
such as seat adjustment, steering wheel
adjustment, or the memory function
If children open a door, they could injure other
persons or get out of the vehicle and injure
themselves or be injured by following traffic.
Do not expose the child restraint system to
direct sunlight. The child restraint system's
metal parts, for example, could become very
hot, and the child could be burned on these
parts.
GWarning!
When operating the rear window sunshade
make sure there is no danger of anyone being
harmed by the extending or retracting
procedure.
The extending or retracting procedure can be
immediately halted by briefly pressing rear
window sunshade switch. To reverse direction
of movement, press rear window sunshade
switch again.
Extending/retracting from the driver's
seat
! Make sure that the roller sunblind can
move freely. Otherwise, the roller sunblind
or other objects could be damaged.
At temperatures below -4 ‡ (-20 †), the roller
sunblind cannot be operated.
XTo extend or retract: briefly press
button :.
The roller sunblind fully extends or fully
retracts.
XTo stop: briefly press button : again.
The roller sunblind stops briefly and moves
back into the out-of-use position.
Extending/retracting from the rear
compartment
The switch is located on the rear door control
panel.
Features429Loading, stowing and featuresZ
Page 433 of 524
Cigarette lighterGWarning
When leaving the vehicle, always remove the
SmartKey from the ignition lock. Always take
the SmartKey with you and lock the vehicle.
Do not leave children unattended in the
vehicle, even if they are secured in a child
restraint system, or with access to an
unlocked vehicle. A child's unsupervised
access to a vehicle could result in an accident
and/or serious personal injury. The children
could:
Rinjure themselves on parts of the vehicle
Rbe seriously or fatally injured through
excessive exposure to extreme heat or cold
Rinjure themselves or cause an accident with
vehicle equipment that can be operated
even if the SmartKey is removed from the
ignition lock or removed from the vehicle,
such as seat adjustment, steering wheel
adjustment, or the memory function
If children open a door, they could injure other
persons or get out of the vehicle and injure
themselves or be injured by following traffic.
Do not expose the child restraint system to
direct sunlight. The child restraint system's
metal parts, for example, could become very
hot, and the child could be burned on these
parts.
GWarning
Never touch the heating element or sides of
the lighter; they are extremely hot. Hold the
knob only.
Make sure any children traveling with you do
not injure themselves or start a fire with the
hot cigarette lighter.
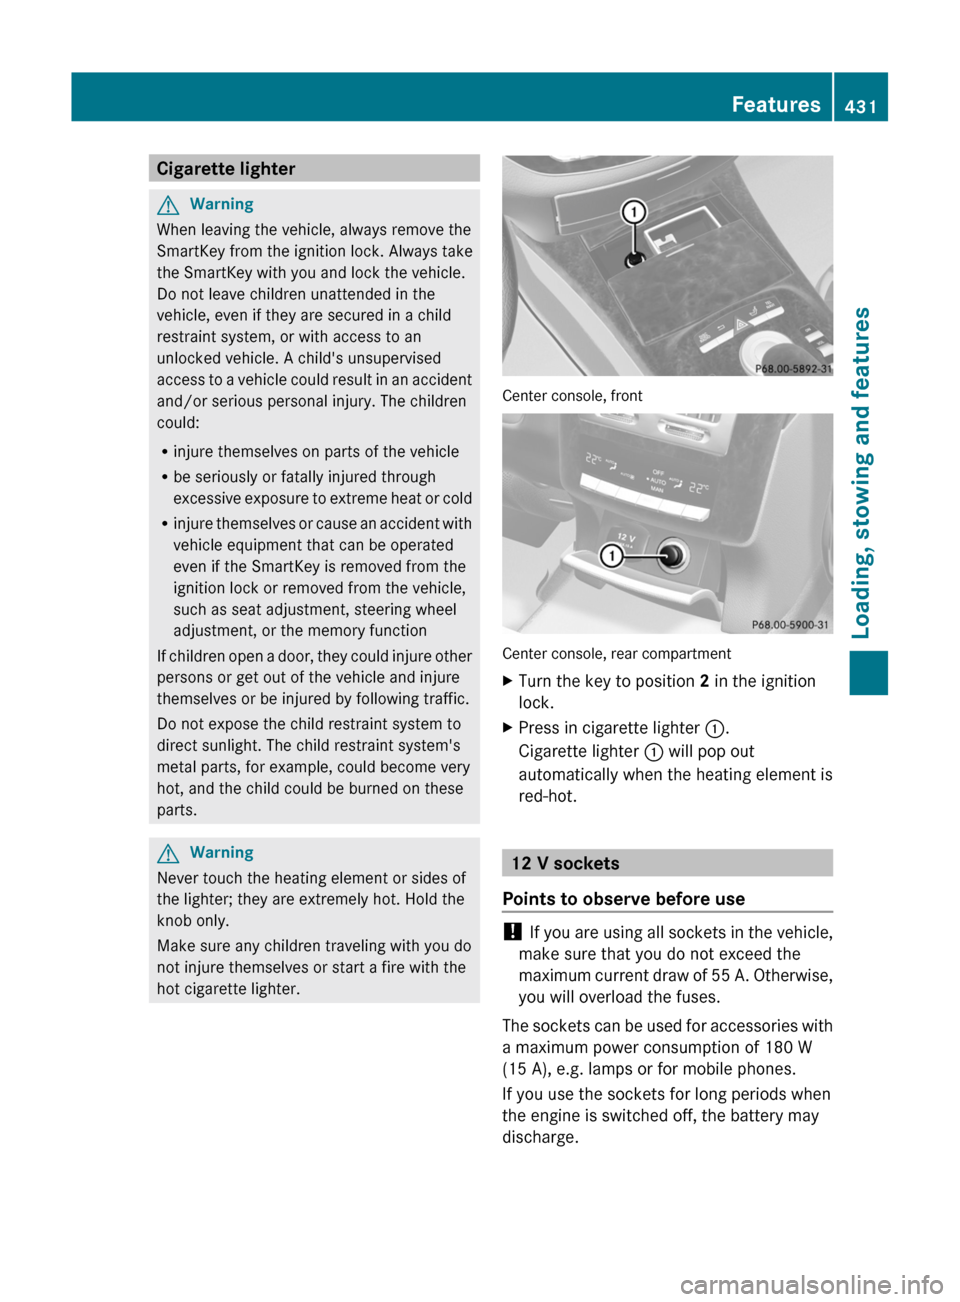
Center console, front
Center console, rear compartment
XTurn the key to position 2 in the ignition
lock.
XPress in cigarette lighter :.
Cigarette lighter : will pop out
automatically when the heating element is
red-hot.
12 V sockets
Points to observe before use
! If you are using all sockets in the vehicle,
make sure that you do not exceed the
maximum current draw of 55 A. Otherwise,
you will overload the fuses.
The sockets can be used for accessories with
a maximum power consumption of 180 W
(15 A), e.g. lamps or for mobile phones.
If you use the sockets for long periods when
the engine is switched off, the battery may
discharge.
Features431Loading, stowing and featuresZ
Page 443 of 524
view mirror with the garage door system
receiver after programming.
You will find further information in the
garage door opening system's operating
instructions, e.g. the sections on
"Synchronizing the transmitter" or
"Registering a new transmitter". You can
also call the hotline mentioned above.
Notes on programming the remote
control
Canadian radio frequency laws require a
"break" (or interruption) of the transmission
signals a few seconds after broadcasting.
Therefore, these signals may not last long
enough for the integrated remote control to
recognize the signal during programming.
Comparable with Canadian law, some U.S.
garage door openers also have a built-in
"interruption".
If you live in Canada or have difficulties
programming the garage door opener
(regardless of where you live) when using the
programming steps (see above), proceed as
follows:XPress transmitter button ( ;, = or ?) and
hold it down during the following steps until
the setup has been completed
successfully.XAt the same time, press transmitter button
B of the garage door remote control for
two seconds, then release it for two
seconds, then press it again for two
seconds.XRepeat this sequence on transmitter
button B of the garage door remote
control until the frequency signal has been
saved.XIf the setup procedure is successful,
indicator lamp : flashes once slowly and
goes out after a few seconds.XContinue with the other programming
steps (see above).Problems when programming
If you have problems when programming the
integrated remote control, please note the
following:
R Check the transmitter frequency of garage
door remote control A (which can usually
be found on the rear of the remote control).
The integrated remote control is
compatible with devices that operate at
frequencies between 280 and 390 MHz.
R Replace the batteries in garage door
remote control A. This increases the
likelihood of garage door remote
control A sending a strong and precise
signal to the integrated remote control on
the rear-view mirror.
R When programming, hold garage door
remote control A at varying distances and
angles from the transmitter button which
you are programming. Try different angles
at a distance of 2 to 12 inches (5 to 30 cm)
or the same angle at different distances.
R If there is another garage door remote
control for the same device, perform the
programming steps again using the remote
control. Before performing these steps,
make sure that new batteries have been
installed in the garage door remote control.
R Align the antenna cable of the garage door
opener unit. This can improve signal
reception/transmission.
Opening or closing the garage door
Once programmed, the integrated remote
control will assume the function of the garage
door system's remote control. Please also
read the operating instructions for the garage
door system.
XTurn the SmartKey to position 2 in the
ignition lock.XPress transmitter button ;, = or ? in the
overhead control panel that you have
programmed to operate the garage door.
Garage door system with fixed code:
indicator lamp : lights up continuously.Features441Loading, stowing and featuresZ
Page 444 of 524

Garage door system with rolling code:
indicator lamp : flashes briefly and then
lights up for approximately two seconds.
This is repeated for up to 20 seconds.
iThe transmitter will transmit a signal for
as long as the transmitter button is being
pressed. The transmission will be halted
after a maximum of 20 seconds and
indicator lamp : will flash. Press the
transmitter button again, if necessary.
Clearing the remote control memory
XTurn the SmartKey to position 2 in the
ignition lock.
XPress and hold transmitter buttons ;
and ? for approximately 20 seconds until
indicator lamp : flashes rapidly.
The memory is cleared.
iYou should clear the remote control
memory before selling the vehicle.
Floormat on the driver's side
GWarning!
Whenever you are using a floormat, make sure
there is enough clearance and that the
floormat is securely fastened.
The floormat should always be securely
fastened using the fastening equipment.
Before driving off, check that the floormat is
securely in place and adjust it if necessary. A
loose floormat could slip and hinder proper
functioning of the pedals.
Do not place several floormats on top of each
other as this may impair pedal movement.
XSlide seat backwards.XTo install: place the floormat in position.XPress floormat eyelets : onto retainer
pins ;.
XTo remove: pull the floormats off
retainers ;.
XRemove the floormat.
Infrared reflective windshield
The infrared reflecting glass prevents the
vehicle interior from becoming too hot. It also
blocks radio waves up into the gigahertz
range.
Vehicles without Night View Assist Plus
:Areas permeable to radio waves (to the
left and right of the rain sensor cover)
;Rain sensor cover=Areas permeable to radio waves442FeaturesLoading, stowing and features
Page 445 of 524

Vehicles with Night View Assist Plus
:Area permeable to radio waves (to the left
of the rain sensor cover);Rain sensor cover=Areas permeable to radio waves
In order to operate radio-controlled
equipment, e.g. toll systems, areas : and
= on the windshield are permeable to radio
waves. In these areas, you can install radio-
controlled systems. These areas can best be
seen from outside the vehicle by observing
the light reflected off the windshield.
Features443Loading, stowing and featuresZ