2011 MERCEDES-BENZ S-Class Light
[x] Cancel search: LightPage 449 of 524

XPull release lever : on the hood.
The hood is released.
! Make sure that the windshield wipers are
not folded away from the windshield. You
could otherwise damage the windshield
wipers or the hood.
XPull hood catch handle ; outwards from
the radiator grill as far as it will go and lift
the hood from underneath by the radiator
grill.
! Do not lift the hood by hood catch
handle ;. The handle may otherwise be
damaged.
Closing the hood
GWarning
When closing the hood, use extreme caution
not to catch hands or fingers. Be careful that
you do not close the hood on anyone.
Make sure the hood is securely engaged
before driving off. Do not continue driving if
the hood can no longer engage after an
accident, for example. The hood could
otherwise come loose while the vehicle is in
motion and injure you and/or others.
XLower the hood and let it fall from a height
of approximately 8 inches (20 cm).
XCheck that the hood has engaged properly.
If the hood can be raised slightly, it is not
properly engaged. Open it again and close
it with a little more force.
Radiator
iVehicles with a diesel engine: do not
cover the radiator, for example with a
winter front or bug cover. Otherwise, the
readings of the on-board-diagnostic
system may be inaccurate. Some of these
readings are required by law and must be
accurate at all times.
Engine oil
Notes on the oil level
GWarning
Hybrid vehicles: ensure that you read the
"HYBRID" supplement. You may otherwise fail
to recognize dangers.
Depending on the driving style, the vehicle
consumes up to 0.9 US qt (0.8 l) of oil over a
distance of 600 miles (1,000 km). The oil
consumption may be higher than this when
the vehicle is new or if you frequently drive at
high engine speeds.
Checking the oil level using the oil
dipstick
On vehicles with a 12-cylinder engine, the oil
level can be checked using the on-board
computer. On all other models, the dipstick
must be used to check the engine oil level.
When checking the oil level:
Rpark the vehicle on a level surface.
Rthe engine should be switched off for
approximately five minutes if the engine is
at normal operating temperature.
Engine compartment447Maintenance and careZ
Page 455 of 524

Rsolvents
R cleaning agents containing solvents
Do not scrub.
Do not touch the surfaces or protective
films with hard objects, e.g. a ring or ice
scraper. You could otherwise scratch or
damage the surfaces and protective film.HEnvironmental note
Dispose of empty packaging and cleaning
cloths in an environmentally responsible
manner.
! Do not park the vehicle for an extended
period right after cleaning it, particularly
after having cleaned the wheels with wheel
cleaner. Wheel cleaners could cause
increased corrosion of the brake discs and
brake pads/linings. For this reason, you
should drive for a few minutes after
cleaning. Braking heats the brake discs and
brake pads, thus drying them. The vehicle
can then be parked up.
Exterior care
Automatic car wash
GWarning
Braking efficiency is reduced after washing
the vehicle. This could cause an accident. For
this reason, you must drive particularly
carefully after washing the vehicle until the
brakes have dried.
GWarning
The vehicle is braked when the HOLD function
or DISTRONIC PLUS is activated. Therefore,
deactivate the HOLD function and DISTRONIC
PLUS before the vehicle is washed in an
automatic car wash.
You can wash the vehicle in an automatic car
wash from the very start.
! Never clean your vehicle in a Touchless
Automatic Car Wash as these use special
cleaning agents. These cleaning agents can
damage the paintwork or plastic parts.
If the vehicle is very dirty, pre-wash it before
cleaning it in an automatic car wash.
! In car washes with a towing mechanism,
make sure that AUTOTRONIC is in
transmission position N, otherwise the
vehicle could be damaged.
R Vehicles with a SmartKey:
Do not remove the SmartKey from the
ignition lock. Do not open the driver's
door or front-passenger door when the
engine is switched off. Otherwise,
AUTOTRONIC selects park position P
automatically and locks the wheels. You
can prevent this by shifting AUTOTRONIC
to N beforehand.
R Vehicles with KEYLESS-GO:
Do not open the driver's door or front-
passenger door when the engine is
switched off. Otherwise, AUTOTRONIC
selects park position P automatically and
locks the wheels.
Observe the following to make sure that the
automatic transmission stays in position N:XMake sure the vehicle is stationary and the
ignition is switched off.XTurn the key to position 2 (Y page 299) in
the ignition lock.
Use the key instead of the Start/Stop
button on vehicles with KEYLESS-GO.XDepress and hold the brake pedal.XShift the automatic transmission to
position N.XRelease the brake pedal.XRelease the parking brake.XSwitch off the ignition and leave the key in
the ignition lock.
! Make sure that the side windows are
completely closed, that the ventilation/
heating is switched off and that the
windshield wiper switch is set to 0.
Otherwise, the rain/light sensor could be
activated, triggering unintended wiper
Care453Maintenance and careZ
Page 456 of 524

movements. This can cause damage to the
vehicle.
After using an automatic car wash, wipe off
wax from the windshield and the wiper
blades. This will prevent smears and reduce
wiping noises caused by residue on the
windshield.
Washing by hand
Carefully remove all deposits of road salt as
soon as possible when driving in winter.
Also, clean the insides of the wheels when
washing the underbody of the vehicle.
XDo not use hot water and do not wash the
vehicle in direct sunlight.XUse a soft car sponge for cleaning.XUse a gentle cleaning agent, e.g. a
Mercedes-Benz approved car shampoo.XWash down the vehicle with a gentle water
jet.XDo not point the water jet directly at the air
inlets.XUse plenty of water and rinse the sponge
frequently.XRinse the vehicle with clean water and dry
it thoroughly with a chamois.XDo not allow the cleaning agent to dry on
the paintwork.
Power washers
GWarning
Do not use power washers with circular jet
nozzles (concentrated-power jets) to clean
your vehicle, especially for cleaning tires. You
could otherwise damage the tires and cause
an accident.
! Keep the distance between the vehicle
and the nozzle of the power washer at
11.8 in (30 cm). Information about the
correct distance is available from the
equipment manufacturer.
Move the power washer nozzle around
when cleaning your vehicle.
Do not aim directly at any of the following:
R tires
R door joint
R electrical components
R battery
R connectors
R lights
R seals
R trim elements
R ventilation slots
Damaged seals or electrical components
can lead to leaks or failures.
Cleaning the wheels
! Do not use acidic wheel cleaning products
to remove brake dust. This could damage
wheel bolts and brake components.
! Do not park the vehicle for an extended
period right after cleaning it, particularly
after having cleaned the wheels with wheel
cleaner. Wheel cleaners could cause
increased corrosion of the brake discs and
brake pads/linings. For this reason, you
should drive for a few minutes after
cleaning. Braking heats the brake discs and
brake pads, thus drying them. The vehicle
can then be parked up.
Cleaning the paintwork
Scratches, corrosive deposits, areas affected
by corrosion and damage caused by
inadequate care cannot always be completely
repaired. In such cases, visit a qualified
specialist workshop immediately, e.g. an
authorized Mercedes-Benz Center.
XRemove impurities immediately, where
possible, whilst avoiding rubbing too hard.XSoak insect remains with insect remover
and rinse off the treated areas afterwards.XSoak bird droppings with water and rinse
off the treated areas afterwards.XRemove coolant, brake fluid, tree resin,
oils, fuels and greases by rubbing gently454CareMaintenance and care
Page 457 of 524

with a cloth soaked in petroleum ether or
lighter fluid.XUse tar remover to remove tar stains.XUse silicone remover to remove wax.
! Do not affix:
R stickers
R films
R magnetic plates or similar items
to painted surfaces. You could otherwise
damage the paintwork.
If water no longer forms "beads" on the
painted surface, paint care products should
be used that have been approved and
recommended by Mercedes-Benz. This is the
case approximately every three to five
months, depending on climatic conditions
and the care product used.
If dirt has entered the paint surface or the
paintwork has become dull, a paint cleaner
should be used that has been approved and
recommended by Mercedes-Benz.
Never use such care products in direct
sunlight or on a hot hood.
XUse a suitable touch-up stick, e.g. MB
Touch Up stick, for quick, temporary repair
of damaged paintwork.
Matte finish care
If your vehicle has a clear matte finish,
observe the following instructions in order to
avoid damage to the paintwork due to
incorrect care.
! Never polish the vehicle. Polishing causes
the finish to shine.
! Do not use paintwork cleaner, grinding or
polishing products or gloss preservers such
as wax. These products are only suitable for
high-gloss surfaces. Using them on
vehicles with matte paintwork can cause
severe damage to the surface (shiny,
mottled patches).
Always have paintwork repairs performed
at a qualified specialist workshop, e.g. an
authorized Mercedes-Benz Center.
! Do not use wash programs with a hot wax
treatment under any circumstances.
i Use only insect remover and car shampoo
from the range of recommended and
approved Mercedes-Benz care products.
Cleaning the windowsGWarning
Switch off the windshield wipers and remove
the SmartKey from the ignition lock before
cleaning the windshield or the wiper blades.
On vehicles with KEYLESS-GO, press the
Start/Stop button repeatedly until all
indicator lamps in the instrument cluster have
gone off. The windshield wipers could
otherwise move and injure you.
! Only fold the windshield wipers away from
the windshield when vertical. Otherwise,
you will damage the hood.
XClean the inside and outside of the
windows with a damp cloth and a cleaning
agent that is recommended and approved
by Mercedes-Benz.
! Do not use dry cloths, abrasive products,
solvents or cleaning agents containing
solvents to clean the inside of the windows.
Do not use hard objects to clean the insides
of the windows, e.g. an ice scraper or ring.
There is otherwise a risk of damaging the
windows.
! Clean the water drainage channels of the
windshield and the rear window at regular
intervals. Deposits such as leaves, petals
and pollen may under certain
circumstances prevent water from draining
away. This can lead to corrosion damage
and damage to electronic components.
Care455Maintenance and careZ
Page 461 of 524

Cleaning results depend on the type of
dirt and how long it has been there.
R clean Alcantara® covers with a damp
cloth. Make sure you wipe entire seat
sections to avoid leaving visible lines.
i Note that regular care is essential to
ensure that the appearance and comfort of
the covers is retained over time.
Cleaning the seat beltsXUse clean, luke-warm water and soap
solution.
! Do not clean the seat belts using chemical
cleaning agents. Do not dry the seat belts
by warming them above 176 ‡ (80 †) or
placing them in direct sunlight.
GWarning
Do not bleach or dye seat belts as this may
severely weaken them. In a crash, they may
not be able to provide adequate protection.
Cleaning the roof lining and carpets
XRoof lining: use soft brushes or dry
shampoo if it is particularly dirty.XCarpets: use carpet and textile cleaners
that have been approved and
recommended by Mercedes-Benz.Care459Maintenance and careZ
Page 466 of 524

XPrepare the vehicle as described
(Y page 463).
XRemove the following items from the
stowage well under the trunk floor:
XSecure the vehicle to prevent it from rolling
away.
Securing the vehicle to prevent it from
rolling away
GWarning
Only jack up the vehicle on level ground or on
slight inclines/declines. The vehicle could
otherwise fall off the jack and injure you or
others.
If your vehicle is equipped with a wheel chock,
it can be found in the vehicle tool kit
(Y page 462).
The folding wheel chock is an additional
securing measure to prevent the vehicle from
rolling away, for example when changing a
wheel.
XFold both plates upwards :.XFold out lower plate ;.XGuide the lugs on the lower plate fully into
openings in base plate =.
Securing the vehicle on level ground
XOn level ground: place chocks or other
suitable items under the front and rear of
the wheel that is diagonally opposite the
wheel you wish to change.
Securing the vehicle on slight downhill gradients
XOn downhill gradients: place chocks or
other suitable items in front of the wheels
of the front and rear axle.
Raising the vehicle
GWarning
When jacking up the vehicle, only use the jack
which has been specifically approved by
Mercedes-Benz for your vehicle.
The jack is designed exclusively for jacking up
the vehicle at the jacking points built into both
sides of the vehicle. The jack saddle must be
placed centrally under the jacking point. The
jack must always be vertical when in use,
especially on inclines or declines.
The jack is intended only for lifting the vehicle
briefly for wheel changes. It is not suited for
464Flat tireRoadside assistance
Page 468 of 524

XMake sure that the base of the jack is
positioned directly under the jacking point.
XTurn crank ? clockwise until jack = sits
completely on jacking point ; and the
base of the jack lies evenly on the ground.
XTurn crank ? until the tire is raised a
maximum of 1.2 inches (3 centimeters)
from the ground.
Removing a wheel
XUnscrew the uppermost wheel bolt
completely.
XScrew alignment bolt : into the thread
instead of the wheel bolt.
XUnscrew the remaining wheel bolts fully.
! Do not place wheel bolts in sand or on a
dirty surface. The bolt and wheel hub
threads could otherwise be damaged when
you screw them in.
XRemove the wheel.Mounting a new wheelGWarning!
Always replace wheel bolts that are damaged
or rusted.
Never apply oil or grease to wheel bolts.
Damaged wheel hub threads should be
repaired immediately. Do not continue to
drive under these circumstances! Contact an
authorized Mercedes-Benz Center or call
Roadside Assistance.
Incorrect wheel bolts or improperly tightened
wheel bolts can cause the wheel to come off.
This could cause an accident. Make sure to
use the correct wheel bolts.
GWarning
Only use genuine Mercedes-Benz wheel bolts.
Other wheel bolts may come loose.
Do not tighten the wheel bolts when the
vehicle is raised. Otherwise, the vehicle could
fall off the jack.
GWarning
Make sure to use the original length wheel
bolts when remounting the original wheel
after it has been repaired.
Wheel bolts for:
:All light-alloy wheels and "Minispare"
emergency spare wheel with light-alloy
wheel
;"Minispare" emergency spare wheel with
steel wheel
466Flat tireRoadside assistance
Page 469 of 524

! Always use wheel bolts : to fit the
"Minispare" emergency spare wheel with
light-alloy wheel. Using other wheel bolts
when fitting the "Minispare" emergency
spare wheel with light-alloy wheel could
damage the brake system.
Always use wheel bolts ; to fit the
"Minispare" emergency spare wheel with
steel wheel. Using other wheels when
fitting the "Minispare" emergency spare
wheel with steel wheel could damage the
brake system.
XClean the wheel and wheel hub contact
surfaces.
! To prevent damage to the paintwork, hold
the wheel securely against the wheel hub
while screwing in the first wheel bolt.
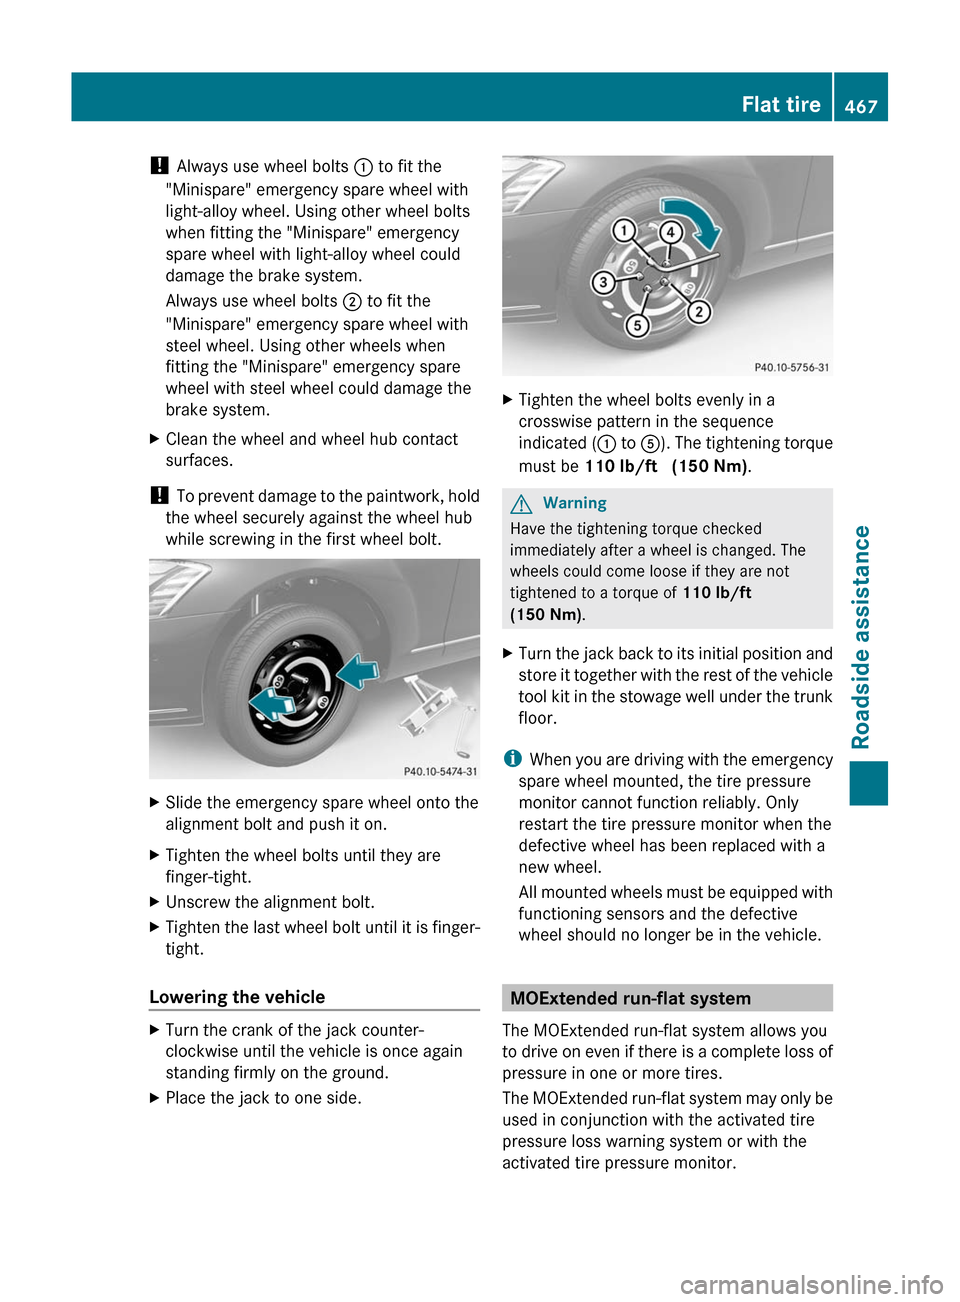
XSlide the emergency spare wheel onto the
alignment bolt and push it on.
XTighten the wheel bolts until they are
finger-tight.
XUnscrew the alignment bolt.XTighten the last wheel bolt until it is finger-
tight.
Lowering the vehicle
XTurn the crank of the jack counter-
clockwise until the vehicle is once again
standing firmly on the ground.
XPlace the jack to one side.XTighten the wheel bolts evenly in a
crosswise pattern in the sequence
indicated (: to A). The tightening torque
must be 110 lb/ft (150 Nm).
GWarning
Have the tightening torque checked
immediately after a wheel is changed. The
wheels could come loose if they are not
tightened to a torque of 110 lb/ft
(150 Nm).
XTurn the jack back to its initial position and
store it together with the rest of the vehicle
tool kit in the stowage well under the trunk
floor.
iWhen you are driving with the emergency
spare wheel mounted, the tire pressure
monitor cannot function reliably. Only
restart the tire pressure monitor when the
defective wheel has been replaced with a
new wheel.
All mounted wheels must be equipped with
functioning sensors and the defective
wheel should no longer be in the vehicle.
MOExtended run-flat system
The MOExtended run-flat system allows you
to drive on even if there is a complete loss of
pressure in one or more tires.
The MOExtended run-flat system may only be
used in conjunction with the activated tire
pressure loss warning system or with the
activated tire pressure monitor.
Flat tire467Roadside assistanceZ