2011 MERCEDES-BENZ M-CLASS SUV key
[x] Cancel search: keyPage 151 of 389

A
Neutral
Do not shift the transmiss
ionto N
whil edriving. Otherwise, th eauto-
matic transmission could be dam-
aged.
No powe ristransmitte dfromt he
engine to the drive wheels.
Releasing the brakes will allo wyou
to move the vehicl efreely, e.g .to
push it or tow it.
If ESP ®
is deacti vated or faulty:
only shift the transmission to posi-
tion Nif the vehicle is in dange rof
skidding, e.g. on icy roads.
If you swit choff the engin eusing
the key or the Start/Stop but ton,
the automatic transmission shifts
to neutral Nautomatically.
! Rolling in neutral Ncan lead to
damage to the transmission. 7
Drive
The automatic transmission
changes gear automatically. All
forward gears are available. Changin
ggear
The automatic transmission shift stothe indi-
vidual gear sautomatically when it is in trans-
missio nposition D.This automatic gearshift-
ing behaviour is determined by:
R ap ossible limitation of the shift range
R the selected drive program
R the position of the accelerator pedal
R the roa dspeed Driving tips
Accelerator peda lposition Your style of drivin
ginfluences how the auto-
matic transmissio nshift sgear:
R littl ethrot tle: earl yupshifts
R mor ethrot tle: late upshifts
Kickdown Use kickdown for maximu
macceleration.
X Depress the accelerato rpedal beyond the
pressur epoint.
The transmission shift stoalower gear
depending on the engin espeed.
X Ease off the accelerator pedal once the
desired speed is reached.
The automatic transmission shifts back up.
Trailer towing X
Drive in the middle of the engine speed
range on uphill gradients.
X Shift down to shift range 3or
2 (Y page 150) depending on the uphill or
downhill gradient, even if cruise control,
DISTRONIC PLU SorSPEEDTRONIC is acti-
vated. Progra
mselector button
General notes The program selector button allow
syou to
choose between differen tdriving character-
istics. 148
Automatic transmissionDri
ving and parking
Page 157 of 389

R
paraffin
R kerosene
Do not mix these fuels with diesel fuels and
do not use any special additives. Other-
wise, this can lead to damage to the engine.
This excludes flow improver ;see "Low out-
side temperatures".
! Use afilter when adding fuel from afuel
can. Otherwise, the fuel lines and/or the
diesel injection system could be blocked by
particles from the fuel can.
For further information on "Fuel", see
(Y page 374).
Low outsid etemperatures Diesel fuel with improved cold flow qualities
is available during the winter months. In
Europe, various climate-dependent low-tem-
peratur eclasses are defined in EN 590 .Refu-
elling with diesel fuel which complies with the
climatic specification sofstandard EN 590
can hel ptoprevent operatin gproblems. At
exceptionall ylow tempera tures, it is possible
that the flow properties of the fuel ma ybe
inadequate. This also applies to fuel that has
not been adapted to suit the climatic condi-
tions, e.g. diesel fuel from warmer regions.
i Further information about country-spe-
cific fuel properties can be obtained from
oil companies, e.g. at filling stations.
Flow improver Flow improvers can be added to improv
ethe
cold resistan ceof diesel fuel. The effective-
ness of aflow improver is not guaranteed with
every diesel fuel.
Correc tdosage and thorough mixing ar edeci-
sive factor sinensuring improvement in low-
temperature resistance. Avoid excessive dos-
age .Exce ssiv edosage ma yactuall ydecrease
low-temperature resistanc eunder certain cir-
cumstances. Follo wthe manufacturer's dos-
ing inst ructions. Mix the additive with the diese
ling ood time,
befor ethe flo wproperties of th ediesel
become inadequate. Malfunction scan other-
wise only be rectified by heating the entire
fuel system, e.g. by parking the vehicle in a
heated garage.
Observe the information provided by the man-
ufacturer when using aflow improver. Only
use flow improvers that have been tested and
approved by Mercedes-Benz. You can obtain
further information from any Mercedes-Benz
Servic eCentre. Refuelling
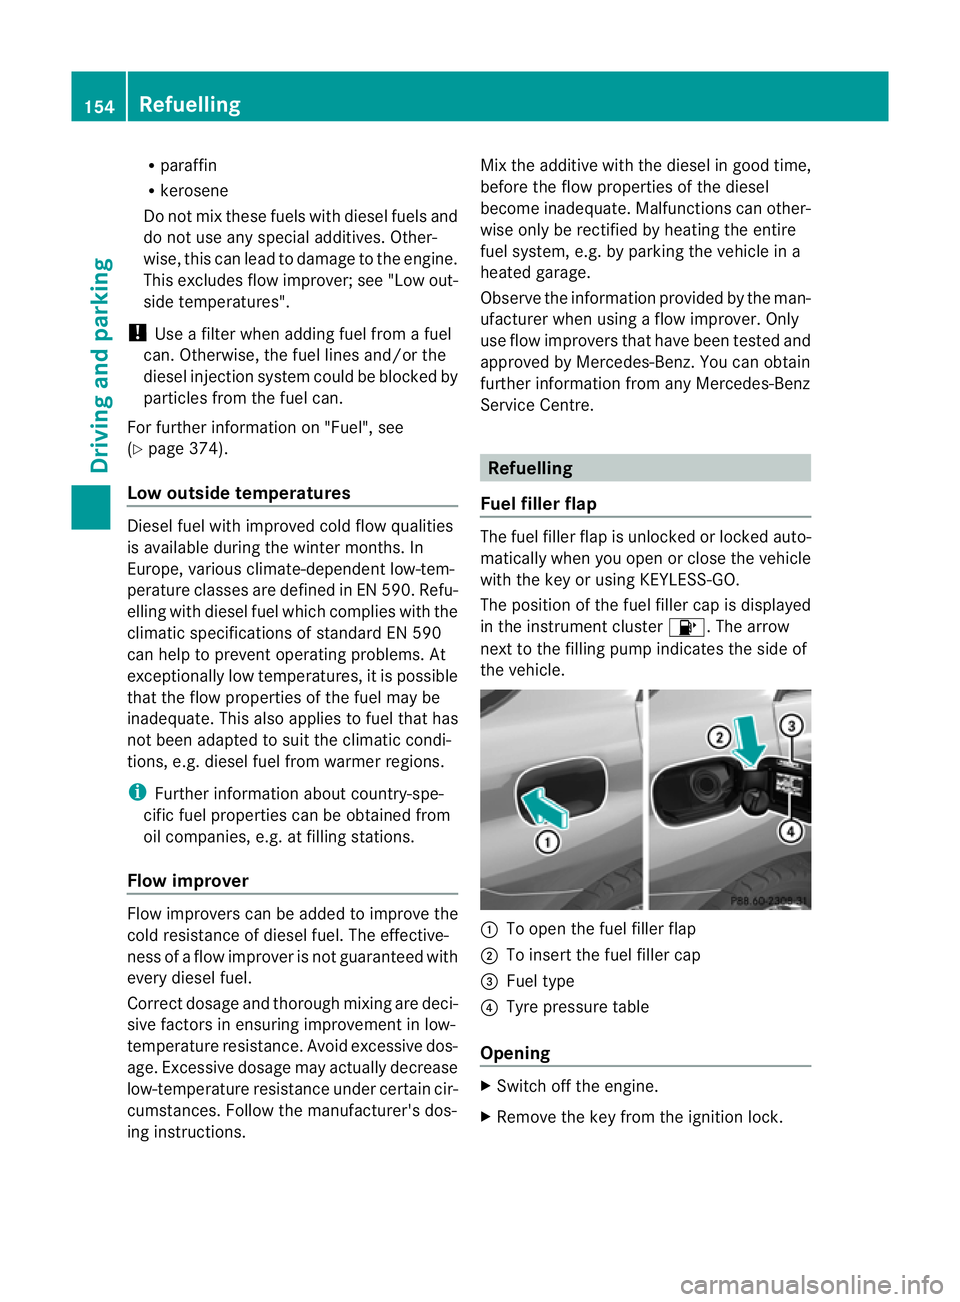
Fuel filler flap The fuel filler fla
pisunlocke dorlockedauto-
matically when you open or close the vehicle
with the key or using KEYLESS-GO.
The position of the fuel filler cap is displayed
in the instrument cluster 8.The arrow
nex ttot he filling pum pindicate sthe side of
the vehicle. :
To open the fuel filler flap
; To inser tthe fuel filler cap
= Fue ltype
? Tyre pressure table
Opening X
Switch off the engine.
X Remove the key from the ignitio nlock. 154
RefuellingDriving and parking
Page 158 of 389

KEYLESS-GO: open th
edriver's door. This
switche sthe ignition to positi on0,w hich
corresponds to having removed the key.
The driver's door can be closed again.
X Press the fuel filler fla pint he direction of
arrow :.
The fuel filler fla pswings up.
X Turn the fuel filler cap anti-clockwise and
remove it.
X Insert the fuel filler cap into the holder
bracket on the inside of filler flap ;.
X Completely insert the pump nozzle into the
filler neck and refuel.
X Only fill the tank until the pump nozzle
switches off.
! Overfilling the fuel tank could damag ethe
fuel system.
Closing X
Replace the fuel filler cap and tur nitclock-
wise .The fuel filler cap audibly engages.
X Close the fuel filler flap. Refuelling
155Drivingand park ing Z
Page 159 of 389

Problems wit
hthe fuel and fuel tank Problem Possible causes/consequences and
M Solutions
Fue
lisl eakin gfrom the
vehicle. G
Ris
kofe xplosion or fire
The fuel line or the fuel tan kisf aulty.
X Turn the key to position 0(Ypage 139 )inthe ignition lock
immediately and remove it.
X Do not restar tthe engin eunder any circumstances.
X Consult aqualified specialist workshop. The engine does not
start. The fuel tank of
avehicle with adiesel engine has been run com-
pletely dry.
X Refuel the vehicle with at least fiv elitres of diesel.
X Turn the ignition on for at least 10 seconds (Y page 139).
X Star tthe engin econtinuously for up to 10 second suntil it runs
smoothly.
If the engine doe snot start:
X Tur nthe ignition on again for approximatel y10seconds
(Y page 139).
X Start the engine again continuously for up to 10 seconds until
it run ssmoothly.
If th eengine doe snot star tafter three attempts:
X Consult aqualified specialist workshop. The fuel filler flap can-
not be opened. The fuel filler flap is not unlocked.
or
The key battery is discharged.
X Unlock the vehicle (Y page 72).
or
X Unlock the vehicle using the emergency key element
(Y page 74). The fuel filler flap is unlocked, but the opening mechanism is jam-
med.
X Consult aqualified specialist workshop. 156
RefuellingDrivin
gand parking
Page 161 of 389

ded. Fillin
gavehicle standing on an uneven
surface is not permitted. There is adanger
of overfilling, which can cause damage to
BlueTEC exhaust gas aftertreatment com-
ponents.
Have the AdBlue ®
tank refilled at aqualified
specialist workshop. However ,you can also
top up the AdBlue ®
tan k:
R at afilling station with an AdBlue ®
filling
pump
R with AdBlue ®
refill bottles
R with an AdBlue ®
refill canister
If the outside temperature is lower than
Ò 11 †, it may be difficult to top up. If
AdBlue ®
is frozen and ther eisanactive warn-
ing indicator, topping up may not be possible.
Park the vehicle in awarmer place, e.g. in a
garage, until AdBlue ®
has become fluid again.
Topping up is then possible again. Alterna-
tively, have the AdBlue ®
tank refilled at a
qualified specialis tworkshop.
When the pum pnozzle switches off automat-
ically during filling at afilling pump, the
AdBlue ®
tank has been completely filled. Do
not fill the the AdBlue ®
tank any fur ther.
AdBlue ®
may possibly leak.
! Surfaces which have com eintoc ontact
with AdBlue ®
while refillin gshould be
rinsed immediately with water, or remove
AdBlue ®
with amoist clot hand cold water.
If AdBlue ®
has alread ycrystallised, us ea
sponge and cold water to clean the area.
AdBlue ®
residue crystallises after acertain
amount of tim eand soils the affected sur-
faces.
! AdBlue ®
is not afuel additive and must
not be added to the fuel tank .IfAdBlue ®
is
added to the fuel tank ,this can lead to
engin edamage.
Further information on
AdBlue ®
(Y page 374). Opening the AdBlue
®
filler cap The filler nec
kfor AdBlue ®
is located behind
the fuel filler flap.
The fuel filler fla pisunlocked or locked auto-
matically whe nyou open or close the vehicle
with the key or using KEYLESS-GO. X
Swit choff the ignition.
X Press the fuel filler fla pinthe direction of
arrow :.
The fuel filler fla pswings up.
X Turn blue AdBlue ®
filler cap ;anti-clock-
wise and remov eit.
AdBlue ®
filler cap ;is secured with aplas-
tic strip.
AdBlue ®
refill canisters AdBlue
®
refill canisters can be obtained at
many filling stations or at aMercedes-Benz
Ser vice Centre. AdBlue ®
refill canis ters are
often sold with afiller hose. Afiller hose that
does not exactly fit the vehicle's AdBlue ®
tan koffers no pro tection agains toverfilling.
AdBlue ®
could leak ou tasar esult of overfill-
ing. Mercedes-Ben zoffers aspecial disposa-
ble hose with overfill protection. You can
obtain this from any Mercedes-Benz Service
Centre. AdBlue ®
is available in avariety of
containers and receptacles. Only use the dis-
posable hos ewith the Mercedes-Benz
AdBlue ®
refill canister s.158
RefuellingDriving and parking
Page 163 of 389

X
Release AdBlue ®
refill bottle :.
X Turn AdBlue ®
refill bottle :anti-clockwise
and remove it.
X Screw the protective cap onto AdBlue ®
refill bottle :again.
Closing th eAdBlue ®
filler cap and fuel
filler flap X
Fit AdBlue ®
filler cap ;on the filler neck
and tur nitclockwise.
X To close th efuel filler flap ,press it in the
di rectio nofarrow:.
X Drive faster than 15 km/h.
The Refill AdBlue See Owner' sMan‐ ual messag
egoeso ut after approximately
on em inute.
i If the Refill AdBlue See Owner's Manual messag
eremain sinthe mu ltifunc-
tion display, you mus ttop up with more
AdBlue ®
. Parking
Important safety notes
G
WARNING
Only remove the key from the ignition lock
when the vehicle is stationary, as you can not
steer the vehicle when the key is removed.
Never leav echildren unsupervised in the vehi-
cle. They might release the electric parking
brake. This coul dlead to aserious or fatal
accident. G
WAR
NING
Under no circumstances should the exhaust
system come into contact with flammable
materials such as dry grass or petrol ,for
example. Do not par kthe vehicle on dry grass-
lan dorh arvested grain fields. The hot exhaust
system could otherwise ignite the flammable
material and set the vehicle on fire.
To ensure that the vehicle is secured against
rolling away unintentionally:
R the electric parking brake must be applied.
R the transmission must be in position Pand
the key must be removed from the ignition
lock.
R on steep uphill or downhill gradients, turn
the fron twheels towards the kerb. Switching of
fthe engine
Important safety notes G
WARNING
Neve rswitch off the engine while the vehicle
is in motion.
There is no brake boost for the service brake
if the engine is not running. If the ignition is
switched off, there is also no power assis-
tance for the steering.
You will require considerably more effort to
steer and brake and you could therefore lose
control of the vehicle and cause an accident.
X Apply the electric parking brake.
X Shift the transmission to position P.
Using the key X
Turn the key to position 0in the ignition
lock and remove it.
The immobiliser is activated.
i If you switch the engine off with the trans-
mission in position Ror D,t he automatic
transmission shift stoNautomatically. 160
ParkingDriving and parking
Page 164 of 389

If yo
uthen open one of the front doors or
remove the key from the ignition ,the auto-
matic transmission shift stoP.
If yo ushift the automatic transmission to
N before switching off the engine, the auto-
matic transmission remains in Neven when
ad oor is opened.
Using KEYLESS-GO X
Press the Start/Stop button (Y page 139).
The engin estops and all the indicator
lamp sint he instrumen tcluster go out.
i If you use the Start/Stop button to switch
off the engine, the automatic transmission
shifts to Nautomatically. If you then open
one of the front doors, the automatic trans-
missio nshift stoP .
i The engin ecan be turned off while the
vehicle is in motion by pressing and holding
the Start/Stop button for three seconds.
This function operates independently of the
ECO start/stop automatic engine switch-
off function. Electric parking brake
General notes i
The electric parking brake carries out a
function check at regular intervals when
the engine is switched off. Noises that
occur are normal. Engaging/releasing manually
X
To engage: push handle :.
The red !indicator lamp in the instru-
ment cluster lights up.
i The electric parking brake can also be
applied when the key is removed.
X To release: pull handle:.
The red !indicator lamp in the instru-
ment cluster goes out.
i The electric parking brake can only be
released when the key in the ignition lock
is in position 1or the ignition is switched
on using the Start/Stop button.
To ensure that you don't roll backwards when
pulling away on an uphill slope, engage the
electric parking brake (Y page 141).
Engaging automatically Your vehicle's electric parking brake is auto-
matically applied if DISTRONIC PLUS or the
HOLD function bring the vehicle to
astand-
still ,ora re engaged to kee pthe vehicle sta-
tionary. In addition, at least one of the follow-
ing condition smust be fulfilled:
R the engine is switched off.
R the driver' sdoor is open and the seat belt
is not fastened.
R the vehicle is stationar yfor alengthy
period.
The red !indicator lam pint he instrument
cluster lights up.
i The electric parkin gbrake is not automat-
icall yengaged if the engine is switched off
by the ECO start/stop function.
Releasing automatically The electric parking brake of your vehicl
eis
release dautomatically when all of the follow-
ing conditions are fulfilled:
R the engine is running.
R the transmission is in position Dor R. Parking
161Drivingand park ing Z
Page 191 of 389

R
the electrica lsystem in thee ngine com-
partment, the battery or the fuses are tam-
pered with.
R the battery is disconnected.
If you leave the vehicl eorpark it, deactivate
the HOLD function and secure the vehicle
against rolling away.
The electric parking brake secures the vehicle
automatically if the HOLD function is activa-
ted and:
R the driver' sdoor is open and the driver's
seat belt is unfastened.
R the engin eisswitched off, unless it is auto-
matically switched off by the ECO start/
stop func tion.
R as ystem fault occurs.
R the powe rsupply is not sufficient.
On steep uphill or downhill inclines or if there
is am alfunction, the transmission may also
automatically be shifted into position P.AIRMATIC package
General notes AIRMATIC enables
asuspension tuning set-
ting to be selected and regulates the damping
behaviou rand level of your vehicle. The sys-
tem comprises aminimum of two compo-
nents. These are ADS (Adaptive Damping Sys-
tem) (Y page 188 )and level control
(Y page 189) .Your vehicle ma yalso be equip-
ped with the Active Curv eSystem
(Y page 188).
Observe the notes on driving with atrailer
(Y page 226).
ADS (Adaptive Damping System) General notes
ADS adapts th
edamping characteristic sto
the curren toperatin gand driving situation. Thi
sd epends on:
R your drivin gstyle
R the road surface conditions
R the AD Ssetting
R the vehicle level setting
Your selection remains stored even if you
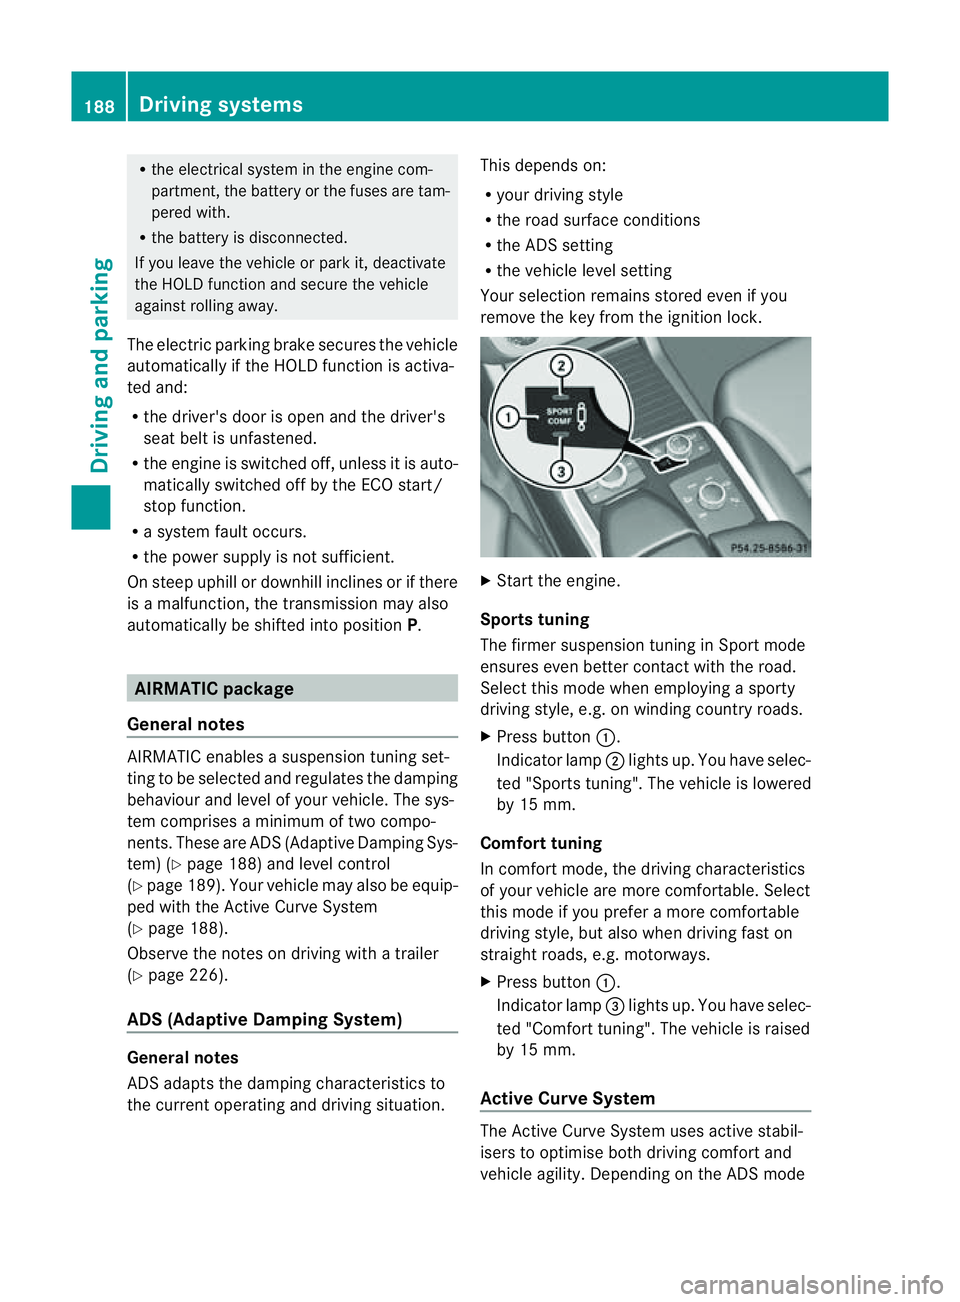
remov ethe key from the igni tion lock. X
Star tthe engine.
Sports tuning
The firmer suspension tunin ginSport mode
ensures even better contact with the road.
Select this mode when employing asporty
drivin gstyle, e.g. on winding country roads.
X Press button :.
Indicator lamp ;lights up. You have selec-
ted "Sports tuning". The vehicle is lowered
by 15 mm.
Comfort tuning
In comfort mode, the driving characteristics
of your vehicle are more comfortable. Select
this mode if you prefer amore com fortable
driving style ,but also when drivin gfast on
straight roads, e.g. motorways.
X Press button :.
Indicator lamp =lights up. You have selec-
ted "Comfort tuning". The vehicle is raised
by 15 mm.
Active Curve System The Active Curve System uses activ
estabil-
isers to optimis eboth drivin gcomfort and
vehicle agility. Depending on the AD Smode 188
Driving systemsDriving and parking