2011 MERCEDES-BENZ M-CLASS SUV key
[x] Cancel search: keyPage 89 of 389
lead to serious or even fatal injury. Make sure
that nobody can becom etrapped when clos-
ing the side windows.
If as ide window is obstructed during closing
and reopen sagain slightly:
X Im me diately after the window blocks, pull
the correspondin gswitc hagain until the
side window has closed.
The side window is close dwith increased
force.
If as ide window is obstructed again during
closing and reopen sagain slightly:
X Im me diately after the window blocks, pull
the correspondin gswitc hagain until the
side window has closed.
The side window is close dwithout the anti-
entrapmen tfeature. Sliding sunroof
Important safet
ynotes
Your vehicle may be fitted with asliding sun-
roof or apanorama sliding sunroof. In the fol-
lowing section, the ter m"slidin gsunroof"
refers to both types of sliding sunroof. G
WARNING
Make sure that nobody can become trapped
when opening and closing the sliding sunroof.
If there is arisk of entrapment ,release the
switch immediately. Durin gautomatic opera-
tion ,push the switc hbriefly in any direction
to stop the sliding sunroof. G
WARNING
Th eg lass in th epanoram asunroof could
brea kinana ccident. If yo uare not wearin ga
seat belt ,there is arisk that you could be
thrown through the opening in the event of the
vehicle overturning. Therefore, always wear a
seat belt to reduce the risk of injuries. G
WARNING
Children could injur ethemselves if they oper-
ate the slidin gsunroof.
Never leave children unsupervised in the vehi-
cle. Always take the key with you when leaving
the vehicle, even if you are only leaving it for
as hort time.
! Only open the panoram asliding sunroof
if it is free of snow and ice. Otherwise, mal-
func tions ma yoccur.
Do not allo wanything to protrude from the
sliding sunroof. Otherwise, the seals could
be damaged.
i Resonance noises can occur in addition
to the usual airflow noises whe nthe sliding
sunroof is open. They ar ecaused by minor
pressure fluctuations in the vehicle interior.
Change the position of the sliding sunroof
or open aside window slightly to reduce or
eliminat ethese noises. Operating th
esliding sunroof
Opening and closing i
You can continue to operate the sliding
sunroof after switching off the engine or
removing the key. This function remains
activ efor fiv eminutes or until the driver's
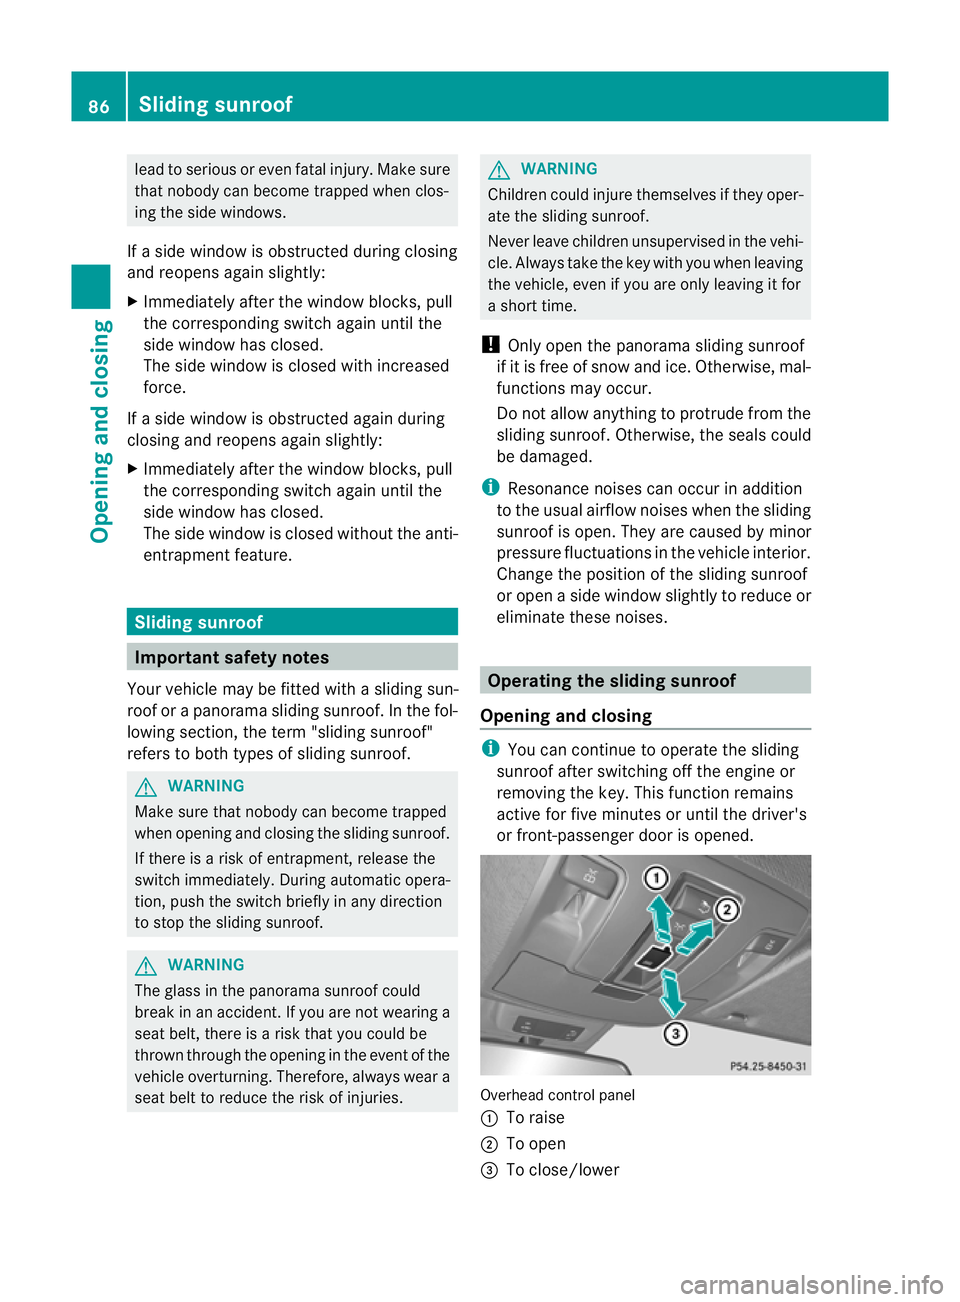
or front-passenger door is opened. Overhead control panel
:
To raise
; To open
= To close/lower 86
Slidin
gsunroofOpenin gand closing
Page 90 of 389

X
Tur nthe key to position 1or 2in the ignition
lock.
X Press or pull the 2switchinthe corre-
sponding direction.
i If you press the 2switchbeyond the
point of resistance, an automatic opening/
closing process is star tedint he corre-
sponding direction .You can stop automatic
operation by pressin gagain.
The sun protection cover automatically opens
along with the slidin gsunroof. You can open
or close the sun protection cover manually
when the sliding sunroof is raised or closed.
Rain closin gfeature When the key is in position
0in the ignition
lock or is removed, the sliding sunroof closes
automatically:
R if it start storain
R at extreme outside temperatures
R after six hours
R if there is amalfunction in the power supply
The rear of the sliding sunroof is then raised
in order to ventilate the vehicle interior.
i If the sliding sunroof is obstructed when
being closed by the rain closing feature, it
opens again slightly. The rain closing fea-
ture is then deactivated.
The sliding sunroof does not close if:
R it is raised at the rear.
R it is blocked.
R no rain is falling on the area of the wind-
screen being monitored by the rain sensor
(e.g. because the vehicle is under abridge
or in acarport).
Resetting Reset the sliding sunroof if it does not move
smoothly. X
Turn the key to position 1or 2in the ignition
lock.
X Raise the sliding sunroof fully at the rear
(Y page 86).
X Keep the 2switch presse dfor another
second.
X Make sure that the slidin gsunroof can be
fully opened and closed again (Y page 86).
X If this is not the case, repeat the steps
above again.
! If the sliding sunroof still cannot be
opened or closed fully after resetting, con-
tact aqualified specialist workshop. Operating the panorama slidin
gsun-
roof
Opening and closi ng Overhead con
trol panel
: To raise
; To open
= To close/lower
X Turn the key to position 1or 2in the ignition
lock.
X Push or pull the 2switch in the corre-
sponding direction.
i If you press the 2switch beyond the
point of resistan ce,ana utomatic opening/
closing process is started in the corre-
sponding direction. You can stop automatic
operation by pressing again. Sliding sunroof
87Openingand closing Z
Page 91 of 389

Rain closin
gfeature Whe
nthe key is in position 0in the ignition
lock or is removed ,the panorama slidin gsun-
roof closes automatically:
R if it starts to rain
R at extreme outsid etemperatures
R after six hours
R if there is amalfunction in the power supply
The panorama sliding sunroof remains raised
at the rear in order to allow ventilation of the
vehicle interior.
i If the panorama sliding sunroof is obstruc-
ted when being closed by the rain closing
feature, it opens again slightly. The rain
closing feature is then deactivated.
The panorama sliding sunroof does not close
if:
R it is raised at the rear.
R it is blocked.
R no rain is falling on the area of the wind-
screen being monitored by the rain sensor
(e.g. because the vehicle is under abridge
or in acarport). Operating the panoram
asliding sun-
roof roller sunblinds
Genera lnotes The roller sunblinds shield the vehicle interior
from sunlight. The two roller sunblinds can
only be opened and closed together when the
panoram asliding sunroof is closed. G
WARNING
Make sure that nobody can become trapped
as you open or close the roller sunblinds. Opening and closing Overhead control panel
:
To open
; To open
= To close
X Turn the key to position 1or 2in the ignition
lock.
X Press or pull the 2switch in the corre-
sponding direction.
i If you press the 2switch beyond the
point of resistance, an automatic opening/
closing process is started in the corre-
sponding direction. You can stop automatic
operation by pressing again.
Resetting the panora masliding sunroof
and th eroller sunblinds Reset the panorama sliding sunroof and the
roller sunblinds if the panorama sliding sun-
roof or the roller sunblinds do not move
smoothly.
X Turn the key to position 1or 2in the ignition
lock.
X Pull the 2switchrepeatedly to the point
of resistanc einthe direction of arrow =
until the pano rama sliding sunroof is fully
closed.
X Kee pswitch 2pulled for an additional
second.
X Pull the 2switchrepeatedly to the point
of resistanc einthe direction of arrow =
until the roller sunblinds ar efully closed. 88
Sliding sunroofOpenin
gand closing
Page 96 of 389
in such
away that you have agood view of
roa dand traffic conditions.
X Vehicles with amemory function: save
the seat, steerin gwheel and exterior mirror
settings (Y page 103). Sea
ts Important safety notes
G
WARNING
The seats can still be adjusted when ther eis
no key in the ignition lock. For this reaso n,
children shoul dnever be left unsupervised in
the vehicle. They could adjust the seat sand
become trapped. G
WARNING
Only adjus tthe driver' sseat when the vehicle
is stationary. You will otherwise be distrac ted
from the road and traffic conditions and you
could lose control of the vehicle as aresult of
the seat moving. This could cause an acci-
dent. G
WAR
NING
If you adjus tthe seat height car elessly, you or
others could be trapped and thereb yinjured.
Children in particular could unintentionally
pres sthe buttons to electrically adjust the
seat sand become trapped.
Take care that:
R whil emoving the seats, your hands do not
get under the lever assembly of the seat
adjustmen tsystem.
R children in the vehicl edonot slidetheir
hands unde rthe levers. G
WARNING
Make sur ethat nobody can becom etrapped
when adjusting the seats.
Observe the notes on airbags.
Secure children as recomm ended; see the
"Children in the vehicle" section. G
WAR
NING
Make sure that the back of your head is sup-
ported at eye level by the central area of the
head restraint .Ifyour head is not supported
correctly by the head restraint ,you coul dsuf-
fer asever eneck injury in the event of an
accident .Never driv eifthe head rest raints are
not engaged and set correctly. G
WARNING
As eat belt can only offer its intended degree
of protection when the back rest is almost ver-
tical and the occupan tiss itting upright. Avoid
seat positions that do not allow the seat belt
to be routed correctly. Adjust the backrest so
that it is as upright as possible .Never travel
with the back rest reclined too fa rbackwards.
You could otherwise be seriousl yoreven
fatally injured in th eevent of an accident or
sudden braking.
! To avoid damag etothe seats and the seat
heating, observe the followin ginformation:
R do not spill any liquids on the seats. If
liquid is spilled on the seats, dry them as
soon as possible.
R if the sea tcover sare damp or wet, do not
switc hont he seat heating. The seat
heating should also not to be used to dry
the seats.
R clea nthe seat cover sasrecommended;
see the "In terior care" section.
R do not transport heav yloads on the
seats. Do not plac eshar pobjects on the
seat cushions ,e.g. knives, nails or tools.
Th es eats should only be occupied by
passengers, if possible.
R when the seat heatin gisinoperation ,do
not cover the seats with insulating mate-
rials, e.g. blanke ts,c oats, bags, seat cov-
ers, child seats or booster seats.
! When you mov ethe seats, make sur ethat
ther eare no objects in th efootwell or
behind the seats. Otherwise, you could
damage the seats and the objects. Seats
93Seats,steering wheeland mirrors Z
Page 100 of 389
i
If th ebattery voltage is too low, the seat
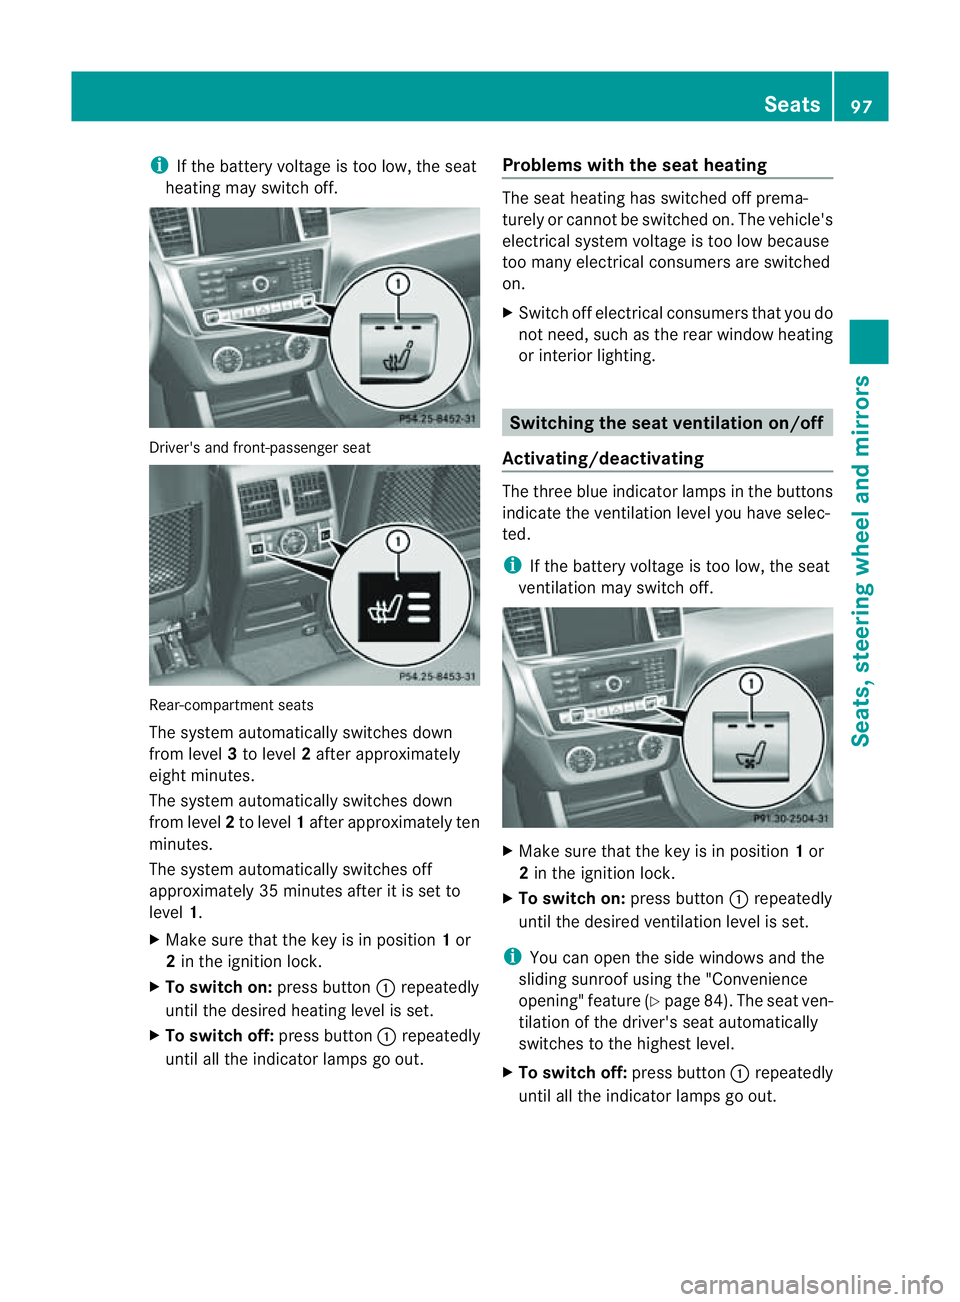
heating may switch off. Driver's and front-passenger seat
Rear-compartment seats
The system automaticall
yswitches down
from level 3to level 2after approximately
eight minutes.
The system automaticall yswitches down
from level 2to level 1after approximately ten
minutes.
The system automatically switches off
approximately 35 minutes after it is set to
level 1.
X Make sure that the key is in position 1or
2 in the ignition lock.
X To switch on: press button:repeatedly
until the desire dheatin glevel is set.
X To switch off: press button:repeatedly
until all the indicator lam psgo out. Problems with th
eseat heating The seat heating has switched off prema-
turely or cannot be switched on. The vehicle's
electrical system voltage is too low because
too many electrical consumer sare switched
on.
X Switch off electrica lconsumers that you do
not need, such as the rea rwindow heating
or interior lighting. Switching the seat ventilation on/off
Activating/deactivating The three blu
eindicato rlamps in the buttons
indicate the ventilation level you have selec-
ted.
i If the battery voltage is too low, the seat
ventilation may switch off. X
Make sure that the key is in position 1or
2 in the ignition lock.
X To switch on: press button:repeatedly
until the desire dventilation level is set.
i You can open the side windows and the
sliding sunroof using the "Convenience
opening" featur e(Ypage 84). The seat ven-
tilation of the driver' sseat automatically
switches to the highest level.
X To switc hoff:press button :repeatedly
until all th eindicato rlamps go out. Seats
97Seats,steeri ngwheel and mirrors Z
Page 101 of 389

Problems wit
hthe seat ventilation Th
es eat ven tilation has switched off prema-
turely or cannot be switched on. The vehicle's
electrical system voltage is too low because
too many electrical consumer sare switched
on.
X Switch off electrica lconsumers which you
do not need, such as the rea rwindow heat-
ing or interior lighting. Steering wheel
Important safet
ynotes G
WARNING
The electrically adjustable steering wheel can
still be adjusted when there is no key in the
ignition lock. Therefore, do not leave children
unsupervised in the vehicle, as they could
become trapped if the steering wheel is adjus-
ted. G
WARNING
Only adjust the steering wheel when the vehi-
cle is stationar yand do not pull away until the
steering wheel adjustment mechanis mis
locked in position. You might otherwise drive
without the steering wheel adjustment mech-
anism being locked in position. As aresult,
you could be distracted from road and traffic
condition sbyanunintentional movement of
the steering wheel and thereby cause an acci-
dent.
However, the steerability of the vehicl eisnot
affected. Adjusting th
esteerin gwheel man-
ually :
Release lever
; To adjus tthe steering wheel height
= To adjust the steering wheel position
(fore-and-af tadjustment)
X Push release lever :down completely.
The steerin gcolum nisu nlocked.
X Adjus tthe steering wheel to the desired
position.
X Push release lever :up completely.
The steering column is locked.
X Chec kifthe steering column is locked.
When doing so, tr ytopush the steering
wheel up or down or try to move it in the
fore-and-aft direction. Adjusting the steering wheel electri-
cally
:
To adjust the steering wheel height
; To adjust the steering wheel position
(fore-and-aft adjustment) 98
Steering wheelSeats, steerin
gwhee land mirrors
Page 102 of 389
i
Related topics:
R EASY-ENTRY/EXI Tfeature
(Y page 99)
R Storing setting s(Ypage 103) Steering whee
lheating
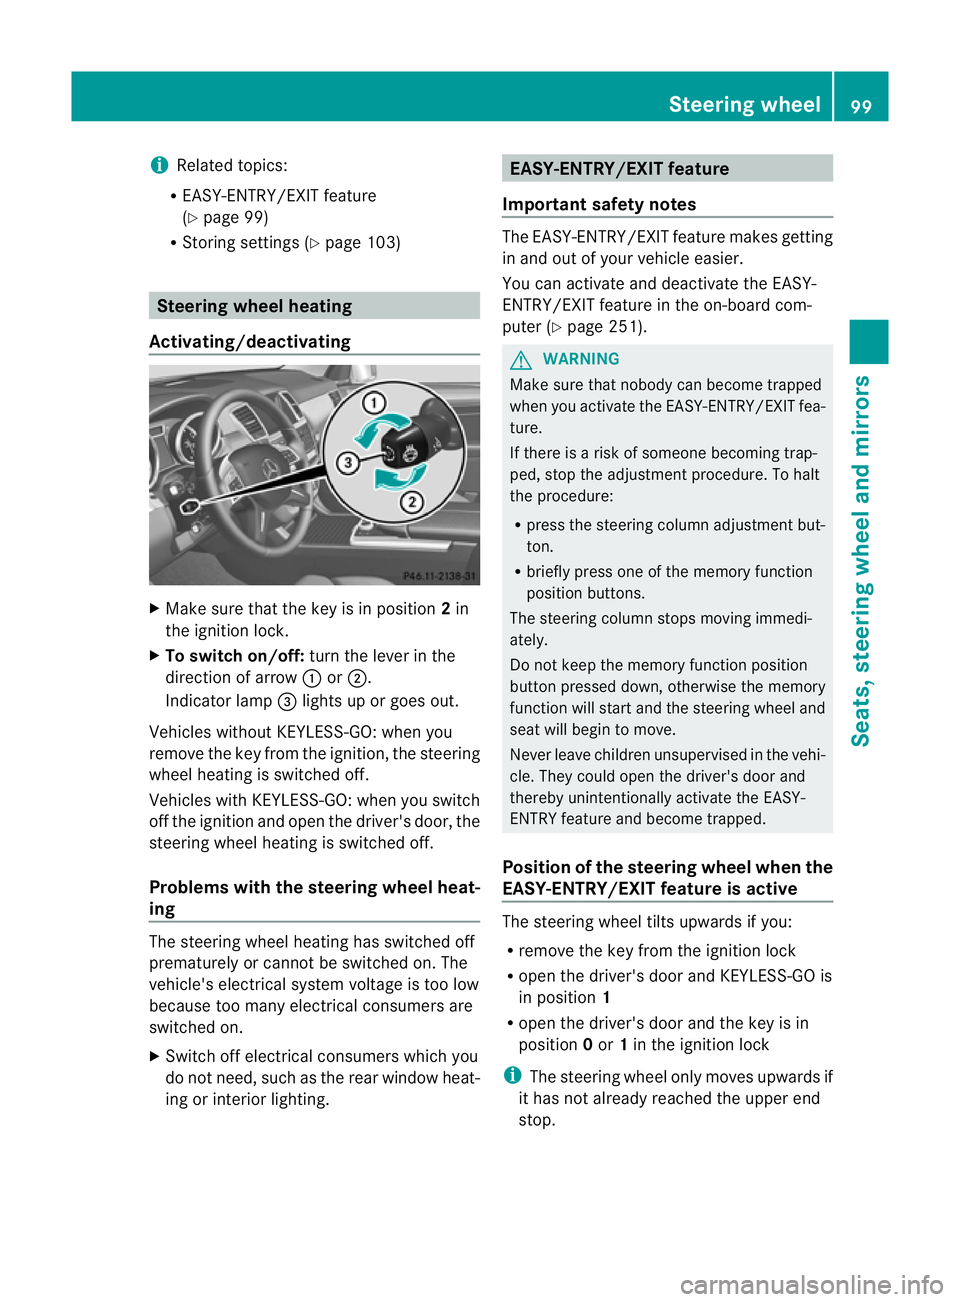
Activating/deactivating X
Mak esuret hat the key is in position 2in
th ei gnition lock.
X To switch on/off: turnthe lever in the
direction of arrow :or;.
Indicato rlamp =lights up or goes out.
Vehicles without KEYLESS-GO: when you
remove the key from the ignition ,the steering
wheel heating is switched off.
Vehicles with KEYL ESS-GO:when you switch
off the ignition and open the driver's door, the
steering wheel heating is switched off.
Problems wit hthe steering whee lheat-
ing The steering wheel heating has switched off
prematurely or cannot be switched on. The
vehicle's electrical system voltage is too low
because too many electrical consumer sare
switche don.
X Switch off electrical consumers which you
do not need ,such as the rear window heat-
ing or interior lighting. EASY-ENTRY/EXIT featu
re
Important safety notes The EASY-ENTRY/EXI
Tfeatur emakes getting
in and out of your vehicle easier.
You can activate and deactivate the EASY-
ENTRY/EXIT feature in the on-board com-
puter (Y page 251). G
WARNING
Make sure that nobody can become trapped
when you activate the EASY-ENTRY/EXI Tfea-
ture.
If there is arisk of someone becoming trap-
ped, stop the adjustment procedure. To halt
the procedure:
R press the steering column adjustment but-
ton.
R briefly press one of the memor yfunction
position buttons.
The steering column stops moving immedi-
ately.
Do not keep the memory function position
button presse ddown, otherwise the memory
function will star tand the steering wheel and
sea twill begin to move.
Never leave children unsupervised in the vehi-
cle. They could open the driver's door and
thereby unintentionally activate the EASY-
ENTRY featur eand become trapped.
Positio nofthe steering whee lwhen the
EAS Y-ENTRY/EXIT featur eisactive The steerin
gwheel tilt supwards if you:
R remove the key from the ignition lock
R open the driver' sdoor and KEYLESS -GOis
in position 1
R open the driver's door and the key is in
position 0or 1in the ignition lock
i The steerin gwheel only moves upwards if
it has not already reached the upper end
stop. Steering wheel
99Seats,steering wheeland mirror s Z
Page 103 of 389
Position of th
esteerin gwheel for driv-
ing Th
es teering whee lismoved to the previously
set position if:
R the driver's door is closed.
R you inser tthe key int othe ignition lock.
or
R you press the Star t/Stop butto nonce on
vehicles with KEYLESS-GO.
If you clos ethe driver's door with the key
inserted int othe ignition lock ,the steering
wheel is automatically moved to the previ-
ously set position.
The last position of the steering wheel is
stored when you switc hoff th eignition or
when you stor ethe setti ngwith the memory
function (Y page 103).
Crash-responsive EASY-EXIT fea tureIf th
ecrash-resp onsive EASY-EXIT feature is
trig gere dinana ccident,the steeri ngcolu mn
will mov eupwards when the driv er'sdoor is
opened. This occurs irrespective of the posi-
tion of the key in the ignition lock .This makes
it easier to exit the vehicle and rescue the
occupants.
The crash-responsive EASY-EXIT featur eis
only operational if the EASY-EXIT/ENTRY fea-
tur eisa ctivate dinthe on-boar dcomputer. Mirrors
Rear-view mirror
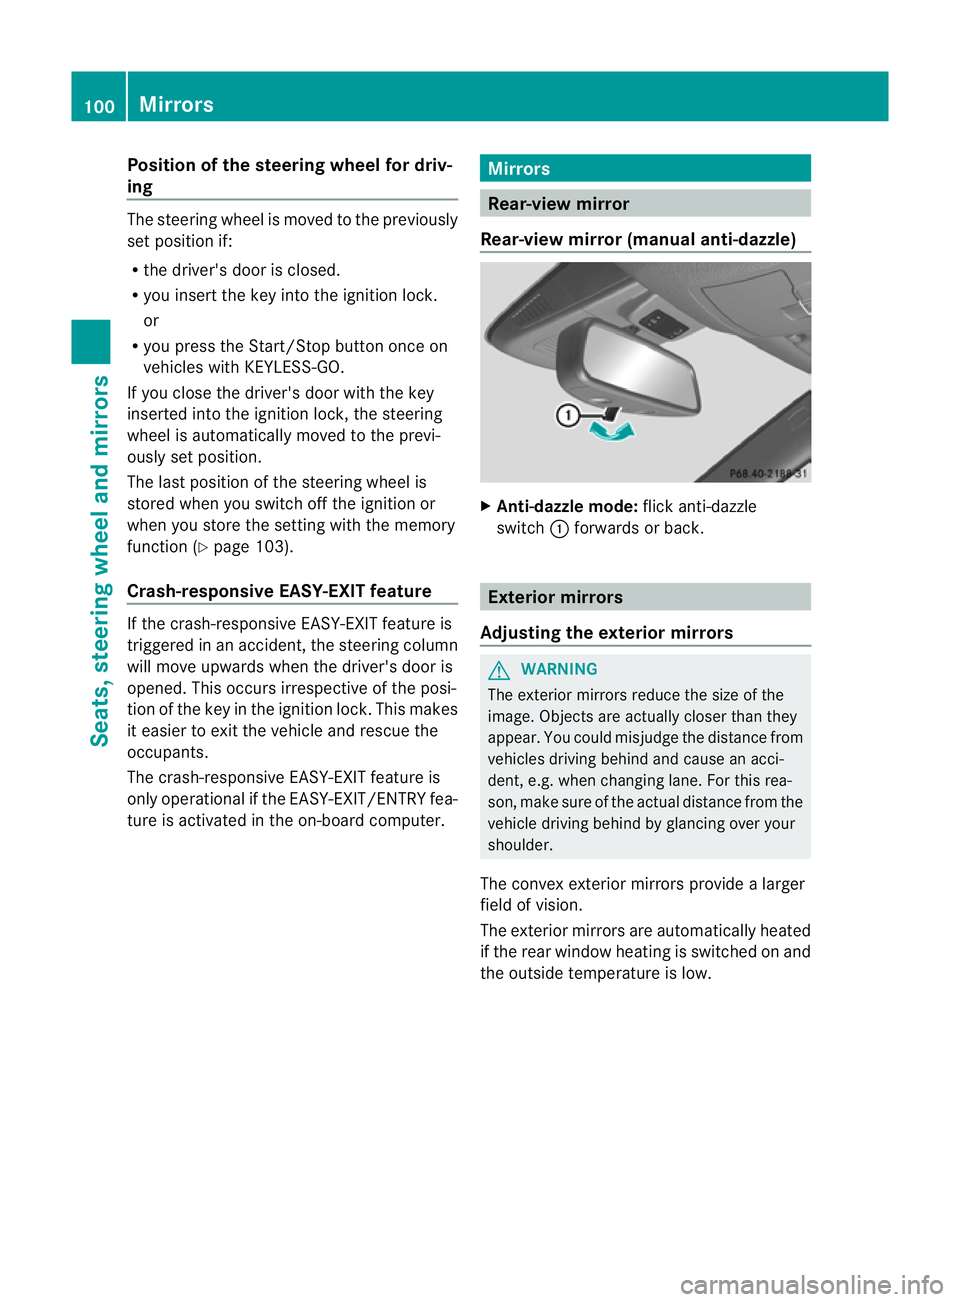
Rear-view mirror (manua lanti- daz zle) X
Anti-dazzle mode: flick anti-dazzle
switch :forward sorback. Exterior mirrors
Adjusting the exterior mirrors G
WARNING
The exterior mirrors reduce the size of the
image. Objects are actually closer than they
appear. You could misjudge the distance from
vehicles driving behind and cause an acci-
dent, e.g. when changing lane. For this rea-
son, make sure of the actual distance from the
vehicle driving behind by glancing over your
shoulder.
The convex exterior mirrors provide alarger
field of vision.
The exterior mirrors are automatically heated
if the rear window heating is switched on and
the outside temperature is low. 100
MirrorsSeats
,steering wheel and mirrors