2011 MERCEDES-BENZ M-CLASS SUV check engine
[x] Cancel search: check enginePage 295 of 389

Problem Possible causes/consequences and
M Solutions
?
The red coolant warn-
ing lam
pcomes on
while the engin eisrun-
ning. The coolant level is too low.
If the coolant level is correct, the airflow to the engine radiator
may be blocked or the electric engine radiator fan may be mal-
functioning.
The coolant is too hot and the engine is no longer being cooled
sufficiently.
X Observe the additional display messages in the multifunction
display.
X Stop the vehicle immediately, paying attention to road and traf-
fic conditions, and switch off the engine.
X Let the engine and coolant cool down.
X Check the coolant level and top up the coolant (Y page 321).
Observe the warning notes as you do so.
X If you have to top up the coolant frequently, have the engine
cooling system checked.
X Make sure that the air suppl ytot he engin eradiator is not
blocked, e.g. by frozen slush.
X If the coolant temperature is less than 120 †, you can continue
driving to the nearest qualified specialis tworkshop.
X Avoid heav yloads on the engin easyou do so, e.g. driving on
mountain roads and stop-star ttraffic. ?
Th
er ed coolan twarn-
ing lamp comes on
while the engine is run-
ning. Awarning tone
also sounds. The coolant temperature has exceeded 120 †. The airflow to the
engine radiator may be blocked or the coolant level may be too
low.
The engine is not being cooled sufficiently and may be damaged.
X Observe the additional display message sint he multifunc tion
display.
X Stop the vehicle immediately, paying attention to roa dand traf-
fic conditions, and switch off the engine.
X Let the engine and coolant cool down.
X Check the coolant level and top up the coolant (Y page321).
Observe the warning notes as you do so.
X If you have to top up the coolan tfrequently, have th eengine
cooling system checked.
X Make sure that the air supply to the engine radiato risnot
blocked, e.g. by frozen slush.
X If the coolant temperatur eisless than 12 0†,you can con tinue
driving to the neares tqualified specialist workshop.
X Avoid heavy loads on the engine as you do so, e.g. driving on
mountain roads and stop-s tart traffic. 292
Warning and indicator lamps in the instrument clusterOn-boar
dcomputer and displays
Page 323 of 389

X
Lower th ebonnet and let it fal lfrom a
heig ht of approx imately 20 cm.
X Check that the bonnet has engaged prop-
erly.
If the bonnet can be raised slightly, it is not
properly engaged. Open it again and close
it with alittle more force. Radiator
i Vehicles with diesel engine: do not
cover the radiator .Don ot use thermal
mats, insec tprotectio ncover sora nything
similar. Doing so can cause the Onboard
Diagnosti csSystem to display inaccurate
values .Some of these values ar elegally
required and must be cor rect. Engine oil
Notes on the oil level Depending on driving style, the vehicle con-
sume samaximum of 0.8 loil per 100 0km.
Th eo il consumption may be higher than this
when the vehicle is new or if you frequently
drive at high engin espeeds.
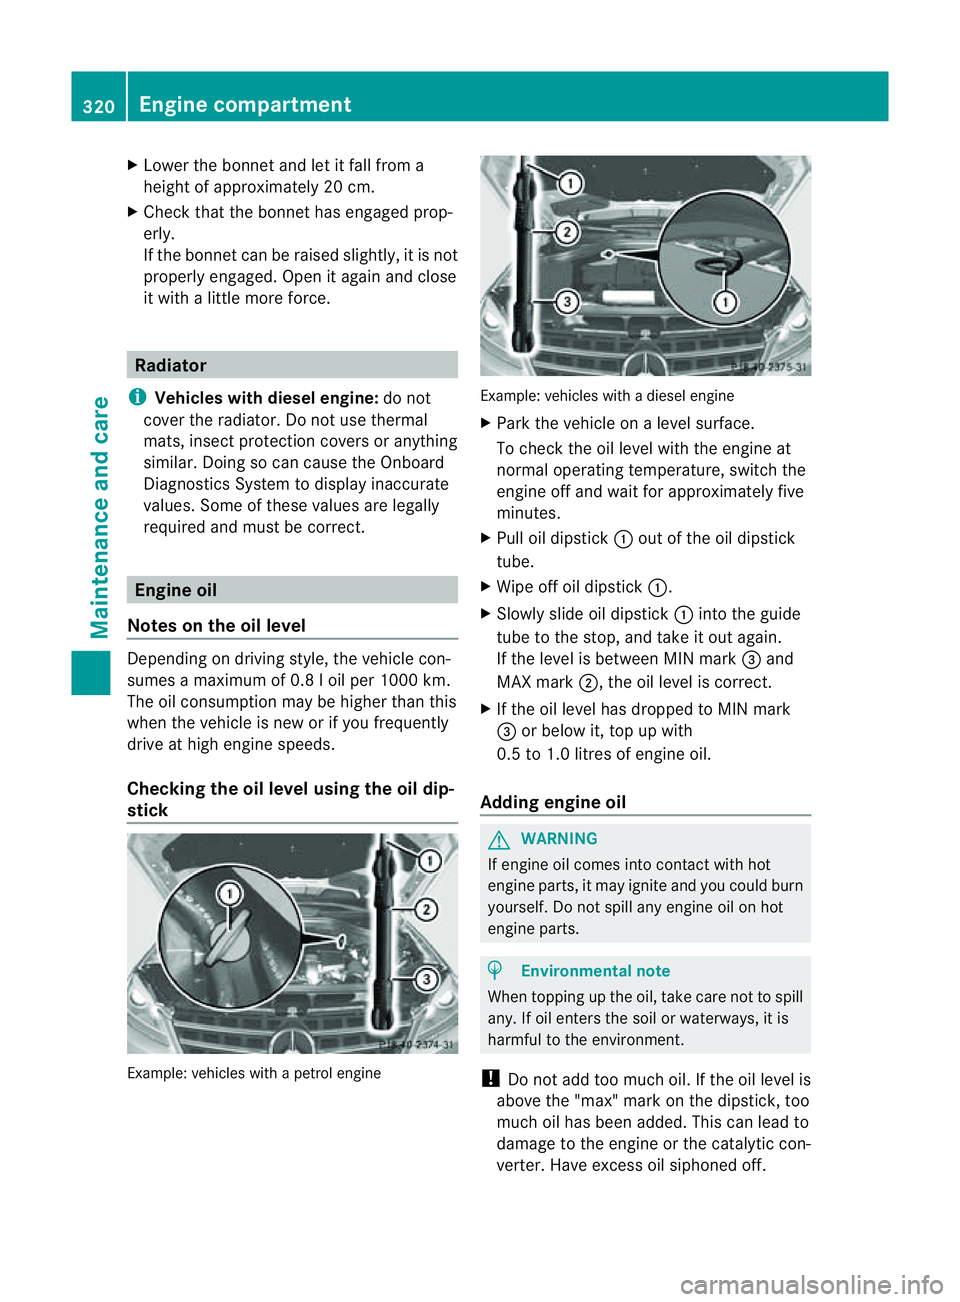
Checking the oil level using the oil dip-
stick Example: vehicles with
apetro lengine Example: vehicle
swithadiesel engine
X Park the vehicle on alevel surface.
To chec kthe oil level with the engin eat
normal operating temperature, switch the
engine off and wait for approximately five
minutes.
X Pull oil dipstick :out of the oil dipstick
tube.
X Wip eoff oi ldipstick :.
X Slowly slide oil dipstick :into the guide
tube to the stop, and take it out again.
If the level is between MIN mark =and
MAX mark ;,the oil level is correc t.
X If th eoil level has dropped to MIN mark
= or below it, top up with
0.5 to 1.0 litres of engine oil.
Adding engine oil G
WARNING
If engine oil comes into contact with hot
engine parts, it may ignite and you could burn
yourself .Donot spill any engin eoil on hot
engine parts. H
Environmental note
When topping up the oil, take care not to spill
any. If oil enters the soil or waterways, it is
harmful to the environment.
! Do not add too much oil. If the oil level is
above the "max" mar konthe dipstick ,too
much oil has been added. This can lead to
damage to the engin eorthe catalytic con-
verter .Have excess oil siphoned off. 320
Eng
inecompartmentMaintenance and care
Page 324 of 389

Examp
le:e ngine oi lcap
X Turn cap :anti-clockwise and remove it.
X Top up the engine oil.
If the oi llev el is at or belo wthe MIN mark
on the dipstick ,top up with
0. 5to1 .0 litres of engine oil.
X Replace cap :on the fille rneck and turn
clockwise.
Make sure that the cap locks into place
securely.
X Check the oil level agai nwith the oil dip-
stick (Y page 320).
Further information on engine oil
(Y page 375). Checking and adding other service
products
Checking the coolant level Only check the coolant level when the vehicle
is on alevel surface and the engine has cooled
down.
X Turn the key to position 2(Y page 139) in
the ignition lock.
On vehicles with KEYLESS-GO, press the
Start/Stop button twic e(Ypage 139).
X Check the coolant temperatur egauge in
the multifunction displ ay.G
WARNING
Th ec ooling system is pressurised. Therefore,
only unscrew the cap once the engin ehas
cooled down. The coolant temperature gauge must display less than 70
†.Otherwi se,you
could be scalded if ho tcoolant escapes. X
Slowl yturn cap :half aturna nti-clock-
wis eand allo wexcess pressure to escape.
X Turn cap :further anti-clockwis eand
remove it.
If the coolant is at the level of markerbar
= in the filler nec kwhen cold ,ther eis
enough coolan tincoolant expansion
tank ;.
If the coolant leve lisapproximately 1.5 cm
above marker bar =in the filler nec kwhen
warm, ther eisenoughcoolant in coolant
expansion tank ;.
X If necessary ,top up with coolant that has
been tested and approved by Mercedes-
Ben z.
X Replace cap :and turn it clockwise as far
as it will go.
For further information on coolant, see
(Y page 377).
Windscreen washer system and head-
lamp cleanin gsystem Th
ew asher fluid reservoir is used for both the
windscreen washe rsystem and the headlamp
cleaning system.
i Components and service products must
be matched. Mercedes-Benz recommends
that you use products teste dand approved
by Mercedes-Be nz.T hey ar elisted in this
Mercedes-Ben zOwner's Manual in the
appropriat esection. Engine compartment
321Maintenance andcare Z
Page 352 of 389

X
Switch off al lelec trical consumers (e.g. radio ,blow er, etc.).
X Ope nthe bonnet (Y page 318). Position number
Bidentifies the charged battery of the other vehicle or an equivalent jump-
startin gdevice.
X Slide cover :of positiv eterminal ;in the direction of the arrow.
X Connect positiv eterminal ;on your vehicle to positiv eterminal =of donor battery B
using the jum plead, beginning with your own battery.
X Start the engine of the donor vehicle and run it at idling speed.
X Connect negative terminal ?of donor battery Bto eart hpoint Aof your vehicle using
the jum plead, connectin gthe jum plead to donor battery Bfirst.
X Start the engine.
X Allow the engine to run for afew minutes befor edisconnecting the jump lead.
X First, remov ethe jum plead from eart hpoint Aand negative terminal ?,then from positive
terminal ;and positive terminal =,each time disconnecting from the contacts on your
own vehicle first.
X After removing the jump lead, close cover :on positive terminal ;.
X Have the battery checked at aqualified specialist workshop, e.g. aMercedes-Ben zService
Cent re.T he jump-star ting procedure is not astandard operatin gstate; therefore, have the
battery checked. Towing and tow-starting
Important safet
ynotes
Observe the legal requirements for the rele-
vant countries when towing. G
WARNING
If you tow the vehicle, you must use arigid
towing bar if: Towing and tow-starting
349Breakdown assis tance
Z
Page 356 of 389

seat
,only use fuses with the suffix "S".
Components or systems could otherwise
be damaged. Before changin
gafuse
X Park th evehicle and apply the electric park-
ing brake.
X Switch off all electrical consumers.
X Remov ethe key from the ignition lock.
The fuses ar elocated in variou sfuse boxes:
R fuse box on the front-passenger side of the
dashboard
R fuse box in the engine compartment on the
right-hand side of the vehicle, when viewed
in the direction of travel
R fuse box under the rear bench seat
The fuse allocation chart is located in the fuse
box (Y page 353 )under the rear bench seat. Dashboard fuse box
! Do not use apointed objec tsuch as a
screwdriver to open the cover in the dash-
board. You could damage the dashboard or
the cover. X
To open: pull cover :outwards in the
direction of the arrow and remove it.
X To close: clip in cover :on the front of
the dashboard.
X Fold cover :inwards until it engages. Fuse box in the engin
ecompar tment
X Open the bonnet (Y page 318). X
Remove any existing moisture from the
fuse box using adry cloth.
X To open: open clamps ;.
X Fol dc over :upwards in the direction of
the arrow and remove it.
! Make sure that no moistur ecan enter the
fuse box when the cover is open.
X To close: check whethe rthe seal is lying
correc tlyinc over:.
X Insert cover :at the side of the fuse box
int ot he retainer.
X Fold down cover :and close clamps ;.
! The cover must be fitted properly. Mois-
tur eord irt could otherwise impair the oper-
ation of the fuses.
X Close the bonnet (Y page 319). Fuse box under the rear benc
hseat
X Fold the right-hand rear bench seat
forwar d. Electrical fuses
353Breakdownassistance Z