2011 MERCEDES-BENZ M-CLASS SUV window
[x] Cancel search: windowPage 88 of 389

Using th
ekey i
The key must be close to the driver 'sdoor
handle.
X Point the tip of the key at the driver' sdoor
handle.
X Press and hold the &button until the
side window sand the sliding sunroof or the
panorama sliding sunroof are fully closed.
X Make sure that all the side windows and the
sliding sunroof or panorama sliding sunroof
are closed.
On vehicles with apanorama sliding sunroof:
X Press and hold the &button again until
the roller sunblinds of the panorama sliding
sunroof close.
X To interrupt convenienc eclosing:
release the &button.
Using KEYLESS-GO The KEYL
ESS-GOkey must be outside the
vehicle .All the doors must be closed. X
Touch recessed sensor surface :on the
door handle until the side windows and the
sliding sunroof or the panoram asliding
sunroof are fully closed.
i Make sure you only touch recessed sen-
sor surface :.
X Make sure that all the side windows and the
sliding sunroof or panoram asliding sunroof
are closed. On vehicles with
apanorama sliding sunroof:
X Touch recessed senso rsurface :on the
door handle again until the roller sunblinds
of the panorama sliding sunroof close.
X To interrupt convenienc eclosing:
release recessed sensor surface :on the
door handle. Resetting the side windows
If as ide window can no longer be closed fully,
you must reset it.
X Close all the doors.
X Turn the key to position 1or 2in the ignition
lock.
X Pull the corresponding switch on the door
control panel until the side window is com-
pletely closed. (Y page 83)
X Hold the switch for an additional second.
If the side window opens again slightly:
X Immediately pull the corresponding switch
on the door control panel until the side win-
dow is completely closed (Y page 83).
X Hold the switch for an additional second.
X If the corresponding side window remains
closed after the button has been released,
the side window has been reset correctly.
If this is not the case, repeat the steps
above again. Problems with the side windows
Problem: aside window cannot be closed
because it is blocked by objects, e.g.
leaves in th ewindow guide.
X Remov ethe objects.
X Close the side window.
Problem :aside window cannot be closed
and you cannot see th ecause. G
WARNING
Closing the side windows wit hincrease dforce
or withou tthe anti-entrapmen tfeature could Side windows
85Openingand closing
Z
Page 89 of 389

lead to serious or even fatal injury. Make sure
that nobody can becom etrapped when clos-
ing the side windows.
If as ide window is obstructed during closing
and reopen sagain slightly:
X Im me diately after the window blocks, pull
the correspondin gswitc hagain until the
side window has closed.
The side window is close dwith increased
force.
If as ide window is obstructed again during
closing and reopen sagain slightly:
X Im me diately after the window blocks, pull
the correspondin gswitc hagain until the
side window has closed.
The side window is close dwithout the anti-
entrapmen tfeature. Sliding sunroof
Important safet
ynotes
Your vehicle may be fitted with asliding sun-
roof or apanorama sliding sunroof. In the fol-
lowing section, the ter m"slidin gsunroof"
refers to both types of sliding sunroof. G
WARNING
Make sure that nobody can become trapped
when opening and closing the sliding sunroof.
If there is arisk of entrapment ,release the
switch immediately. Durin gautomatic opera-
tion ,push the switc hbriefly in any direction
to stop the sliding sunroof. G
WARNING
Th eg lass in th epanoram asunroof could
brea kinana ccident. If yo uare not wearin ga
seat belt ,there is arisk that you could be
thrown through the opening in the event of the
vehicle overturning. Therefore, always wear a
seat belt to reduce the risk of injuries. G
WARNING
Children could injur ethemselves if they oper-
ate the slidin gsunroof.
Never leave children unsupervised in the vehi-
cle. Always take the key with you when leaving
the vehicle, even if you are only leaving it for
as hort time.
! Only open the panoram asliding sunroof
if it is free of snow and ice. Otherwise, mal-
func tions ma yoccur.
Do not allo wanything to protrude from the
sliding sunroof. Otherwise, the seals could
be damaged.
i Resonance noises can occur in addition
to the usual airflow noises whe nthe sliding
sunroof is open. They ar ecaused by minor
pressure fluctuations in the vehicle interior.
Change the position of the sliding sunroof
or open aside window slightly to reduce or
eliminat ethese noises. Operating th
esliding sunroof
Opening and closing i
You can continue to operate the sliding
sunroof after switching off the engine or
removing the key. This function remains
activ efor fiv eminutes or until the driver's
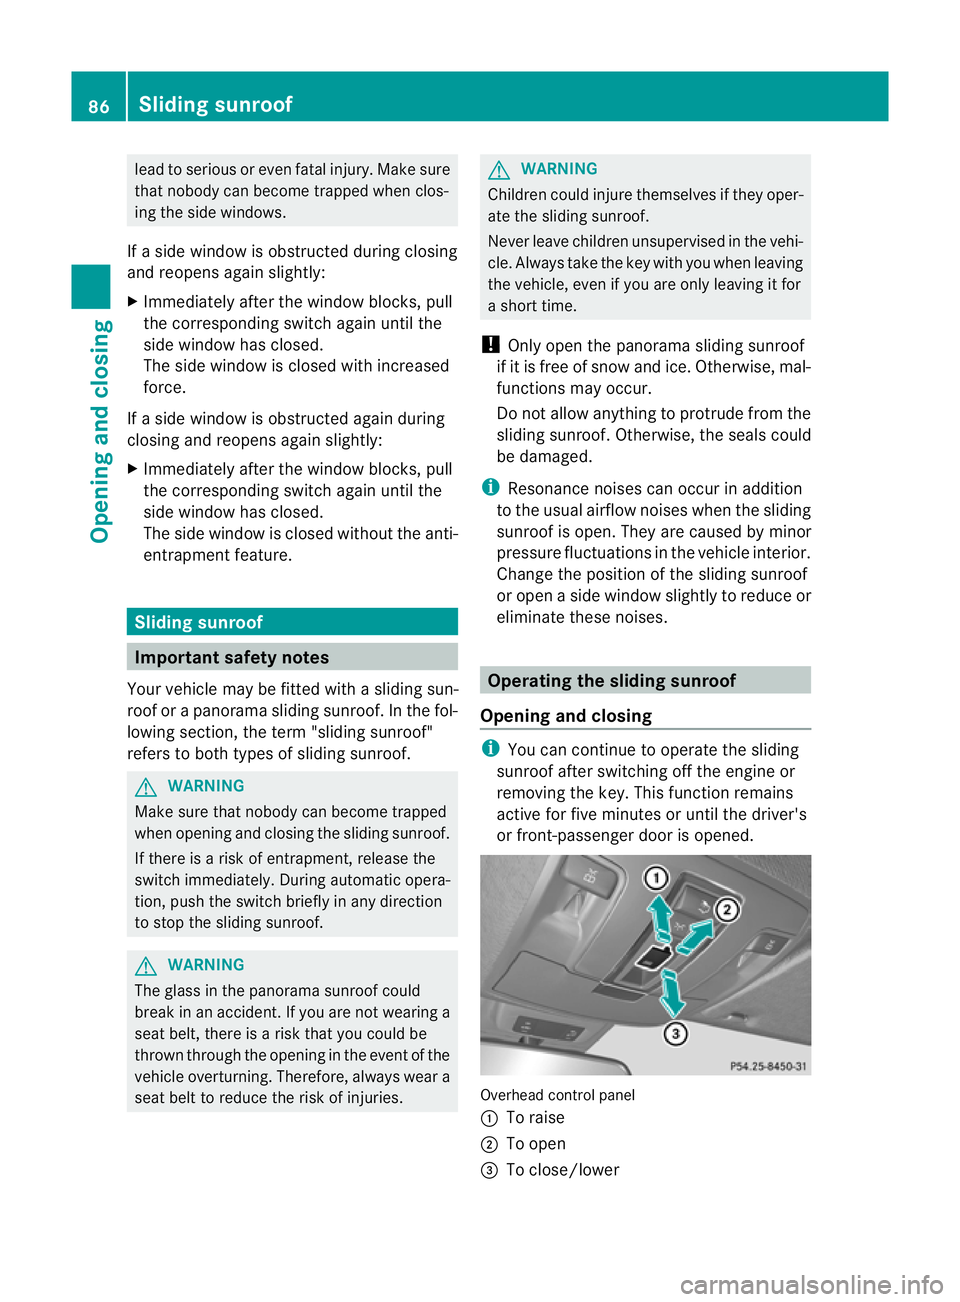
or front-passenger door is opened. Overhead control panel
:
To raise
; To open
= To close/lower 86
Slidin
gsunroofOpenin gand closing
Page 100 of 389

i
If th ebattery voltage is too low, the seat
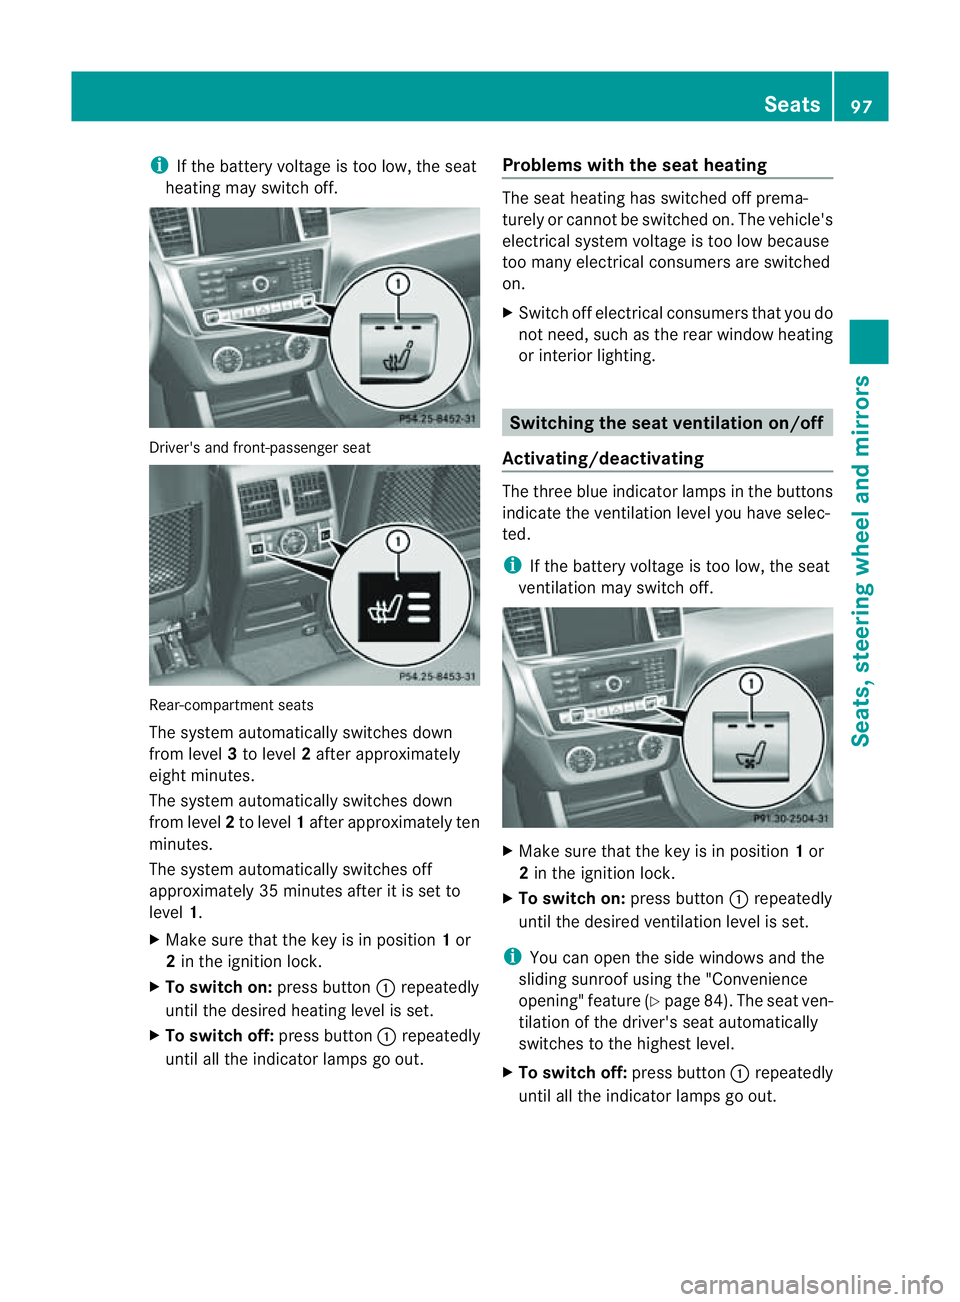
heating may switch off. Driver's and front-passenger seat
Rear-compartment seats
The system automaticall
yswitches down
from level 3to level 2after approximately
eight minutes.
The system automaticall yswitches down
from level 2to level 1after approximately ten
minutes.
The system automatically switches off
approximately 35 minutes after it is set to
level 1.
X Make sure that the key is in position 1or
2 in the ignition lock.
X To switch on: press button:repeatedly
until the desire dheatin glevel is set.
X To switch off: press button:repeatedly
until all the indicator lam psgo out. Problems with th
eseat heating The seat heating has switched off prema-
turely or cannot be switched on. The vehicle's
electrical system voltage is too low because
too many electrical consumer sare switched
on.
X Switch off electrica lconsumers that you do
not need, such as the rea rwindow heating
or interior lighting. Switching the seat ventilation on/off
Activating/deactivating The three blu
eindicato rlamps in the buttons
indicate the ventilation level you have selec-
ted.
i If the battery voltage is too low, the seat
ventilation may switch off. X
Make sure that the key is in position 1or
2 in the ignition lock.
X To switch on: press button:repeatedly
until the desire dventilation level is set.
i You can open the side windows and the
sliding sunroof using the "Convenience
opening" featur e(Ypage 84). The seat ven-
tilation of the driver' sseat automatically
switches to the highest level.
X To switc hoff:press button :repeatedly
until all th eindicato rlamps go out. Seats
97Seats,steeri ngwheel and mirrors Z
Page 101 of 389

Problems wit
hthe seat ventilation Th
es eat ven tilation has switched off prema-
turely or cannot be switched on. The vehicle's
electrical system voltage is too low because
too many electrical consumer sare switched
on.
X Switch off electrica lconsumers which you
do not need, such as the rea rwindow heat-
ing or interior lighting. Steering wheel
Important safet
ynotes G
WARNING
The electrically adjustable steering wheel can
still be adjusted when there is no key in the
ignition lock. Therefore, do not leave children
unsupervised in the vehicle, as they could
become trapped if the steering wheel is adjus-
ted. G
WARNING
Only adjust the steering wheel when the vehi-
cle is stationar yand do not pull away until the
steering wheel adjustment mechanis mis
locked in position. You might otherwise drive
without the steering wheel adjustment mech-
anism being locked in position. As aresult,
you could be distracted from road and traffic
condition sbyanunintentional movement of
the steering wheel and thereby cause an acci-
dent.
However, the steerability of the vehicl eisnot
affected. Adjusting th
esteerin gwheel man-
ually :
Release lever
; To adjus tthe steering wheel height
= To adjust the steering wheel position
(fore-and-af tadjustment)
X Push release lever :down completely.
The steerin gcolum nisu nlocked.
X Adjus tthe steering wheel to the desired
position.
X Push release lever :up completely.
The steering column is locked.
X Chec kifthe steering column is locked.
When doing so, tr ytopush the steering
wheel up or down or try to move it in the
fore-and-aft direction. Adjusting the steering wheel electri-
cally
:
To adjust the steering wheel height
; To adjust the steering wheel position
(fore-and-aft adjustment) 98
Steering wheelSeats, steerin
gwhee land mirrors
Page 102 of 389

i
Related topics:
R EASY-ENTRY/EXI Tfeature
(Y page 99)
R Storing setting s(Ypage 103) Steering whee
lheating
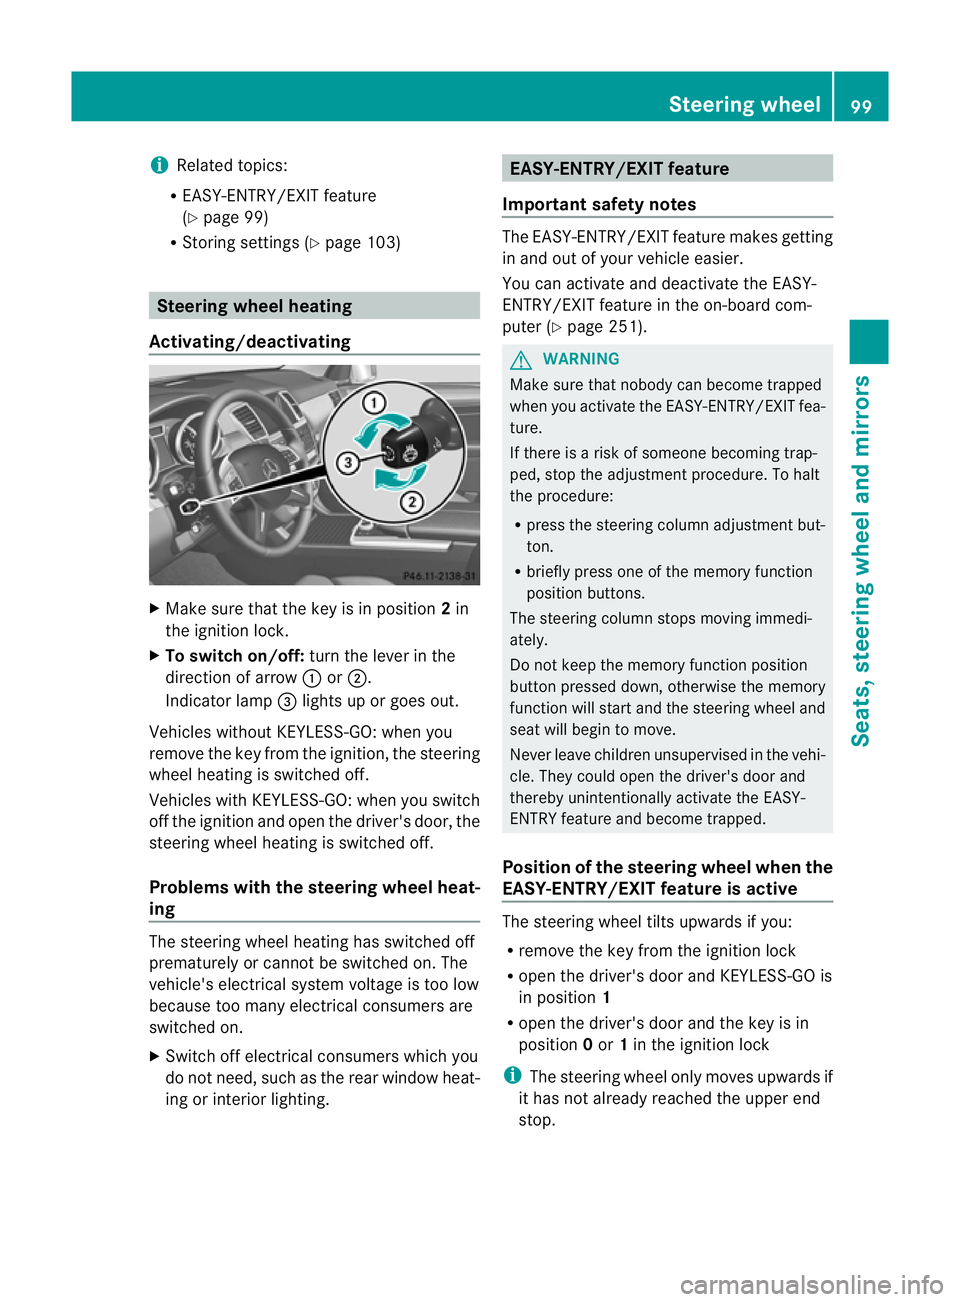
Activating/deactivating X
Mak esuret hat the key is in position 2in
th ei gnition lock.
X To switch on/off: turnthe lever in the
direction of arrow :or;.
Indicato rlamp =lights up or goes out.
Vehicles without KEYLESS-GO: when you
remove the key from the ignition ,the steering
wheel heating is switched off.
Vehicles with KEYL ESS-GO:when you switch
off the ignition and open the driver's door, the
steering wheel heating is switched off.
Problems wit hthe steering whee lheat-
ing The steering wheel heating has switched off
prematurely or cannot be switched on. The
vehicle's electrical system voltage is too low
because too many electrical consumer sare
switche don.
X Switch off electrical consumers which you
do not need ,such as the rear window heat-
ing or interior lighting. EASY-ENTRY/EXIT featu
re
Important safety notes The EASY-ENTRY/EXI
Tfeatur emakes getting
in and out of your vehicle easier.
You can activate and deactivate the EASY-
ENTRY/EXIT feature in the on-board com-
puter (Y page 251). G
WARNING
Make sure that nobody can become trapped
when you activate the EASY-ENTRY/EXI Tfea-
ture.
If there is arisk of someone becoming trap-
ped, stop the adjustment procedure. To halt
the procedure:
R press the steering column adjustment but-
ton.
R briefly press one of the memor yfunction
position buttons.
The steering column stops moving immedi-
ately.
Do not keep the memory function position
button presse ddown, otherwise the memory
function will star tand the steering wheel and
sea twill begin to move.
Never leave children unsupervised in the vehi-
cle. They could open the driver's door and
thereby unintentionally activate the EASY-
ENTRY featur eand become trapped.
Positio nofthe steering whee lwhen the
EAS Y-ENTRY/EXIT featur eisactive The steerin
gwheel tilt supwards if you:
R remove the key from the ignition lock
R open the driver' sdoor and KEYLESS -GOis
in position 1
R open the driver's door and the key is in
position 0or 1in the ignition lock
i The steerin gwheel only moves upwards if
it has not already reached the upper end
stop. Steering wheel
99Seats,steering wheeland mirror s Z
Page 103 of 389

Position of th
esteerin gwheel for driv-
ing Th
es teering whee lismoved to the previously
set position if:
R the driver's door is closed.
R you inser tthe key int othe ignition lock.
or
R you press the Star t/Stop butto nonce on
vehicles with KEYLESS-GO.
If you clos ethe driver's door with the key
inserted int othe ignition lock ,the steering
wheel is automatically moved to the previ-
ously set position.
The last position of the steering wheel is
stored when you switc hoff th eignition or
when you stor ethe setti ngwith the memory
function (Y page 103).
Crash-responsive EASY-EXIT fea tureIf th
ecrash-resp onsive EASY-EXIT feature is
trig gere dinana ccident,the steeri ngcolu mn
will mov eupwards when the driv er'sdoor is
opened. This occurs irrespective of the posi-
tion of the key in the ignition lock .This makes
it easier to exit the vehicle and rescue the
occupants.
The crash-responsive EASY-EXIT featur eis
only operational if the EASY-EXIT/ENTRY fea-
tur eisa ctivate dinthe on-boar dcomputer. Mirrors
Rear-view mirror
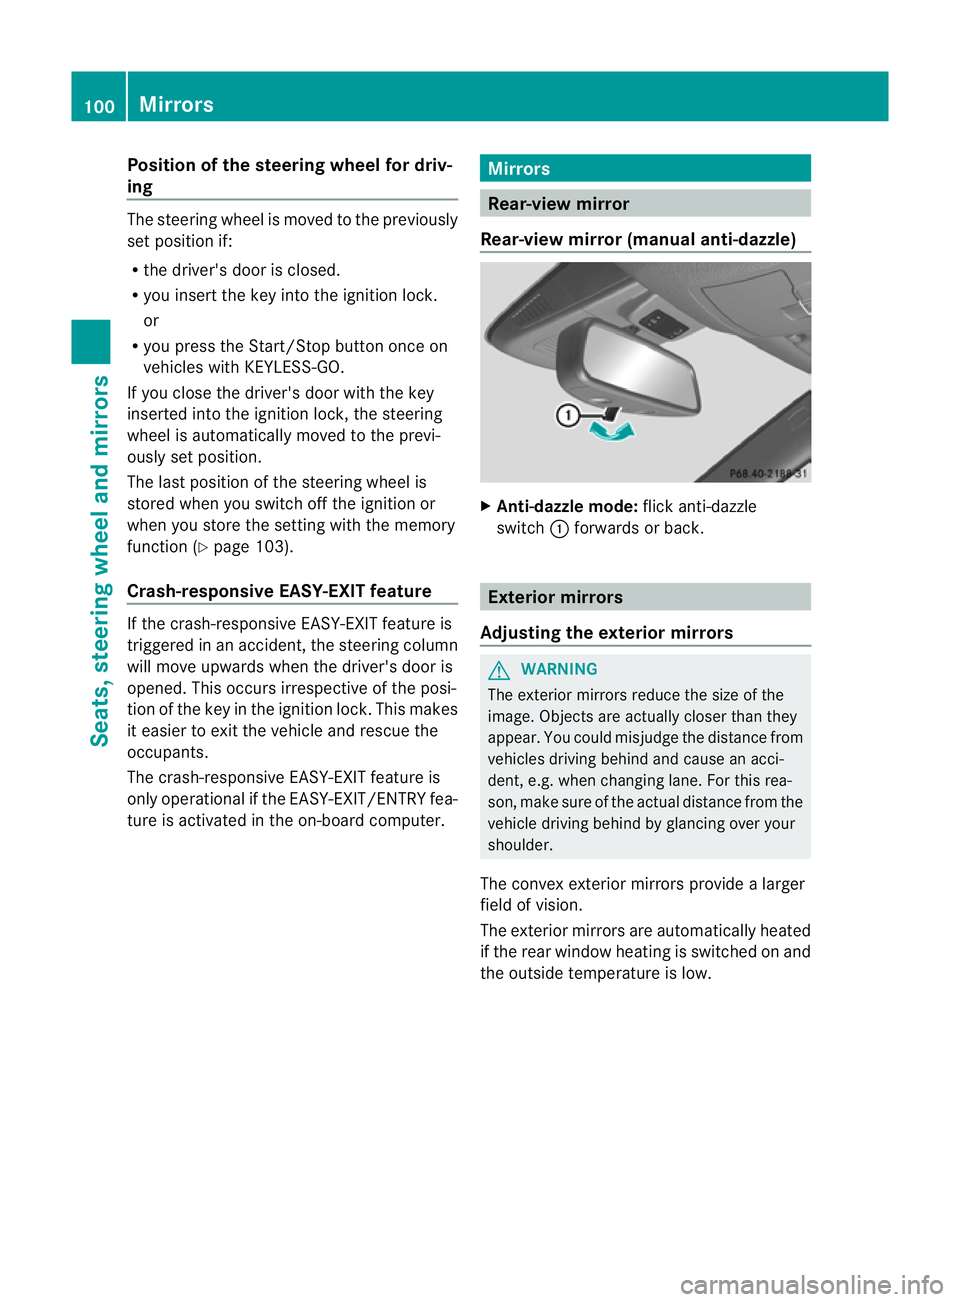
Rear-view mirror (manua lanti- daz zle) X
Anti-dazzle mode: flick anti-dazzle
switch :forward sorback. Exterior mirrors
Adjusting the exterior mirrors G
WARNING
The exterior mirrors reduce the size of the
image. Objects are actually closer than they
appear. You could misjudge the distance from
vehicles driving behind and cause an acci-
dent, e.g. when changing lane. For this rea-
son, make sure of the actual distance from the
vehicle driving behind by glancing over your
shoulder.
The convex exterior mirrors provide alarger
field of vision.
The exterior mirrors are automatically heated
if the rear window heating is switched on and
the outside temperature is low. 100
MirrorsSeats
,steering wheel and mirrors
Page 120 of 389

position
,the rain senso rismore sensitive
than in the Äposition ,causing the wind-
screen wiper to wipe more frequently. Switching the rear window wiper on/
off Combination switch
:
è Rear window wiper switch
2 b To wipe with washe rfluid
3 ° To switch on intermittent wiping
4 e To switch off intermittent wiping
5 b To wipe with washer fluid
X Turn the key to position 1or 2in the ignition
lock.
X Slide switch :on the combination switch
up or down to the appropriate position.
When the rear window wiper is switched on,
the icon appears in the instrument cluster. Replacing the wiper blades
Import ants afety notes G
WARNING
Th ew iper arm scould star tmovin gand cause
an injury if you leave the windscreen wipers
switched on.
Remove the key from the ignition lock before
replacing the wipe rblades.
! To avoid damaging the windscreen wiper
blades, make sure that you touch only the
wiper arm of the windscreen wiper. !
Never open the bonnet if awindscreen
wiper arm has been folded away from the
windscreen.
Never fold awindscreen wiper arm without
aw iper blade back onto the windscreen/
rear window.
Hold the windscreen wiper arm firmly when
you change the wiper blade .Ifyou release
the windscreen wiper ar mwithout awiper
blade and it falls ont othe windscreen ,the
windscreen ma ybedamaged by the force
of the impact.
Mercedes-Benz recommends that you have
the wiper blades replaced by aqualified
specialist workshop, e.g. at aMercedes-
Ben zServic eCentre.
Replacin gthe windscreen wiper blades Removin
gthe wiper blades
X Remov ethe key fro mtheignition lock.
X Fold th ewiper arm away from th ewind-
screen. X
Firmly press release knob :and pull the
wiper blade upward sfromt he wi per arm in
the direction of the arrow. Windscreen wipers
117Lightsand windscr een wipers Z
Page 121 of 389

Fitting th
ewiper blades
X Positio nthe new wiper blade in the retainer
on the wiper ar mand slide it into place in
the opposite direction to the arrow.
The wipe rblade audibly engages.
X Make sure that wiper blade is seated cor-
rectly.
X Fold the wiper arm back onto the wind-
screen.
Replacing the rear window wiper blade Removing the wiper blade
G
WARNING
The wiper arm could be set in motion and
injur eyou if the windscreen wiper sare
switched on.
Remove th ekey from the ignition lock before
replacing the wiper blade. X
Remov ethe key from the ignition lock.
X Fold wiper arm :away from the rea rwin-
dow until it engages.
X Position wiper blade ;atar ight angle to
wiper arm :.
X Hold wiper arm :and press wiper
blade ;in the direction of the arrow until
it releases.
X Remove wiper blade ;. Fitting the wiper blade
X
Place new wiper blade ;onto wiper
arm :.
X Hold wiper arm :and press wiper
blade ;in the opposite direction to the
arrow until it engages.
X Make sure that wiper blade ;is seated
correctly.
X Position wiper blade ;parallel to wiper
arm :.
X Fold wiper arm :back onto the rear win-
dow. Problems with the windscreen wipers
The windscreen wipers are obstructed Leaves or snow, for example, may be
obstructing the windscreen wiper movement.
The wiper motor has been deactivated.
X
For safety reasons, you should remov ethe
key from the ignition lock.
or
X Switc hoff th eengine using the Start/Stop
butto nand ope nthe driver's door.
X Remove the cause of the obstruction.
X Switc hthe windscreen wiper sback on.
The windscreen wipers are inoperative The windscreen wiper drive is malfunctioning.
X
Select another wiper spee donthe combi-
nation switch.
X Hav ethe windscreen wiper schecked at a
qualified specialist workshop.
Th es pra ynozzles are misaligned The windscreen washer fluid from the spray
nozzles no longer hits the centre of the wind-
screen. The spray nozzles are misaligned.
X Have the spray nozzles adjusted at aquali-
fied specialist workshop. 118
Windscreen wipersLights and windscreen wipers