2011 MERCEDES-BENZ M-CLASS SUV window
[x] Cancel search: windowPage 170 of 389

safety reasons, get out of the vehicle first
and survey the off-road route.
R chec kthe depth of water before fording
river sand streams.
R loo kout for obstacle ssuch as rocks, holes,
tree stumps and furrows.
R take care when turning on an uphil lor
downhill slope and when turning at sharp
angles. The vehicle could otherwise tip
over.
R always keep the side windows and the pan-
oram asliding sunroof closed during the
journey.
R do not stray from marked routes or paths.
i Information abou tretrofitting special all-
ter rain tyres is available from any
Mercedes-Benz Service Centre. H
Environmental note
Protection of the environmen tisofprimary
importance .Trea tnature with respect.
Observe all prohibiting signs.
Checklist before drivin goff-road X
Engine oi llevel: checkthe engin eoil and
top it up if necessary.
When drivin gonsteep gradients, the oil
level must be sufficiently hig htoensure a
correct oil supply in the vehicle.
X AdBlue ®
tank (BlueTEC vehicl es):check
the fluid leve land, if necessary, refill to the
maximum (13 l) (Y page157).
X Tyre-chang etool kit: check that the jack
is working and make sure you have the
wheelbrace, arobust tow cabl eand afold-
ing spade in the vehicle.
X Wheels and tyres: checkthe tyr etread
depth and tyre pressure.
X Check for damag eand remove any foreign
objects, e.g. small stones, from the
wheels/tyres.
X Repl acea ny missing valve caps. X
Repl aced ented or damaged wheels.
X Wheels: dented or bent wheels can lead to
al oss of tyr epressure and damag etot he
tyr eb ead. Before driving off-road, check
the wheels and replace them if necessary.
Checklist after driving off-road !
If you detect damage to the vehicle after
driving off-road, have the vehicle checked
immediately at aqualified specialist work-
shop.
Driving over rough terrain places greater
demands on your vehicle than driving on nor-
mal roads. After driving off-road, check the
vehicle. This allow syou to detec tdamage
promptly and reduce the risk of an accident
to yourself and other road users.
X Vehicles with the ON&OFFROAD pack-
age: activate the on-road program
(Y page 222).
X Vehicles without the ON&OFFROAD
package: deactivate the on-road program
(Y page 222).
X Deactivate the LOW RANGE off-road gear
(Y page 223).
X Deactivate DSR (Y page 220).
X Lower the vehicle level again to alevel suit-
able to the road conditions, e.g. to the high-
way/high-speed level.
X Clean the headlamps and rear lights and
check for damage.
X Clean the front and rear licence plates.
X Clean the wheels/tyres with awater jet and
remove any foreign objects.
X Clea nthe wheels, wheel arches and the
vehicle underside with awater jet; check
for any foreign objects and damage.
X Check whethe rtwigs or other parts of
plants have become trapped. These
increase the risk of fire and can damage
fuel pipes, brake hose sorthe rubber bel-
lows of the axl ejoint sand propeller shafts.
X After the trip, examine without fail the
entire undercarriage, wheels ,tyres, brakes, Driving tips
167Drivingand park ing Z
Page 240 of 389
For further information on disp
laying the
transmission position, see (Y page 146).
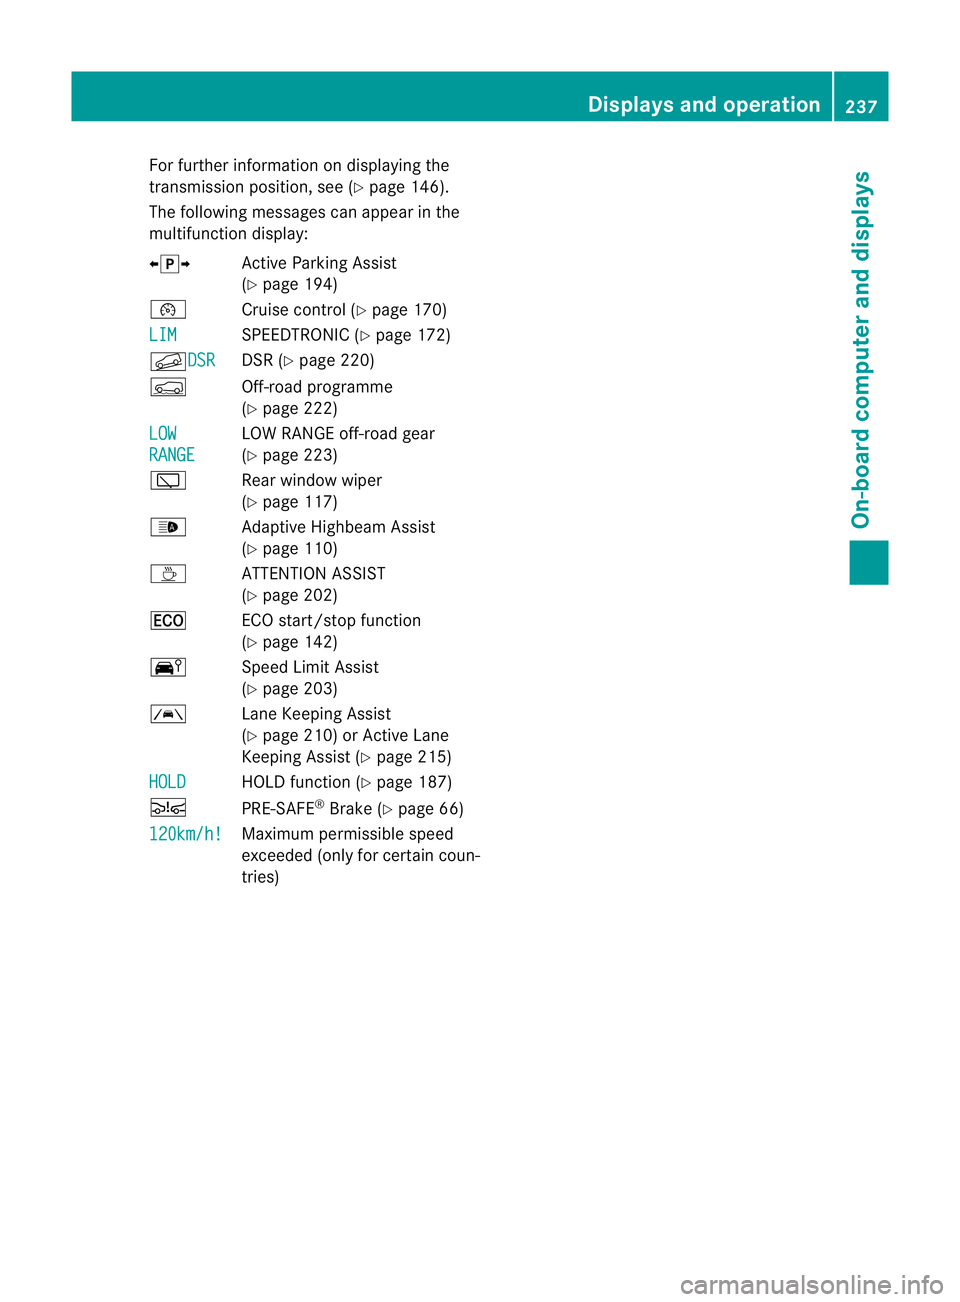
The following messages can appea rinthe
multifunction display:
Xj Y Active Parking Assist
(Y page 194)
¯ Cruise control (Y page 170)
LIM SPEEDTRONIC (Y
page 172)
fDSR DSR (Y
page 220)
Ç Off-road programme
(Ypage 222)
LOW RANGE LOW RANGE off-road gear
(Y page 223)
è Rear window wiper
(Ypage 117)
_ Adaptive Highbea mAssist
(Y page 110)
À ATTENTION ASSIST
(Y page 202)
¤ ECOs tart/stop function
(Y page 142)
Ä Speed Limit Assist
(Ypage 203)
à Lane Keeping Assist
(Y page 210) or Active Lane
Keeping Assist (Y page 215)
HOLD HOLD function (Y
page 187)
Ä PRE-SAFE®
Brake (Y page 66)
120km/h! Maximum permissible speed
exceeded (only for certain coun-
tries) Displays and operation
237On-boardcomputerand disp lays Z
Page 265 of 389
Displa
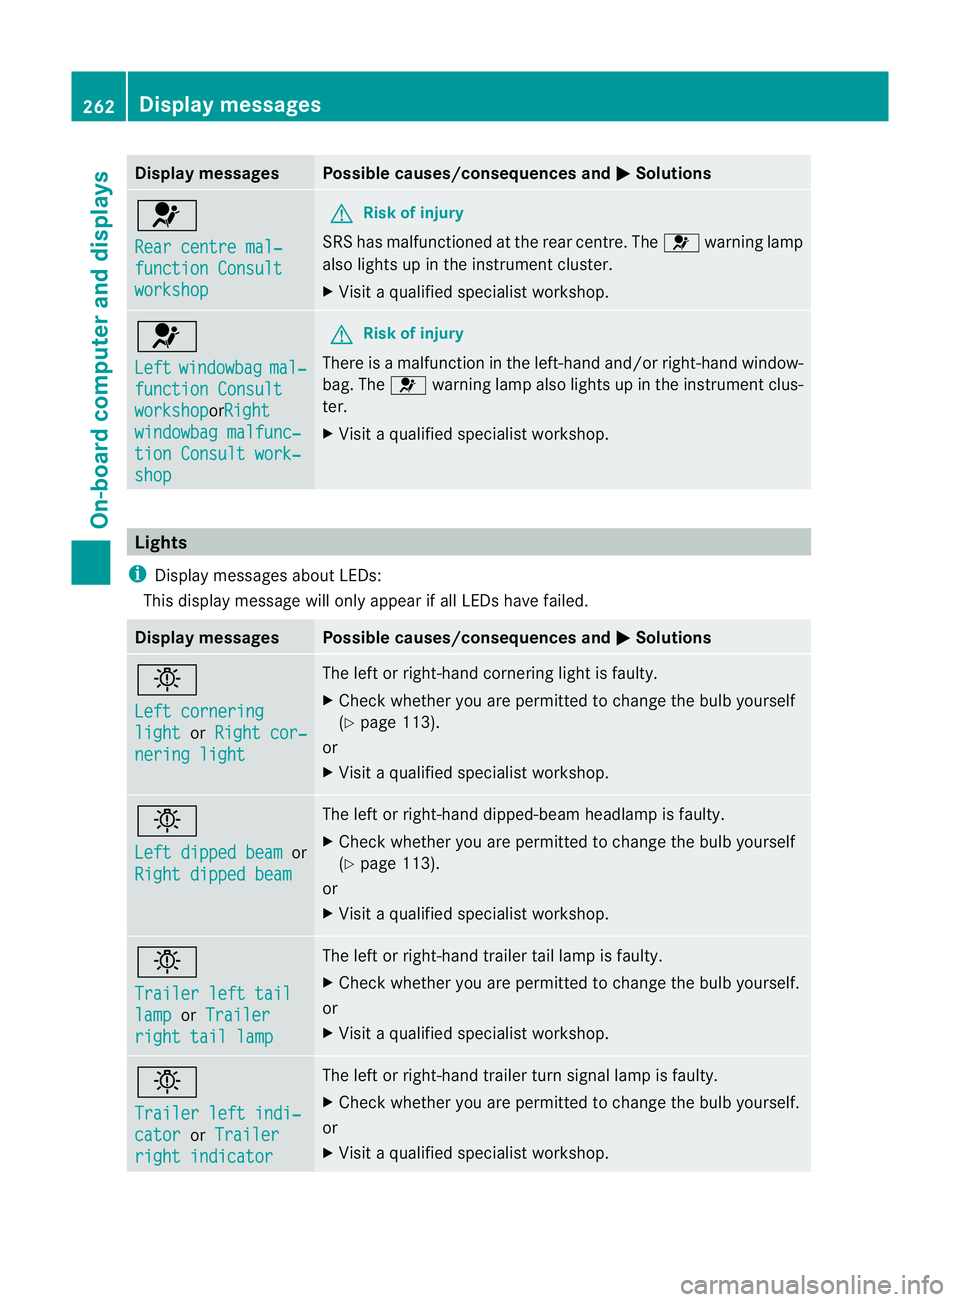
ymessages Possible causes/consequences and
M Solutions
6
Re
ar centre mal‐ function Consult
workshop G
Risk of in
jury
SRS has malfunctioned at the rear centre. The 6warning lamp
als olights up in th einstrument cluster.
X Visi taqualified specialist workshop. 6
Left
windowbag mal‐
function Consult
workshop orR
ight windowba
gmalfunc‐ tion Consult work‐
shop G
Ris
kofi njury
There is amalfunction in the left-han dand/or right-han dwindow-
bag. The 6warnin glamp also lights up in the instrumen tclus-
ter.
X Visit aqualified specialist workshop. Lights
i Display messages about LEDs:
This display message will only appear if all LEDs have failed. Displa
ymessages Possible causes/consequences and
M Solutions
b
Le
ft cornering light or
Right cor‐ nering light Th
eleft or right-hand cornering light is faulty.
X Chec kwhether you ar epermitted to change the bulb yourself
(Y page 113).
or
X Visit aqualified specialist workshop. b
Left dipped beam
or
Righ tdipped beam Th
eleft or right-hand dipped-beam headlamp is faulty.
X Check whether you are permitted to change the bulb yourself
(Y page 113).
or
X Visit aqualified specialist workshop. b
Traile
rleft tail lamp or
Trailer right tail lamp Th
eleft or right-hand trailer tail lam pisfaulty.
X Check whethe ryou ar epermitted to change the bulb yourself.
or
X Visit aqualified specialist workshop. b
Traile
rleft indi‐ cator or
Trailer right indicator Th
eleft or right-hand trailer tur nsignal lamp is faulty.
X Check whether you are permitted to change the bulb yourself.
or
X Visit aqualified specialist workshop. 262
Display messagesOn-board computer and displ
ays
Page 304 of 389
or fragile objec
ts.W hen brakin gsharply,
changing direction quickly or in the even tof
an accident ,the bag hooks will not secur ethe
item ssufficiently. This could result in injury to
yourself or others.
! The bag hoo kcan bear amaximum load
of 3k g. Do not use it to secur eaload.
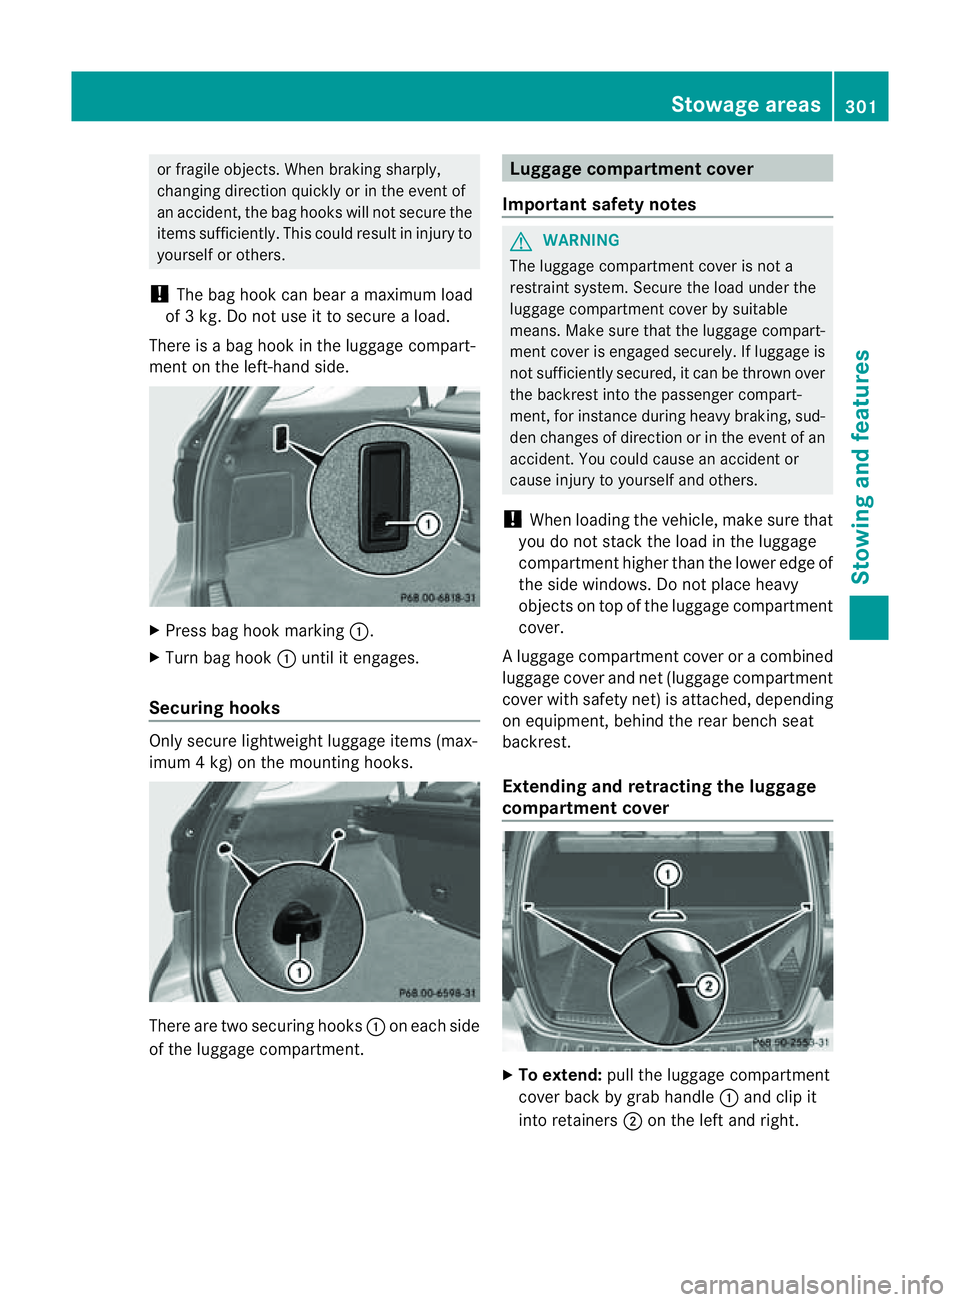
There is abag hook in the luggag ecompart-
men tont he left-hand side. X
Press bag hook marking :.
X Tur nbag hook :until it engages.
Securing hooks Only secure lightweight luggag
eitems (max-
imum 4kg) on the mounti nghooks. There ar
etwo securing hooks :on each side
of the luggage compart ment. Luggag
ecompartment cover
Important safety notes G
WARNING
The luggage compartment cover is not a
restraint system. Secur ethe load unde rthe
luggag ecompart ment cover by suitable
means. Make sure that the luggage compart-
ment cover is engaged securely. If luggage is
not sufficiently secured, it can be thrown over
the backres tinto the passenger compart-
ment, for instance during heavy braking, sud-
den change sofdirection or in the event of an
accident .You coul dcause an accident or
cause injury to yourself and others.
! When loading the vehicle, make sure that
you do not stack the load in the luggage
compartment higher than the lower edge of
the side windows .Donot plac eheavy
object sontop of the luggage compartment
cover.
Al uggage compartment cover or acombined
luggage cover and net (luggage compar tment
cove rwith safety net) is attached, depending
on equipment, behind the rear bench seat
backrest.
Extending and retracting the luggage
compa rtment cover X
To extend: pull the luggage compartment
cover back by grab handle :and clip it
int or etainers ;on the left and right. Stowage areas
301Stowingandfeatur es Z
Page 319 of 389
Frequencies for th
egarage doo ropener Th
er adio typ eapproval number and th efrequency range for th egarag edoor opener can be
fou ndonthe Interne tat: http://www.mercedes-benz.de/betriebsanleitung. Floormats
G
WARNING
Make sure that there is sufficient clearance
around the pedals when floormats are used,
and that the floormats are properly secured.
The floormats must be correctly secured at all
times using retainer sand press-studs.
Before you drive off ,chec kthe floormats and
secur eifnecessary. Afloormat which is not
properly secured can slip and, thereby, inter-
fere with the movemen tofthe pedals.
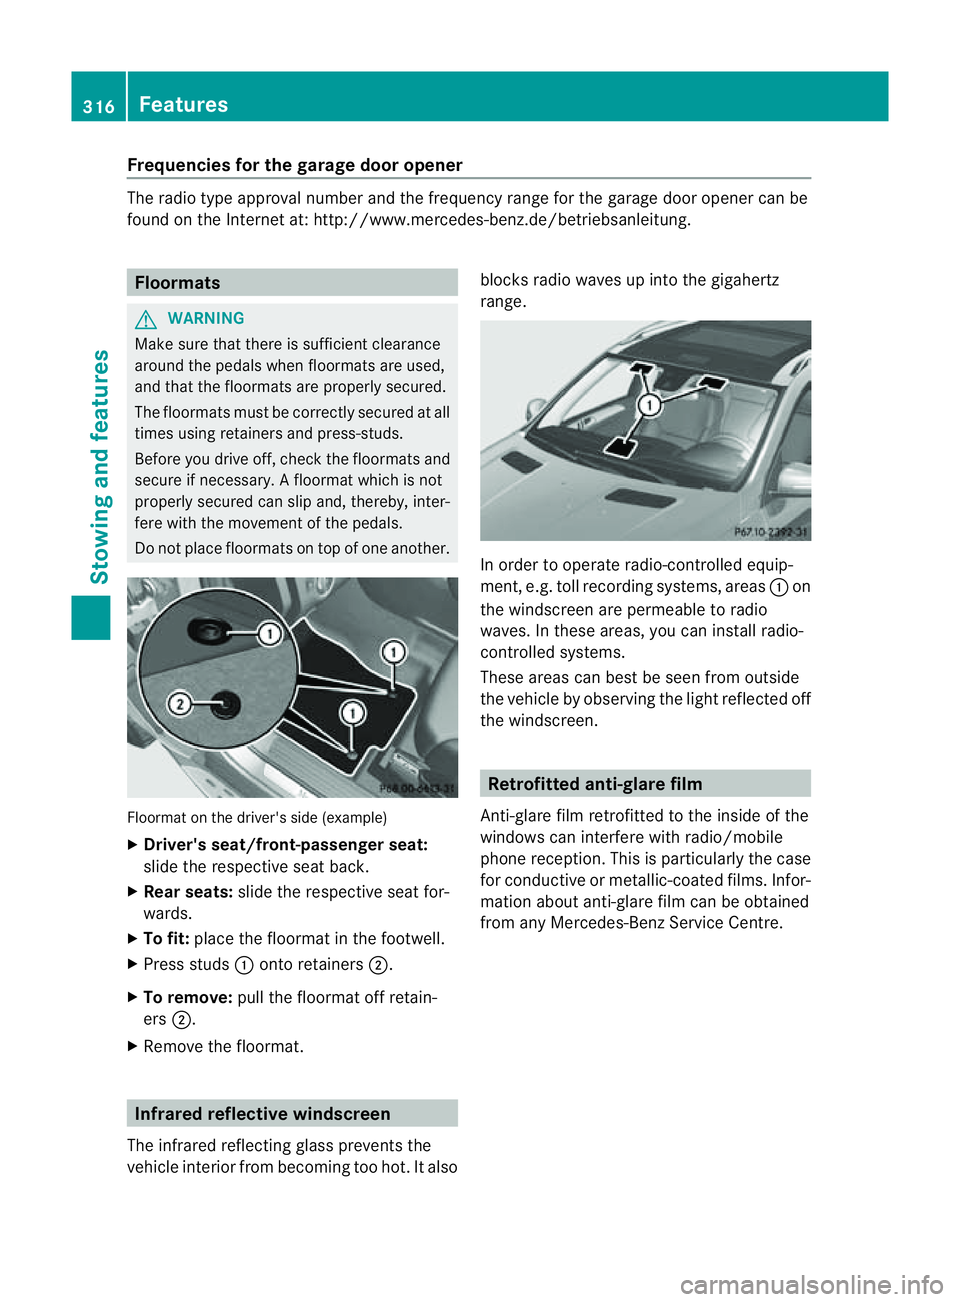
Do not plac efloormats on top of one another. Floormat on the driver's side (example)
X
Driver's seat/front-passenger seat:
slide the respective seat back.
X Rear seats: slide the respective seat for-
wards.
X To fit: place the floorma tinthe footwell.
X Press studs :ontoretainers ;.
X To remove: pull the floormat off retain-
ers ;.
X Remov ethe floormat. Infrared reflective windscreen
The infrared reflecting glass prevents the
vehicle interior from becoming too hot. It also blocks radio waves up int
othe gigahertz
range. In orde
rtooperateradio-controlled equip-
ment, e.g. toll recording systems, areas :on
the windscreen are permeable to radio
waves. In these areas, you can install radio-
controlled systems.
Thes earea scan best be seen from outside
the vehicle by observing the light reflected off
the windscreen. Retrofitted anti-glar
efilm
Anti-glar efilm retrofitted to the inside of the
windows can interfer ewith radio/mobile
phone reception. This is particularly the case
for conductive or metallic-coated films. Infor-
mation about anti-glar efilm can be obtained
from any Mercedes-Ben zService Centre. 316
FeaturesStowing and features
Page 328 of 389
X
Release the electric parking brake.
X Switc hoff the ig nition and leav ethe key in
th ei gnition lock.
! Mak esuret hat:
R the side windows and slidin gsunroo fare
close dcompl etely.
R the blower for the ventilation/heating is
switched off (OFF button is depressed).
R the windscreen wiper switch is at posi-
tion 0.
The vehic lecoul dotherwise be damaged.
After using an automatic car wash, wip eoff
wa xfrom th ewindscreen and the wiper
blades. This wil lprevent smears and red uce
wiping noises cause dbyresidue on the wind-
screen.
Washing by hand In some countries, washing by hand is only
allowed at speciall
yequipped washing bays.
Observe the lega lrequirements for each indi-
vidual country.
X Do not use hot water and do not wash the
vehic lein direct sunlight.
X Use asoft sponge to clean.
X Use amild cleaning agent, such as acar
shampoo approved by Mercedes-Benz.
X Thoroughly hos edown the vehicle with a
gentle jet of water.
X Do not point the water jet directly towards
the air inlet.
X Use plenty of water and rinse out the
sponge frequently.
X Rinse the vehicle with clean water and dry
thoroughly with achamois.
X Do not let the cleanin gagent dry on the
paintwork.
When using the vehicle in winter, remove all
traces of roa dsalt deposits carefully and as
soon as possible. High-pressure cleanin
gequipment G
WARNING
Do not use high-pressure cleaners with circu-
lar-jet nozzles (dirt grinders) to clean your
vehicle, in particular the tyres. You could oth-
erwis edamage the tyres and cause an acci-
dent.
! Always maintain adistance of at least
30 cm between the vehicle and the high-
pressure cleaner nozzle. Information about
the correct distance is available from the
equipment manufacturer.
Move the high-pressure cleaner nozzle
around when cleaning your vehicle.
Do not aim directly at any of the following:
R tyres
R door gaps, roof gaps, joint setc.
R electrical components
R battery
R connectors
R lights
R seals
R trim elements
R ventilatio nslots
Damaged seals or electrical components
can lead to leaks or failures.
Cleanin gthe whee ls !
Do not use acidic whee lcleaning products
to remov ebrake dust .This could damage
wheel bolts and brake components.
! Do not par kupthe vehicle for an extended
period straight after cleanin git, particularly
after having cleaned the wheels with wheel
cleaner. Wheel cleaners could cause
increased corrosio nofthe brake discs and
brake pads/linings. For this reason, you
should drive for afew minutes after clean-
ing. Brakin gheats the brak ediscs and the
brake pads/linings, thus drying them. The
vehicle can then be parked up. Care
325Maintenance andcare Z
Page 329 of 389

Cleaning th
epaintwork Scra
tches, corrosiv edeposits ,area saffected
by corrosion and damage ca used by inade-
quate care canno talways be completely
repaired. In such cases, visit aqualified spe-
cialist workshop, e.g. aMercedes-Benz
Servic eCentre.
X Remov eimpurities immediately, where
possible, whilst avoiding rubbing to ohard.
X Soak insect remain swith insec tremover
and rinse off the treated area safterwards.
X Soa kbird droppings with water and rinse
off the treated areas afterwards.
X Remove coolant, brak efluid, tree resin,
oils, fuels and greases by rubbin ggently
with acloths oaked in petroleum ether or
lighter fluid.
X Use tar rem overtor emove tar stains.
X Use silicone rem overtor emove wax.
! Do not affix:
R stickers
R films
R magnetic plates or simila ritems
to painted surfaces. You could otherwise
damage the paintwork.
Car eand treatment of matt paintwo rkIf
your vehicle has aclear mat tfinish, observe
the followin ginstructions in order to avoid
damage to the paintwork due to incorrect
care.
These notes also appl ytolight alloy wheels
with aclear mat tfinish.
! Neve rpolish the vehicle or the light alloy
wheels. Polishing makes the paintwork
shiny. !
The following ma ycause the paint to
become shiny and thus reduce the matt
effect:
R Vigorous rubbing with unsuitable mate-
rials.
R Frequent use of car washes.
R Washing the vehicle in direct sunlight.
! Never use paint cleaner, buffing or pol-
ishing products, or glos spreserver, e.g.
wax .These product sare onl ysuitable for
high-glos ssurfaces. Thei ruse on vehicles
wit hm att finish leads to considerable sur-
face damage (shiny, spotted areas).
Always have paintwork repairs performed
at aq ualified specialist workshop, e.g. a
Mercedes-Benz Servic eCentre.
! Do not use wash programs with ahot wax
treatment under any circumstances.
i The vehicle should preferably be washed
by hand using asoft sponge, car shampoo
and plent yofwater.
i Use only insect remover and car shampoo
from the range of recommended and
approved Mercedes-Benz care products.
Cleaning the windows G
WARNING
Switch off the windscreen wipers and remove
the key from the ignition lock before cleaning
the windscreen or the wiper blades. On vehi-
cles with KEYLESS-GO, press the Start/Stop
button repeatedly until all indicator lamps in
the instrument cluster have gone off. The
windscreen wipers could otherwise move and
injure you.
X Clean the inside and outside of the win-
dows with adamp cloth and acleaning
agent that is recom mended and approved
by Mercedes-Benz.
! Do not use dry cloths, abrasive products,
solvents or cleaning agents containing sol-
vent stoc lean the inside of the windows. 326
CareMaintenance and care
Page 330 of 389

Do not touch the insides of the windows
with hard objects
,e.g.ani ce scraper or
ring .There is otherwise arisk of damaging
the windows.
! Clean the water drainage channels of the
windscreen and the rear window at regular
intervals. Deposits such as leaves, petals
and pollen may under certain circumstan-
ces prevent water from drainin gaway .This
can lead to corrosion damage and damage
to electronic components.
Cleaning th ewiper blades G
WARNING
Switch off the windscreen wipers and remove
the key from the ignition lock befor ecleaning
the windscreen or the wiper blades. On vehi-
cles with KEYLESS-GO, press the Star t/Stop
butto nrepeatedly unti lall indicator lamps in
the instrumen tcluster have gone off. The
windscreen wipers could otherwise move and
injur eyou.
! Do not pull on the wiper blade. Otherwise,
the wiper blade could be damaged.
! Do not clean wiper blades too often and
do not rub them too hard. Otherwise, the
graphit ecoatin gcould be damaged. This
coul dcause wiper noise.
X Fold the wiper arms away from the wind-
screen.
X Clea nthe wiper blades carefully usin ga
damp cloth.
X Fold the windscreen wipers back again
befor eswitching on the ignition.
! Hold the wiper arm securely when folding
back. The windscreen could be damaged if
the wiper arm hits against it suddenly.
Cleanin gthe exterio rlighting X
Clean the plastic lenses of the exterior
lighting using awet sponge and amild
cleaning agent, e.g. Mercedes-Ben zcar
shampoo or cleanin gcloths. !
Only use cleanin gagents or cleaning
cloth sthat ar esuitable for plastic lenses.
Unsuitable cleanin gagents or cleaning
cloth scoul dscratch or damag ethe plastic
lenses of th eexteri or lighting.
Clea ningthe sensors X
Clean sensors :of th edriving systems
with water, car shampoo and asoftc loth.
! If you clean the sensor swithahigh-pres-
sure cleaner, mak esure that you keep a
distanc eofatl east 30 cm between the
vehicle and the high-pressure cleaner noz-
zle. Information about the correc tdistance
is available from the equipment manufac-
turer.
Cleaning th ereversing camera Care
327Maintenance andcare Z