2011 MERCEDES-BENZ M-CLASS SUV trailer
[x] Cancel search: trailerPage 200 of 389
X
Shift the transmissio ntoposition Dwhile
the vehicle is stationary.
Active Parkin gAssist immediately steer sin
the othe rdirection.
The Park Assist active Accelerate and brake Observe surroundings mes-
sage appears in the multifunction display.
i You will achieve the best parkin gresults
by waiting for the steerin gprocedure to
complete before moving forwards.
X Drive forward sand be ready to brake at all
times.
X Stop as soon as PARKTRONIC sounds the
continuou swarning tone, if not before.
The Park Assist active Select R Observe surroundings message appears in
the multifunc tion display.
X Further transmission shift smay be neces-
sary.
As soon as the parking procedure is com-
plete, the Park Assist switched off mes-
sage appears in the multifunc tion display.
PARKTRONIC con tinues to be available.
X Manoeuvre if necessary.
X Always observe the warning message sdis-
played by PARKTRONI C(Ypage 192).
Cancell ingA ctive Parking Assist You can cancel Active Parking Assist at any
time.
X Stop the movemen tofthe multifunc tion
steerin gwheel or steer yourself.
Ac tive Parkin gAssist will be cancelled at
once. The Park Assist cancelled mes-
sage appears in the multifunc tion display.
or
X Press the PARKTRONIC button on the
cen trec onsole (Y page 192).
PARKTRONIC is switched off and Active
Parkin gAssist is immediately cancelled.
The Park Assist cancelled message
appears in the multifunc tion display. Active Parkin
gAssist is cancelled automati-
cally if:
R parkin gusing Ac tive Parkin gAssist is no
longe rpossible.
R you ar edriving faster than 10 km/h.
R aw heel spins and ESP ®
intervenes or fails.
The ä warnin glamp lights up in the
instrument cluster.
Aw arning ton esounds. The par king spa ce
sym boldisappear sand the ParkA ssist cancelled messag
eappear sinthe multi-
functio ndisplay.
When Activ eParking Assist is cancelled, you
must steer again yourself.
Towing atrailer For vehicles with
atrailer to whitch, the min-
imum length for parking spaces is slightly
increased.
If yo uhavea ttache datrailer to your vehicle,
yo us houl dnot us eActiv eParking Assist.
Once the electrica lconnection is established
between your vehicl eand the trailer, Active
Parking Assist is no longer available .PARK-
TRONIC is deactivated for the rear area. Reversin
gcamera
Important safety notes Th
er eversing camera is an optica lparking
and manoeuvring aid. It shows the area
behind your vehicle with guide lines in the
COMAND displ ay. G
WARNING
Make sure tha tnopersons or animals are in
the manoeuvring range. Otherwise, they
could be injured.
The reversing camera is in the handle on the
tailgate. Driving systems
197Drivingand park ing Z
Page 201 of 389
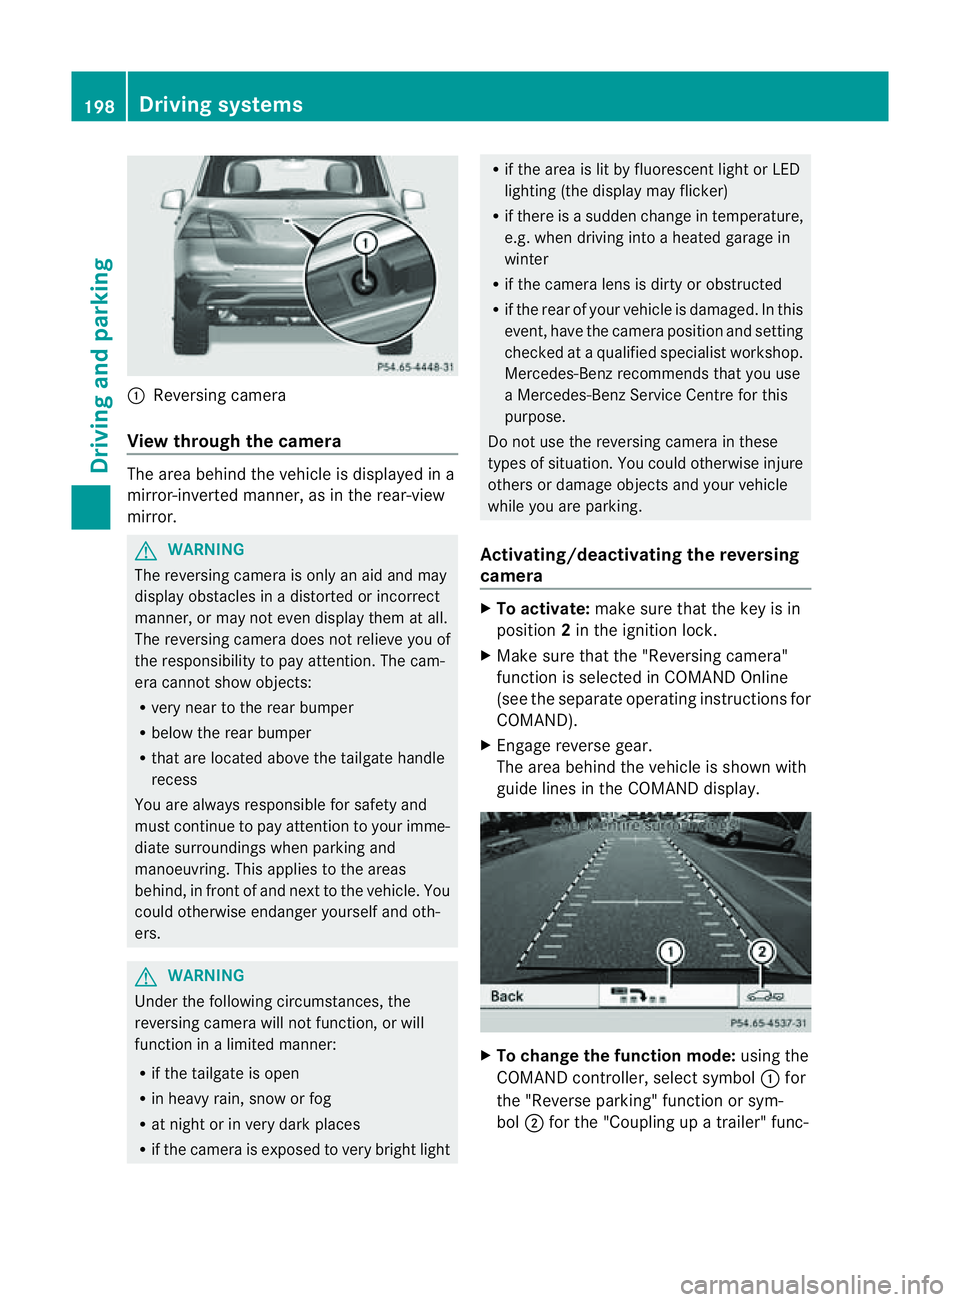
:
Reversin gcamera
View through th ecamera Th
ea rea behind the vehicle is displaye dina
mirror-inverted manner, as in the rea r-view
mirror. G
WARNING
The reversin gcamera is only an aid and may
display obstacles in adistorted or incorrect
manner, or may no teven display them at all.
Th er eversing camera does not relieve you of
the responsibility to pay attention. The cam-
era cannot show objects:
R ver ynear to the rear bumper
R belo wthe rea rbumper
R that are located above the tailgate handle
recess
You are alway sresponsible for safet yand
must continue to pay attentio ntoyourimme-
di at es urroundings when parking and
manoeuvring. This applie stothe areas
behind, in front of and nex ttothe vehicle. You
coul dotherwise endang er yourself and oth-
ers. G
WARNING
Under the following circumstances, the
reversing camera will not function, or will
function in alimited manner:
R if the tailgate is open
R in heavy rain, snow or fog
R at night or in very dark places
R if the camer aisexposed to very brigh tlight R
if the area is lit by fluorescen tlight or LED
lighting (the display may flicker)
R if there is asudden change in temperature,
e.g. when driving into aheated garage in
winter
R if the camera lens is dirt yorobstruc ted
R if the rear of your vehicle is damaged. In this
event ,have the camera positio nand setting
checked at aqualified specialist workshop.
Mercedes-Benz recommends that you use
aM ercedes-Benz Servic eCentr efor this
purpose.
Do not use the reversin gcamera in these
types of situation. You could otherwise injure
others or damage objects and your vehicle
while you are parking.
Activating/deactivating the reversing
camera X
To activate: make sure that the key is in
position 2in the ignition lock.
X Make sure that the "Reversing camera"
function is selected in COMAND Online
(see the separate operating instructions for
COMAND).
X Engage reverse gear.
The area behind the vehicle is shown with
guide lines in the COMAND display. X
To change the function mode: using the
COMAND controller, select symbol :for
the "Reverse parking" function or sym-
bol ;for the "Coupling up atrailer" func- 198
Dri
ving systemsDriving and parking
Page 202 of 389

tion. See the separate COMAND operating
instructi
ons.
The symbo lofthe selected function is high-
lighted.
To deactivate: the reversing camera is deac-
tivated if you:
R shift the transmission to position P
R drive forward ten metres
R shift the transmission from position Rto
anothe rposition (after 15 seconds)
R drive forwards at aspeed of over
10 km/h
Displays in the COMAN Ddisplay G
WARNING
Usin gthe reversing camera can be dangerous
if you ar ecolour-blin dorify our ability to dis-
tinguish colours is impaired.
Only use the reversin gcamera if you can see
and distinguis hbetween all the coloured
guide lines that are displayed by the reversing
camera in the COMAN Ddisplay. G
WARNING
Please note that objects not at ground level
may appea rtobefurther away than they
actually are. Thes einclude:
R the bumper of avehicle that is parked
behind your vehicle
R at railer drawbar
R theb all coupling of atrailer tow hitch
R thet ail-end of alorry
R slanted posts
The lines are only guides, not accurate meas-
urements of the distance to an obstacle.
Therefore, you should never pass the red line
when approachin ganobstacle. You could oth-
erwise cause an accident and injur eyourself
and others. :
Vehicle width includin gexterior mirrors
; Vehicl ewidth including wheel extremities
= Yellow guide line at adistance of approx-
imately 4.0 mfrom th erear area
? Red lane of vehicle width at curren tsteer-
ing whee langle (dynamic)
A Yellow lane of tyres at current steering
wheel angle (dynamic)
B Bumper
C Red guid eline at adistance of approx-
imately 0.2 5mfrom th erear area
D Yellow guide line at adistance of approx-
imately 1.0 mfrom th erear area
E White lane of vehicle width with steering
wheel straight (static)
F Vehicle centre axle (marker assistance)
The guide lines are only shown when the
transmission is in position R.
The distance specification sonly appl yto
objec tsthat are at ground level. Driving systems
199Drivingand park ing Z
Page 204 of 389
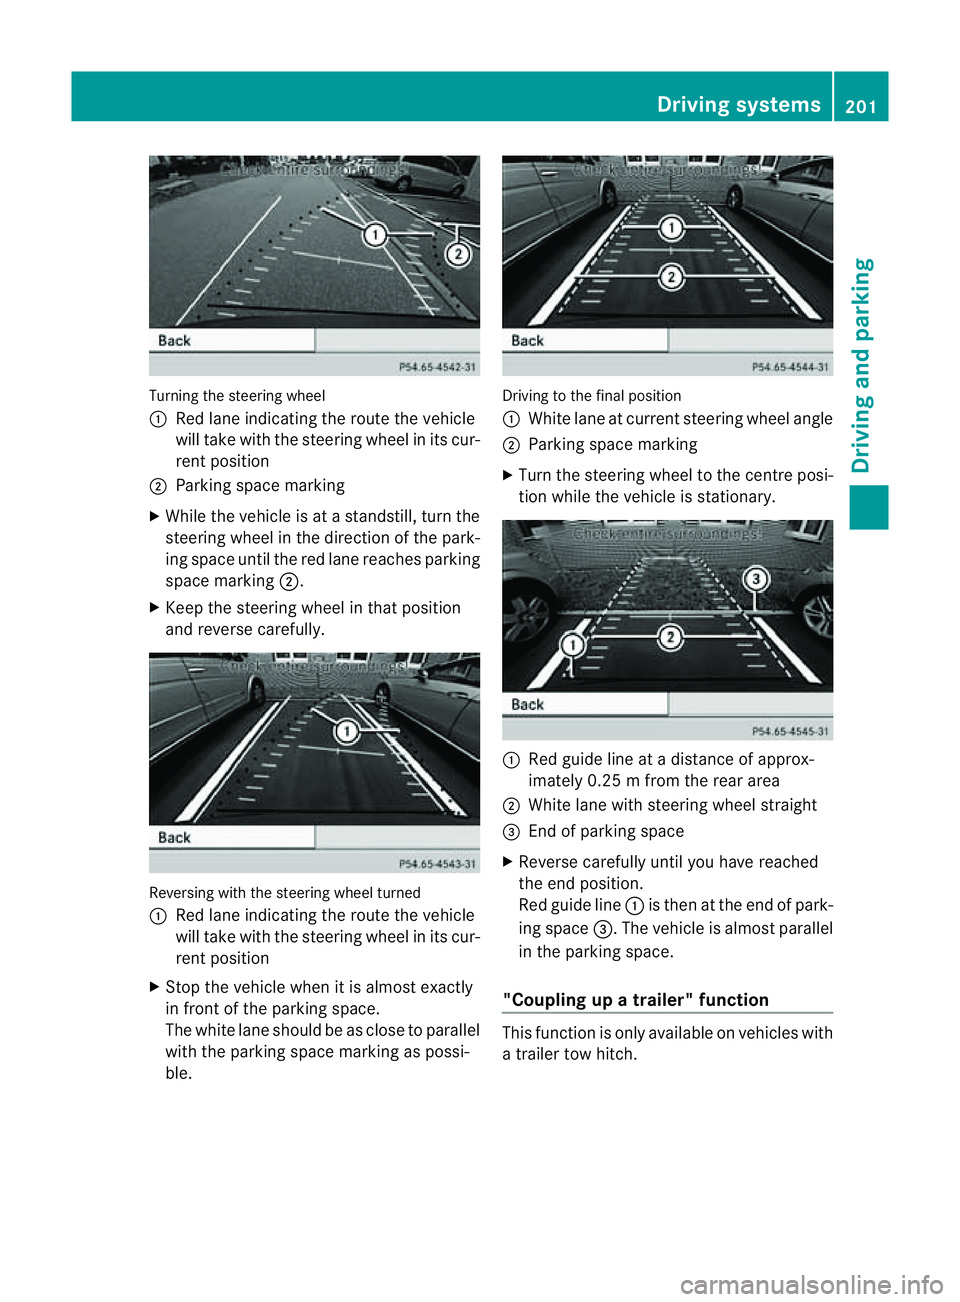
Turning the steering wheel
:
Red lane indicating the rout ethe vehicle
will tak ewith the steerin gwheel in its cur-
ren tposition
; Parkin gspace marking
X While the vehicle is at astandstill, turn the
steerin gwheel in the direction of the park-
ing spac euntil the red lane reache sparking
space marking ;.
X Keep the steering wheel in that position
and reverse carefully. Reversing with the steering wheel turned
:
Red lane indicating the route the vehicle
will take with the steering wheel in its cur-
rent position
X Stop the vehicle when it is almost exactly
in front of the parking space.
The white lane should be as close to parallel
with the parking space markin gaspossi-
ble. Drivi
ngto the final position
: White lane at current steerin gwheel angle
; Parkin gspace marking
X Turn the steerin gwheel to the cen trep osi-
tion while the vehicle is stationary. :
Red guide line at adistance of approx-
imately 0.2 5mfrom th erear area
; White lane with steerin gwheel straight
= Endofp arking space
X Reverse carefully until you have reached
the end position.
Red guide line :is then at the end of park-
ing space =.The vehicle is almost parallel
in the parkin gspace.
"Coupling up atrailer" function Thi
sfunction is only available on vehicles with
at railer to whitch. Drivin
gsystems
201Drivingand park ing Z
Page 205 of 389
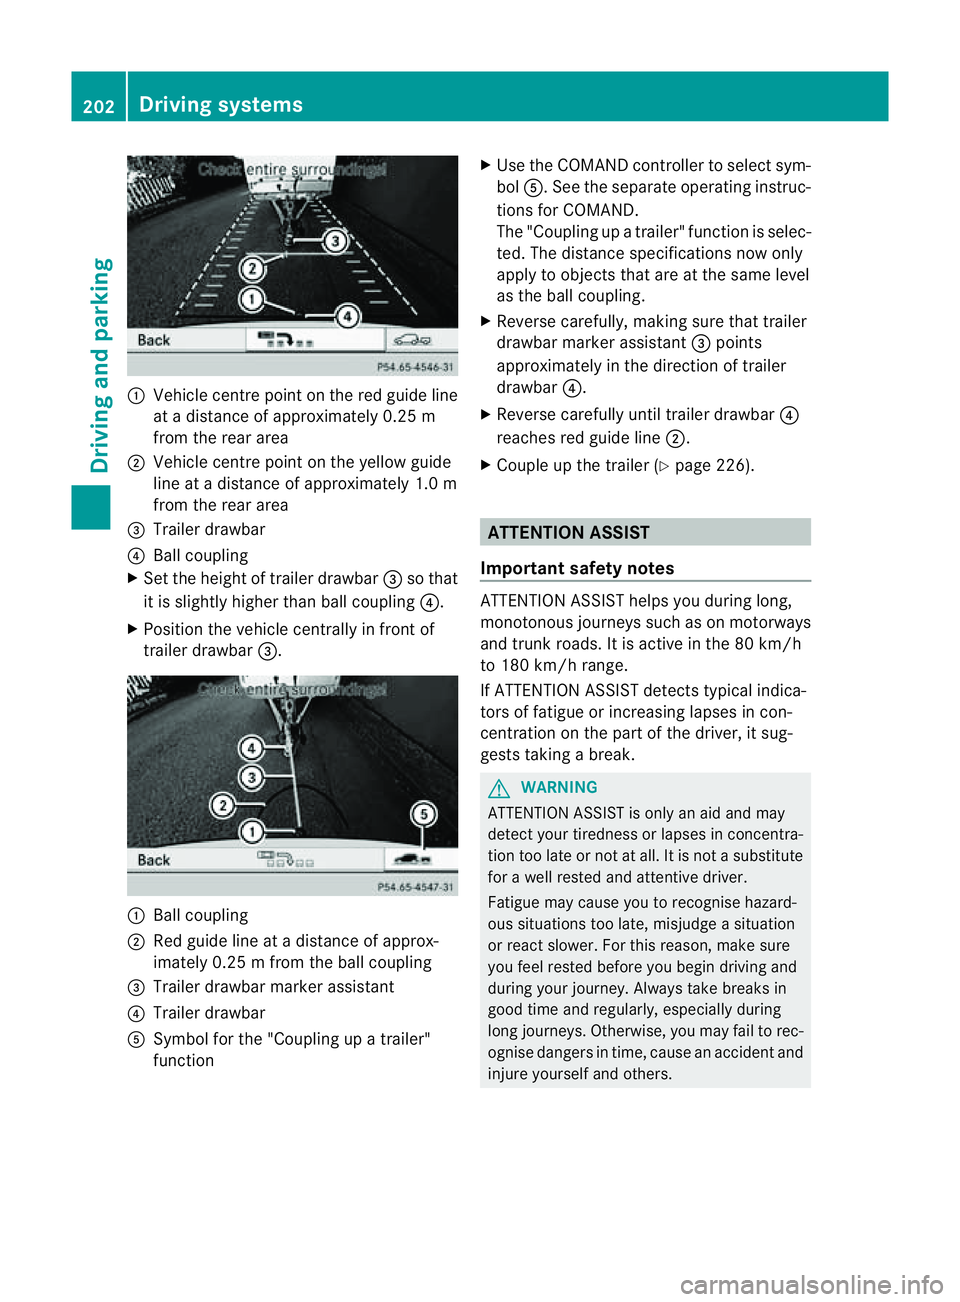
:
Vehicl ecentr epoint on the red guide line
at ad istance of approxim ately0.25 m
from the rear area
; Vehicl ecentr epoint on the yellow guide
line at adistance of approxim ately1.0 m
from the rear area
= Trailer drawbar
? Ball coupling
X Set the heigh toftrailer drawbar =so that
it is slightly higher than ball coupl ing?.
X Posi tion the vehicle centrally in front of
trailer drawbar =. :
Ball coupling
; Red guid eline at adistance of approx-
imately 0.2 5mfrom th eball coupling
= Trailer drawbar marker assistant
? Trailer drawbar
A Symbol for the "Coupling up atrailer"
function X
Use th eCOMAN Dcontroller to select sym-
bol A.S ee the separate operatin ginstruc-
tions for COMAND.
The "Coupling up atrailer" functio niss elec-
ted. The distan cespecifi cations now only
apply to obje ctst hat ar eatthe sam elevel
as the ball coupling.
X Reverse carefully, makin gsure that trailer
drawbar marker assistant =points
approximately in the direction of trailer
drawbar ?.
X Reverse carefully until trailer drawbar ?
reaches red guide line ;.
X Couple up the trailer (Y page 226). ATTENTION ASSIST
Important safet ynotes ATTENTION ASSIS
Thelps you during long,
monotonous jour neys such as on motorways
and trun kroads. It is active in the 80 km /h
to 180 km/ hrange.
If ATTENTION ASSIS Tdetects typical indica-
tors of fatigue or inc reasing lapses in con-
centration on the part of the driver, it sug-
gests takin gabreak. G
WARNING
ATTENTIO NASSIST is only an aid and may
detec tyour tiredness or lapses in concentra-
tion too late or not at all. It is not asubstitute
for aw ell reste dand attentiv edriver.
Fatigue may cause you to recognise hazard-
ou ss ituations to olate ,misjudge asituation
or reac tslower .For this rea son, make sure
you fee lreste dbefore you begin driving and
duri ngyour jour ney. Always tak ebreaks in
good time and regularly ,especiall yduring
long jour neys. Otherwise ,you may fai ltorec-
ognise danger sintime, caus eanaccidentand
injur eyours elfa nd others. 202
Driving systemsDriving and
parking
Page 213 of 389

the warning onl
yoccurs if the differenc ein
spee dislesst han 12 km/h.
The yellow indicator lamp goes out if reverse
gea rise ngaged. Blind Spot Assist is then
deactivated.
The brightness of the indicator/warning
lamps is adjusted automaticall yaccording to
the ambient light. G
WARNING
Blind Spot Assist is not active at speeds below
30 km/h, and the indicator lamps in the exte-
rior mirrors are yellow. Vehicles in the moni-
toring range are the nnot indicated.
Always pay attention to traffic condition sand
your surroundings .Otherwise, you may fail to
recognis edangers in time, cause an accident
and injure yoursel fand others.
Collisio nwarning
If av ehicle is detected in the mon itoring range
of Blind Spot Assis tand you switch on the turn
signal, adouble warnin gtone sounds. Red
warnin glamp :flashes .Ifthe tur nsignal
remains on, detected vehicles are indicated
by the flashing of red warnin glamp :.T here
ar enof urther warning tones.
Switching on Blind Spot Assist
X On vehicles without anavigation system,
make sure that the Becker ®
MAP PILOT is
connected; see the separate operating
instructions for Audio 20.
X Make sure that the radar senso rsystem
(Y page 249) and Blind Spot Assist
(Y page 245) are activated in the on-board
computer.
X Turn the key to position 2in the ignition
lock.
Warning lamps :ligh tupr ed in the exte-
rior mirror sfor approximately 1. 5seconds
and then tur nyellow.
Trailer towing
If you attach atrailer, make sure that yo uhave
correctly established the electrical connec-
tion. This can be accomplished by checking the trailer lighting
.Blind Spot Assist is then
deactivated. The indicator lamp in the exte-
rior mirrors lights up yellow, and the Blind Spot Assist currentl
yunavailable See Owner's Manual message appe
arsin
the multifunction display.
i You can deactivate the indicato rlamps in
the exterior mirrors.
To do so, switch off Blind Spot Assis tif:
R thek ey is in position 2in the ignition
lock.
R the engine is not running.
R the electrical connection to the trailer
has been established.
Lane Keeping Assist Important safety notes
Lan
eKeeping Assist monitor sthe area in
front of your vehicle by means of acamera at
the top of the windscreen. Lane Keeping
Assis tdetect slane markings on the road and
warns you before you leave your lane unin-
tentionally. :
Lane Keeping Assis tcamera
If you have chose nthe Displa yunit Speed-/odometer (Y
page 246) functio nin
the on-board computer and select km as the
unit of measurement, Active Lane Keeping
Assist is active from speeds of 60 km/h. If
the miles displa
yunit is selected ,the assis-
tance range begin sat40mph. 210
Driving systemsDriving and parking
Page 218 of 389

R
the Off-roa dprogra misa ctivate d(vehicles
without th eON&OFFROAD package).
R Off-road progra m1or2isactivated(vehi-
cle sw ith the ON&OFFROAD package).
R the LOW RANGE off-road gear is activated
(vehicles with the ON&OFFROAD package).
R al oss of tyr epressure or adefectiv etyre is
detected.
Activating Active Blind Spot Assist
X On vehicles without anavigation system,
make sure that the Becker ®
MAP PILOT is
connected; see the separate operating
instructions for Audio 20.
X Make sure that the radar senso rsystem
(Y page 249) and Active Blind Spot Assist
(Y page 245) are activated in the on-board
computer.
X Turn the key to position 2in the ignition
lock.
Warning lamps :ligh tupr ed in the exte-
rior mirror sfor approximately 1. 5seconds
and then tur nyellow.
Trailer towing
If you attach atrailer, make sure that yo uhave
correctly established the electrical connec-
tion. This can be accomplished by checking
the trailer lighting .Active Blind Spo tAssist is
then deactivated. The indicator lam plights up
yellow in the exterior mirrors and the ActiveBlind Spot Assist currently unavail‐
able Se
eOwner's Manual message
appe arsint he multifunction display.
Active Lan eKeeping Assist Import
ants afety notes
Active Lane Keeping Assis tmonitors the area
in front of your vehicle by means of acamera
at the top of the windscreen. Active Lane
Keeping Assis tdetect slane markings on the
road and warns you before you leave your
lane unintentionally .Ifyou do not react to the
warning, alane-correcting application of the
brakes can bring the vehicle back into the
original lane. :
Active Lane Keeping Assis tcamera
If you have selected the Displayunit Speed-/odometer (Y
page 246) function in
th eo n-board compute rand select km as the
unit of measurement, Active Lane Keeping
Assist is active from speeds of 60 km/h. If
the miles display unit is selected
,the assis-
tan ce ra nge begins at 40 mph. G
WARNING
Active Lane Keeping Assist doe snot keep
your vehicle in its lane. It is only an aid and
may detec tthe lan emarkings on the road
incorrectly or not at all.
The system may be impaired or may not func-
tion if:
R several or no lane markings for asingle lane
are present.
R there is poor visibility, e.g. due to insuffi-
cient illumination of the road, or due to
snow, rain, fog or spray.
R there is glare, e.g. from oncoming traffic,
the sun, or reflec tion from other vehicles.
R the windscreen is dirty, misted up or cov-
ered, for insta ncebyasticker, in the vicinity
of the camera.
R the lane markings are worn away ,dark or
covered up, e.g. by dirt or snow.
R the distance to the vehicle in front is too
small and the lane markings thus cannot be
detected.
R the lane markings on the road are unclear,
e.g. near roadworks. Driving systems
215Drivingand park ing
Z
Page 220 of 389
your surroundings. Otherwise, you may fail to
recognise danger
sintime,cause an accident
and injur eyourself and others.
No lane-correcting brak eapplication occurs
if:
R you clearly and acti vely steer ,brake ,or
accelerate.
R you cut the corner on ashar pbend.
R you have switched on the tur nsignals.
R ad riving safet ysystem intervenes, such as
ESP ®
,P RE-SAFE ®
Brak eorA ctive Blind
Spot Assist.
R you have adopted asport ydriving style with
high cornerin gspeeds or high rates of
acceleration.
R on vehicles with atrailer to whitch, the
electrical connection to the trailer has been
correctly established.
R ESP ®
is deactivated.
R the transmission is not in position D.
R the Off-road program is activated (vehicles
without the ON&OFFROA Dpackage).
R Off-road program 1or2isactivated (vehi-
cles with the ON&OFFROAD package).
R the LOW RANGE off-road gear is activated
(vehicles with the ON&OFFROAD package).
R al oss of tyr epressure or adefective tyre
has been detected and displayed.
Activ eLaneK eeping Assist does no tdetect
road and traffic conditions .Aninappropriate
brake applicatio nmay be interrupted at any
time if:
R you steer slightly in the opposite direction.
R you use aturn signal.
R you clearly brake or accelerate.
Al ane- correcting bra keapplication is inter-
rupted automatically if:
R ad riving safet ysystem intervenes, such as
ESP ®
,P RE-SAFE ®
Brake or Active Blind
Spot Assist.
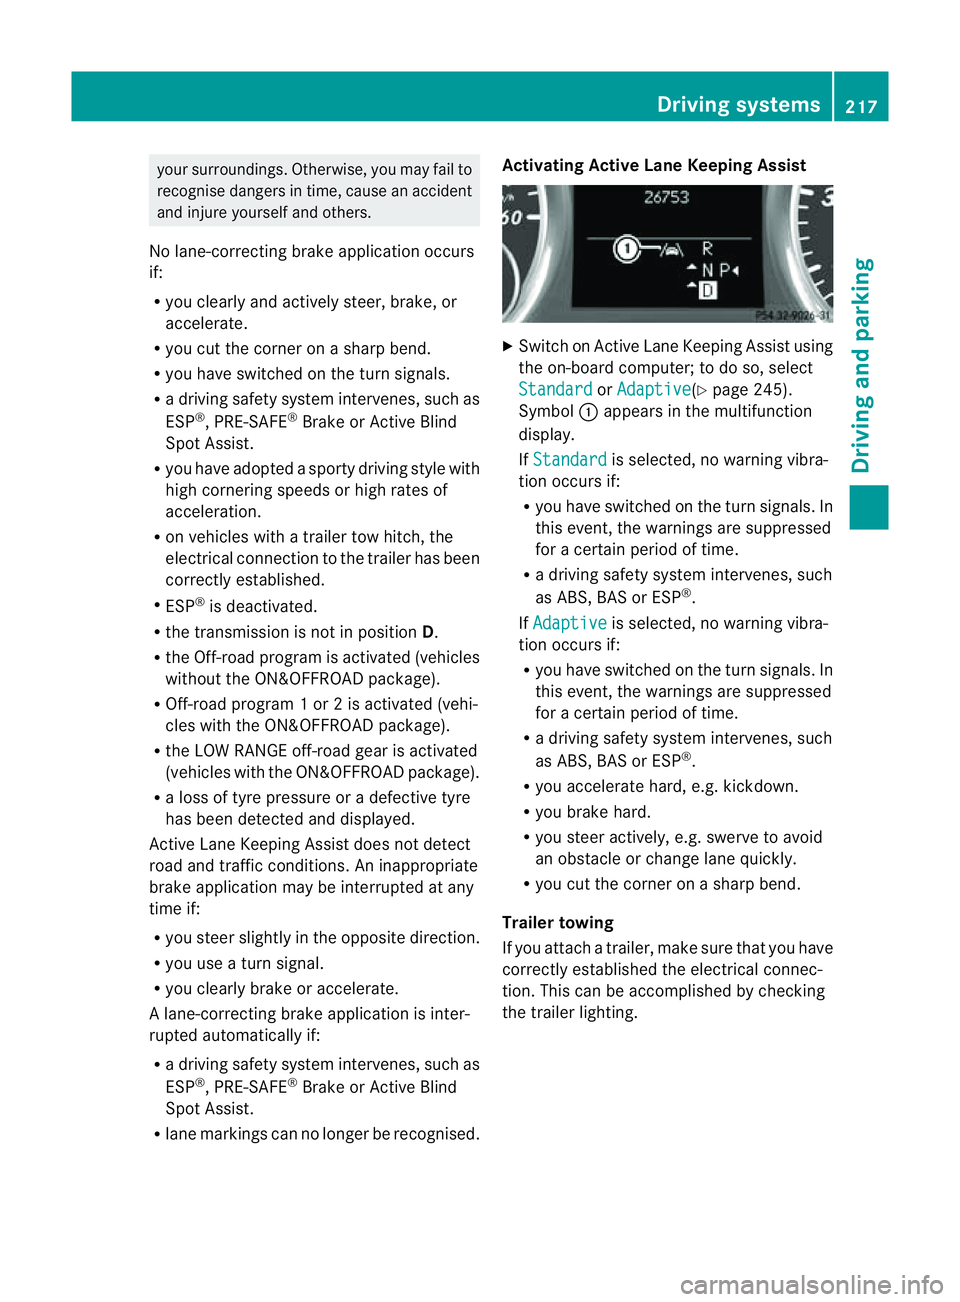
R lane markings can no longe rberecognised. Activating Active Lane Keeping Assist
X
Switch on Active Lan eKeeping Assist using
the on-boar dcomputer ;todoso, select
Standard or
Adaptive (Y
page 245).
Symbol :appears in the multifunction
display.
If Standard is selected, no warnin
gvibra-
tion occur sif:
R you have switched on th eturn signals .In
this event, the warnings are suppressed
for acertain period of time.
R ad riving safety system intervenes, such
as ABS, BAS or ESP ®
.
If Adaptive is selected, no warning vibra-
tio no ccurs if:
R you have switche donthe tur nsignals. In
this event, the warnings are suppressed
for acertain period of time.
R ad riving safety system intervenes, such
as ABS, BAS or ESP ®
.
R yo ua ccelerate hard ,e.g. kickdown.
R you brake hard.
R you steer actively, e.g. swerve to avoid
an obstacle or chang elane quickly.
R you cut the corner on ashar pbend.
Trailer towing
If you attach atrailer, make sure that yo uhave
correctly established the electrical connec-
tion. This can be accomplished by checking
the trailer lighting. Driving systems
217Drivingand parking Z