Page 306 of 389

Safety net in th
ecombined luggage
cover and net
Important safety notes G
WARNING
The safety net cannot secure heavy loads. You
should therefor ealways lash down the load.
You could otherwise be injured by objects
which have not been sufficiently secured
being thrown around in the event of sharp
braking, asudden change of direction or an
accident. G
WARNING
In the event of sharp braking, asudden
change of direction, or an accident, light loads
can be thrown about.
This could result in injury to yourself or others.
Therefore, if you are transporting light loads,
use the safety net.
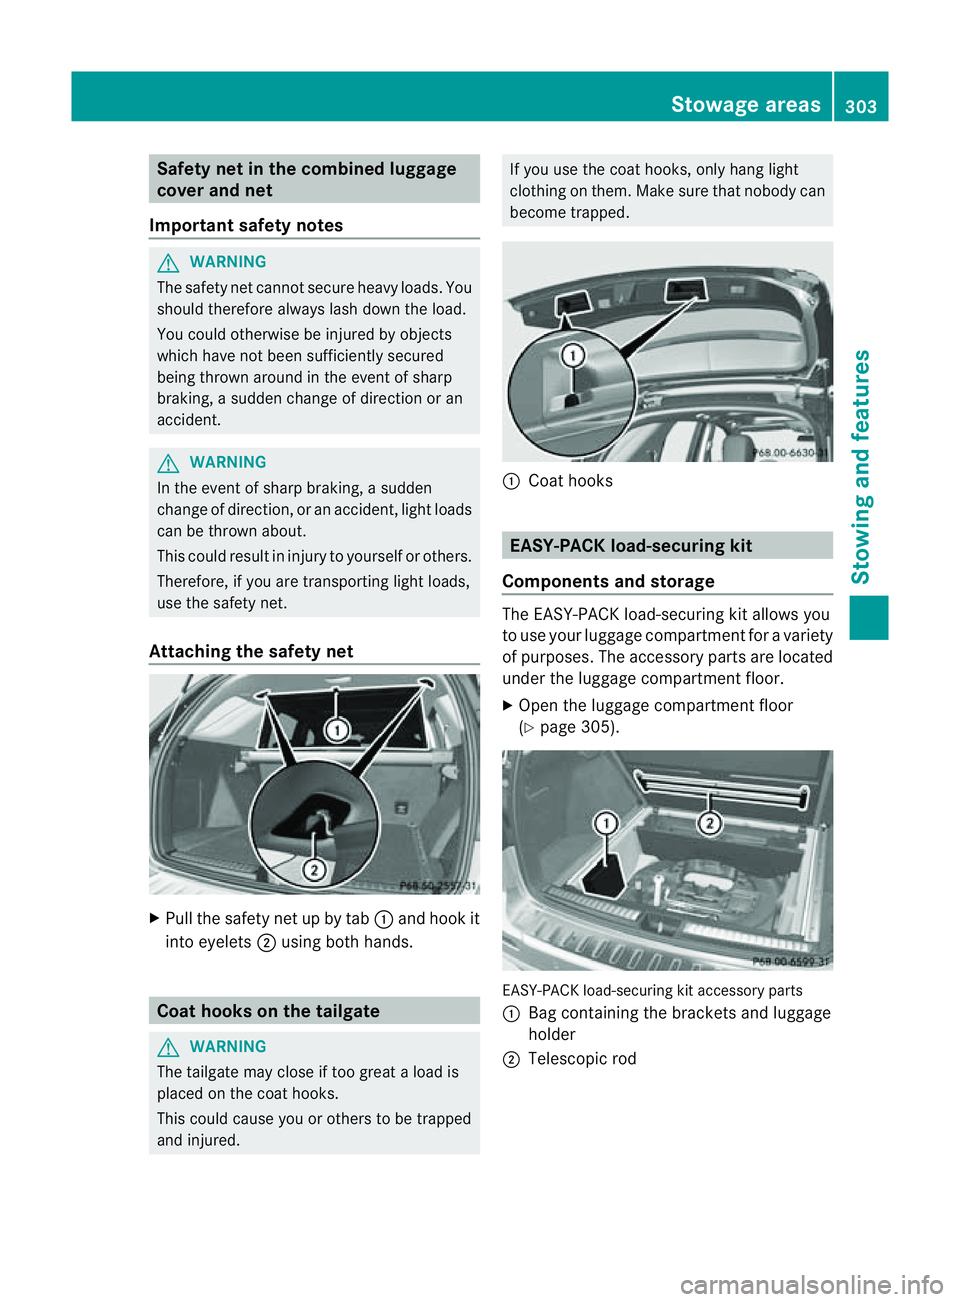
Attaching the safety net X
Pull the safety net up by tab :and hoo kit
into eyelets ;using both hands. Coat hook
sonthe tailgate G
WARNING
Th et ailgate may close if too great aload is
placed on the coat hooks.
This coul dcause you or others to be trapped
and injured. If you use the coat hooks
,only hang light
clothing on them. Make sure that nobody can
become trapped. :
Coat hooks EASY-PACK load-securing kit
Components and storage Th
eE ASY-PACK load-securing kit allo wsyou
to use your luggag ecompartmen tfor av ariety
of purposes .The accessory parts ar elocated
under the luggage compartment floor.
X Open the luggage compartment floor
(Y page 305). EASY-PACK load-securin
gkit accessory parts
: Bag containing the bracket sand luggage
holder
; Telescopic rod Stowage areas
303Stowingand fe atures Z
Page 308 of 389

X
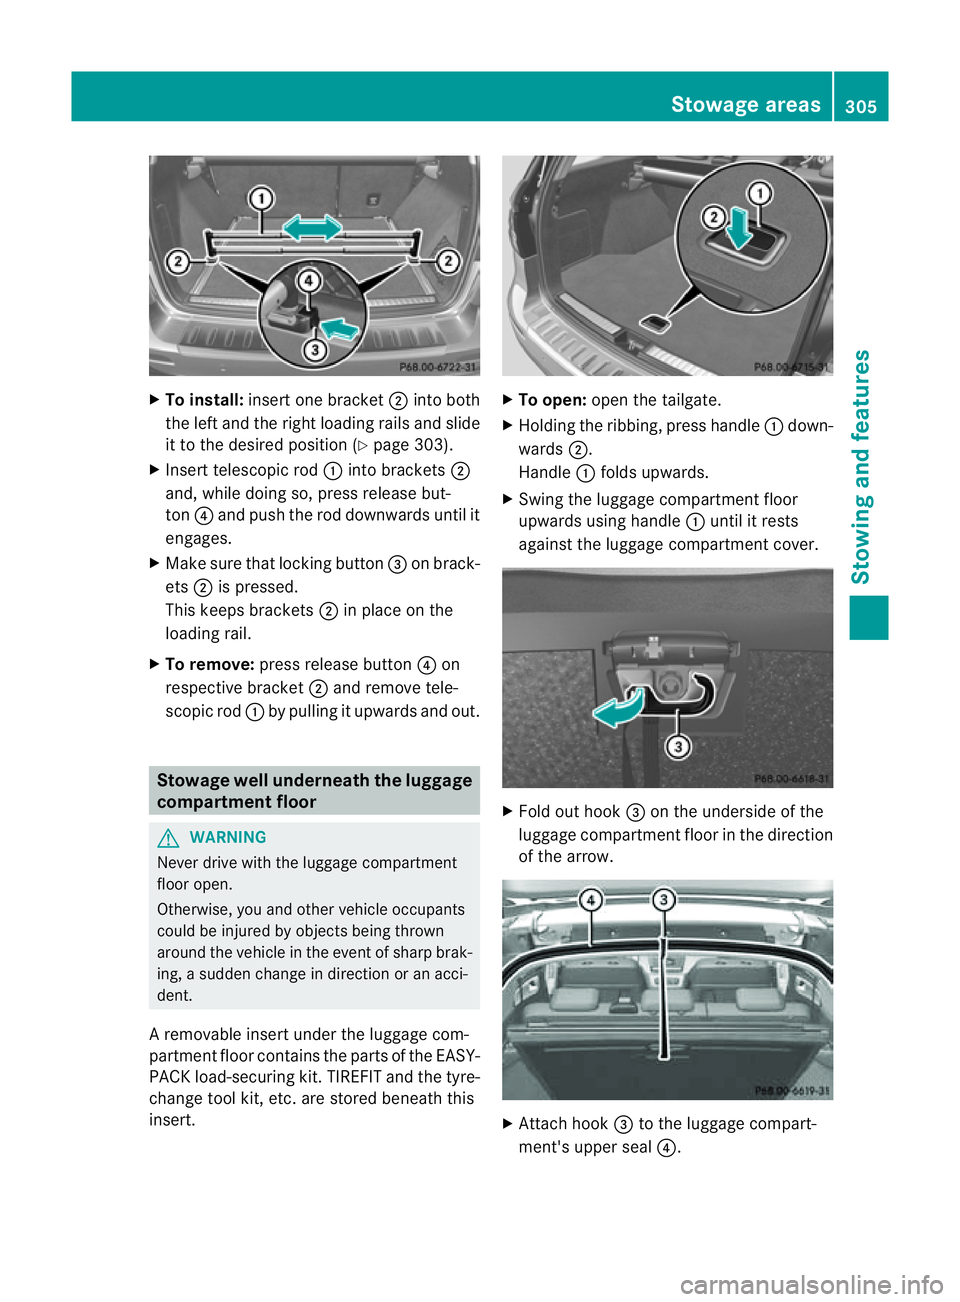
To install: insert one bracket ;into both
the left and the right loading rai lsand slide
it to the desired positio n(Ypage 30 3).
X Insert telescopic rod :into brackets ;
and ,while doing so, press release but-
ton ?and push the rod downwards until it
engages.
X Make sur ethat locking button =on brack-
ets ;is pressed.
This keeps brackets ;in plac eonthe
loading rail.
X To remove: press release button ?on
respe ctive bracket ;and remov etele-
scopic rod :by pullin gitupwards and out. Stowage well unde
rneath the luggage
compartment floor G
WARNING
Never drive with the luggage compar tment
floor open.
Otherwise, you and other vehicle occupants
could be injured by objects being thrown
around the vehicle in the event of sharp brak-
ing, asudden change in direction or an acci-
dent.
Ar emovable inser tunder the luggage com-
partmen tfloor contain sthe par tsof the EASY-
PACK load- securingkit.T IREFIT and th etyre-
change tool kit, etc. are stored beneath this
insert. X
To open: openthe tailgate.
X Holding the ribbing, press handle :down-
wards ;.
Handle :folds upwards.
X Swing the luggage compartment floor
upwards usin ghandle :until it rests
against the luggage compartment cover. X
Fold out hook =on the underside of the
luggage compartment floor in the direction
of the arrow. X
Attach hook =to the luggage compart-
ment' supper seal ?. Stowage areas
305Stowingandfeatures Z
Page 309 of 389

X
To close: detach hook =from the luggage
compartment's uppe rseal ?.
X Fasten hook =to the brac ketont he
underside of the luggage compar tment
floor.
X Fold the luggage compartmen tfloor down.
X Press the luggage compar tment floor
down ;until it engages. Roof car
rier
Important safet ynotes G
WARNING
An incorrectly secured roof carrier, ski rack or
load could become detached from the vehi-
cle. These objects might then be thrown
around and could injur eyou or other sor
caus eana ccident.F ollow the roof carrier /ski
rack manufacturer's installation instructions
and special instructions for use.
The roof load raises the vehicle's centre of
gravity, thereb yaffecting vehicl ehandling.
You must alway sobserv ethe maximum roof
load of 10 0kg. Always adapt your driving style
to the prevailin groad, traffic and weather
condition sand drive with particula rcare if the
roof is laden.
! Mercedes -Benz recommends that you
only use roof carrier sthat hav ebeen tested
and approved for Mercedes-Benz vehicles.
This helps to preven tdamage to the vehi-
cle.
Position the load on the roof carrier in such
aw ay that the vehicle will not sustain dam-
age even when it is in motion.
Depending on the vehicle equipment,
ensure that when the roof carrier is fitted
you can:
R raise the sliding sunroof fully
R open the panorama sliding sunroof fully
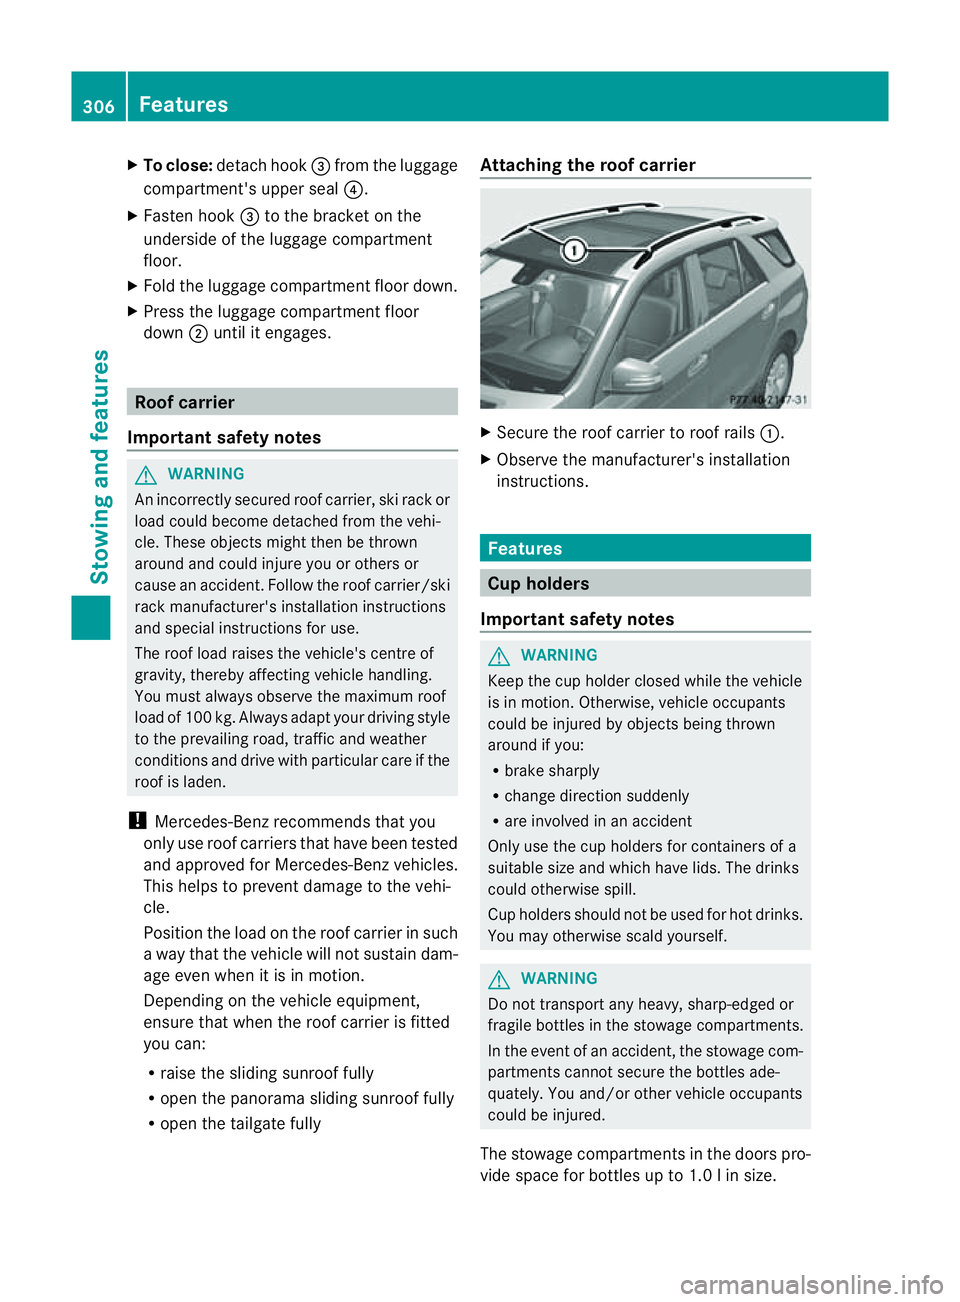
R open the tailgate fully Attaching the roof carrier
X
Secure the roof carrier to roof rails :.
X Observe the manufacturer' sinstallation
instructions. Features
Cup holders
Important safety notes G
WARNING
Keep the cup holder closed whil ethe vehicle
is in motion. Otherwise, vehicle occupants
coul dbei njured by object sbeing thrown
around if you:
R brak esharply
R change direction suddenly
R arei nvolved in an accident
Only use the cup holders for container sofa
suitable size and whic hhave lids. The drinks
could otherwise spill.
Cup holders shoul dnot be used for hot drin ks.
You may otherwise scald yourself. G
WARNING
Do not transport any heavy, sharp-edged or
fragile bottles in the stowage compar tments.
In the event of an accident, the stowage com-
partments can notsecur ethe bottles ade-
quately. You and/or other vehicle occupan ts
coul dbei njured.
The stowage compartments in the doors pro-
vide space for bottles up to 1.0 linsize. 306
FeaturesStowin
gand features
Page 335 of 389

Usefu
linfor mati on
i This Owner's Manual describes all models
and all standard and optional equipment
available to your vehicle at the time of pub-
lication of the Owner's Manual. Country-
specific deviation sare possible .Please
not ethat your vehicle ma ynot be equipped
with all featur es described. This also
applies to safety-releva ntsystems and
functions.
i Please read the information on qualified
specialist workshops (Y page 24).Where will
Ifind...? Warning triangle
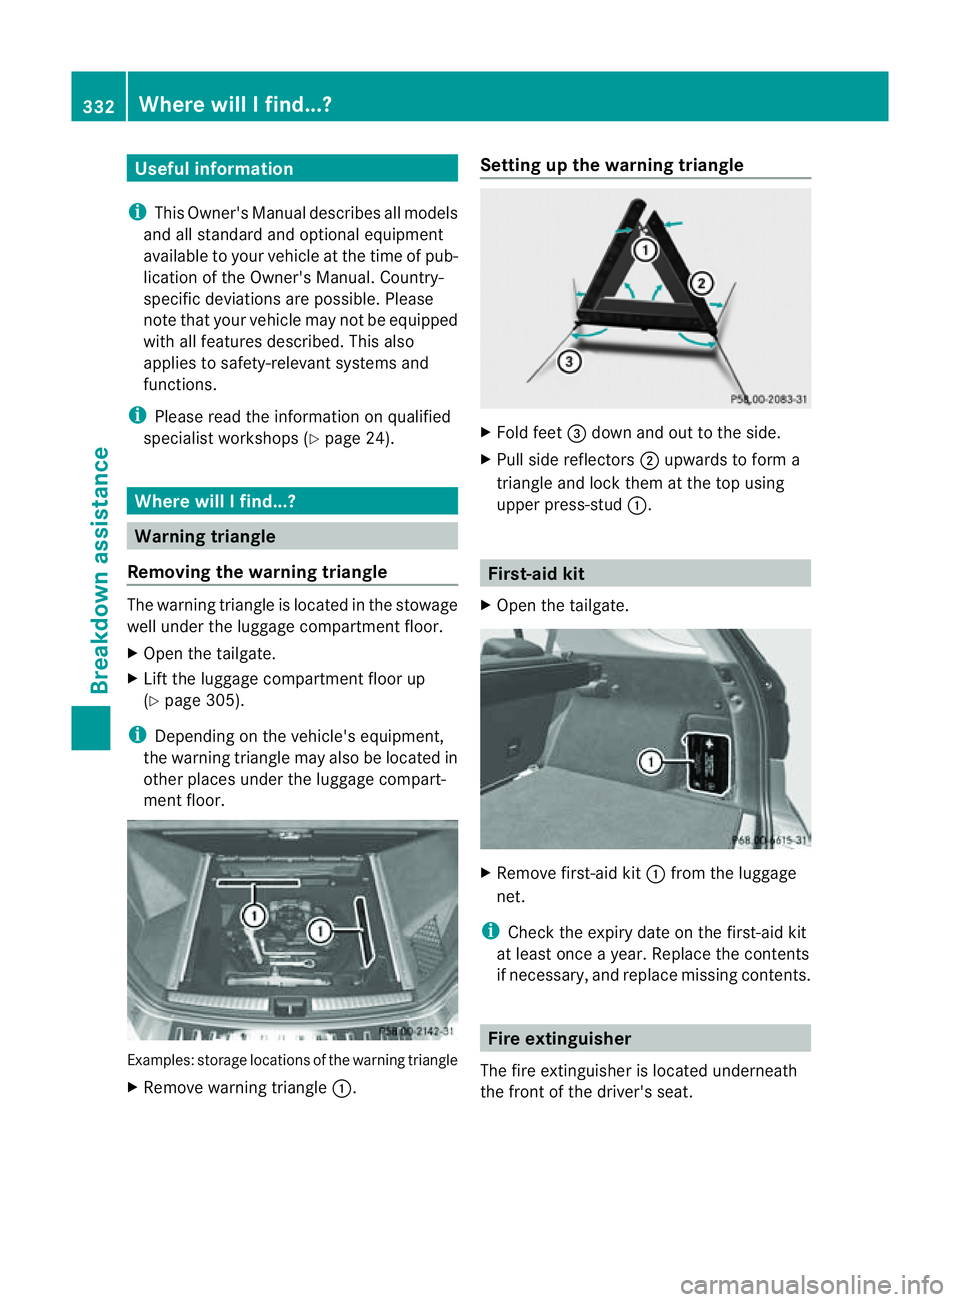
Removing th ewarning triangle Th
ew arnin gtriangle is located in th estowage
well under th eluggage compartmen tfloor.
X Open the tailgate.
X Lif tthe luggage compar tment floor up
(Y page 30 5).
i Dependin gonthe vehi cle's equipment,
the warnin gtriangle may also be located in
other places under the luggag ecompar t-
ment fl oor. Examples: storage loca
tions of the warnin gtriangle
X Remove warnin gtriangle :. Setting up th
ewarnin gtriangle X
Fol dfeet =down and out to the side.
X Pull side reflectors ;upwards to for ma
triangle and lock them at thet op using
upper press-stud :. First-aid kit
X Open the tailgate. X
Remove first-aid kit :from the luggage
net.
i Check the expir ydate on the first-aid kit
at least once ayear. Replace the contents
if necessary, and replace missin gcontents. Fire extinguisher
The fir eextinguisher is locate dunderneath
the front of the driver's seat. 332
Where wil
lIfind...?Breakdown assistance
Page 342 of 389

the whee
lthat is diagona llyo pposite the
wheel you wish to change. Securing the vehicle on slight downhil
lgradients
X On downhill gradients: place chocks or
othe rsuitabl eitems in front of the wheels
of the front and rear axle.
Raisin gthe vehicle G
WARNING
Th ejack is intended only for lifting the vehicle
briefly for wheel changes.
The vehicle must be placed on stands if you
intend to work under it.
Make sure that the jack is placed on afirm,
non-slip, level surface. Do not use wooden
blocks or similar objects as ajack underlay.
The vehicle could otherwise slip off the jack
and seriousl yinjure you.
Do not start the engine at any time whil ethe
wheel is being changed.
Do not lie unde rthe vehicle when it is being
supported by the jack. If you do not raise the
vehicle as described, it coul dslip off the jack
(e.g. if the engine is started or adoor or the
tailgate is opened or closed) and seriously
injure you. G
WARNING
If you fai ltoposition the jac kcorrectly, the
vehicle may:
R slip off the jack
R injure you or others
R be damaged. Therefore, mak
esure that the jack is posi-
tioned correctly in the respective jacking
points. Before positioning the jack, remove
any dirt that may have collected in the jacking
points. Pleas enote that you must position the
jac kint he openin gofthe jackin gpoint. X
Usin gwheel wrench :,loosen the bolts on
the wheel you wish to change by about one
full turn. Do not unscrew th ebolts com-
pletely.
The jacking points are locate djustb ehind the
fron twheel arches and just in front of the rear
wheel arches (arrows). X
Take the ratchet ring spanner out of the
vehicle tool kit and plac eitont he hexagon
nut of the jac ksothat the letters AUFare
visible. Flat ty
re
339Breakd ownassistance Z
Page 372 of 389
Usefu
linfor mation ............................ 370
Notes on the technical data .............370
Genuine Mercedes-Benz parts .........370
Vehicle electronics ...........................371
Vehicle identification pla tes............ 372
Service products and capacities .....373
Vehicle da ta...................................... 377
Tailgate opening dimensions ...........378
Trailer tow hitch ................................ 378
24-GHz radar sensor system (coun-
tr yo verview) ..................................... 380 369Technical
data
Page:
< prev 1-8 9-16 17-24