2011 MERCEDES-BENZ M-CLASS SUV fuel
[x] Cancel search: fuelPage 76 of 389

signa
lcan be activated and deactivated using
the on-board computer (Y page 249).
X To unlock centrally: press the%but-
ton.
If you do not open the vehicle within approx-
imately 40 seconds of unlocking:
R the vehicle is locked again.
R the anti-theft system is primed again.
X To lock centrally: press the&button. KEYLESS-GO
You can start, lock or unlock the vehicle using
KEYLE SS-GO. To do this ,you only need carry
the key with you. When you touc hthe surface
of the sensor sonthe vehicle' soutside door
handles ,KEYLESS-GO establishes aradio
connection between the vehicle and the key.
When the engine is started and whils tyou are
driving, KEYLE SS-GO also checks whether a
valid key is in the vehicl ebyperiodically
establishing radi ocontact.
When locking or unlockin gwith KEYLESS-GO,
the distance between the key and the door
handle you wish to lock or unlock must not
be greater than 1m. X
To unlock the vehicle: touch the inner
surface of the doo rhandle.
X To lock the vehicle: touch sensorsur-
face :.
X Convenienc eclosing feature: touch
recessed sensor surface ;for an exten-
ded period (Y page 85). If you pull on the handle of the tailgate, only
the luggage compartmen
tofthe vehicle is
unlocked. Changing th
esettings of the locking
system
You can change the setting of the locking
system in such away that only the driver's
door and the fuel filler flap are unlocked. This
is useful if you frequently travel on your own.
X To change the setting: press and hold
down the %and& buttons simulta-
neously for approximately six seconds until
the battery check lamp (Y page 74)
flashes twice.
i If the setting of the locking system is
changed within the signal range of the vehi-
cle, pressing the &or% button locks
or unlocks the vehicle.
The key now function sasfollows:
X To unlock th edriver's door: press the
% button once.
X To unlock centrally: press the%but-
ton twice.
X To lock centrally: press the&button.
The KEYLESS-GO function is change dasfol-
lows:
X To unlock th edriver's door: touch the
inner surface of the doo rhandle on the
driver' sdoor.
X To unlock centrally: touchthe inner sur-
face of the door handl eonthe front-
passenger door or the rea rdoor.
X To lock centrally: touchthe outer sensor
surface on one of the door handles. Restoring th
efactory settings
X Press the %and& button ssimulta-
neously for approximately six seconds until
the battery check lamp flashes twice. Key
73Opening and closing Z
Page 81 of 389

the doors from ins
idethe vehicle. Deactivate
the interio rmotion sensor (Y page 69)before
you lock the vehicle. The doors can then be
opened from the inside after the vehicle has
been locked from the outside.
You can only open the rear doors from inside
the vehicle if they are not secured by the
child-proof locks (Y page 60).X
Pull door handle ;.
If the door is locked, locki ngknob :pops
up. The doo risu nlocke dand can be
opened. Centrally lockin
gand unlocking the
vehicle from th einside
You can cen trally lock or unlock the vehicle
from the inside.
The central locking/unlocking button does
not lock or unlock the fuel filler flap.
The button sare locate donboth front doors.
i You can notu nlock the vehicl ecentrally
from the inside if the vehicle has been
locked with the key or KEYLESS-GO.
i It is only possible to lock the vehicle cen-
trally if the front-passenger door is closed. X
To unlock: press button :.
X To lock: press button ;. Automatic locking mechanism
The vehicle is locked automatically when the
ignition is switched on and the wheels are
turning.
You could therefor ebelockedout when:
R the vehicle is being pushed.
R the vehicle is being towed.
R the vehicle is being tested on adynamom-
eter. X
To deactivate: press and holdbutton :
for about five seconds until atones ounds.
X To activate: press and hold button ;for
about fiv eseconds until atones ounds.
i If you press one of the two button sand
do not hea ratone, the relevant setting has
already been selected. 78
DoorsOpening and closing
Page 82 of 389

You can also switc
hthe automati clocking
function on and off using the on-boar dcom-
puter (Y page 249). Unlocking th
edriver' sdoor (emer-
gency key element)
If the vehicle can no longer be unlocked with
the key, use the emergenc ykey element.
If you use the emergenc ykey elemen tto
unlock and open the driver' sdoor, the anti-
thef talarm system will be triggered
(Y page 68).
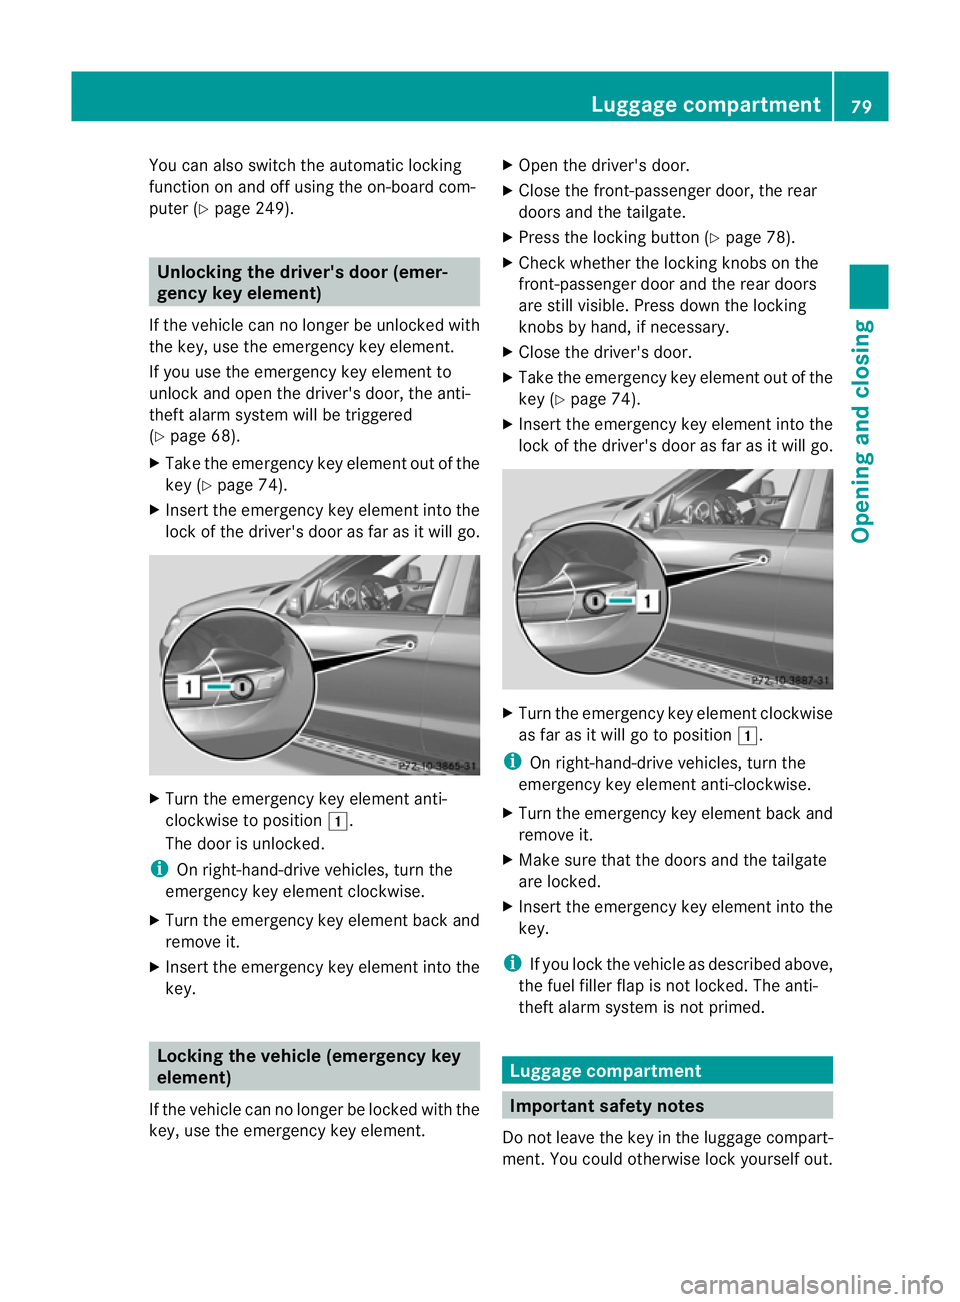
X Take the emergenc ykey elemen tout of the
key (Y page 74).
X Insert the emergenc ykey elemen tinto the
lock of the driver's doo rasfar as it will go. X
Turn the emergency key element anti-
clockwise to position 1.
The door is unlocked.
i On right-hand-drive vehicles, turn the
emergency key element clockwise.
X Turn the emergency key element back and
remove it.
X Insert the emergency key element into the
key. Locking the vehicle (emergency key
element)
If the vehicle can no longer be locked with the
key, use the emergency key element. X
Open the driver' sdoor.
X Close the front-passenger door, the rear
doors and the tailgate.
X Press the locking button (Y page 78).
X Check whether the locking knobs on the
front-passenger door and the rea rdoors
ar es till visible. Press down the locking
knobs by hand, if necessary.
X Clos ethe driver's door.
X Take the emergenc ykey elemen tout of the
key (Y page 74).
X Insert the emergency key element into the
lock of the driver' sdoor as far as it will go. X
Tur nthe emergenc ykey elemen tclockwise
as far as it will go to position 1.
i On right-hand-drive vehicles, turn the
emergenc ykey elemen tanti-clockwise.
X Turn the emergency key element back and
remove it.
X Make sure that the doors and the tailgate
are locked.
X Insert the emergency key element into the
key.
i If you lock the vehicl easdescribed above,
the fuel filler fla pisnot locked. The anti-
thef talarm system is not primed. Luggage compartment
Important safet
ynotes
Do not leave the key in the luggage compart-
ment. You could otherwise lock yourself out. Luggage compartment
79Openingand closing Z
Page 133 of 389

X
To deactivate: press theÌ/Á but-
ton.
The indicator lamp in the Ì/Ábut-
ton goe sout.
i Residual hea tisdeactivated automati-
cally:
R after about 30 minutes
R when the ignition is switched on
R if the batter yvoltage drops
R if the coolant temperatur eistoo low Auxiliar
yheating
Important safety notes G
WARNING
Exhaust fumes are produced when the auxili-
ary heating is in operation. Inhalin gthese
exhaust fumes can be poisonous. You should
therefor eswitch off the auxiliary heating in
confined spaces without an extraction sys-
tem, e.g. agarage. G
WARNING
When operating the auxiliary heating, parts of
the vehicle may become very hot, and highly
inflammable material such as fuels could be
ignited. Operating the auxiliary heating is thus
prohibited at filling stations or when your vehi-
cle is being refuelled .You must therefore
switc hoff the auxiliary heating at filling sta-
tions.
! Operatin gthe auxiliary heating/ ventila-
tion draws on the vehicl ebattery. After you
have heated or ventilated the vehicle a
maximum of two times, drive for alonger
distance.
i Switch on the auxiliary heatin gregularly,
e.g. for about ten minutes ever ymonth.
The auxiliary heatin gheats the air in the vehi-
cle interior to the set temperature without
using the heat of the runnin gengine .The aux-
iliary heating is operated directly usin gthe
vehicle' sfuel. For this reason, the tank con- tent must be at least at reserve fuel level to
ensure that the auxiliary heating functions.
The auxiliary heating/ventilation automati-
cally adjusts to changes in temperature and
weather conditions. For this reason, the aux-
iliary heating could switch from ventilation
mode to heating mode or from heating mode
to ventilation mode.
The auxiliary heating switches off when the
engine is switched off. The auxiliary ventila-
tion switches off when you turn the key to key
position 2.
The auxiliary heating switches off automati-
cally after 30 minutes. This time limit can be
altered. To do this, visit aqualified specialist
workshop, e.g. aMercedes-Benz Service
Centre.
You can notu se the auxiliary ven tilation to
cool the vehicle interior to atemperature
lower than the outside temperature.
Before switching on X
Turn the key to position 2in the ignition
lock.
X Set the temperature.
The auxiliary heating/ventilation can be acti-
vated even when the climate control is being
controlled manually. Optimum comfor tcan
be attained when the system is set to auto-
matic mode. Set the temperature to 22 †.
The auxiliary heating/ventilation can be acti-
vated or deactivated using the remote control
or the button on the centre console.
The on-board computer can be used to spec-
ify up to three departure times, one of which
may be preselected (Y page 250).130
Operating the climate control systemClimate control
Page 137 of 389

Problems wit
hthe auxiliary heating/ventilation Display messages Possible causes/consequences and
M Solutions
$
FAIL Th
es ignal transmission between the transmitter and the vehicle
is faulty.
X Change your position in relation to the vehicle, movin gcloser if
necessary.
X Make another attempt to switch the auxiliary heating on or off
using the remote control. FAIL
© This display message will only appear if you attempt to activate
the auxiliary heating.
There is not enough fuel in the fuel tank ,orthe auxiliary heating
is faulty.
X Refuel at the nearest filling station.
X Make another attemp ttos witch on the auxiliary heating using
the remote control.
X Have the auxiliary heating checked at aqualified specialist
workshop. FAIL This display messag
emay appear if you attempt to activate the
auxiliary heating or during astatus query.
If the auxiliary heating doe snot switc honorh as switched off while
running, this has occurred due to one of the following reasons:
R the auxiliary heating was started more than twice when the
engine was switched off.
R the starter battery is not sufficiently charged.
R there is too little fuel in the fuel tank.
R the auxiliary heating is faulty.
If the auxiliary heating was switched on more than twice:
X Switch on the engine and let it run for more than 10 seconds.
X Make another attempt to switch on the auxiliary heating using
the remote control.
If the starter battery is not sufficiently charged:
X Charge the starter battery.
X Make another attempt to switch on the auxiliary heating using
the remote control.
If there is not enough fuel:
X Refuel at the nearest filling station.
X Make another attempt to switch on the auxiliary heating using
the remote control. 134
Operating the climate control systemClimate control
Page 140 of 389

Usefu
linfor mation ............................ 138
Running-in notes ............................... 138
Driving ............................................... 138
Automati ctran smission ................... 145
Refuelling ........................................... 152
Parking ............................................... 160
Driving tips ........................................ 162
Driving systems ................................ 170
Off-road driving systems ..................220
Towing atrailer ................................. 226 137Driving
and parking
Page 145 of 389

X
Take your foot off the brake pedal.
i Onc eyou have taken your foot off the
brake pedal, the vehicle is held for around
one second.
X Pull away.
Hill star tassist will not func tion if:
R you ar epulling away on alevel road or a
downhill gradient.
R the transmission is in position N.
R the electric parking brak eisapplied.
R ESP ®
is malfunc tioning. ECO sta
rt/stop function
General notes The ECO start/stop func
tion switches the
engin eoff automatically if th evehicle stops
moving.
The engine star tsautomatically when you pull
away again. The ECO start/stop function
thereby helps you to reduce the fuel con-
sumption and emissions of your vehicle.
The ECO start/stop function is activated each
time the engine is switched on. The system is
operational when ECO symbol ¤is shown
in the multifunc tion display.
If the ECO star t/stop func tion is deactivated
(Y page 143), ECO symbol ¤is not
shown. G
WARNING
If the ECO symbol appears in the multifunc-
tion displa ywhen the engin eisswitched off,
the engine was switched off automatically.
However, all vehicle systems remain active. If
you open the door, unfasten your seat belt or
remove your foot from the brake pedal, the
engine will automatically start .The vehicle
ma ybegin moving. There is arisk of accident.
To prevent the vehicle from accidentally pull-
ing away, do not release the brake pedal until
you want to drive on. Do not leave the vehicle until you have
switched off the ignition and secured the vehi-
cle to prevent it from rolling away.
! Always switch the ignition off and take the
key with you when leaving the vehicle.
Automa tice ngine switch-off The ECO start/stop function switches the
engin
eoff automatically in certain situations.
To do this ,the vehicle must brake to astand-
still and the brakes must remain depressed
with the transmission in position Dor N.
The engine is only switched off if:
R the vehicle is at astandstill.
R the outside temperature is withi nthe range
that is suitable for the system.
R the engin eisatnormal operatin gtemper-
ature.
R the set temperature for the vehicle interior
has been reached.
R the batter yissufficiently charged.
R the system detects that the windscreen is
not misted up when the air-conditioning
system is switched on.
R the bonnet is closed.
R the driver' sdoor is closed and the seat belt
is fastened.
i If you shift the transmission from Rto D,
the ECO start/stop func tion is available
again onc ethe ¤ ECO symbol reap-
pear sint he multifunction display.
i The engin ecan be switched off automat-
ically amaximum of three times in succes-
sion. The automatic engine switch-off is
then available again after the ¤ECO
symbol appears in the multifunction dis-
play.
i You can still activate the HOLD function
when the vehicle is stationary, even if the
engine has been switched off automati-
cally. It is then not necessary to continue
applying the brakes during the automatic
stop phase .When you depress the accel- 142
DrivingDriving and parking
Page 147 of 389

Problems wit
hthe engine Problem Possible causes/consequences and
M Solutions
Th
ee ngine doe snot
start. The starter motor
can be heard. R
There is amalfunction in the engine electronics.
R There is amalfunction in the fuel supply.
X Before attempting to start the engine again, turn the key in the
ignition back to position 0or press the Start/Stop button
repeatedly until all indicator lamps in the instrumen tcluster go
out.
X Try to start the engin eagain (Y page 14 0).A void excessively
long and frequen tattempt stostartthe engine, as this will drain
the battery.
If the engine doe snot star tafter several attempts:
X Consult aqualified specialist workshop, e.g. aMercedes-Benz
Servic eCentre. The engine does not
start .The starter motor
can be heard. The
reserve fuel warning
lam pisl it and the fuel
gauge displa yshows 0. The fuel tan
kise mpty.
X Refue lthe vehicle. The engin
edoes not
start. You cannot hear
the starter motor. The on-boar
dvoltage is too low because the battery is too weak
or discharged.
X Jump-start the vehicle (Y page 348).
If the engin edoes not star tdespite attempt stojump-start it:
X Consult aqualified specialist workshop, e.g. aMercedes-Benz
Servic eCentre. The starter motor was exposed to
athermal load that was too high.
X Allo wthe starter motor to cool down for approximatel ytwo
minutes.
X Try to start the engine again.
If the engine still does not start:
X Consult aqualified specialist workshop, e.g. aMercedes-Benz
Servic eCentre. 144
DrivingDriving and parking