2011 MERCEDES-BENZ M-CLASS SUV wheel
[x] Cancel search: wheelPage 292 of 389
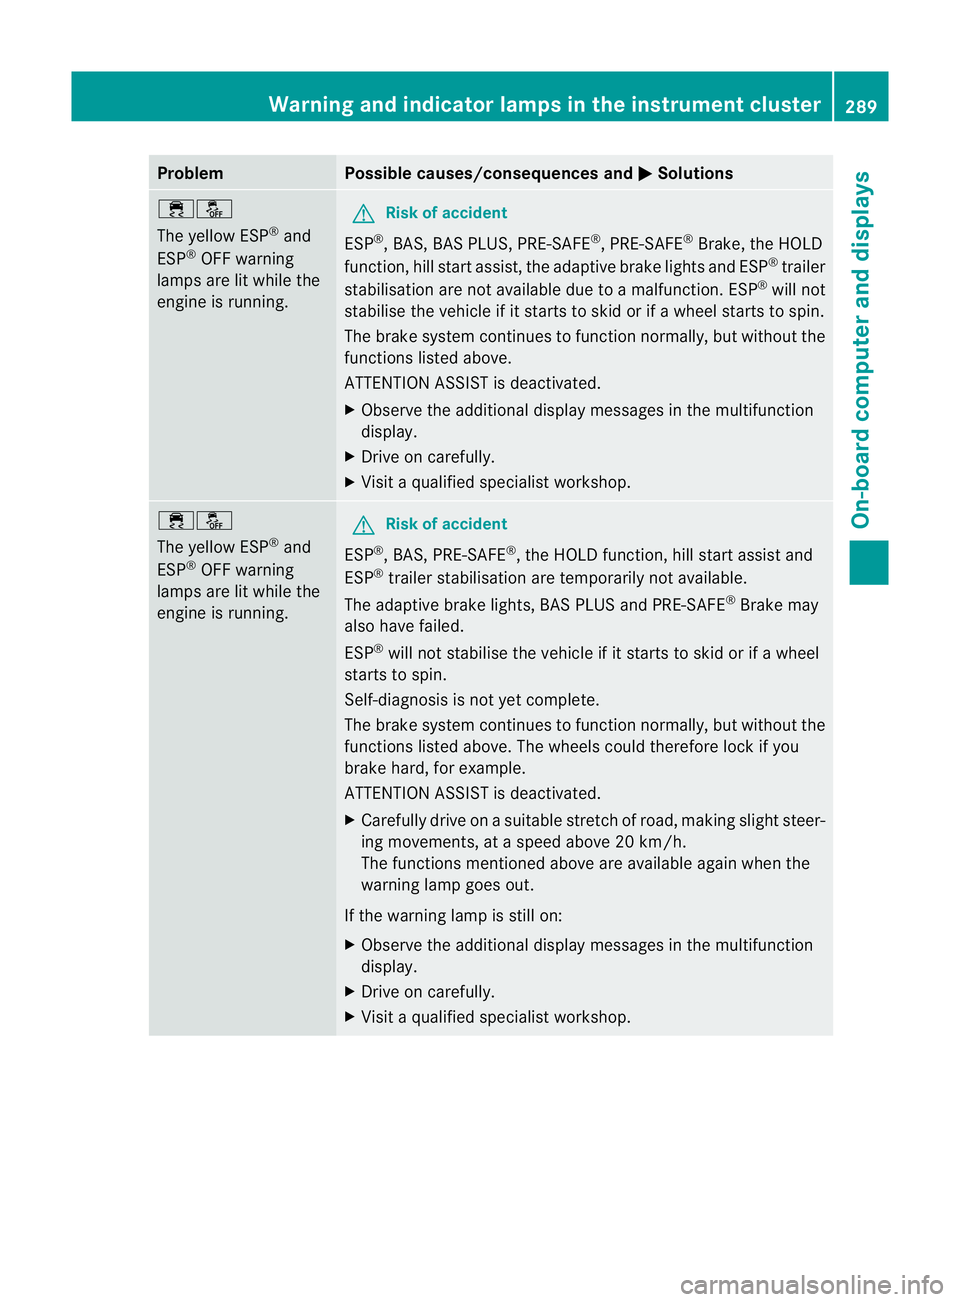
Problem Possible causes/consequences and
M Solutions
֌
The yellow ESP
®
and
ESP ®
OFF warning
lamps ar elit while the
engine is running. G
Risk of accident
ESP ®
,B AS ,BAS PLUS, PRE-SAFE ®
,P RE-SAFE ®
Brake, the HOLD
function, hill start assist, the adaptive brake lights and ESP ®
trailer
stabilisatio nare not availabl edue to amalfunction .ESP ®
will not
stabilise the vehicl eifitstarts to skid or if awheel starts to spin.
The brake system con tinues to function normally, but without the
functions listed above.
ATTENTION ASSIST is deactivated.
X Observe the additional displa ymessages in the multifunction
display.
X Drive on carefully.
X Visit aqualified specialist workshop. ֌
The yellow ESP
®
and
ESP ®
OFF warning
lamps are lit while the
engine is running. G
Risk of accident
ESP ®
,B AS ,PRE-SAFE ®
,t he HOL Dfunction, hill start assis tand
ESP ®
trailer stabilisation are temporarily not available.
The adaptive brake lights ,BAS PLUS and PRE-SAFE ®
Brake may
also have failed.
ESP ®
will not stabilis ethe vehicle if it starts to skid or if awheel
starts to spin.
Self-diagnosis is not yet complete.
The brake system con tinues to function normally, but without the
functions listed above .The wheels could therefor elock if you
brake hard ,for example.
ATTENTIO NASSIST is deactivated.
X Carefully drive on asuitable stretc hofroad, makin gslight steer-
ing movements, at aspeed above 20 km/h.
The functions mentioned above are available again when the
warning lamp goes out.
If the warning lamp is still on:
X Observe the additional display messages in the multifunction
display.
X Drive on carefully.
X Visit aqualified specialist workshop. Warnin
gand indicator lam psin the instru ment cluster
289On-boardcomput er anddisplays Z
Page 296 of 389
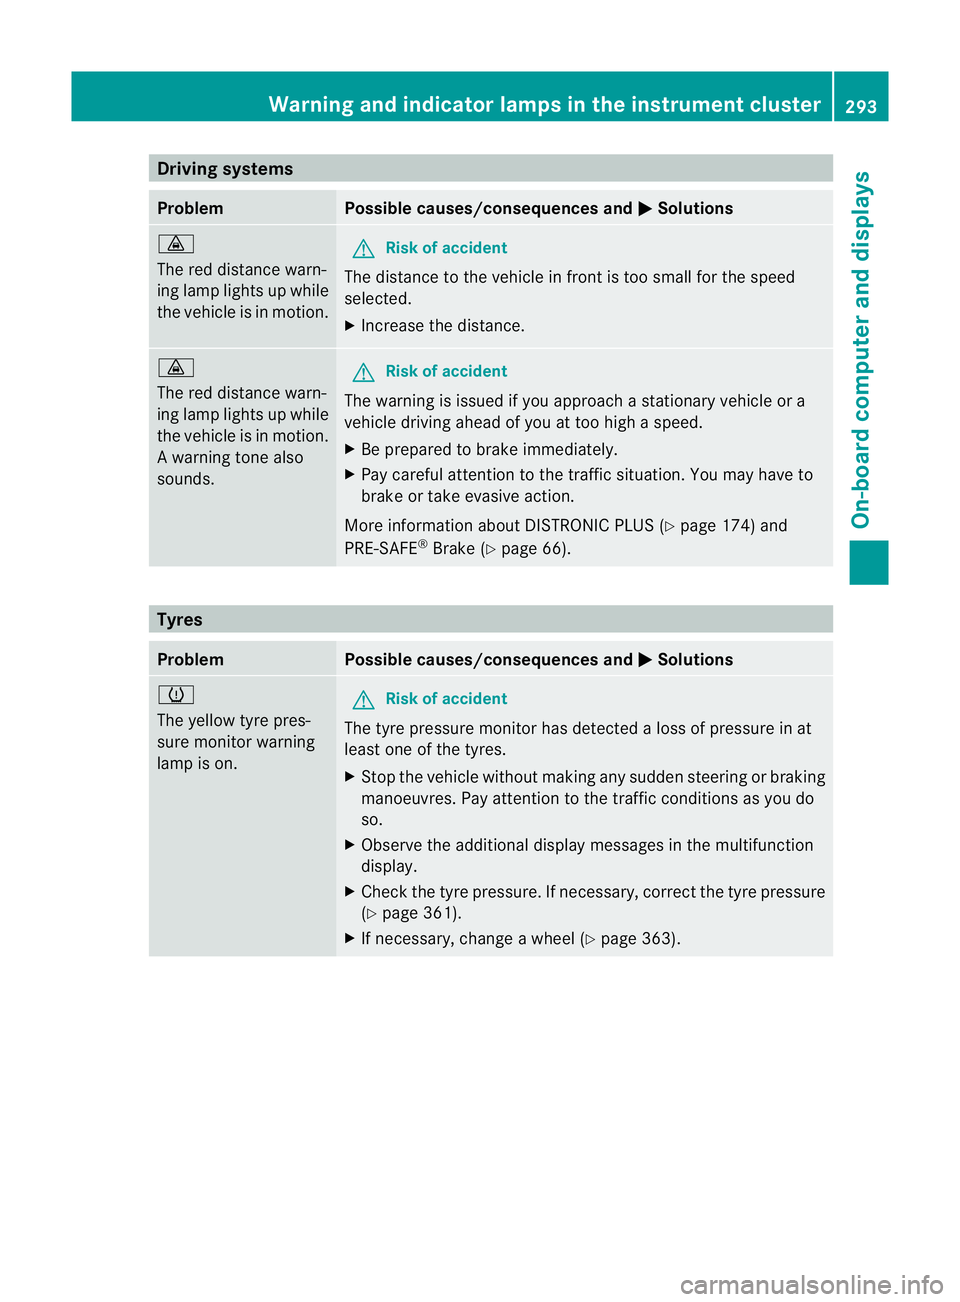
Driving systems
Problem Possible causes/consequences and
M Solutions
·
The red distanc
ewarn-
in gl amp lights up while
th ev ehicle is in motion. G
Risk of acc
ident
The distanc etothe vehicle in frontistoo smal lfor the speed
selected.
X Increase the distance. ·
The red distance warn-
ing lam
plights up while
the vehicle is in motion.
Aw arning ton ealso
sounds. G
Ris
kofa ccident
The warning is issued if you approach astationar yvehicle or a
vehicle driving ahead of you at to ohigh aspeed.
X Be prepared to brak eimmediately.
X Pa yc areful attention to the traffic situation. You may have to
brak eort akee vasive action.
Mo reinformatio nabout DISTRONI CPLUS(Ypage 174) and
PRE-SAFE ®
Brake (Y page 66). Tyres
Problem Possible causes/consequences and
M Solutions
h
The yellow tyr
epres-
sure monitor warning
lamp is on. G
Risk of accident
Th et yrep ressure monitor has detected aloss of pressure in at
least on eofthe tyres.
X Stop the vehicl ewithout making any sudden steering or braki ng
manoeuvres .Pay attention to the traffic conditions as you do
so.
X Observ ethe additiona ldisplay messages in the multifunction
display.
X Check the tyre pressure. If necessary, correc tthe tyr epressure
(Y page 361).
X If necessary, change awheel (Y page 363). Wa
rning and indicator lamp sinthe instrument cluster
293On-boardcomputerand disp lays Z
Page 314 of 389

healt
hofothers. Using an exterior aerial takes
into account current scientific discussions
relating to the possibl ehealth risk posed by
electromagnetic fields.
Mercedes-Ben zrecom mends the use of an
approved exterior aerial .This ensures:
R optimal mobile phone reception quality in
the vehicle
R mutua linfluences between the vehicle
electronics and mobil ephones ar emini-
mised
An exterior aerial has the following advan-
tages:
R it conducts the electromagnetic fields gen-
erated by awireless device to the exterior.
R the field strengt hinthe vehicle interior is
lower than in avehicle that does not have
an exterior aerial.
i There are various mobile phone brac kets
that may be fitted to your vehicle ;insome
cases, these ar ecountry-specific.
i Even if your vehicle is equipped with con-
venience telephony, you can connec ta
Blueto oth®
capable mobil ephone to Audio
20 or COMAND Online via the Bluetooth ®
interfac e.
More information on suitabl emobilephones,
mobile phone brackets and on connecting
Bluetooth ®
capable mobile phones to Audio
20 or COMAND Online can be obtained:
R at your Merc edes-Ben zServ iceC entre
R on the Internet at http://www.mercedes-
benz.com/connect
i The functions and service savailab lewhen
you use the phone depend on you rmobile
phone model and service provider. Inserting th
emobile phone X
Open the telephone compartment
(Y page 298).
X If required by the design of the mobile
phone bracket ,instal lthe slidin gadapter
(Y page 312).
X Insert the mobile phone into the mobile
phone bracket (see the separat emobile
phone bracke tinstallatio ninstructions).
If the mobil ephone is inser tedint he mobile
phone bracket ,you can speak to the person
you ar ecalling using the hands-free system.
i On some mobile phone brackets, you first
have to connect the mobile phone via Blue-
tooth ®
to am obile phone bracke t(see the
separate operating inst ructions for the
mobile phone bracke t).
On these mobile phone brackets, the
mobile phone does not hav etobeinserted
into the bracket for you to be able to use
the telephone functions .Inthis case ,the
charging func tion and aerial func tion are
not available.
Operating th emobile phone You can operate the telephone using the
6 and~ button sonthe multifunc tion
steering wheel. You can operate other mobile
phone func tions via the on-boar dcomputer
(Y page 242).
If you tak ethe key out of the ignition lock ,the
mobile phone stay sonb ut you can no longer
use the hands-free system.
If you are making acall and you would like to
take the key out of the ignition lock, first
remove the mobile phone from the bracket.
Otherwise, the call will be ended.
i When amobile phone bracke tisu sed that
is con nected to the mobile phone via Blue-
tooth ®
:ify ou wan ttocontinue acall in
"Private mode", you have to perform the
necessary steps on the mobile phone (see Features
311Stowingandfeatures Z
Page 326 of 389

Maintainin
gthe time-dependen tservice
schedule:
X Not edown the service due date displayed
in the multifunc tion display befor ediscon-
necting the battery.
or
X Subtract the battery disconnection periods
from the servic edate shown on the displ ay
after reconnecting the battery.
i The ASSYST PLUS service interval displ ay
does not show any information on the
engine oil level .Observ ethe notes on the
engin eoil level (Y page 320).
Hiding aservice message X
Pres sthe % ora button on th esteer-
ing wheel.
Displaying service messages X
Switch th eignitio non.
X Press =or; on the steering wheel
to select the Serv. menu.
X Press 9or: to select the ASSYST PLUS submenu and press
ato confirm.
The service du edatea ppears in the multi-
function display.
Points to remember Resettin
gthe ASSYS TPLUS service inter-
val display
Aq ualified specialist workshop, e.g. a
Mercedes -Ben zS ervice Cent re,w ill reset the
ASSYST PLU Sservic einterval display after
the service work has bee ncarried out.
You can obtain further information ,e.g.
regarding servic ework,from aMercedes-
Benz Ser vice Centre or directly from
Mercedes-Benz.
! If the ASSYST PLUS servic einterval dis-
play has bee ninadvertently reset, this set-
ting can be corrected at aMercedes-Benz
Ser vice Centre. Have servic
ework carried out as described
in the Ser vice Boo klet. This may otherwise
lead to inc reased wear and damage to the
major assemblies or the vehicle.
Driving abroad
An extensive Mercedes -Ben zS ervice network
is also available in other coun tries. The
Service Hotline's curren ttelephone numbers
for use when you are abroa dare to be found
in th e"Mercedes-Ben zService24h" section
of the Ser vice Boo klet. AdBlue
®
service indicator
i For BlueTE Cvehicles only.
The BlueTE Cexhaus tgas aftertreatment
must be operated with the reducing agent
AdBlue ®
in order for it to function correctly.
Under normal operating conditions, afull tank
of AdBlue ®
should last until the nex tservice
due date.
Depending on how and where the vehicle is
used, there may be an inc rease in the
AdBlue ®
consumption, resulting in the next
servic edue date being brought forward.
Certain display messages sho wthat
AdBlue ®
must be topped up, e.g.
Refill AdBlue at worksh opSee Owner’s Manual
Refill AdBlue at worksho
pNostart in .. km
Aw
arning signal also sounds.
You can no longer star tthe engin ewhen the
AdBlue ®
supply has been used up
(Y page 268).
Top up AdBlue ®
(Y page 157).
Before taking atripw ithy our vehicle outside
Europe, have th eAdBlue ®
suppl ychec kedat
aq ualified specialist workshop. If necessary,
have the AdBlue ®
topped up. Before using
your vehicle for an extended period in coun-
tries outside Europe, con tact aq ualified spe-
cialist workshop.
Obser vethe note sonAdBlue®
(Y page 374). Maintenance
323Maintenanceand care Z
Page 327 of 389
You can obtain fur
ther information about
BlueTE Cexhaus tgas aftertreatmen tand
AdBlue ®
from any Mercedes-Benz Service
Centre. Care
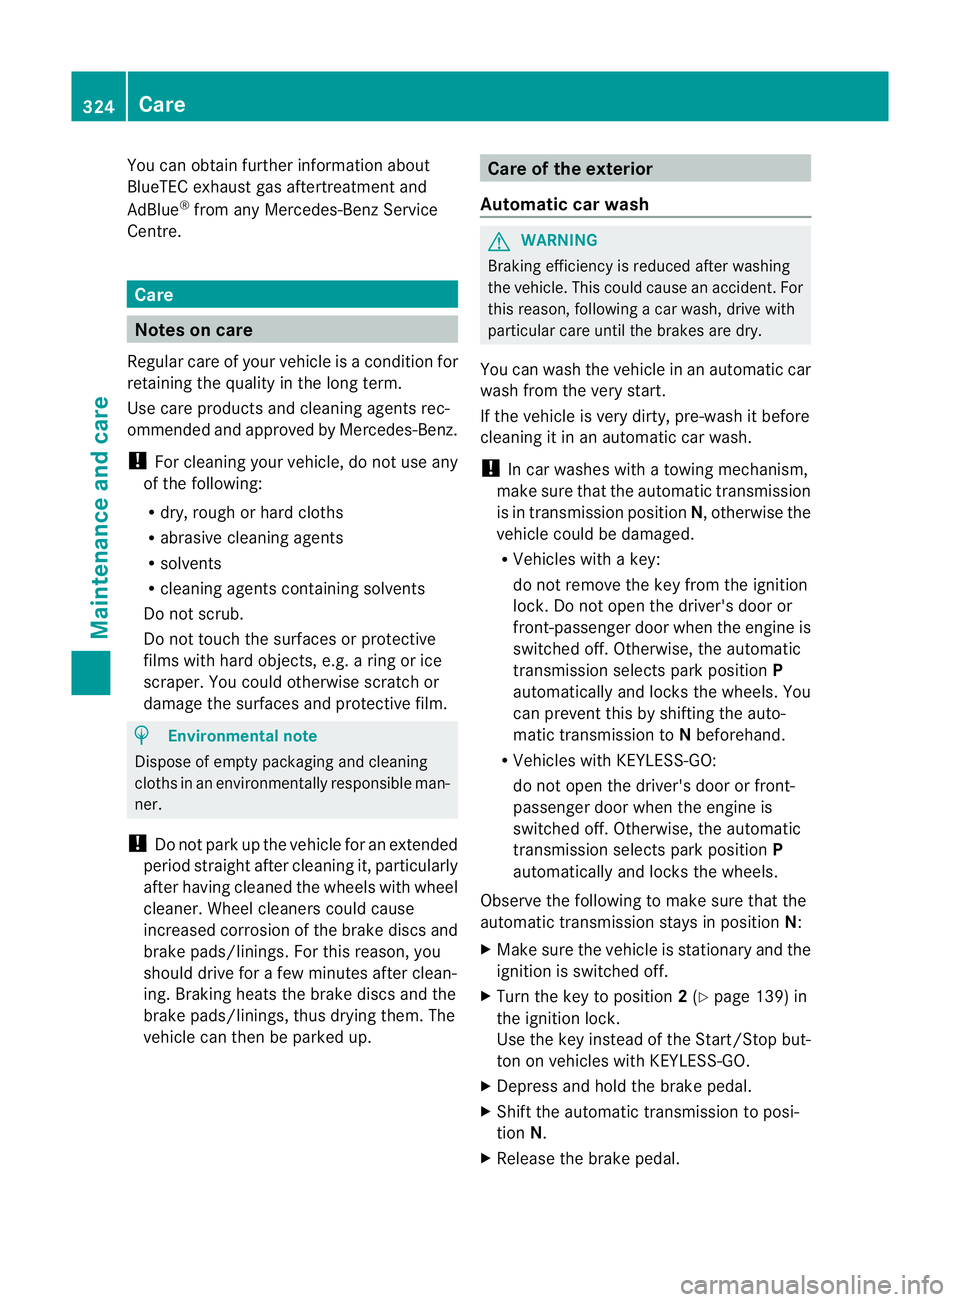
Note
sonc are
Regular care of your vehicle is aconditio nfor
retaining th equalit yint he long term.
Us ec arep roducts and cleani ngagent srec-
ommended and approved by Mercedes-Benz.
! For cleanin gyour vehicle ,donot useany
of the following:
R dry ,rough or hard cloths
R abrasive cleanin gagents
R solvents
R cleanin gagents con taining solvents
Do not scrub.
Do not touch the surfaces or protective
film swith hard objects, e.g. aring or ice
scraper .You coul dotherwis escratch or
damag ethe surfaces and protective film. H
Environmenta
lnote
Dispose of empty packaging and cleaning
cloths in an environmentally responsible man-
ner.
! Do not park up the vehicle for an extended
period straight after cleaning it, particular ly
after having cleaned the wheels with wheel
cleaner. Whee lcleaners could cause
increased corrosion of the brake discs and
brake pads/linings. For this reason, you
should drive for afew minutes after clean-
ing. Brakin gheats the brak ediscs and the
brake pads/linings, thus drying them. The
vehicle can then be parked up. Care of the exterior
Automatic car wash G
WARNING
Braking efficiency is reduced after washing
the vehicle. This could cause an accident. For
this reason, following acar wash, drive with
particular care until the brakes are dry.
You can wash the vehicle in an automatic car
wash from the very start.
If the vehicle is very dirty, pre-wash it before
cleaning it in an automatic car wash.
! In car washe swithatowing mechanism,
make sure that the automatic transmission
is in transmission position N,otherwis ethe
vehicle could be damaged.
R Vehicles with akey:
do not remove the key from the ignition
lock. Do not open the driver' sdoor or
front-passenger door when the engin eis
switched off .Otherwise, the automatic
transmission selects park position P
automaticall yand locks the wheels .You
can prevent this by shifting the auto-
matic transmission to Nbeforehand.
R Vehicles with KEYLE SS-GO:
do not ope nthe driver's door or front-
passenger door when the engin eis
switched off .Otherwise, the automatic
transmission selects park position P
automaticall yand locks the wheels.
Observe the following to make sure that the
automati ctransmission stays in position N:
X Make sure th evehicle is stationary and the
ignition is switched off.
X Turn the key to position 2(Y page 139) in
the ignition lock.
Use the key instead of the Start/Stop but-
ton on vehicles with KEYLE SS-GO.
X Depres sand hol dthe brake pedal.
X Shif tthe automatic transmission to posi-
tion N.
X Release the brake pedal. 324
CareMaintenance and care
Page 328 of 389
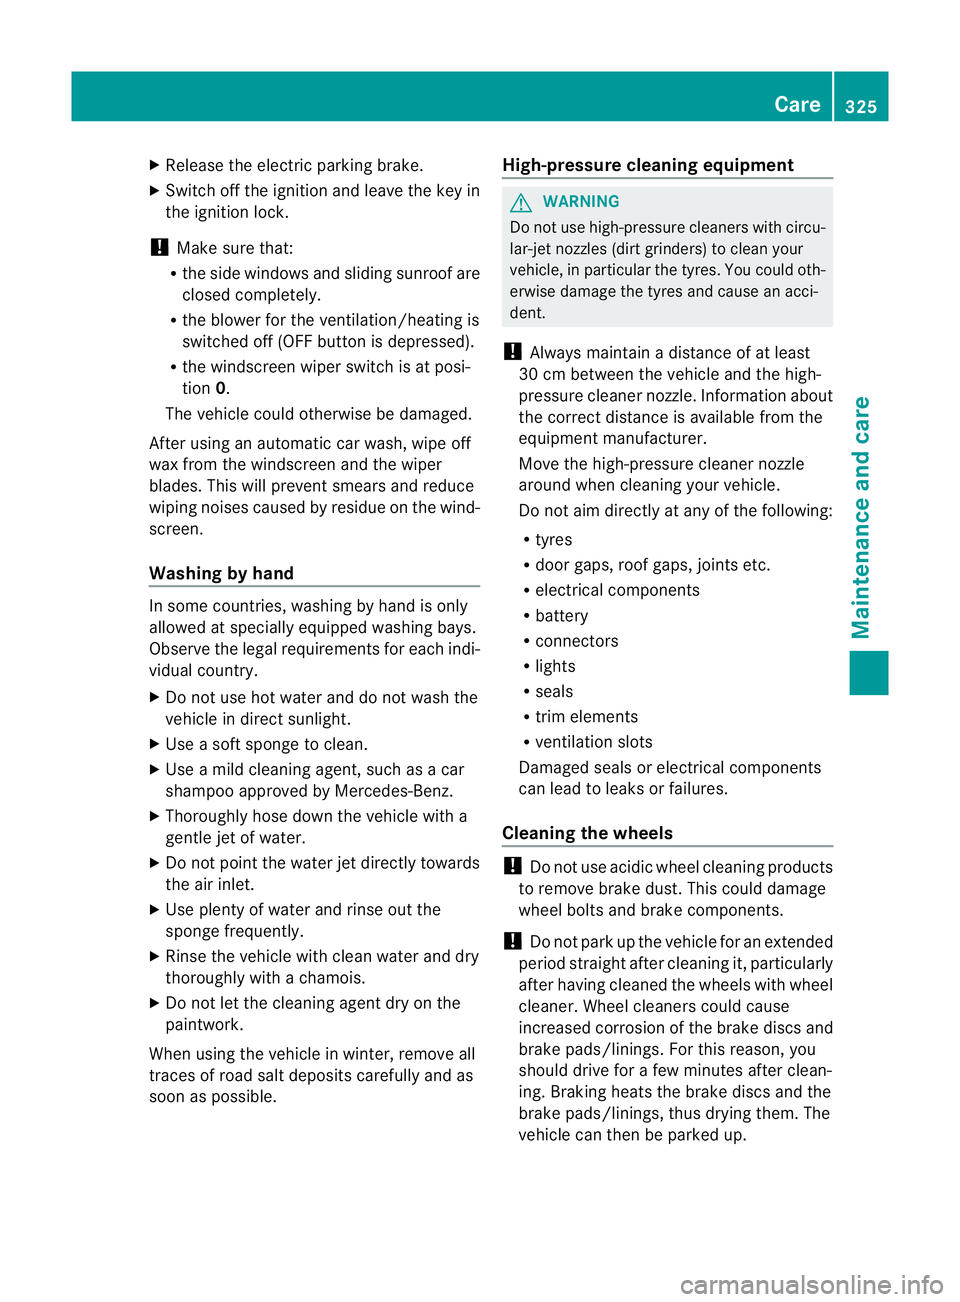
X
Release the electric parking brake.
X Switc hoff the ig nition and leav ethe key in
th ei gnition lock.
! Mak esuret hat:
R the side windows and slidin gsunroo fare
close dcompl etely.
R the blower for the ventilation/heating is
switched off (OFF button is depressed).
R the windscreen wiper switch is at posi-
tion 0.
The vehic lecoul dotherwise be damaged.
After using an automatic car wash, wip eoff
wa xfrom th ewindscreen and the wiper
blades. This wil lprevent smears and red uce
wiping noises cause dbyresidue on the wind-
screen.
Washing by hand In some countries, washing by hand is only
allowed at speciall
yequipped washing bays.
Observe the lega lrequirements for each indi-
vidual country.
X Do not use hot water and do not wash the
vehic lein direct sunlight.
X Use asoft sponge to clean.
X Use amild cleaning agent, such as acar
shampoo approved by Mercedes-Benz.
X Thoroughly hos edown the vehicle with a
gentle jet of water.
X Do not point the water jet directly towards
the air inlet.
X Use plenty of water and rinse out the
sponge frequently.
X Rinse the vehicle with clean water and dry
thoroughly with achamois.
X Do not let the cleanin gagent dry on the
paintwork.
When using the vehicle in winter, remove all
traces of roa dsalt deposits carefully and as
soon as possible. High-pressure cleanin
gequipment G
WARNING
Do not use high-pressure cleaners with circu-
lar-jet nozzles (dirt grinders) to clean your
vehicle, in particular the tyres. You could oth-
erwis edamage the tyres and cause an acci-
dent.
! Always maintain adistance of at least
30 cm between the vehicle and the high-
pressure cleaner nozzle. Information about
the correct distance is available from the
equipment manufacturer.
Move the high-pressure cleaner nozzle
around when cleaning your vehicle.
Do not aim directly at any of the following:
R tyres
R door gaps, roof gaps, joint setc.
R electrical components
R battery
R connectors
R lights
R seals
R trim elements
R ventilatio nslots
Damaged seals or electrical components
can lead to leaks or failures.
Cleanin gthe whee ls !
Do not use acidic whee lcleaning products
to remov ebrake dust .This could damage
wheel bolts and brake components.
! Do not par kupthe vehicle for an extended
period straight after cleanin git, particularly
after having cleaned the wheels with wheel
cleaner. Wheel cleaners could cause
increased corrosio nofthe brake discs and
brake pads/linings. For this reason, you
should drive for afew minutes after clean-
ing. Brakin gheats the brak ediscs and the
brake pads/linings, thus drying them. The
vehicle can then be parked up. Care
325Maintenance andcare Z
Page 329 of 389

Cleaning th
epaintwork Scra
tches, corrosiv edeposits ,area saffected
by corrosion and damage ca used by inade-
quate care canno talways be completely
repaired. In such cases, visit aqualified spe-
cialist workshop, e.g. aMercedes-Benz
Servic eCentre.
X Remov eimpurities immediately, where
possible, whilst avoiding rubbing to ohard.
X Soak insect remain swith insec tremover
and rinse off the treated area safterwards.
X Soa kbird droppings with water and rinse
off the treated areas afterwards.
X Remove coolant, brak efluid, tree resin,
oils, fuels and greases by rubbin ggently
with acloths oaked in petroleum ether or
lighter fluid.
X Use tar rem overtor emove tar stains.
X Use silicone rem overtor emove wax.
! Do not affix:
R stickers
R films
R magnetic plates or simila ritems
to painted surfaces. You could otherwise
damage the paintwork.
Car eand treatment of matt paintwo rkIf
your vehicle has aclear mat tfinish, observe
the followin ginstructions in order to avoid
damage to the paintwork due to incorrect
care.
These notes also appl ytolight alloy wheels
with aclear mat tfinish.
! Neve rpolish the vehicle or the light alloy
wheels. Polishing makes the paintwork
shiny. !
The following ma ycause the paint to
become shiny and thus reduce the matt
effect:
R Vigorous rubbing with unsuitable mate-
rials.
R Frequent use of car washes.
R Washing the vehicle in direct sunlight.
! Never use paint cleaner, buffing or pol-
ishing products, or glos spreserver, e.g.
wax .These product sare onl ysuitable for
high-glos ssurfaces. Thei ruse on vehicles
wit hm att finish leads to considerable sur-
face damage (shiny, spotted areas).
Always have paintwork repairs performed
at aq ualified specialist workshop, e.g. a
Mercedes-Benz Servic eCentre.
! Do not use wash programs with ahot wax
treatment under any circumstances.
i The vehicle should preferably be washed
by hand using asoft sponge, car shampoo
and plent yofwater.
i Use only insect remover and car shampoo
from the range of recommended and
approved Mercedes-Benz care products.
Cleaning the windows G
WARNING
Switch off the windscreen wipers and remove
the key from the ignition lock before cleaning
the windscreen or the wiper blades. On vehi-
cles with KEYLESS-GO, press the Start/Stop
button repeatedly until all indicator lamps in
the instrument cluster have gone off. The
windscreen wipers could otherwise move and
injure you.
X Clean the inside and outside of the win-
dows with adamp cloth and acleaning
agent that is recom mended and approved
by Mercedes-Benz.
! Do not use dry cloths, abrasive products,
solvents or cleaning agents containing sol-
vent stoc lean the inside of the windows. 326
CareMaintenance and care
Page 332 of 389
X
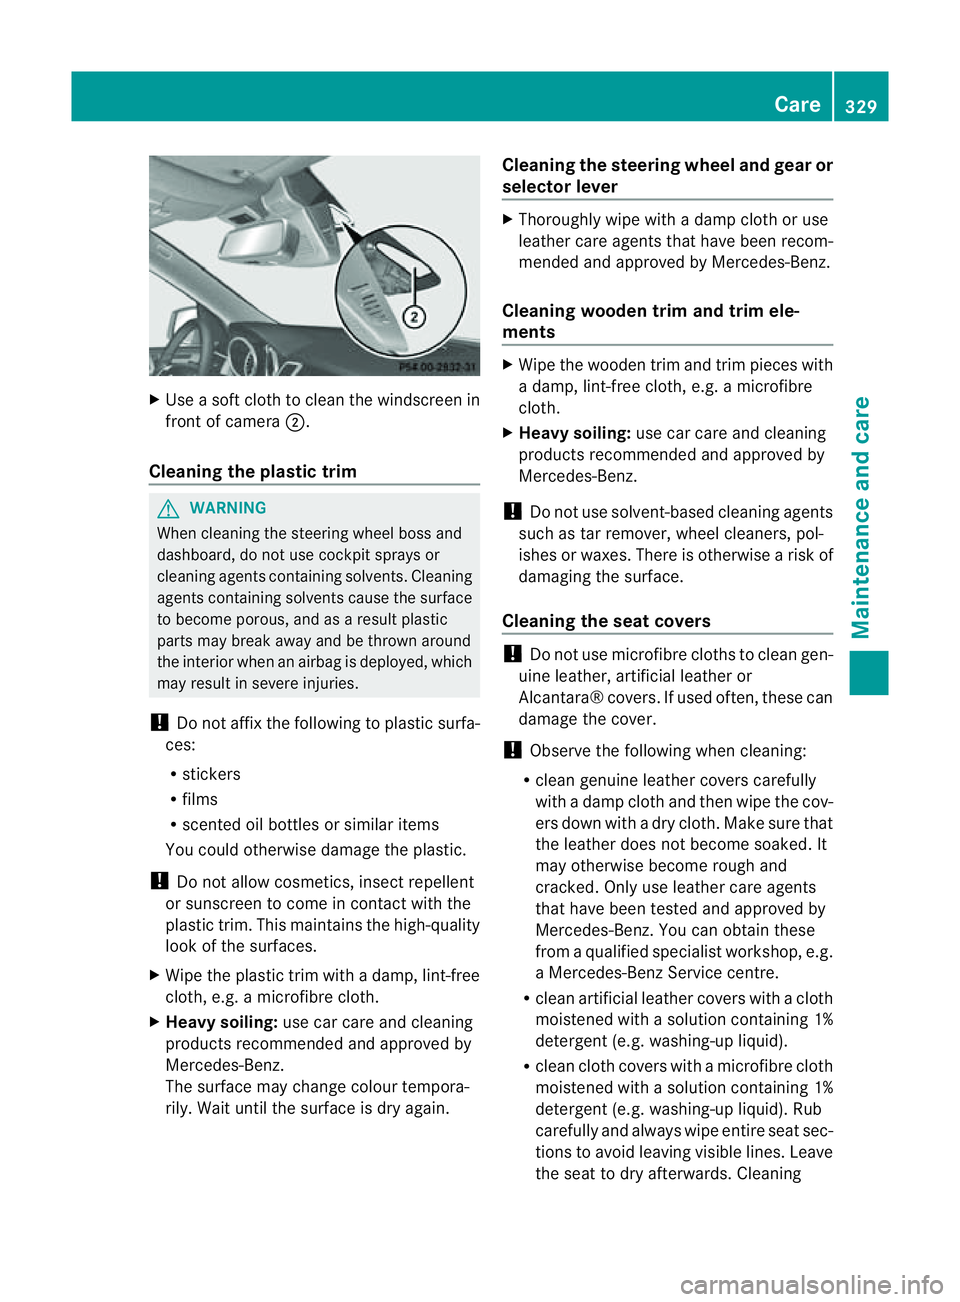
Use asoft clot htoclean the windscreen in
front of camera ;.
Cleaning the plastic trim G
WARNING
When cleanin gthe steering wheel boss and
dashboard, do not use cockpit sprays or
cleanin gagents containing solvents. Cleaning
agent scontaining solvents cause the surface
to becom eporous, and as aresult plastic
part smay break away and be thrown around
the interior when an airbag is deployed, which
may result in severe injuries.
! Do not affix the following to plastic surfa-
ces:
R stickers
R films
R scented oil bottles or similar items
You could otherwise damage the plastic.
! Do not allow cosmetics, insect repellent
or sunscreen to come in contact with the
plastic trim .This maintain sthe high-quality
look of the surfaces.
X Wipe the plastic trim with adamp, lint-free
cloth, e.g. amicrofibre cloth.
X Heavy soiling: use car care and cleaning
products recommended and approved by
Mercedes-Benz.
The surface may change colour tempora-
rily. Wait until the surface is dry again. Cleanin
gthe steering whee land gear or
selector lever X
Thoroughl ywipe with adamp cloth or use
leather care agents that have been recom-
mended and approved by Mercedes-Benz.
Cleanin gwooden trim and trim ele-
ments X
Wipe the wooden trim and trim pieces with
ad amp, lint-free cloth, e.g. amicrofibre
cloth.
X Heavy soiling: use car care and cleaning
products recommended and approved by
Mercedes-Benz.
! Do not use solvent-based cleaning agents
such as tar remover, wheel cleaners, pol-
ishes or waxes. There is otherwise arisk of
damaging the surface.
Cleanin gthe seat covers !
Do not us emicrofibre cloths to clean gen-
uine leather, artificial leather or
Alcantara® covers. If used often, these can
damage the cover.
! Observe the following when cleaning:
R clean genuine leather cover scarefully
with adamp cloth and then wipe the cov-
ers down with adry cloth .Make sure that
the leather does not become soaked .It
may otherwise become rough and
cracked .Only use leather care agents
that have bee ntested and approved by
Mercedes-Benz. You can obtain these
from aqualified specialist workshop, e.g.
aM ercedes-Ben zService centre.
R clean artificial leather covers with acloth
moistened with asolution con taining 1%
detergent (e.g. washing-up liquid).
R clean cloth cover switham icrofibre cloth
moistened with asolution con taining 1%
detergent (e.g. washing-up liquid). Rub
carefully and always wipe entire seat sec-
tions to avoid leaving visible lines. Leave
the seat to dry afterwards. Cleaning Care
329Maintenance andcare Z