2011 MERCEDES-BENZ GL350 BlueTEC reset
[x] Cancel search: resetPage 231 of 376
Display messages
Hiding display messages
GWarning
All categories of messages contain important information which should be taken note of and,
where a malfunction is indicated, addressed as soon as possible at an authorized Mercedes-Benz
Center.
Failure to repair the condition noted may cause damage not covered by the Mercedes-Benz
Limited Warranty, or result in property damage or personal injury.
Display messages appear in the multifunction display.
XPress the V, U , & or * button on the steering wheel to select another display.
or
XPress reset button . on the instrument cluster ( Y page 28).
The display message is cleared.
The multifunction display shows high-priority display messages in red.
You cannot hide display messages of the highest priority. The multifunction display shows
these messages continuously until the causes for the messages have been remedied.
Certain display messages are accompanied by an audible warning tone or a continuous tone.
Please respond in accordance with the display messages and follow the additional notes in
this Operator's Manual.
Message memory menu
The on-board computer saves certain display messages. You can call up the display messages
in the message memory menu.
The message memory menu is only shown if any display messages have been stored.
XPress the V or U button repeatedly, until either the original menu or the message
memory menu is shown.
If there are display messages, the multifunction display shows, for example, 2 messages.XUsing & or * scroll through the display messages.
When the ignition is switched off, all display messages are deleted apart from some high-
priority display messages. Once the causes of the high-priority display messages have been
rectified, the corresponding display messages are also deleted.
Display messages229On-board computer and displaysBA 164.8 USA, CA Edition B 2011; 1; 2, en-USd2sboikeVersion: 3.0.3.52010-04-21T15:08:44+02:00 - Seite 229Z
Page 301 of 376
The service interval display informs you of the
next service due date.
If a service due date has been exceeded, you
also hear an acoustic signal.
The multifunction display shows a service
message for a few seconds, e.g.
Service A In .. Miles
Service A due now
Service A Exceeded By .. Miles
The letter indicates how much time the
workshop will require to carry out the service
work. The letters displayed range from A for
a short service duration to H for a long service
duration.
The service interval display does not take into
account any periods of time during which the
battery is disconnected.
Maintaining the time-dependent service
schedule:XNote down the service due date displayed
in the multifunction display before
disconnecting the battery.
or
XSubtract the battery disconnection periods
from the service date shown on the display
after reconnecting the battery.
Hiding the service message
XPress the . reset button on the
instrument cluster ( Y page 28).
Displaying the service message
XSwitch on the ignition.XPress V or U to select the standard
display menu on the steering wheel
( Y page 218).XSelect & or * to select the service
interval display.
The service due date appears in the
multifunction display.Points to remember
A qualified specialist workshop, e.g. an
authorized Mercedes-Benz Center, will reset
the service interval display after the
necessary service work has been carried out.
You can obtain more information, e.g. on
maintenance work, at an authorized
Mercedes-Benz Center or directly at
Mercedes-Benz.
! If the service interval indicator has been
inadvertently reset, this setting can be
corrected at an authorized Mercedes-Benz
Center.
Have the service work carried out as
described in the Service Booklet. There
may otherwise be increased wear, resulting
in damage to the vehicle or to the major
assemblies.
Care
Notes on care
Regular care of your vehicle is a condition for
retaining the quality in the long term.
Use care products and cleaning agents
recommended and approved by Mercedes-
Benz.
GWarning
Many cleaning products can be hazardous.
Some are poisonous, others are flammable.
Always follow the instructions on the
particular container. Always open your
vehicle's doors or windows when cleaning the
inside.
Never use fluids or solvents that are not
designed for cleaning your vehicle.
Always lock away cleaning products and keep
them out of reach of children.
! For cleaning your vehicle, do not use any
of the following:
R dry, rough or hard cloths
R abrasive cleaning agents
Care299Maintenance and careBA 164.8 USA, CA Edition B 2011; 1; 2, en-USd2sboikeVersion: 3.0.3.52010-04-21T15:08:44+02:00 - Seite 299Z
Page 311 of 376
After an accidentProblemPossible causes/consequences and M SolutionsFuel is leaking from the
vehicle.GRisk of explosion or fire
The fuel line or the fuel tank is faulty.
XImmediately turn the key to position 0(Y page 147)in the ignition
lock and remove it.XDo not restart the engine under any circumstances.XConsult a qualified specialist workshop.You are unable to
determine the extent of
the damage.XConsult a qualified specialist workshop.You cannot detect any
damage.XStart the engine as normal.The NECK-PRO head
restraints/NECK-PRO
luxury head restraints
on the driver's and
front-passenger seat
have been triggered.Your vehicle has been involved in a rear-end collision.XReset the triggered NECK-PRO head restraints/NECK-PRO
luxury head restraints ( Y page 52).Where will I find...?
First-aid kit
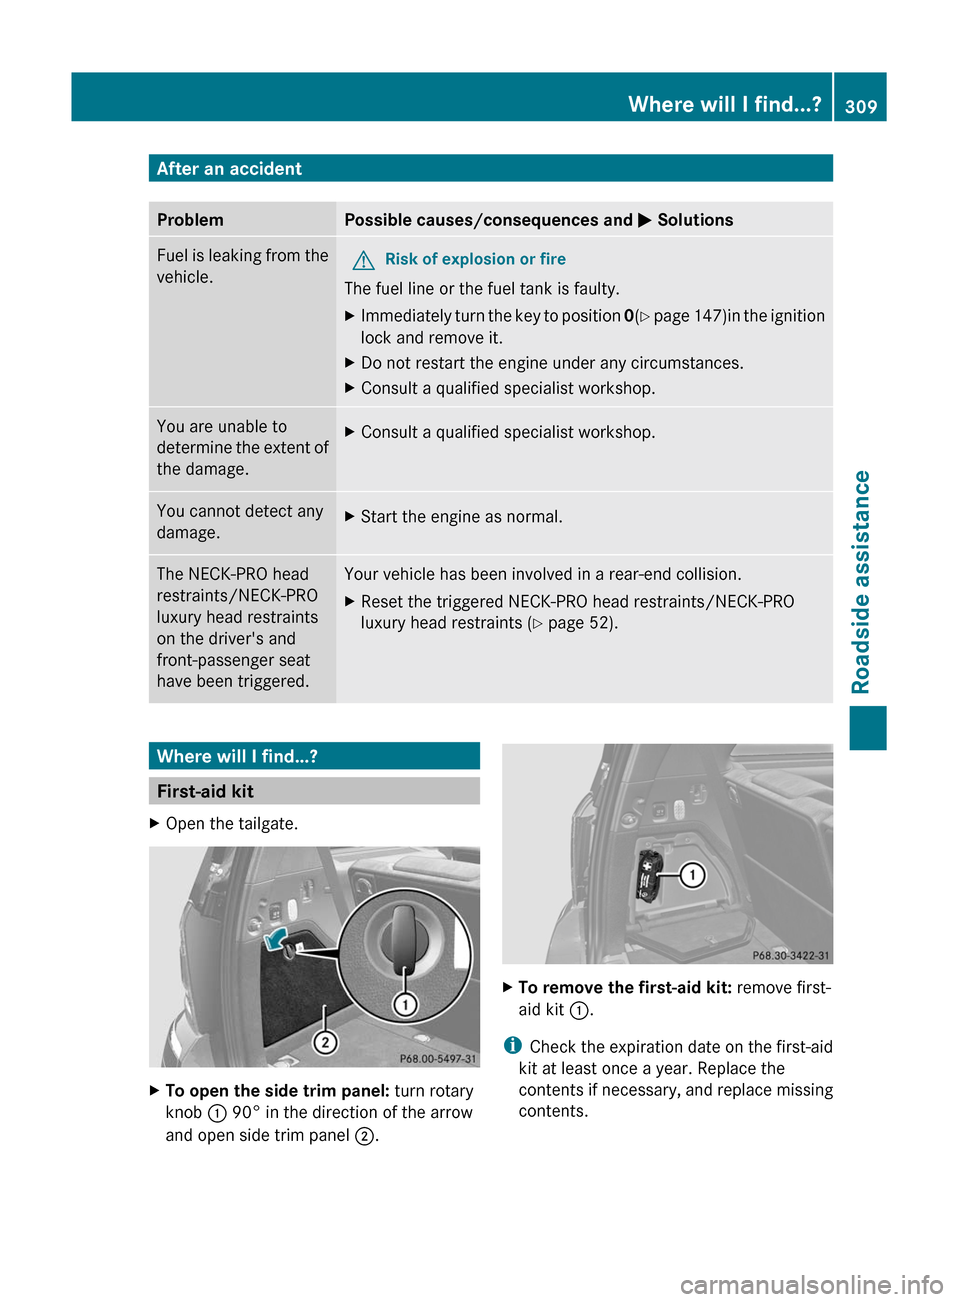
XOpen the tailgate.XTo open the side trim panel: turn rotary
knob : 90° in the direction of the arrow
and open side trim panel ;.XTo remove the first-aid kit: remove first-
aid kit :.
i
Check the expiration date on the first-aid
kit at least once a year. Replace the
contents if necessary, and replace missing
contents.
Where will I find...?309Roadside assistanceBA 164.8 USA, CA Edition B 2011; 1; 2, en-USd2sboikeVersion: 3.0.3.52010-04-21T15:08:44+02:00 - Seite 309Z
Page 325 of 376
GWarning
Do not place any metal objects on the battery
as this could result in a short circuit.
Use leak-proof batteries only to avoid the risk
of acid burns in the event of an accident.
Take care that you do not become statically
charged, e.g. by wearing synthetic clothing or
rubbing against textiles. For this reason, you
also should not pull or push the battery over
carpets or other synthetic materials.
Never touch the battery first. First, touch the
outside body of the vehicle in order to release
any possible electrostatic charges.
Do not rub the battery with rags or cloths. The
battery could explode if touched due to
electrostatic charge or due to spark
formation.
! Switch off the engine and remove the
SmartKey before disconnecting the
terminal clamps from the battery. On
vehicles with KEYLESS-GO, make sure that
the ignition is switched off. Check that all
the indicator lamps in the instrument
cluster are off. You may otherwise destroy
electronic components, such as the
alternator.
! Like other batteries, the vehicle battery
may discharge over time if you do not use
the vehicle. In this case, have the battery
disconnected at a qualified specialist
workshop, e.g. an authorized Mercedes-
Benz Center. You can also charge the
battery with a charger recommended by
Mercedes-Benz. Contact an authorized
Mercedes-Benz Center for further
information.
The battery, breather hose and cover of the
positive terminal clamp must be installed
securely during operation.
i Remove the SmartKey if you park the
vehicle and do not require any electrical
consumers. The vehicle will then use very
little energy, thus conserving battery
power.
Mercedes-Benz recommends that you do not
carry out work on batteries yourself, e.g.
removing, charging or replacing. Always have
this work performed at a qualified specialist
workshop, e.g. an authorized Mercedes-Benz
Center.
i If the power supply has been interrupted,
e.g. if the battery has been reconnected,
you must carry out the following tasks:
R set the clock ( Y page 222)
On vehicles with COMAND and a
navigation system, the clock is set
automatically.
R reset the sliding sunroof ( Y page 90)
R reset the function for folding the exterior
mirrors in/out automatically by folding
the mirrors out once ( Y page 108)
R reset the side windows ( Y page 87)
Charging the battery
GWarning
Never charge a battery while still installed in
the vehicle unless the accessory battery
charge unit approved by Mercedes-Benz is
being used. Gases may escape during
charging and cause explosions that may
result in paint damage, corrosion or personal
injury.
An accessory battery charge unit specially
adapted for Mercedes-Benz vehicles and
tested and approved by Mercedes-Benz is
available. It permits the charging of the
battery in its installed position. Contact an
authorized Mercedes-Benz Center for
information and availability.
Charge the battery in accordance with the
separate instructions for the accessory
battery charger.
GWarning!
There is a risk of acid burns during the
charging process due to the gases which
escape from the battery. Do not lean over the
battery during the charging process.
Battery323Roadside assistanceBA 164.8 USA, CA Edition B 2011; 1; 2, en-USd2sboikeVersion: 3.0.3.52010-04-21T15:08:44+02:00 - Seite 323Z
Page 330 of 376
XRemove the towing eye from the vehicle
tool kit ( Y page 310).GWarning
The exhaust tail pipe may be hot. You could
burn yourself if you touch the tail pipe. Be
particularly careful when removing the rear
cover.
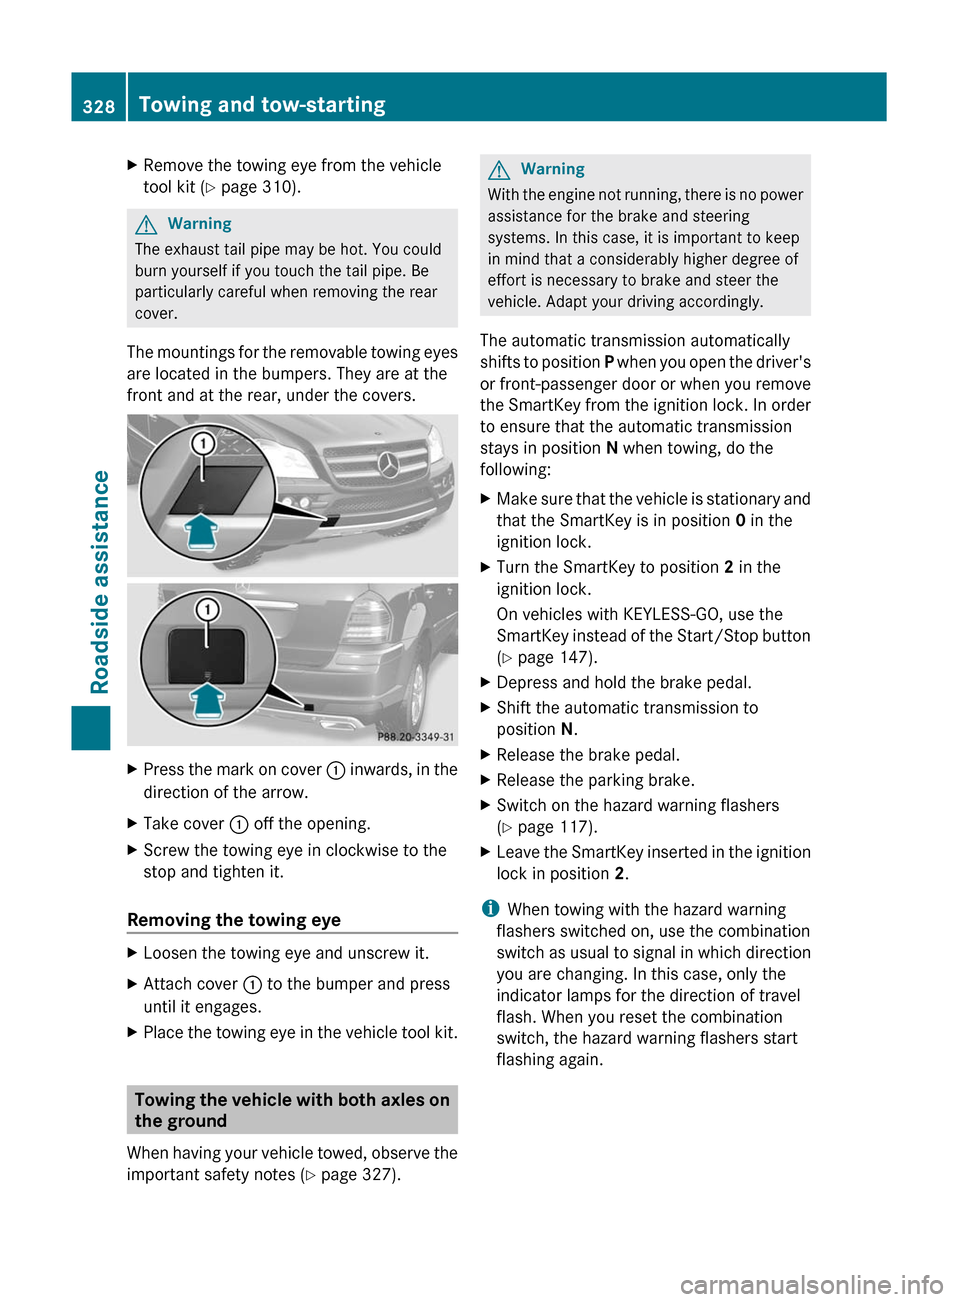
The mountings for the removable towing eyes
are located in the bumpers. They are at the
front and at the rear, under the covers.
XPress the mark on cover : inwards, in the
direction of the arrow.XTake cover : off the opening.XScrew the towing eye in clockwise to the
stop and tighten it.
Removing the towing eye
XLoosen the towing eye and unscrew it.XAttach cover : to the bumper and press
until it engages.XPlace the towing eye in the vehicle tool kit.
Towing the vehicle with both axles on
the ground
When having your vehicle towed, observe the
important safety notes ( Y page 327).
GWarning
With the engine not running, there is no power
assistance for the brake and steering
systems. In this case, it is important to keep
in mind that a considerably higher degree of
effort is necessary to brake and steer the
vehicle. Adapt your driving accordingly.
The automatic transmission automatically
shifts to position P when you open the driver's
or front-passenger door or when you remove
the SmartKey from the ignition lock. In order
to ensure that the automatic transmission
stays in position N when towing, do the
following:
XMake sure that the vehicle is stationary and
that the SmartKey is in position 0 in the
ignition lock.XTurn the SmartKey to position 2 in the
ignition lock.
On vehicles with KEYLESS-GO, use the
SmartKey instead of the Start/Stop button
( Y page 147).XDepress and hold the brake pedal.XShift the automatic transmission to
position N.XRelease the brake pedal.XRelease the parking brake.XSwitch on the hazard warning flashers
( Y page 117).XLeave the SmartKey inserted in the ignition
lock in position 2.
i
When towing with the hazard warning
flashers switched on, use the combination
switch as usual to signal in which direction
you are changing. In this case, only the
indicator lamps for the direction of travel
flash. When you reset the combination
switch, the hazard warning flashers start
flashing again.
328Towing and tow-startingRoadside assistance
BA 164.8 USA, CA Edition B 2011; 1; 2, en-USd2sboikeVersion: 3.0.3.52010-04-21T15:08:44+02:00 - Seite 328
Page 343 of 376
XMake sure that the key is in position 2
( Y page 147) in the ignition lock.XPress and hold the V or U button on
the multifunction steering wheel until the
standard display appears in the
multifunction display ( Y page 218).XPress the * or & button until the
Run Flat Indicator Active Menu: R-
Button message appears in the
multifunction display.XPress the reset button ( Y page 28) on the
instrument cluster.
The Restart Run Flat Indicator?
Yes Cancel message appears in the
multifunction display.
If you wish to confirm the restart:
XPress the W button.
The Run Flat Indicator Restarted
message appears in the multifunction
display.
After a teach-in period, the tire pressure
loss warning system will monitor the set
tire pressures of all four tires.
If you wish to cancel the restart:
XPress the X button.
or
XWait until the Restart Run Flat
Indicator? Yes Cancel message
disappears.
The tire pressure values stored at the last
restart will continue to be monitored.
Tire pressure monitoring system
(USA only)
Important safety information
The tire pressure monitoring system consists
of sensors installed in the vehicle wheels that
monitor the air pressure in all four tires. The
tire pressure monitoring system warns you
when the pressure in one or more tires
decreases. It only works when the
corresponding sensors are installed on all the
wheels.
The tire pressure monitor informs you via a
yellow warning lamp in the instrument cluster
about pressure loss or if the system is
malfunctioning. Whether the warning lamp
flashes or lights up indicates whether a tire
pressure is too low or the tire pressure
monitor is malfunctioning:
R If the warning lamp is lit up constantly, one
or more of your tires are significantly
underinflated. The tire pressure monitor is
not malfunctioning.
R If the warning lamp flashes for 60 seconds
and is then lit constantly, the tire pressure
monitor is malfunctioning.GWarning!
Each tire, including the spare (if provided),
should be checked at least once a month
when cold and inflated to the inflation
pressure recommended by the vehicle
manufacturer on the tire and loading
information table on the driver's door B-pillar
or the tire inflation pressure table on the
inside of the fuel filler flap. If your vehicle has
tires of a different size than the size indicated
on the tire and loading information table or
the tire inflation pressure table, you should
determine the proper tire inflation pressure
for those tires.
As an added safety feature, your vehicle has
been equipped with a tire pressure monitor
(TPMS). An indicator lamp lights up if one or
more of your tires are significantly
underinflated. Accordingly, when the low tire
pressure indicator lamp lights up, you should
stop and check your tires as soon as possible,
and inflate them to the proper pressure.
Driving on a significantly underinflated tire
causes the tire to overheat and can lead to
tire failure.
Underinflation also reduces fuel efficiency
and tire tread life and may affect the vehicle's
handling and stopping ability. Please note that
the TPMS is not a substitute for proper tire
maintenance and it is the driver's
Tire pressures341Tires and wheelsBA 164.8 USA, CA Edition B 2011; 1; 2, en-USd2sboikeVersion: 3.0.3.52010-04-21T15:08:44+02:00 - Seite 341Z
Page 345 of 376
Monitor Active message appears instead
of the tire pressure display. The tire pressures
are already being monitored.
i If a spare wheel is installed, the system
may continue to show the tire pressure of
the wheel that has been removed for a few
minutes. If this occurs, note that the value
displayed for the position where the
emergency spare wheel/spare wheel is
installed is not the same as the current tire
pressure for the spare wheel.
TPMS warning messages
If the TPMS detects a significant pressure
loss on one or more tires, a warning message
is shown in the multifunction display. In
addition, a warning tone sounds and the tire
pressure warning lamp lights up in the
instrument cluster.
Each tire in which a significant pressure loss
has been detected is highlighted with a red
triangle.
Restarting the tire pressure monitoring
system
GWarning
It is the driver's responsibility to set the tire
inflation pressure to the recommended cold
tire inflation pressure. Underinflated tires
affect the ability to steer or brake the vehicle.
You might lose control over the vehicle.
When you restart the TPMS, all existing
warning messages are deleted and the
warning lamps go out. The currently set tire
pressures are adopted as the specified values
for monitoring.
The TPMS must be restarted when you set the
tire pressure to a new value (as a result of
changed handling or load characteristics, for
example). The TPMS then monitors the new
tire pressure values.
Restart the TPMS after the tire pressure has
been set, as desired, according to the
recommended values for the driving
conditions ( Y page 336). Only correct tire
pressures on cold tires. Comply with the tire
pressures recommended on the Tire and
Loading Information placard on the B-pillar on
the driver's side. Additional tire pressure
values for driving at high speeds or with heavy
loads can be found in the tire pressure table
on the inside of the fuel filler flap.XMake sure that the tire pressure is set
properly in all four tires.XMake sure that the key is in position 2 in
the ignition lock.XPress and hold the V or U button on
the multifunction steering wheel until the
standard display appears in the
multifunction display ( Y page 218).XPress and hold the & or * button
until the tire pressure of all tires or the
Tire pressure displayed after
driving for a few minutes. message
is shown.XPress the reset button on the instrument
cluster ( Y page 28).
The Restart tire pressure monitor?
Yes Cancel message appears in the
multifunction display.XTo confirm selection: press the W
button.
The Tire Pressure Monitor
Restarted message appears in the
multifunction display.
After driving for a few minutes, the system
confirms that the current tire pressure
values are within the specified range. The
new tire pressure values are then accepted
as reference values and monitored.XTo cancel restart: press the X button.
i
If the positions of the wheels on the
vehicle have been changed, the tire
pressure may be shown in the wrong
position briefly. This will be corrected after
driving for a few minutes and the tire
pressure will be displayed in the correct
position.
Tire pressures343Tires and wheelsBA 164.8 USA, CA Edition B 2011; 1; 2, en-USd2sboikeVersion: 3.0.3.52010-04-21T15:08:44+02:00 - Seite 343Z