2011 MERCEDES-BENZ GL350 BlueTEC reset
[x] Cancel search: resetPage 46 of 376
If the 4 2 indicator lamp is not
illuminated, the front passenger front air bag
is activated and will be deployed
R in the event of certain frontal impacts
R if impact exceeds a preset deployment
threshold
R independently of the side impact air bags
If the front passenger front air bag is
deployed, the rate of inflation will be
influenced by
R the rate of relevant vehicle deceleration as
assessed by the air bag control unit
R the front passenger’s weight category as
identified by the OCS
For further information, see "Air bag display
messages" ( Y page 231).GWarning
Accident statistics show that children
secured in the rear seats are safer than
children secured in the front-passenger seat.
For this reason, we strongly advise that you
always secure children in the rear seats.
Regardless of the seat position, children
under 12 years must be secured correctly in
a suitable infant or child restraint system or
booster seat suitable for the size and weight
of the child.
The infant or child restraint system must be
correctly secured using the vehicle's seat
belt, the seat belt and Top Tether belt or the
lower anchorages and the Top Tether belt in
complete accordance with the child seat
manufacturer's instructions.
Occupants, in particular children, must sit as
upright as possible, fasten the seat belt
correctly and use a suitable infant restraint
system, child restraint system or booster seat
suitable for the size and weight of the child.
Children can be killed or seriously injured by
an inflating air bag. Observe the following
important information if it is absolutely
necessary to carry a child on the front-
passenger seat:
R your vehicle is equipped with air bag
technology designed to deactivate the
passenger front air bag in your vehicle
when the system senses the weight of a
typical 12-month-old child or less along
with the weight of a standard appropriate
child restraint on the passenger seat.
R a child in a rear-facing child restraint on the
passenger seat will be seriously injured or
even killed if the passenger front air bag
inflates in a collision which could occur
under some circumstances, even with the
air bag technology installed in your vehicle.
The only way to completely rule out this risk
is by making sure you never place a child in
a rearward-facing child restraint system on
the front-passenger seat. For this reason,
we strongly advise that you always carry
children in a rearward-facing child restraint
system on a rear seat.
R if it is absolutely necessary to install a
rearward-facing child restraint system on
the front-passenger seat, make sure the
42 indicator lamp is
illuminated, indicating that the front-
passenger front air bag is disabled. If the
42 indicator lamp does not
light up or goes out when the child restraint
system is installed, check the anchorages
of the restraint system. Check the
42 indicator lamp regularly
while driving to ensure that the
42 indicator lamp is
illuminated. If the 42 indicator
lamp lights up or remains out, you may only
carry a child on the front-passenger seat
once the system has been repaired.
A child in a rear-facing child restraint on the
passenger seat will be seriously injured or
even killed if the passenger front air bag
inflates.44Occupant safetySafety
BA 164.8 USA, CA Edition B 2011; 1; 2, en-USd2sboikeVersion: 3.0.3.52010-04-21T15:08:44+02:00 - Seite 44
Page 54 of 376
of having to swerve to avoid an obstacle at
a speed above 85 mph (140 km/h).
PRE-SAFE ®
takes the following measures
depending on the hazardous situation
detected:
R the front seat belts are pre-tensioned.
R on vehicles with memory functions: the
front-passenger seat is adjusted if it is in an
unfavorable position under accident
conditions.
R if the vehicle skids, the side windows are
closed so that only a small gap remains.
R on vehicles with sliding sunroof: if the
vehicle skids, the sliding sunroof closes so
that only a small gap remains.
If the hazardous situation passes without
resulting in an accident, PRE-SAFE ®
slackens
the belt pretensioning. All settings made by
PRE-SAFE ®
can then be reversed.
If the seat belts are not released:XMove the backrest or the seat back slightly
until the belt pretensioning is reduced.
The locking mechanism releases.GWarning
Make sure that nobody can become trapped
as you adjust the seat.
! Make sure that there are no objects in the
footwell or behind the seats when resetting
the seats. There is a risk that the seats
and/or the objects could be damaged.
More information about belt adjustment, a
convenience function integrated into PRE-
SAFE ®
, can be found in the "Belt adjustment"
section ( Y page 56).
NECK-PRO head restraints
The NECK-PRO head restraints increase
protection to the driver's and front-
passenger's head and neck. To this end, the
head restraints on the driver's and front-
passenger seats are moved forwards and
upwards in the event of a rear-end collision of
a certain severity. This provides better head
support.GWarning
Do not secure any objects (e.g. coat hangers)
on the NECK-PRO head restraints. Otherwise,
the NECK-PRO head restraints may not
function properly, or in the event of a rear-end
collision may not be able offer the level of
protection they are designed to provide.
If the NECK-PRO head restraints have been
triggered in an accident, you must reset the
NECK-PRO head restraints on the driver’s and
front-passenger seat ( Y page 52).
Otherwise, the additional protection will not
be available in the event of another rear-end
collision. You can recognize when NECK-PRO
head restraints have been triggered by the
fact that they have moved forwards and can
no longer be adjusted.
Resetting triggered NECK-PRO head
restraints
Important safety information
GWarning
For reasons of safety, have the NECK-PRO
head restraints/NECK-PRO luxury head
restraints checked at a Mercedes-Benz
Service Center after a rear-end collision.
GWarning
If you press the NECK-PRO head restraint
cushion backwards, make sure that your
fingers are not trapped between the cushion
and the cover. Failure to observe could result
in injuries.
NECK-PRO head restraints
i Resetting the NECK-PRO head restraints
requires a certain amount of strength. If
you have difficulty resetting the NECK-PRO
head restraints, have this work carried out
at a qualified specialist workshop, e.g. an
authorized Mercedes-Benz Center.
52Occupant safetySafety
BA 164.8 USA, CA Edition B 2011; 1; 2, en-USd2sboikeVersion: 3.0.3.52010-04-21T15:08:44+02:00 - Seite 52
Page 55 of 376
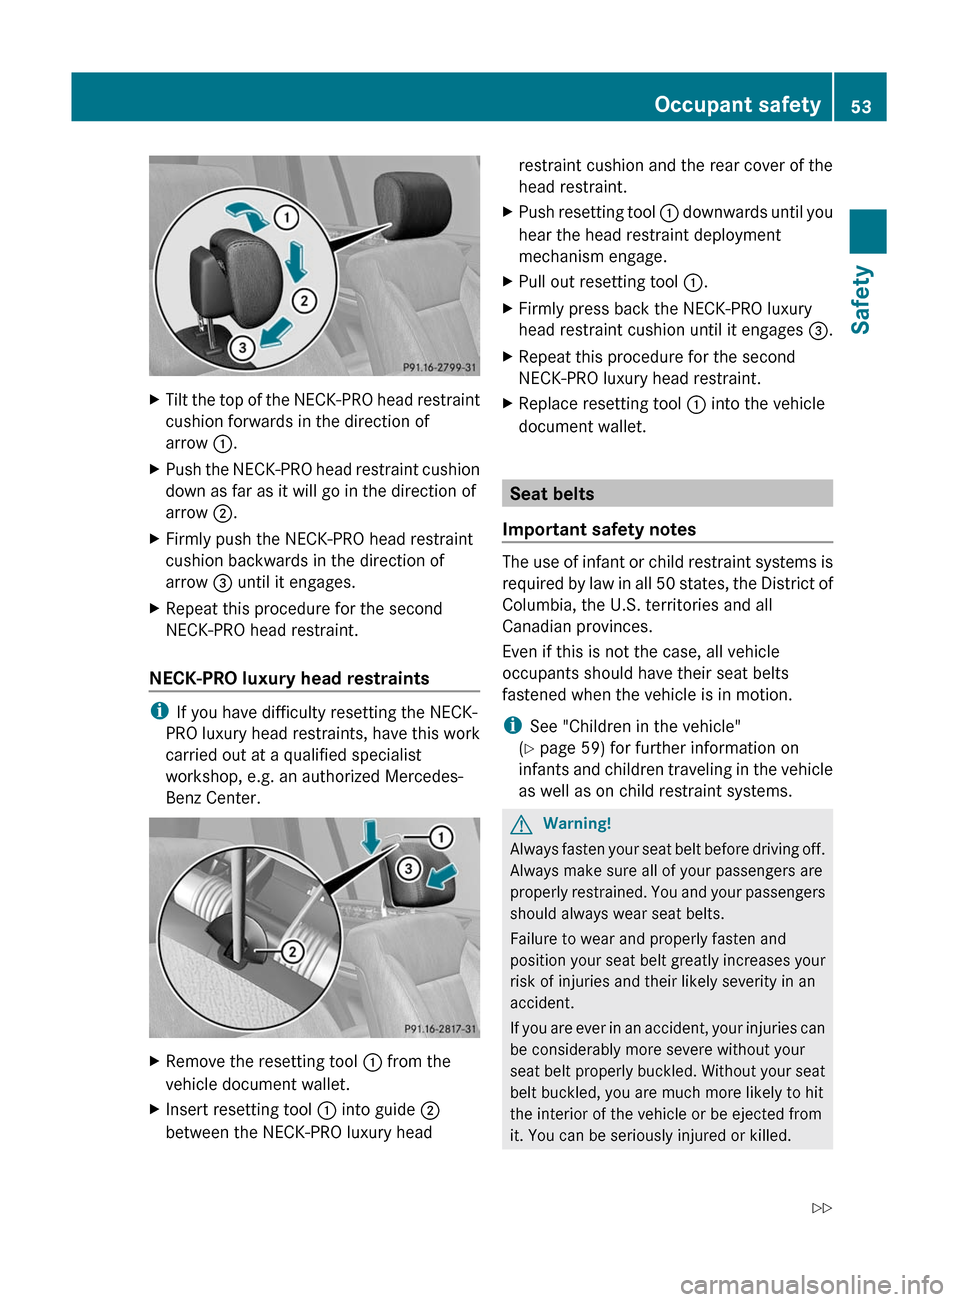
XTilt the top of the NECK-PRO head restraint
cushion forwards in the direction of
arrow :.XPush the NECK-PRO head restraint cushion
down as far as it will go in the direction of
arrow ;.XFirmly push the NECK-PRO head restraint
cushion backwards in the direction of
arrow = until it engages.XRepeat this procedure for the second
NECK-PRO head restraint.
NECK-PRO luxury head restraints
i If you have difficulty resetting the NECK-
PRO luxury head restraints, have this work
carried out at a qualified specialist
workshop, e.g. an authorized Mercedes-
Benz Center.
XRemove the resetting tool : from the
vehicle document wallet.XInsert resetting tool : into guide ;
between the NECK-PRO luxury headrestraint cushion and the rear cover of the
head restraint.XPush resetting tool : downwards until you
hear the head restraint deployment
mechanism engage.XPull out resetting tool :.XFirmly press back the NECK-PRO luxury
head restraint cushion until it engages =.XRepeat this procedure for the second
NECK-PRO luxury head restraint.XReplace resetting tool : into the vehicle
document wallet.
Seat belts
Important safety notes
The use of infant or child restraint systems is
required by law in all 50 states, the District of
Columbia, the U.S. territories and all
Canadian provinces.
Even if this is not the case, all vehicle
occupants should have their seat belts
fastened when the vehicle is in motion.
i See "Children in the vehicle"
( Y page 59) for further information on
infants and children traveling in the vehicle
as well as on child restraint systems.
GWarning!
Always fasten your seat belt before driving off.
Always make sure all of your passengers are
properly restrained. You and your passengers
should always wear seat belts.
Failure to wear and properly fasten and
position your seat belt greatly increases your
risk of injuries and their likely severity in an
accident.
If you are ever in an accident, your injuries can
be considerably more severe without your
seat belt properly buckled. Without your seat
belt buckled, you are much more likely to hit
the interior of the vehicle or be ejected from
it. You can be seriously injured or killed.
Occupant safety53SafetyBA 164.8 USA, CA Edition B 2011; 1; 2, en-USd2sboikeVersion: 3.0.3.52010-04-21T15:08:44+02:00 - Seite 53Z
Page 56 of 376
In the same crash, the possibility of injury or
death is lessened if you are properly wearing
your seat belt. The air bags can only protect
as intended if the occupants are properly
wearing their seat belts.GWarning
Never ride in a moving vehicle with the seat
backrest in an excessively reclined position as
this can be dangerous. You could slide under
the seat belt in a collision. If you slide under
it, the seat belt would apply force at the
abdomen or neck. That could cause serious
or even fatal injuries. The seat backrest and
seat belt provide the best restraint when the
wearer is in a position that is as upright as
possible and the seat belt is properly
positioned on the body.
GWarning
Never let more people ride in the vehicle than
there are seat belts available. Make sure
everyone riding in the vehicle is correctly
restrained with a separate seat belt. Never
use a seat belt for more than one person at a
time.
GWarning
Damaged seat belts or seat belts that have
been subjected to stress in an accident must
be replaced and their anchoring points must
also be checked.
Only use seat belts which have been approved
by Mercedes-Benz.
Do not make any modifications to the seat
belts. This can lead to unintended activation
of the ETDs or to their failure to activate when
necessary.
Do not bleach or dye seat belts as this may
severely weaken them. In a crash they may
not be able to provide adequate protection.
Have all work carried out only by qualified
technicians. Contact an authorized
Mercedes-Benz Center.
Correct use of the seat beltGWarning
USE SEAT BELTS PROPERLY
R Seat belts can only protect when used
properly. Never wear seat belts in any other
way than as described in this section, as
that could result in serious injuries in case
of an accident.
R Each occupant should wear their seat belt
at all times, because seat belts help reduce
the likelihood of and potential severity of
injuries in accidents, including rollovers.
The integrated restraint system includes
SRS (driver's front air bag, driver side knee
bag, front-passenger front air bag, side
impact air bags, window curtain air bags for
door windows), Emergency Tensioning
Devices, seat belt force limiters, and front
seat knee bolsters.
The system is designed to enhance the
protection offered to properly belted
occupants in certain frontal (front air bags,
driver's side knee bag and ETDs) and side
(side impact air bags, window curtain air
bags, and ETDs) impacts which exceed
preset deployment thresholds and in
certain rollovers (window curtain air bags
and ETDs).
R Never wear the shoulder belt under your
arm, against your neck or off your shoulder.
In a frontal crash, your body would move
too far forward. That would increase the
chance of head and neck injuries. The seat
belt would also apply too much force to the
ribs or abdomen, which could severely
injure internal organs such as your liver or
spleen.
Adjust the seat belt so that the shoulder
section is located as close as possible to
the middle of the shoulder. It should not
touch the neck. Never pass the shoulder
portion of the seat belt under your arm. For
this purpose, you can adjust the height of
the seat belt outlet.
54Occupant safetySafety
BA 164.8 USA, CA Edition B 2011; 1; 2, en-USd2sboikeVersion: 3.0.3.52010-04-21T15:08:44+02:00 - Seite 54
Page 81 of 376
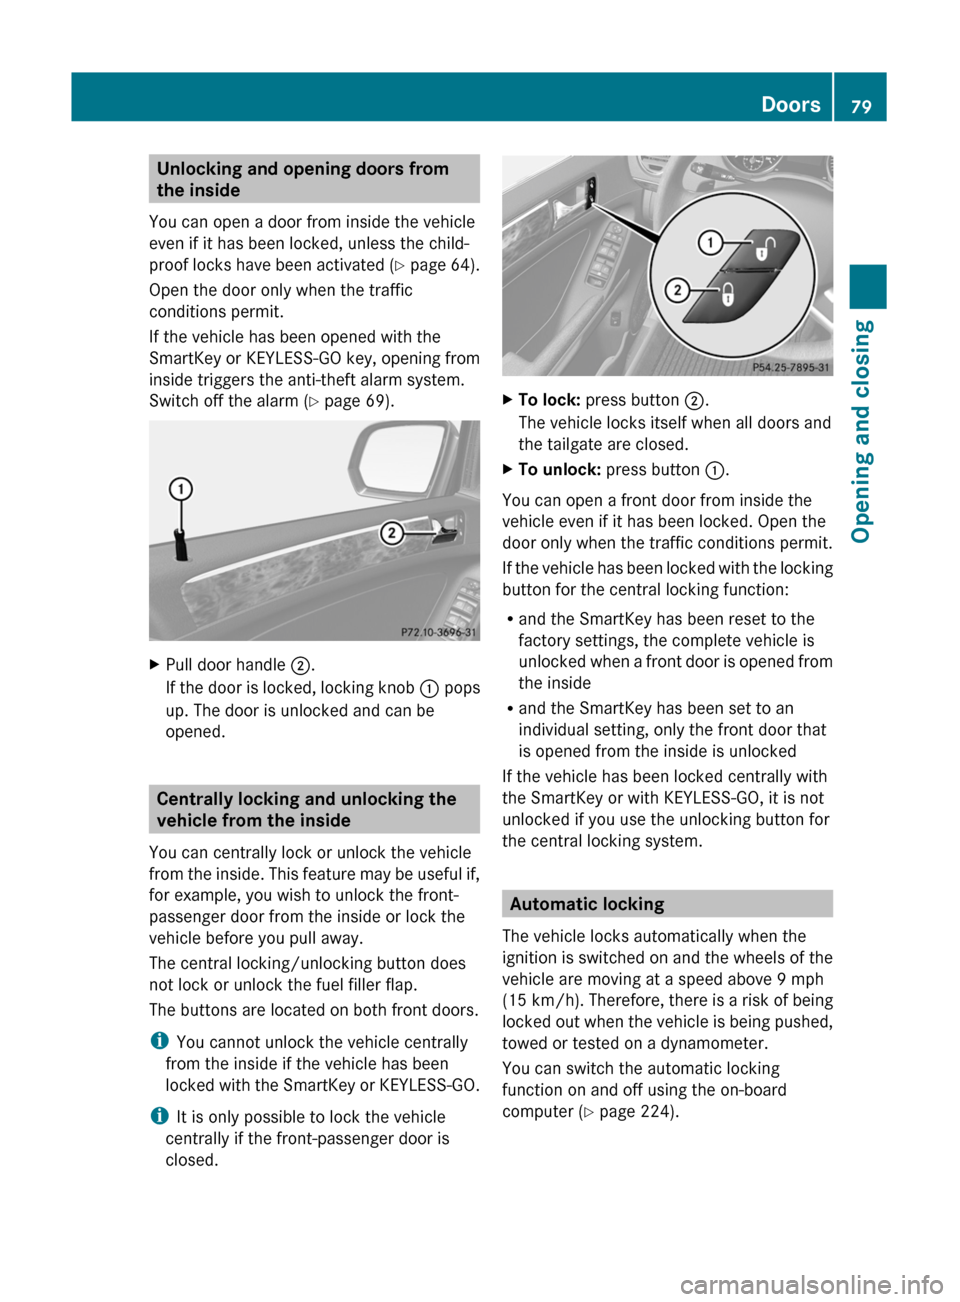
Unlocking and opening doors from
the inside
You can open a door from inside the vehicle
even if it has been locked, unless the child-
proof locks have been activated (Y page 64).
Open the door only when the traffic
conditions permit.
If the vehicle has been opened with the
SmartKey or KEYLESS-GO key, opening from
inside triggers the anti-theft alarm system.
Switch off the alarm ( Y page 69).XPull door handle ;.
If the door is locked, locking knob : pops
up. The door is unlocked and can be
opened.
Centrally locking and unlocking the
vehicle from the inside
You can centrally lock or unlock the vehicle
from the inside. This feature may be useful if,
for example, you wish to unlock the front-
passenger door from the inside or lock the
vehicle before you pull away.
The central locking/unlocking button does
not lock or unlock the fuel filler flap.
The buttons are located on both front doors.
i You cannot unlock the vehicle centrally
from the inside if the vehicle has been
locked with the SmartKey or KEYLESS-GO.
i It is only possible to lock the vehicle
centrally if the front-passenger door is
closed.
XTo lock: press button ;.
The vehicle locks itself when all doors and
the tailgate are closed.XTo unlock: press button :.
You can open a front door from inside the
vehicle even if it has been locked. Open the
door only when the traffic conditions permit.
If the vehicle has been locked with the locking
button for the central locking function:
R and the SmartKey has been reset to the
factory settings, the complete vehicle is
unlocked when a front door is opened from
the inside
R and the SmartKey has been set to an
individual setting, only the front door that
is opened from the inside is unlocked
If the vehicle has been locked centrally with
the SmartKey or with KEYLESS-GO, it is not
unlocked if you use the unlocking button for
the central locking system.
Automatic locking
The vehicle locks automatically when the
ignition is switched on and the wheels of the
vehicle are moving at a speed above 9 mph
(15 km/h) . Therefore, there is a risk of being
locked out when the vehicle is being pushed,
towed or tested on a dynamometer.
You can switch the automatic locking
function on and off using the on-board
computer ( Y page 224).
Doors79Opening and closingBA 164.8 USA, CA Edition B 2011; 1; 2, en-USd2sboikeVersion: 3.0.3.52010-04-21T15:08:44+02:00 - Seite 79Z
Page 89 of 376
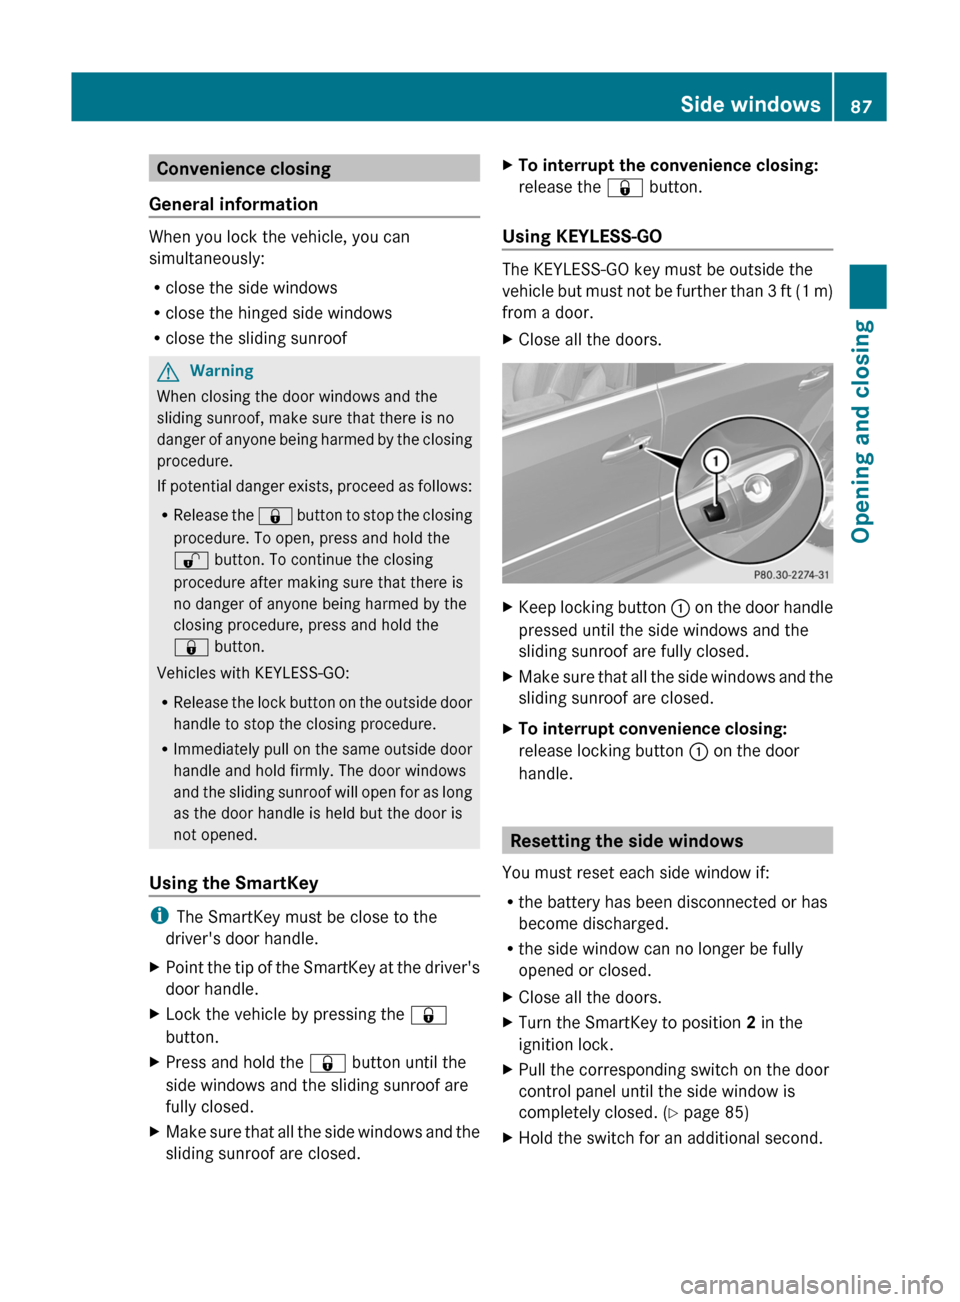
Convenience closing
General information
When you lock the vehicle, you can
simultaneously:
R close the side windows
R close the hinged side windows
R close the sliding sunroof
GWarning
When closing the door windows and the
sliding sunroof, make sure that there is no
danger of anyone being harmed by the closing
procedure.
If potential danger exists, proceed as follows:
R Release the & button to stop the closing
procedure. To open, press and hold the
% button. To continue the closing
procedure after making sure that there is
no danger of anyone being harmed by the
closing procedure, press and hold the
& button.
Vehicles with KEYLESS-GO:
R Release the lock button on the outside door
handle to stop the closing procedure.
R Immediately pull on the same outside door
handle and hold firmly. The door windows
and the sliding sunroof will open for as long
as the door handle is held but the door is
not opened.
Using the SmartKey
i The SmartKey must be close to the
driver's door handle.
XPoint the tip of the SmartKey at the driver's
door handle.XLock the vehicle by pressing the &
button.XPress and hold the & button until the
side windows and the sliding sunroof are
fully closed.XMake sure that all the side windows and the
sliding sunroof are closed.XTo interrupt the convenience closing:
release the & button.
Using KEYLESS-GO
The KEYLESS-GO key must be outside the
vehicle but must not be further than 3 ft (1 m)
from a door.
XClose all the doors.XKeep locking button : on the door handle
pressed until the side windows and the
sliding sunroof are fully closed.XMake sure that all the side windows and the
sliding sunroof are closed.XTo interrupt convenience closing:
release locking button : on the door
handle.
Resetting the side windows
You must reset each side window if:
R the battery has been disconnected or has
become discharged.
R the side window can no longer be fully
opened or closed.
XClose all the doors.XTurn the SmartKey to position 2 in the
ignition lock.XPull the corresponding switch on the door
control panel until the side window is
completely closed. ( Y page 85)XHold the switch for an additional second.Side windows87Opening and closingBA 164.8 USA, CA Edition B 2011; 1; 2, en-USd2sboikeVersion: 3.0.3.52010-04-21T15:08:44+02:00 - Seite 87Z
Page 90 of 376
If the side window opens again slightly:XImmediately pull the corresponding switch
on the door control panel until the side
window is completely closed ( Y page 85).XHold the switch for an additional second.XIf the corresponding side window remains
closed after the button has been released,
the side window has been reset correctly.
If this is not the case, repeat the steps
above again.
Problems with the side windows
Problem: a side window cannot be closed
because objects are trapped between the
side window and the door frame.
XRemove the objects.XClose the side window.
Problem: a side window cannot be closed
because objects in the guide rail are
preventing the window from being raised.
XRemove the objects.XClose the side window.
Problem: a side window cannot be closed,
and you cannot see the cause.
GWarning
Closing the side windows with increased force
or without the anti-entrapment feature could
lead to serious or even fatal injury. Make sure
that nobody can become trapped when
closing the side windows.
If a side window is obstructed during closing
and reopens again slightly:
XImmediately after the window blocks, pull
the corresponding switch again until the
side window has closed.
The side window is closed with increased
force.If a side window is obstructed again during
closing and reopens again slightly:XImmediately after the window blocks, pull
the corresponding switch again until the
side window has closed.
The side window is closed without the anti-
entrapment feature.GWarning!
Pulling and holding the switch to close the
door window immediately after it had been
blocked two times will cause the door window
to close without the anti-entrapment feature
for as long as you hold the switch.
Sliding sunroof
Important safety notes
GWarning!
When leaving the vehicle, always remove the
SmartKey from the starter switch. Always
take the SmartKey with you and lock the
vehicle. Do not leave children unattended in
the vehicle, even if they are secured in a child
restraint system, or with access to an
unlocked vehicle. A child's unsupervised
access to a vehicle could result in an accident
and/or serious personal injury. The children
could
R injure themselves on parts of the vehicle
R be seriously or fatally injured through
excessive exposure to extreme heat or cold
R injure themselves or cause an accident with
vehicle equipment that can be operated
even if the SmartKey is removed from the
starter switch or removed from the vehicle,
such as seat adjustment, steering wheel
adjustment, or the memory function
If children open a door, they could injure other
persons or get out of the vehicle and injure
themselves or be injured by following traffic.
Do not expose the child restraint system to
direct sunlight. The child restraint system's
metal parts, for example, could become very
88Sliding sunroofOpening and closing
BA 164.8 USA, CA Edition B 2011; 1; 2, en-USd2sboikeVersion: 3.0.3.52010-04-21T15:08:44+02:00 - Seite 88
Page 92 of 376

Overhead control panel
:To raise;To open=To closeXSwitch on the ignition.XPush or pull the 2 switch in the
corresponding direction.
i If you press the 2 switch beyond the
point of resistance, an automatic opening/
closing process is started in the
corresponding direction. You can stop
automatic operation by pressing again.
Automatic opening/raising is only available
if the tilt/sliding sunroof is in the closed
position.
You can open/close the cover for the
sunblind manually when the tilt/sliding
sunroof is raised/closed.
Resetting
Reset the tilt/sliding sunroof if it does not
open smoothly, or if the battery has been
disconnected or has become discharged.
! Contact a qualified specialist workshop if
the tilt/sliding sunroof cannot be closed
fully or reset.
XRemove the SmartKey from the ignition
lock or turn to position 0 (KEYLESS-GO).XRemove the fuse for the tilt/sliding sunroof
from the main fuse box. To find out where
the fuse is located, refer to the fuse
allocation chart in the vehicle tool kit
( Y page 310).XReinsert the fuse.XSwitch on the ignition.XRaise the tilt/sliding sunroof fully at the
rear ( Y page 89).XKeep the 2 switch pressed for another
second.XMake sure that the tilt/sliding sunroof can
be opened or closed fully again using the
opening/closing process ( Y page 89).XIf the tilt/sliding sunroof can be raised fully
at the rear it is set correctly. If this is not
the case, you must repeat the previously
described steps.
Problems with the sliding sunroof
Problem: the sunroof cannot be closed
and you cannot see the cause.
GWarning!
You could be severely or even fatally injured
when closing the sliding sunroof with
increased closing force or if the anti-
entrapment feature is deactivated. Make sure
that nobody can become trapped when
closing the sliding sunroof.
If the sliding sunroof is obstructed during
closing:
XImmediately after the sliding sunroof
blocks, pull the 2 switch in the
overhead control panel down to the point
of resistance and hold it until the sliding
sunroof is closed.
The sliding sunroof is closed with increased
force.
If the sliding sunroof is obstructed during
closing again:
XImmediately after the sliding sunroof
blocks, pull the 2 switch in the
overhead control panel down to the point
of resistance and hold it until the sliding
sunroof is closed.
The sliding sunroof is closed without the
anti-entrapment feature.90Sliding sunroofOpening and closing
BA 164.8 USA, CA Edition B 2011; 1; 2, en-USd2sboikeVersion: 3.0.3.52010-04-21T15:08:44+02:00 - Seite 90